• TalkBass has been independent since 1998. Add your voice.
    Create a free account to reply to discussions, view embedded media, and browse with fewer display ads.
    Join freeLog in
    Want zero display ads or expanded classifieds tools? Compare plans.

Nitro P-Bass Build

ShoeManiac

Supporting Member
Jan 19, 2006
2,887
1,239
New Jersey
twitter.com
Way back when I was taking lessons with one of my bass teachers, we got to talking about what he was doing when he wasn't playing, teaching or working in a music store. And I got more and more intrigued by the fact that Bill had designed and built some of his own basses. They were pretty elaborate, all being 6 string basses with some intricate construction techniques. When I asked him for some guidance on how to get started, he said that I should probably start with something simple, like a kit build. This was back around 1993 or so.

Fast forward to the present, and the bug hit me again. But the inspiration was to build something that wasn't readily available. At least not without plunking down a hefty amount of cash. So I started doing some research, trying to find the parts for the bass that I wanted for myself. So what did I want?

-A Precision Bass with a Jazz bass neck
-Nitro finished body & neck
-A vintage style pickup
-Quality hardware
-A 4 ply vintage style tortoiseshell pickguard

So, how to source this with good parts without breaking the bank? Well, I found an eBay seller called Stratosphere that deals almost exclusively in parted out instruments. And there I was able to buy a Fender Classic 50's P-Bass body with a nitro finish.
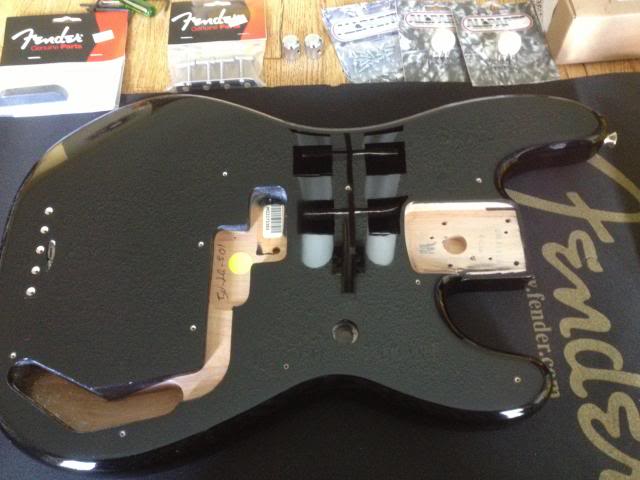
033_zpsc0d0085c.jpg


I had also been hoping to buy a Fender Roadworn Jazz bass neck from them, but the one I had my eye on sold out before I could get it. So, I took to searching elsewhere for a suitable replacement neck. I found it after posting an ad on Talkbass, and this Allparts Jazz bass neck that was finished by luthier Dan Atkinson arrived yesterday. It's got a beautiful finish, with some nice relicing on the back of the neck.
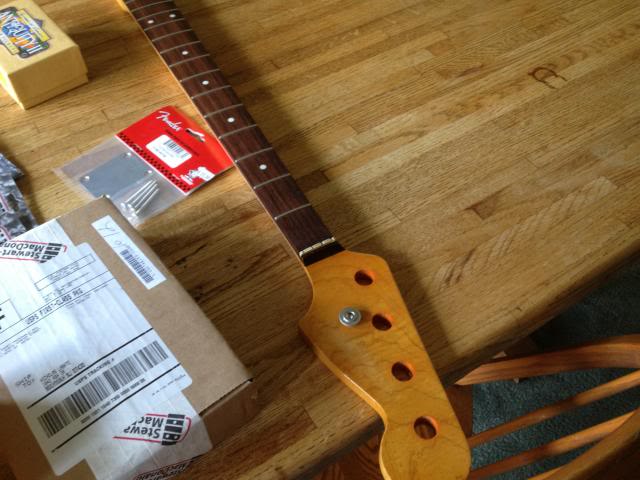
034_zps2f40422d.jpg


The previous owner of the neck took the Atkinson logo off of the headstock. But he did include a Fender decal that I could put on if I chose. I've got somewhat mixed feelings on that front, since I wouldn't want someone else trying to pass off an Allparts neck as a genuine Fender neck to me.

At this point I have almost all of the parts. The pickup I chose is a Seymour Duncan Antiquity II precision pickup. I went to Stewart MacDonald and bought their premium P-Bass wiring kit, complete with cloth covered wire and CTS solid shaft pots (can't forget the wiring diagram!). There were some assorted bits of Fender hardware that I either had on hand or picked up. As for the bridge? I've got an old BadAss II bridge, but I also picked up a Fender vintage reissue bass bridge. I want to see which one gives me a little more room to make adjustments.
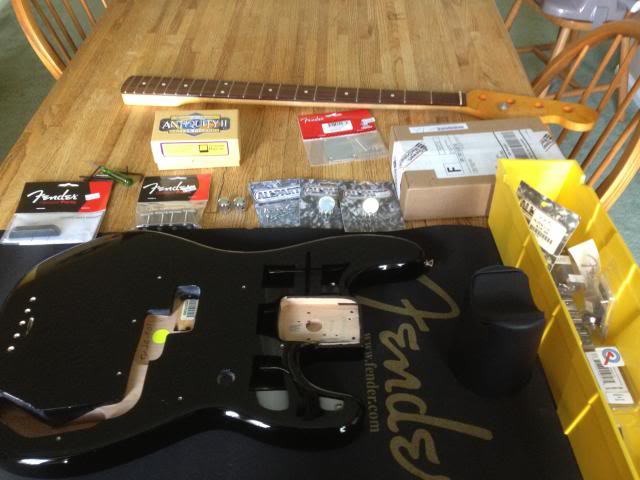
032_zps539941f3.jpg


At this point in time, I've only got a couple of parts to source. I tried buying a set of Fender tuners today, but when I opened them up they were missing the mounting screws as well as the bushings. So those need to go back and get replaced.

Also due to get replaced? I found a tort pickguard that was pretty reasonably priced at only $14. It had the traditional 60's style 13 mounting holes. But alas, they didn't line up well with the 10 drill holes in my P-Bass's body. So now I'm checking with [Invalid or Expired Link Removed] about getting a custom pickguard for this bass.

So does anyone else have some parts bass stories/lessons to share? I'm very much interested in hearing how other builds have gone, and what challenges presented themselves for your own builds.

 
The tort gaurd isnt fitting as that bodies based on a 50's style P body which only has a 10 hole gold aluminum gaurd. Fender hasnt made a stock 10 hole tort guard so your options is go custom as you stated or simply order a stock 13 hole guard and drill 3 more holes in the body. I would just drill the extra holes, if the body isnt returning to 10 hole it doesnt matter and if it did it would cover up. A warmoth gaurd, all parts gaurd or a fender 62 RI gaurd should all fit perfectly with the exception of a few holes needing drilled, the others will line up.
 
The pickguard has been something of a long story. The first one I tried was a Fender 62 reissue pickguard that I bought from a pretty reputable NY area dealer. The pickguard they had listed in their online sale looked great, and had some of that old school 60's red shading to it. But the one I got didn't look like at all like the one in the listing. It was more brown with these ugly flecks of yellow. Not a tort guard that I would've picked out for an in-person transaction.

So I contacted the dealer and expressed my concerns. Their take was that they sold so many pickguards that they couldn't photograph them all for their online sale listings. That wasn't quite what I was hoping to hear. But when I let them know that I was looking for a pickguard that was more red than brown, they totally understood and immediately offered to refund the purchase price as well as return shipping.

So we move onto the second pickguard which I picked up at a Sam Ash store last month. Lo and behold they had some very inexpensive P-Bass guards in what looked like a printed tort. It was in a shade that was much more to my liking. And the price was about $12, which was tough to beat. But when I put it on the body? It didn't line up well at all with the pickguard screw holes, the neck pocket or the pickup rout. So that went back.

Over the weekend I had to make a trip to one of my go-to musical instrument shops for some tuner bushings. While I was there I asked to check out a gold anodized P-Bass pickguard. Sure enough, all of the drill holes lined up perfectly with the guard. But the thing is, I want a red tort guard for this bass. As a result I'm going to bite the bullet and get a custom guard made for this instrument.
 
Looks like fun project. The only thing I'd add is that Allparts necks are Fender approved replacements, so not sure why a Fender logo would be inappropriate. With the skills available in counterfeiting, one would expect that any Fender part sold independently of an instrument without provenance, is potentially fake...
 
Here's the latest update on the status of the project. The body now has the neck bolted on, and it's a pretty tight fit. The gold anodized pickguard is something of a compromise/placeholder.

6986cf56-bd9b-46b0-be91-09fd71cde529_zps679481b0.jpg


I got this gold anodized pickguard because it fit this body perfectly. All of the pickguard screw holes line up perfectly. As such, it's a perfect template for the custom 10 hole tort pickguard that I want for this bass. It's far easier for a guard to be made from the measurements of another guard. As a result this one is now on it's way to Chandler's Music / Pickguard Heaven to serve as that template for my custom tortoiseshell pickguard.
 
Thanks! The folks at Chandler were super helpful on the phone. The conversation I had with them really helped steer my decision regarding the tort I ordered. It really goes to show that personal knowledge and a conversation can be very constructive when you need to make a decision.

Originally, I had wanted a red tort pickguard. You look at some of those vintage Fenders with a tort guard, and the pg's have that great reddish brown color. But it didn't start that way. It was more of a brown to start and aged over time, lightening up to that reddish-brown that you see on vintage instruments. That info being imparted to me, I opted for the material that was a closer match to the original Fender material. It'll be brown to start and lighten up with age.
 
Looks like a great build! Subscribed!

Thanks for tuning in, Ivan!

The build is essentially in a holding pattern until the pickguard gets shipped. And the lead time is roughly 3 weeks from order to delivery.

You would think that I could use this time to get the bass totally prepped for the pickguard, right? But when you think about it, the pickguard really does tie so many elements together. Because the guard really does need to be in place in order to properly mount the pickup.

What about wiring up the pots, output jack and ground wire? Again, they need to be mounted in conjunction with the pickguard. I want my wiring and soldering to be clean and functional. That means having those components mounted on the pickguard and THEN doing the wiring.

I will be posting at least one update soon, as I get the tuners mounted on the headstock. That's at least one project that I'll be tackling while I'm waiting on the pickguard to be delivered.
 
Thanks for tuning in, Ivan!

The build is essentially in a holding pattern until the pickguard gets shipped. And the lead time is roughly 3 weeks from order to delivery.

You would think that I could use this time to get the bass totally prepped for the pickguard, right? But when you think about it, the pickguard really does tie so many elements together. Because the guard really does need to be in place in order to properly mount the pickup.

What about wiring up the pots, output jack and ground wire? Again, they need to be mounted in conjunction with the pickguard. I want my wiring and soldering to be clean and functional. That means having those components mounted on the pickguard and THEN doing the wiring.

I will be posting at least one update soon, as I get the tuners mounted on the headstock. That's at least one project that I'll be tackling while I'm waiting on the pickguard to be delivered.

make a cardboard template of the control area, place appropriate holes in the right spots, and get to wiring.
could at least do the pots/jack...
 
I appreciate the suggestion, but I'd really rather do that work once. I like to keep my soldering as clean as possible. The template idea sounds good, but I don't know that I'd have the holes for the pots properly positioned. And with the gold anodized guard out in Cali for use as the template for the tort guard, I don't have another P-Bass pickguard handy to use for the measurements.
 
I got a shipping notification from Chandler, and the new pickguard should be here soon. Then my wiring work can begin in earnest! I think I may need to make sure that I've got some decent solder on hand.

And once this bass is done... well, there may just be another parts build coming pretty soon after!
 
Did you get the anodized guard from Allparts?

I'm putting together a list of parts for a 57' build. Just wondering if you could comment on the quality.

Thanks.

No, it was actually a Fender pickguard. One that was supposedly being sold as new, but had in fact been modded to include a trussrod adjustment notch. I spent $40 and change on that, and it was definitely a good deal.

As for quality? It was in very good shape. Although the trussrod notch that had been cut wasn't completely clean.
 
I got a shipping notification from Chandler, and the new pickguard should be here soon. Then my wiring work can begin in earnest! I think I may need to make sure that I've got some decent solder on hand.

And once this bass is done... well, there may just be another parts build coming pretty soon after!

Tracking info indicates that the pickguard for the infamous black nitro P-Bass will be here on Tuesday. I had been hoping to have the bass assembled in time for one of my favorite area blues jams for Monday night, but that wasn't meant to me. But what IS convenient is that I'm off all of next week and I can devote some time to the final assembly.

Oh, and that little tease in my last update? Don't say I didn't warn you.

015_zps5c6ebb82.gif
 
Time to revisit this thread since I've finally had a little bit of time to spend on the Nitro P-Bass.

First, the long-storied pickguard! The body is from a Fender Classic 50's Precision bass. As such, it's been drilled for the 50's Precision pickguard which has 10 drill holes. Other P-Basses have 13 drill holes in a somewhat different pattern. The first thing to do? Make sure the pickguard fits.

182_zpsb8715776.jpg


Thankfully, it fit perfectly! The drill holes all lined up like they were supposed to. The next step? Fastening the pickguard in place. To do that I used Allparts pickguard screws. And from there? I wanted to drill pilot holes for a pickup cover as well as for the tug bar.

184_zpsa36e64ec.jpg


185_zps9b7c97cb.jpg


One thing that I made certain to do? Prime the screws before screwing them into the body or neck. Tolerances on these are kind of tight, and the lubrication of some Burt's Beeswax actually makes a noticeable difference.

177_zpsfbff7ae1.jpg


Also on tap for today's work? Mounting the tuning machines. The original owner of the neck had used hipshot ultralite tuners. Those only use a single screw and a bushing to lock the tuner in place on the headstock. I opted for more substantial Fender vintage style tuners which use 4 screws a piece.

173_zpsb3f8f13a.jpg


176_zps478e0b66.jpg


In this case I mounted all four tuners along with their bushings before drilling any pilot holes. The tuners have to line up just right. At that point I started drilling small pilot holes for each screw. Once again, each screw was lubricated with the Burt's Beeswax in order to go in smoothly.

181_zps574749ab.jpg


Next? Removing the pickguard. I put it on at first to make the sure it was the right fit, but kept on the protective film. After all, this was a custom cut pickguard. It had to fit right, otherwise it would need to go back. But once I was confident that it was going to work well the film came off. And this also meant cutting holes in the foil covers for the pots and output jack, and fastening the pots and jacks in place.

187_zps6a2c2042.jpg


188_zps6e41aeee.jpg


For the purposes of wiring the pots and then securing them in place, having the pickguard off and the pots mounted seems to be the best way to go. For the time being my soldering iron is standing by, but I'm going to have to break it out soon when I get to wiring the bass.

So this is where the project stands as of this evening. I'm hoping to have another update within a week. And hopefully this bass is going to be playable before the new year!
 

Latest posts
