• TalkBass has been independent since 1998. Add your voice.
    Create a free account to reply to discussions, view embedded media, and browse with fewer display ads.
    Join freeLog in
    Want zero display ads or expanded classifieds tools? Compare plans.

Defretting a T-24

Jan 23, 2008
960
7
Mountains of Colorado
www.reverbnation.com
Disclosures
Endorsing Artist: Spector Basses
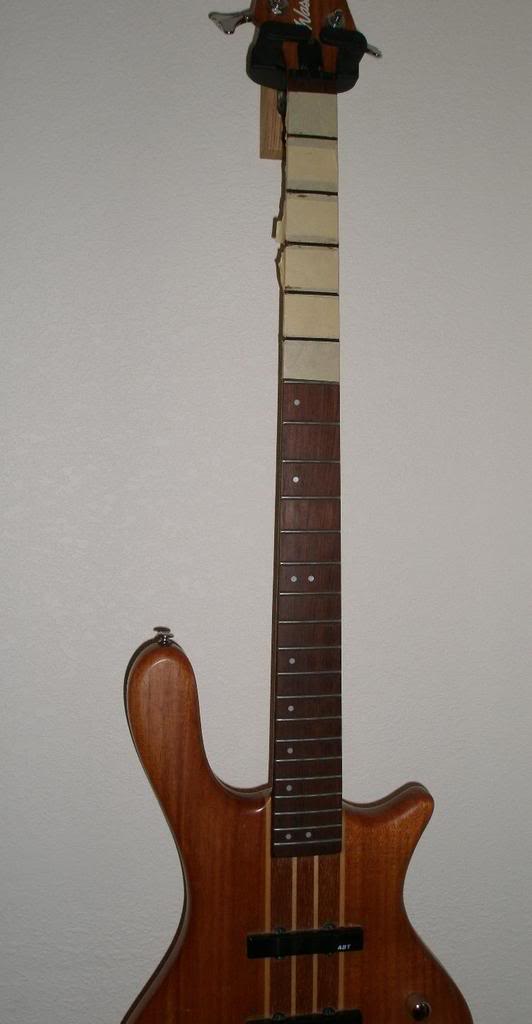
There comes a time in every bass' life when the old frets come out, and you need to decide whether or not to put new ones in.

So...
fl1.jpg


I'll post another when I get the rest out. Good news is that with heat, the frets just fly out.

-----
I'm going to fill in the gaps with the leftovers from sanding mixed in StewMac epoxy. Do you guys think I should coat the board (epoxy) in it as well? Why or why not?
 
They're still not all out (patience), but I though I would document how I was doing this- Not how you should do it, or even the correct way to do it. Keep in mind this is my second defret, ranking me an amateur.

First off, the tools. I'm using masking tape, a utility knife, a paring knife, a flathead jewelers screwdriver, pliers and a soldering iron.

tools.jpg


I know that the sticky says not to use a flathead screwdriver, and I agree, unless it's been filed like this:

clsscrwdvr.jpg


Taping the fretboard may be the most important step (you'll see why in a bit). Get the tape up against the fret with your fingernail and the cut out the fret, using the fret to cut against...

cut1.jpg


cut2.jpg


Next is heat. I'm using my soldering iron for this, and being that this isn't it's intended use- Be careful! You don't want to know what burning flesh smells like.

There are two ways I do this; One is for heating the end of the fret and the other for the whole thing.

heat1.jpg


heat2.jpg


Then, I use the utility knife to get under the fret and lift it enough to get the paring knife under it (utility knife is not so sturdy, but really thin).

int.jpg


knf.jpg


Apply more heat and get the screw driver under there. Slowly and steadily lift the fret up.

scrwdvr.jpg


lift.jpg


Grab the fret with the pliers and wiggle it up and down while applying yet more heat.

plrs.jpg


...And it should just come out.

clsplrs.jpg


Note the nasty burn mark. Thanks to my taping, it's not on my fretboard. Also helps wood stay on the board and not just splinter off.

-----
Any thoughts on the epoxy? I think I'm leaning toward coating the board, but I don't know....
 
The soldering iron technique looks pretty good...though it's worth noting that it takes a mighty hot iron to heat the fret. I wouldn't try it with a 30w iron.

The fret removal technique scares me. Prying frets up is contrary to what Dan Erlewine suggests. Sharp end nippers are his recommendation - and I can forecast a LOT of dents in the fretboard unless incredible care is taken.

The defretting I've done used a soldering iron, sharp end nippers, and careful collection of the rosewood flakes that come off the fretboard next to the frets. Gluing the wood flakes back in takes time, too.
 
The soldering iron technique looks pretty good...though it's worth noting that it takes a mighty hot iron to heat the fret. I wouldn't try it with a 30w iron.

The fret removal technique scares me. Prying frets up is contrary to what Dan Erlewine suggests. Sharp end nippers are his recommendation - and I can forecast a LOT of dents in the fretboard unless incredible care is taken.

The defretting I've done used a soldering iron, sharp end nippers, and careful collection of the rosewood flakes that come off the fretboard next to the frets. Gluing the wood flakes back in takes time, too.

Wow! Despite all your misgivings, it sounds like you did no better with your incredible care than I'm doing with my wanton fret pulling. Hopefully whoever this Dan guy is takes note- There's more than one way to defret a bass.

And if your iron is hot enough to melt solder, then it's hot enough to melt glue.

I've never used an iron, or any other heat source.... defretted 4 necks I think, never needed it... so in my opinion it's a waste of time and could damage the board(burn marks)

That's what the tape is for, and IMO heat makes the process much quicker.

-----
Keep it coming! I'm still looking for some input on the epoxy situation.
 
Wow! Despite all your misgivings, it sounds like you did no better with your incredible care than I'm doing with my wanton fret pulling. Hopefully whoever this Dan guy is takes note- There's more than one way to defret a bass.

And if your iron is hot enough to melt solder, then it's hot enough to melt glue.

That's what the tape is for, and IMO heat makes the process much quicker.

-----
Keep it coming! I'm still looking for some input on the epoxy situation.

You make a good point - it's probably just about impossible to pull out the frets without pulling some chips on the fretboard. I suspect that all techniques will have this problem and will require patience and diligence to repair the damage. I know that I spent 3 or 4 hours gluing rosewood chips back in, but after a light sanding the result was total invisibility that any chipping had occurred.

However, if you don't know the name Dan Erlewine, you would benefit by doing some reading. He is possibly the best known stringed instrument repairman and author in the U.S. His books are "the bibles" for guitar and bass instrument repair. I strongly recommend his book "Guitar Player Repair Guide", available through Amazon at http://www.amazon.com/Guitar-Player...bs_sr_4?ie=UTF8&s=books&qid=1221498997&sr=8-4 . There is a later edition but I have the one at the link and it's an incredible resource.

About "And if your iron is hot enough to melt solder, then it's hot enough to melt glue." Are you aware that frets are normally pressed in, not glued in? The soldering iron is used to heat the fret so that the residual oil in rosewood will be released and help ease the fret out. I agree that heat helps some, but it doesn't seem to make a huge difference.

Please understand this is not criticism, it's discussion of technique in the interests of informing all who read the thread. There are options for how to do most procedures.
 
As an Amazon Associate, TalkBass may receive commissions from qualifying purchases made via links on this site.
...Sharp end nippers are his recommendation - and I can forecast a LOT of dents in the fretboard unless incredible care is taken.....

I defretted a Squier Precision Special 5 using only the toenail clippers that I posted photos of. I did use great care and only made a couple small dents and one chip...the results exceeded my expectations.

I think the key is to go slow, use very thin bladed tools, etc.

Toenail clippers are perfect as they have a flat face that rests against the fingerboard to prevent chips while gently sliding under the fret and slightly pulling it upward.
 
About "And if your iron is hot enough to melt solder, then it's hot enough to melt glue." Are you aware that frets are normally pressed in, not glued in? The soldering iron is used to heat the fret so that the residual oil in rosewood will be released and help ease the fret out. I agree that heat helps some, but it doesn't seem to make a huge difference.

You're right, these however are, which is another reason it's taking a while- I can only handle the fumes in short bursts.

Another reason heat helps (in my method at least) is it makes the fret wire pliable. By the time I get them out, they're bending the other way.

And I would consider it criticism, but that's part of what I'm looking for here. I know this isn't what some believe to be the proper way to defret. It's best to get it out there so when someone is reading this x months from now, they get the information they're looking for.

-----
More pics soon, the battery in my camera is dead.

Also, I want to point out that the "nasty burn mark" is from some idiot (me) trying to use a hand to take a picture of a two hand job.

Edit: Billy, my clippers are rounded, I'll see if I can find some flat ones at the store today.
 
fret wire is also very bendable without heat... and like Pilgrim said: most of the time there's no glue involved and I personally doubt it makes a lot of difference...

one piece of advice: "soak" the board in oil, or at least make sure the board isn't al dried out, prevents chipping and makes it all a bit easier...
 
A drop of water run along the fret edges before applying heat is often useful by slightly softening the wood with the steam produced. This helps to avoid splinters as the fret is pulled out. I always use heat because it's not obvious from visual inspection if the frets are glued in or not.
 
I was careful with my wording when I wrote "frets are normally pressed in" because I had a suspicion yours would be the exception...turns out I guessed right. Sometimes frets are glued down when they're trying to pop up or otherwise problematic.

I like both the oil and water ideas, because anything that reduces chipping along the fret line would be a great help. It's a real pain to glue back in those chips and dust to fill even small holes. Seems to me that lemon oil would be as good as anything.

One benefit of the taping you do is that it provides a buffer between your pry tool and the fretboard to reduce the chance of making dents in the fretboard. I'm still not comfortable with that approach, but it might help.

The toenail clippers cited above normally have a pretty curved blade, but if they could grasp the fret, they would probably work OK. I used end-nippers similar to these:
Nippers.jpg


They can be rocked a bit and don't tend to dent the fretboard material either.

The Cougar head avatar is the athletic logo of the Washington State University Cougars! If you check the design, you'll see that the lines inside the Cougar head spell WSU from left to right. It's the only athletic logo I know of in the US that spells out the school's acronym within a graphic of its mascot. Cougs are pretty proud of their university and logo, so you see it all over the world. It has been seen on hats worn by sherpas carrying stuff up Mt. Everest. Thanks for asking, and GO COUGS!!
 
...

The toenail clippers cited above normally have a pretty curved blade, but if they could grasp the fret, they would probably work OK. ...
They can be rocked a bit and don't tend to dent the fretboard material either.

...

Actually, fingernail clippers are curved because your fingernails are supposed to be curved to contour your fingertips. Toenail clippers are straight because that's how you're supposed to cut your toenails straight to avoid ingrown nails.

My toenail clippers have the same general profile as the nippers that you show, but the blades are much, much thinner so they slide under the fret oh so easily!
 
Actually, fingernail clippers are curved because your fingernails are supposed to be curved to contour your fingertips. Toenail clippers are straight because that's how you're supposed to cut your toenails straight to avoid ingrown nails.

My toenail clippers have the same general profile as the nippers that you show, but the blades are much, much thinner so they slide under the fret oh so easily!

Good point!!!
 
Ok, so the last couple where a little more stubborn than the others, so I had to modify my technique. I used my screwdriver to get under the top and bottom of the fret and wedge it up a bit.

scdvczl.jpg


Now they're all out!

doneish.jpg


Next, I went over every gap with a little wood glue and some toothpicks- Making sure that I got some in the gap, that I pressed everything in it's place, and that there wasn't any excess left with my utility knife. (Sorry for the blurry pictures.)

blur1.jpg


blur2.jpg


knfhl.jpg


Wait a day... And reason #2 that taping is important:

eek.jpg


I just put some more glue under it, and then placed the tape back down.

------
My StewMac stuff arrives Thursday, and then, sanding and line filling.