• TalkBass has been independent since 1998. Add your voice.
    Create a free account to reply to discussions, view embedded media, and browse with fewer display ads.
    Join freeLog in
    Want zero display ads or expanded classifieds tools? Compare plans.

Build Thread

LedBelli Bass

Fine, Handmade Custom Bass Guitars
Dec 25, 2008
1,169
104
Pasco, WA
www.ledbellibass.com
UPDATE: IMAGES WILL BE RESTORED MARCH 26TH. THANKS FOR LOOKING.

New Noah Bolt on:


Neck layup, Maple with Purpleheart. I use a foam mini-roller for glue application -- fast and clean. The Bessey clamps are spendy but worth it -- no more issues with misalignment. Bolt-on neck blank begins as 1 1/8" thick by 36" long by 4 1/2" wide:
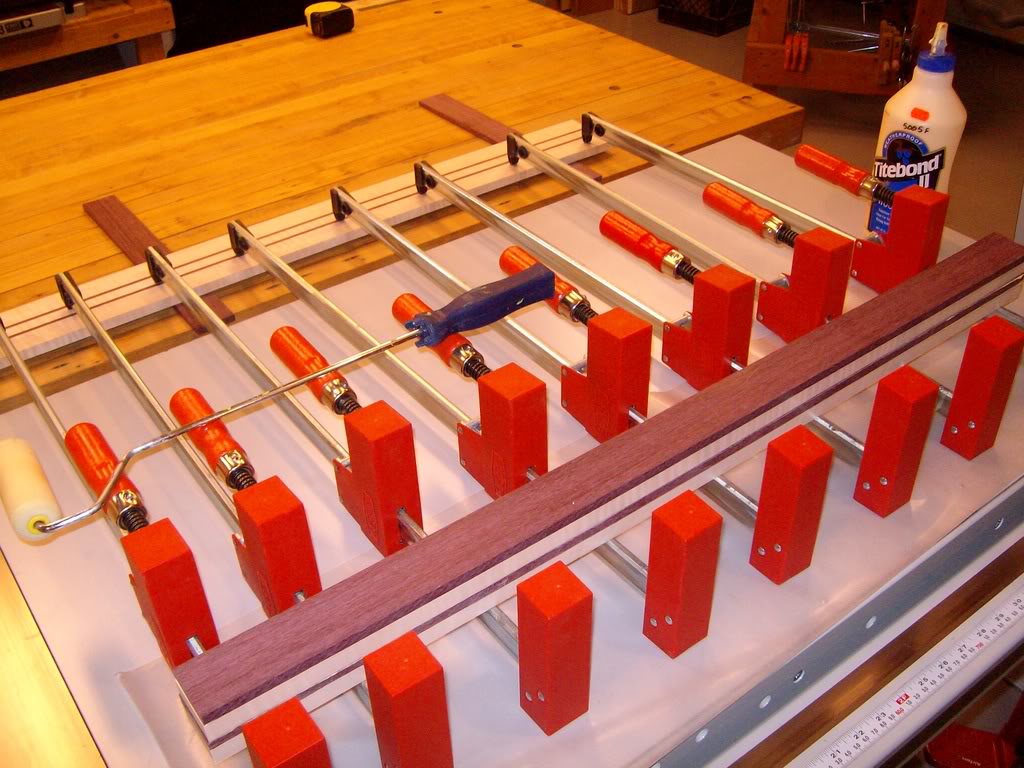
SANY0293.jpg


Neck layout, note template with various indexing holes. I use 1/4" x 1" nylon bushings for index pins during various ops:
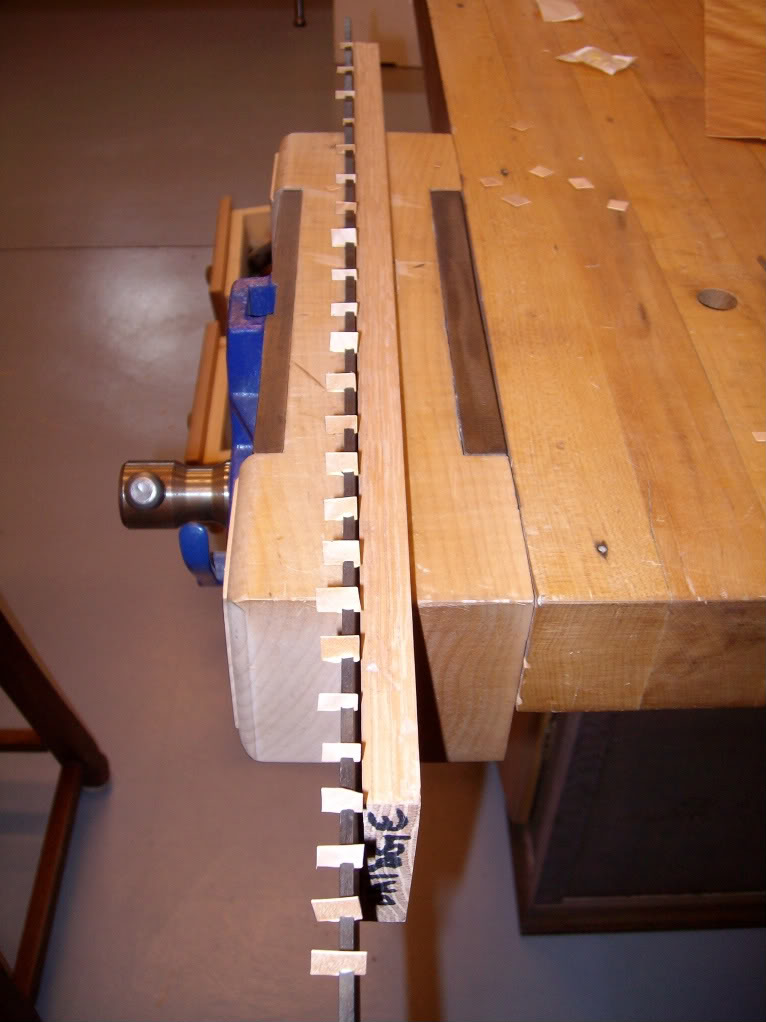
001.jpg


002.jpg


Truss rod and graphite rod channels routed. Truss rod channel is routed from bottom up; reinforcement channels are routed from nut down in a flare pattern. Result is no twist, max stiffness:
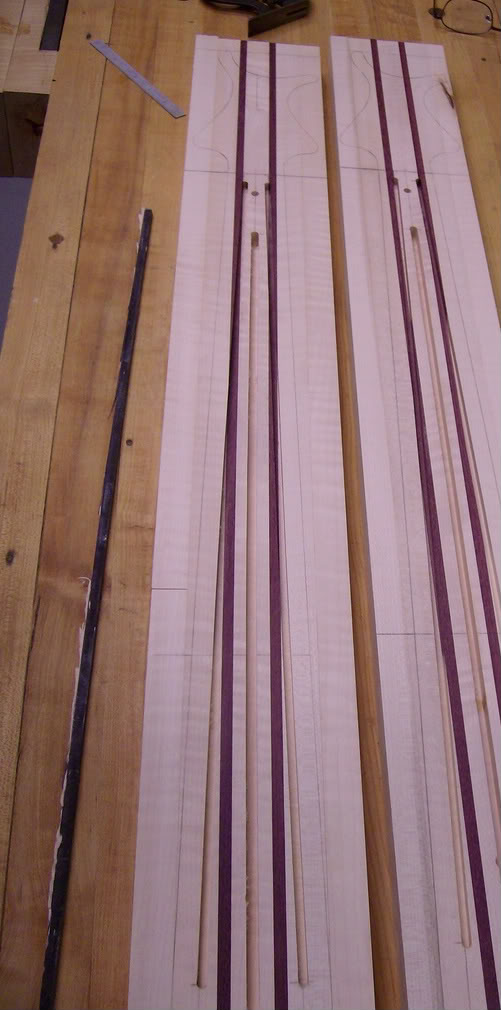
005-1.jpg


Standard body:
SANY0286.jpg
 
hey LB,

care to give us a tutorial on how you're thicknessing your headstock and forming the transition radius into the volute? I put one up a couple years ago on how I utilize an oscilating drum sander with a holding jig to detail thickness mine after I (very) rough cut the excess away at a bandsaw.

I've also seen a custom tool Warmoth built to do this utilizing a cutter head and a flat feed table (it's shown in their shop tour images)

it's always interesting to see how available tools prompt so many creative ways to accomplish the same critical task

all the best,

R
 
looks great
subscribed
could you make a neck or a body that fits a fender?

Yes.

Here's a mornings work:

006.jpg


To answer Rodent: First I take away the bulk of the wood with a handsaw, following layout lines. Then, I use a Ridgid benchtop osscilating belt sander to rough-in the volute and final thickness the headstock.

At this stage the necks are ready for installation of graphite reinforcement rods and then on to profiling and final shaping of the neck and headstock. All of that work will be done with spokeshaves, handrasps, files, and sanding. Also, I will begin fitting each neck to its respective body pocket.
 
To answer Rodent: First I take away the bulk of the wood with a handsaw, following layout lines. Then, I use a Ridgid benchtop osscilating belt sander to rough-in the volute and final thickness the headstock.

curious - are you using any kind of homemade holding devices or alignment jigs for this process? I ask because it appears that you have already removed most of your original reference edges/faces at the time when you are performing this critical thicknessing step. how are you assuring a consistent planar parallelism and toleranced headstock thickness?

got any images and further details you can share on this? your process on this step is significantly different than what is done by most people I know (not that this is bad by any means!) as such, it could serve as an excellent learning aide to many here who don't have the bigger shop tools to do it the more common way

thanks! :)

all the best,

R
 
I thickness before I cut out the final headstock shape. This leaves my reference lines intact to saw to. No jigs or such, all by hand. Care and intuition.

How do the big boys do it?

Here's pics of the Noah Standard. Keep in mind everything is rough-in at this point:

007.jpg


008.jpg


Next up is the body for the Noah Elite . . . tomorrow.
 
I thickness before I cut out the final headstock shape. This leaves my reference lines intact to saw to. No jigs or such, all by hand. Care and intuition.

How do the big boys do it?

nice and skillful :)

Warmoth utilizes this homebrew milling machine to cut their headstock transitions and final thickness

[Invalid or Expired Link Removed]


many of the other larger shops I've visited have a similar kind of homebrew machine - or they use a CNC for their entire neck carving process (it still takes a ton of hand caressing to get everything nuanced just right ;) )

I know of a few guys who utilize thier drum sanders with a jig similar to how I do mine

HeadstockThicknessingSetup.jpg


by slightly loosening the clamp you can bump the holder over a few thousandths at a time and arrive at the precise thickness every time

all the best,

R
 
How to remove a broken screw: Use a thin blade on your Dremel tool to cut a slot into the top of the broken off screw, then use a flat-blade standard screwdriver to unscrew.

Be sure to wear safety glasses when you do this kind of work.

This picture is after removal. The screw was broken off flush with the wood.

005-2.jpg
 
BTW, here's a picture of my main workbench. I built it about 4 years ago.

The main cabinet is 3/4" birch (stained); the drawer faces are figured maple; the drawers themselves are pine with handcut dovetail joints at all four corners.

The top is 2 3/4" thick, quartersawn hard maple salvaged from a 60 year old Halloway open frame workbench that was originally 8 feet long. (Said bench was slated for demolition. go figure!) I shortened it to 6 feet. The vises are original Record model 52 1/2 with Figured Maple faceplates, routed and edged to fit the vise.

The whole thing weighs in at roughly 300 pounds.

IM001013.jpg
 
when the screw is broken but has plenty of screw showing, just clamp a good ol vice grip on it and unscrew it.


when they're broken sub-surface,
I use a 1/4" plug cutter to excavate the wood around the broken screw, then plug the hole with a 1/2" plug, also made with a 1/2" plug cutter from similar woods: if you match the wood carefully, the plug is barely noticable.

for neck bolts.... I always drive them by hand so I can feel the amount of torque needed/being applied. Too many people use a drill/electric driver and no finesse. Stainless steel is pretty soft and shears pretty easily. careful pre-drilling and driving essential screws by hand alleviates busted screws. Also , put a little parrafin/candlewax on the screw when driving and life will be much easier.

above all else, have fun ( and it appears that you are :-)

p.s.... BEAUTIFUL bench.... !

Karl Hoyt
 
when the screw is broken but has plenty of screw showing, just clamp a good ol vice grip on it and unscrew it.


when they're broken sub-surface,
I use a 1/4" plug cutter to excavate the wood around the broken screw, then plug the hole with a 1/2" plug, also made with a 1/2" plug cutter from similar woods: if you match the wood carefully, the plug is barely noticable.

for neck bolts.... I always drive them by hand so I can feel the amount of torque needed/being applied. Too many people use a drill/electric driver and no finesse. Stainless steel is pretty soft and shears pretty easily. careful pre-drilling and driving essential screws by hand alleviates busted screws. Also , put a little parrafin/candlewax on the screw when driving and life will be much easier.

above all else, have fun ( and it appears that you are :-)

p.s.... BEAUTIFUL bench.... !

Karl Hoyt

Got it! See post above on using Dremel Tool.
 
Lion's share of the work is now focused on getting this Noah Standard ready for final sanding ---

My favorite part of the whole process: profiling the neck by hand.

First, I make score-cuts (table saw) across the back of the neck to just shy of the depth I wish to profile. Then, I hog that wood away with a Mallet and a large chisel, leaving extra wood for the volute and heel area.

Secondly, I then use the large coarse rasp on the left to get busy on rough profiling. The remaining score cuts help guide me as to uniformity and depth.

While I'm rasping, I will also stop periodically to shape the volute with the Japanese saw rasp on the right.

Once intuition tells me that things are coming together, I will switch to the saw rasp and spokeshaves exclusively, also using a half-round bastard file to finish things up around the volute.

Also, around now is where I will start using the profile guage pictured on the left. All profiles are taken from the original Noah. Thin: 1/2" "C" at the nut to 9/16" "soft-C" at the 17th fret.

006-1.jpg


007-1.jpg


008-1.jpg


More pics later today . . .
 
agreed about things being to clean! lol at school, i am always the last to clean up and leave. they usually give us 1 wood locker (large enought to fit a few students in) to put our materials in, and i have taken up 3! just putting pieces i like, scraps that are usuable and things lik that all overthe place. my home shop aka bedroom, has random boards of wood parts against the wall, on the floor, on the bed (i just sleep on the coach), and the floor is embeded with sawdust. neatness is never the anwser (exept if it is on the actual work)! btw, interesting neck shaping methods. how do you pre mark with the table saw? first time i have heard of a bolt on neck being carved while bolted to the body, but i can see why. great work