• TalkBass has been independent since 1998. Add your voice.
    Create a free account to reply to discussions, view embedded media, and browse with fewer display ads.
    Join freeLog in
    Want zero display ads or expanded classifieds tools? Compare plans.

First Build: "JVH Orca" 4 strings...

JanVanHove

Guest
Apr 27, 2009
142
0
Brussels, Belgium
basses.janvanhove.com
Disclosures
Founder, Jan Van Hove Basses
Since my other thread was about the planning, I decided to start a dedicated thread to the first build...

So the latest plan is this:
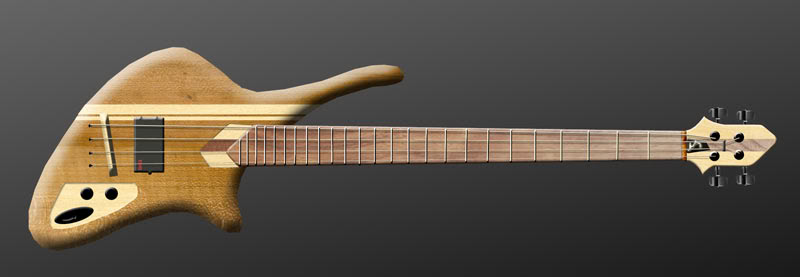
orca-mark-IVb.jpg


Specs go something like this:

-4-string Cherry body, Maple "racing stripes"
-3-piece neck (maple and walnut)
-Walnut fingerboard, 24 frets
-EMG MMTW pickup
-Wooden bridge
-Schaller tuning machines

After cutting the body I started shaping it, rounding the edges...
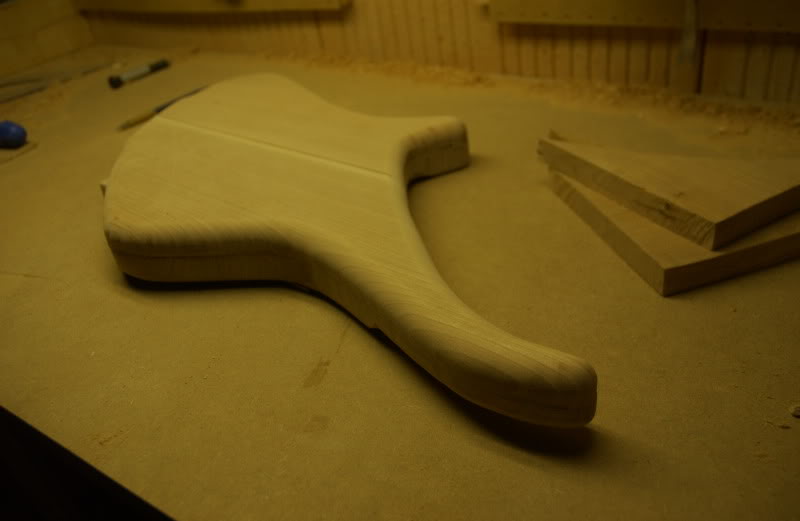
DSC_6550.jpg


Next step will be to do a belly cut and a thinning of the neck part...

 
Pretty body shape. Radically asymmetrical, yes, but pretty. Looks very ergonomic, and the loooong upper horn will be great for balance. So the racing stripes will be inlays, and not full laminates?

Headstock needs work, though. Aesthetically it doesn't work for me. More importantly, you need to re-arrange the tuners to get straight string pull without tacking on an unsightly string tree.

(IMHO)
 
Well, I did quite a bit of work since the last update... After trying unsuccessfully to make a template for the pickup cavity to use with my router, I decided to throw caution to the winds, stare death in the face, and rout it out freehand... Scary... But I did pretty good, considering...

I also routed the control cavity, broke two cheap drill bits while trying to make the connection between the pickup cavity and the control cavity, and finally cut the head to the right thickness...

Next step will be to glue the fingerboard before I cut the neck profile...

DSC_6575.jpg

DSC_6576.jpg

DSC_6579.jpg

DSC_6583.jpg


Not too bad for a freehand job, eh?
DSC_6584.jpg
 
Yeah, it's ok. But still, use a template next time, that's the only way to get it perfect (unless you've got CNC possibilities). I messed up my pickup template too.. I threw it away too, but then I did a second attempt, which succeeded.

How are you going to fix the gap next to the wooden inlay? Or is it just the pictures that it makes it look like it doesn't fit?
 
Time for a little update, since things have moved quite a bit...

Glueing the fretboard...

DSC_6588-1.jpg


And shaping the headstock and neck has started...
This is starting to look like a neck !!

DSC_6589-1.jpg

DSC_6591-1.jpg

DSC_6592-1.jpg

DSC_6593-1.jpg


As you might have noticed, there are round marks on the headstock, which are router marks, and they are too deep to just sand out... I've decided to put a walnut veneer on the front and on the back of the headstock to hide my mistake...

DSC_6594-1.jpg


I'm quite happy with the headway I've made this weekend! :)
 
Well, two big work days!

I routed out the neck pocket, drilled the holes for the bolts, installed the threaded inserts, and put the thing together!

Since it's put together with bolts, and not wood screws, I can take the neck off and put it back on without stripping the wood...

DSC_6598.jpg


I also glued in and sanded down the maple strip to fix the uneven gap on the racing stripes...

DSC_6602.jpg


I worked on the head shaping...

DSC_6600.jpg


Now I need to finish shaping the neck, get that control cavity cover in place, carve up the "ramp" at the end of the fretboard, put in the tuning machines, put in the frets... and wax the whole thing and I'll be set! :P