• TalkBass has been independent since 1998. Add your voice.
    Create a free account to reply to discussions, view embedded media, and browse with fewer display ads.
    Join freeLog in
    Want zero display ads or expanded classifieds tools? Compare plans.

SX 'Geddy Lee' Jazz Bass Build

This thread was inspired by Chunger's SX Batch build thread: I'll be following many of his steps in building this bass.

The bass begins life as a lowly Ursa base black model. It will be paried from the neck from another SX Jazz which was natural ash and had the 'proper' neck.
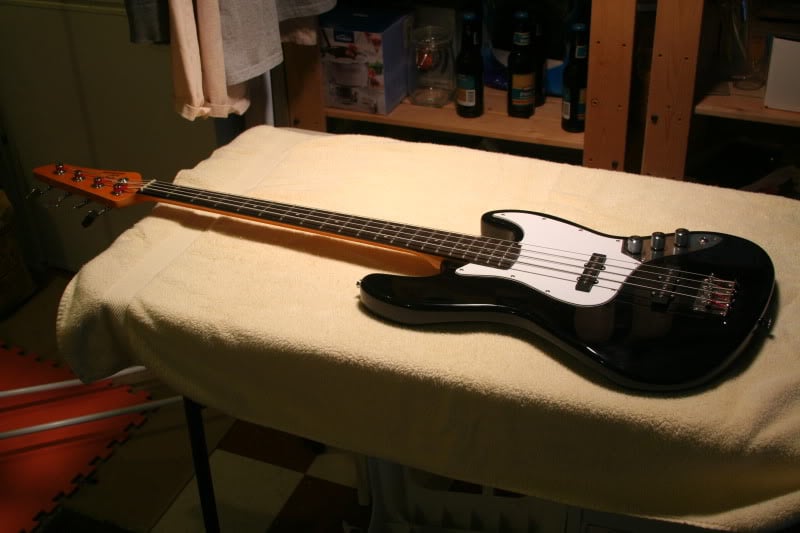
IMG_6715.jpg


I begin the process by stripping it down to the bare body, making sure I tape up the location of the bridge as I'll be replacing it with one of Rondo's Link Removed (more on that later, as it doesn't fit the original holes).

After I have it down to the bare body, I did a complete shield job, using shielding tape from Stew Mac. I'll post most of the pictures in the shielding thread in Pickup's and Electronics, but here is the end result:
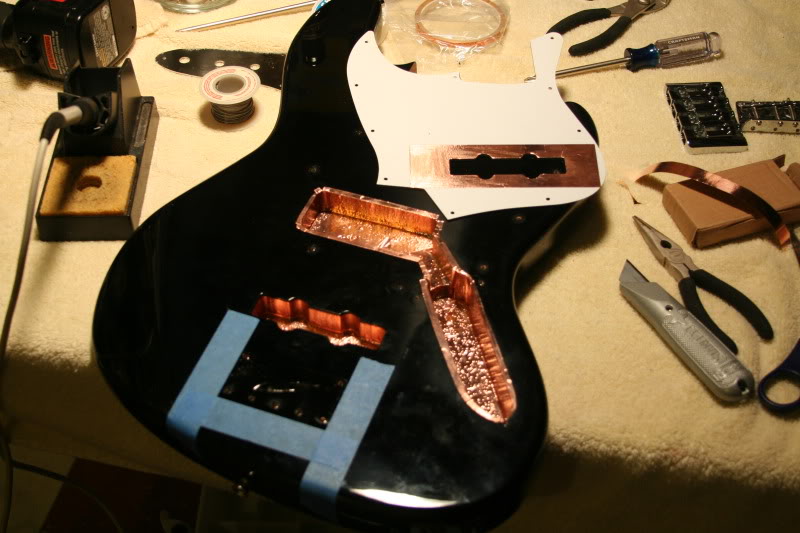
IMG_6734.jpg


I tack-soldered all of the individual pieces to each other so they wouldn't come loose (in an electrical sense).

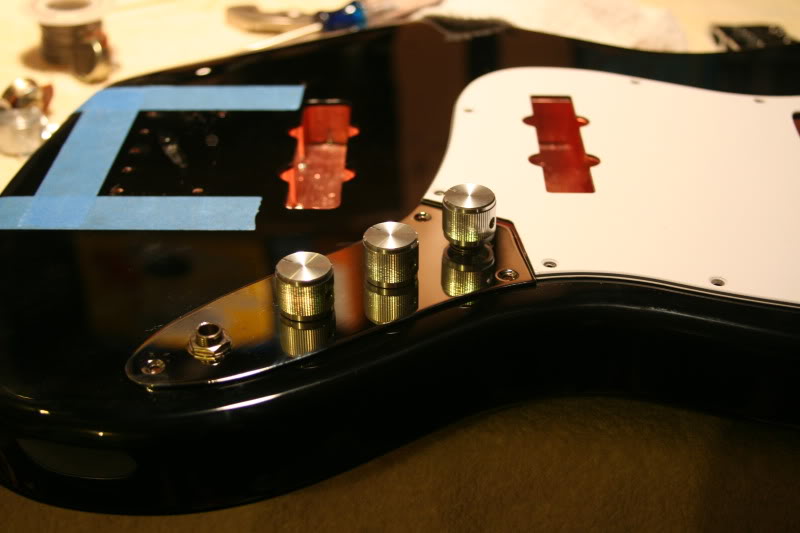
I stripped out the factory wiring harness and pitched it in the garbage. It came stock with 500k pots and a 0.047uF tone cap, which I am switching to a 250k push-pull volume pot (for series/parallel switching) and a 0.022uF tone cap. I'm hoping this tames down some of the 'clackiness' of the stock pickup setup (otherwise I think the tone of the stock pickups is fantastic).

Here's the new control plate populated with new Alpha pots, a Switchcraft jack, and knobs. I replaced the standard knobs with my favorite brushed aluminum knobs from Alpha (you can see the front knob is pulled up as it will be in series mode):
IMG_6736.jpg


So here's where I stand after the shielding job. Next up is to drill out the neck for stainless steel 8-32 threaded inserts, then align the new bridge to give me a 34" scale length with room to adjust. I'll fix the pickup alignment at the same time then re-wire the bass.
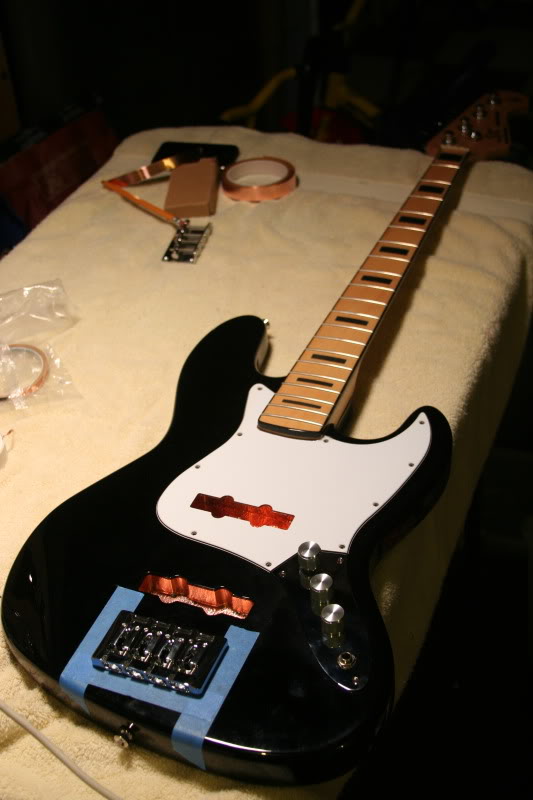
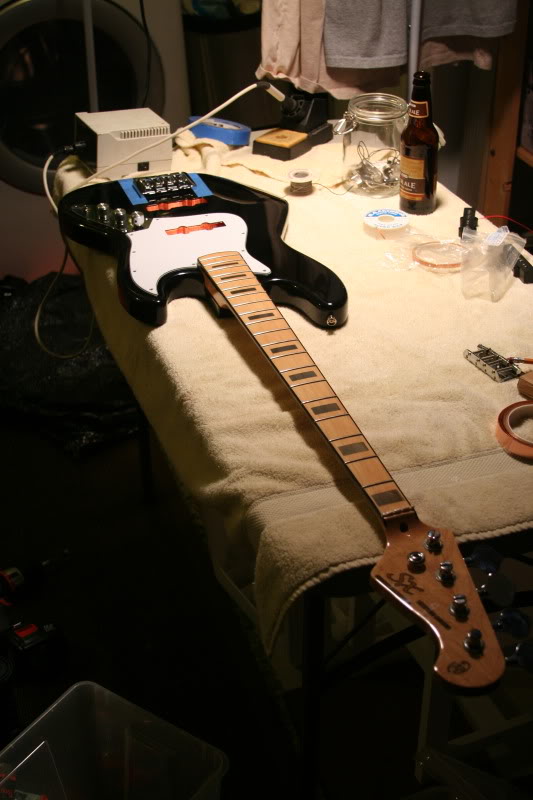
IMG_6738.jpg


IMG_6739.jpg
 
Make sure you run a center line the full length, from the nut to the center of either the existing SX bridge center hole, or better yet, though the centers of your pickups. And square the bridge off the center line.
 
Make sure you run a center line the full length, from the nut to the center of either the existing SX bridge center hole, or better yet, though the centers of your pickups. And square the bridge off the center line.

Which brings up a setup question:

I measured the nut-to saddle spacing for each string. The E string was the longest at 33 7/8", and each string was about 1/4" to 3/8" shorter.

With the new bridge, do I set the saddles all to their middle position, then place them at the average of the other 4 string measurements? That would mean the E string is backed out about 3/8" of an inch, the A and D strings will be about in the middle, and the G string will be forward about 3/8" from the middle position (with 'middle' being equal to the middle of the saddle adjustment range).

Or do I set the saddles all to the longest measurement then shorten them when I set the intonation?
 
I didn't make too much progress this week.

I found out the holes in the body for mounting the neck did not align with the existing holes already in the neck, so I had to fill them and start over. I purchased some maple plugs, and drilled out the existing holes in the neck to 1/4". I installed the plugs with some Gorilla Glue (After wetting the plugs), let it dry overnight, then sanded them flush to the neck with an aluminum sanding block.

Here's where it stands. Next I need to:

1) Align the neck and bridge
2) Drill new pilot holes in the neck through the body
3) Enlarge the holes in the neck to accept steel inserts

IMG_0261.jpg


You'll notice that the plugs are not dowels, they are cut with the grain running side to side, so the inserts will not be installed into the end grain (like if a regular wooden dowel was used).
 
I purchased some maple plugs, and drilled out the existing holes in the neck to 1/4". I installed the plugs with some Gorilla Glue (After wetting the plugs), let it dry overnight, then sanded them flush to the neck with an aluminum sanding block.

I've never wet the doweling/plugs when I've done this. The only moisture was from the glue itself. What does the wetting do to the process, exactly? Obviously, wood will swell ... but are you wetting the plugs to help the glue or something with the plug fit?

Project looks good!
 
You'll notice that the plugs are not dowels, they are cut with the grain running side to side, so the inserts will not be installed into the end grain (like if a regular wooden dowel was used).

Please forgive my noobish question, but where did you find plugs? Home Depot or a craft store maybe? I was going to use dowel for mine, but would rather the plugs.

Thanks in advance!
 
I've never wet the doweling/plugs when I've done this. The only moisture was from the glue itself. What does the wetting do to the process, exactly? Obviously, wood will swell ... but are you wetting the plugs to help the glue or something with the plug fit?

Project looks good!

It's a requirement for polyurethane glues like Gorilla Glue: they react with moisture to cure. They can work with the moisture in the air but by dampening the plug it cures faster/better.

Please forgive my noobish question, but where did you find plugs? Home Depot or a craft store maybe? I was going to use dowel for mine, but would rather the plugs.

A local woodworking shop cut them for me with 1/4" plug cutters out of a piece of maple. I think Osh also carries them.

I think one can also find them at hardwood flooring shops labeled as "side grain wood plugs" in appropriate thicknesses. Just be sure to get the straight plugs, as many are tapered (and you'd need a tapered drill to use them).
 
Ok I got a lot of stuff done, and I thought I would document the process I went through so that others may benefit from the thought process.

So after plugging the holes in the neck, I mounted the neck to the body and started thinking about how I would align everything. Common methodology is to lay straight edges along the neck, then move the neck so that the lines are exactly equidistant from the center line. However I had no centering marks so I had to get creative.

My wife bough me a laser leveler that I have used countless times to put up shelving, hang pictures, find joists, etc, however I put it to some luthier use (this thing has a million uses). I started by putting some blue painters tape on the body, and marking several center points (by measuring the width then dividing by 2):

1) The center of the neck route
2) The center of the jazz pickup route
3) The center hole from the stock bridge (which I confirmed is in the center of the bridge with my dial calipers).

Once these alignment marks were on the bass, I drew a center line by moving my laser level until the beam intersected all three points:

IMG_0263.jpg


You can see the marks on the tape.

IMG_0271.jpg


Next I did the exact same thing on the neck: I measured the nut width (1.5" on an SX), then placed a mark at 0.75" from the edge on the center of the nut. I then measure near the last fret (2.5" width), and then put a piece of tape on the neck and put a mark 1.25" from the edge. I then put the neck on the body making sure it was as far back as it could go.

I then moved the neck around: side to side as well as changing the angle it met the body until all 5 marks were aligned. If a straight lines passes through all points then I've guaranteed that the neck centerline and the body centerline are coplanar:

IMG_0264.jpg


IMG_0265.jpg


IMG_0266.jpg


The whole setup aligned:

IMG_0267.jpg


I then clamped the neck to the body with a spring clamp, then tilted the assembly up so I could drill it with a 1/8" drill using the body as a guide. I marked the bit for the screw depth then drilled the initial holes:

IMG_0268.jpg


I then drilled out the body with a 15/64" bit to give the 8-32 screws some wiggle room for adjustment, then enlarge the holes in the neck to 1/4" for my steel inserts. I then threaded the inserts just beneath the surface of the neck joint where it meets the body.

The hardware I used:

IMG_0270.jpg


Here is the neck with inserts installed:

IMG_0269.jpg


I then bolted the neck to the body and confirmed that all 5 marks were still in alignment.

Success!
 
Now it was time to put on the high mass bridge.

I started by confirming that the scale length was 34" by confirming the distance between the nut and the 12" fret was 17". I then measured along the center line from the 12th fret to my area of tape another 17", giving me 34" total.

I did the same measurement by holding a steel straight edge on each side of the neck, and measuring 17" on each side and placing two more marks (one for each side of the neck). I then drew a line connecting all three which gives me my bridge witness point (repeating a picture from above so you can see the three marks):

IMG_0271.jpg


I confirmed this line was square with the center line with a small steel square (geometry says it will be square, however that assumes the neck is exactly straight on each side). Turns out this was a close enough assumption.

I took the bridge, then screwed out all the saddles as far as they could go towards the neck, then backed them off two turns for some wiggle room (suggested in other threads I have read). I then placed a piece of tape on the top where the strings meet the saddles. This should be aligned with my 34" witness mark for proper starting intonation. The G string should be right on the witness mark, and the other strings will be progressively "longer" (mainly due to each strings gauge being thicker I believe).

I marked the center of the bridge front and back (with my calipers), then placed it on the center line. I then moved it until the tape was right above the line I drew above. I then moved my laser level around until the beam passed through the E string saddle center as well as the nut slot for the E string. Here is that image:

IMG_0272.jpg


I then marked on the tape on the neck near the 20th fret where the string would lie on the neck (same picture but with the lights off to see it better):

IMG_0273.jpg


I repeated this process with the other 3 strings:

IMG_0274.jpg


IMG_0275.jpg


IMG_0276.jpg


After this was done I had the 4 string locations on the neck:

IMG_0277.jpg


I figured if the bridge was aligned correctly, the pairs of inner (A and D) strings and the pairs of outer strings (E and G) would be equidistant from the center line. In this case, it was about 3/64" of an inch skewed to the right, so I moved the bridge slightly to the left compensate, then re-drew the lines and it was perfect!

Here is the new hardware:

IMG_0278.jpg


These are #6 stainless steel oval head screws to replace the stock ones. I drilled out the 4 holes with an appropriate bit:

IMG_0279.jpg


Then removed all of the tape, then installed the bridge:

IMG_0280.jpg


I think all of the HW setup work is now done. All that is left is to wire everything up then it's ready to rock!
 
More progress.

1) Added a square of copper tape under the bridge, and ran a new bridge ground wire into the control cavity

2) Connected up per [Invalid or Expired Link Removed].

IMG_6768.jpg


IMG_6769.jpg


I'm now ready to install strings and do the setup.
 
I'm nearly at the finish line now!

I strung up the bass, and did a quick and basic setup:

1) Set relief by putting a capo on the 1st fret, pressing the string down at the last fret, then measuring the string to fret distance at the 8th fret. I had little to no relief, so I loosed the truss rod until I got 0.4mm on all of the strings with my feeler gauges

2) Set action by lowering the saddles until I got 5/64" on the G and D strings, and 6/64" on the A and E strings between the string and the 17th fret.

3) I roughly set intonation by ear. My Korg tuner finally kicked the bucket (I got it new in 1988!), so I got it as close as my ear could get it.

4) Set pickup height to roughly 6/64"

5) Checked nut height by pressing down at the 3rd fret, and measuring the string to fret distance at the 1st fret. Mine was slightly high, so I may need to adjust this later.

I get no buzzing on any string in any fret position so this is a good start! I think I've found 2 slightly high frets so I may need to tweak this later.

I also replaced the string tree with one from Stew Mac that is a Fender replacement. This one doesn't have sharp grooves so I shouldn't be fraying the silk string ends when I tune it any longer.

Here is a pic stolen from Fender of my inspiration:

[Invalid or Expired Link Removed]

Here are some 'near final' shots of my tribute (final from the outside, but there's more tweaking to do elsewhere):

IMG_6770.jpg


IMG_6772.jpg


IMG_6774.jpg


Here's a list of things I still have to do:

1) I messed up the wiring. I was in too much of a hurry when I wired it, and something didn't look right to me but I didn't stop to check it. What I did was to short the tone capacitor with an extra wire. This is causing the tone pot to be directly in parallel with the volume control, which means the pickups are much more 'loaded' then they would have been otherwise.

When I plugged the bass in to my amp, the sound was extremely dark, and as the tone control was moved down the sound would cut out. Given the wiring mistake above this is expected. However the volume controls work well and the series-parallel switch appears to be working as well.

So I'll need to re-heat the soldering iron and fix this first before I can get an idea of the true sound.

2) I bought two Tusq XL black graphite nuts to replace the stock plastic one. I don't have any problems with the stock one but I think the black nut will fit in better with the color theme (looking at the first picture above I think the white plastic nut 'sticks out' and doesn't fit in with the theme).

3) I have three black aluminum knobs that I might swap on to the controls. The stock Geddy Lee model from Fender has black plastic knobs, so I might try these to look more like the real thing (the black aluminum ones I have are identical to the ones above only anodized black).

4) I find the gloss finish on the neck 'sticky' to me. I'm going to wet-sand it with 800 grit on my random orbit sander, then polish with 0000 steel wool to give it a smooth satin finish.

Total cost of this was about $200 ($119 for the original Ursa black Jazz, and $60 for the neck, and $20 for the bridge)....much better than $1200 for the Fender (although I would still love to own one someday). This clone should tide me over in the meantime. :smug:

Next I'll also be working on some sound clips.
 
Not liking the sound as much as with the smaller cap value from before. There's a noticeable drop in high frequency content and 'growl' from this setup.

What I'm also finding is how important a little fret buzz is to getting a good jazz growl. I have mine setup super-clean on all notes, but if I hit a note then hammer-on to another note I get a great growl.

Uploading initial clips now...

I'm also thinking about changing the tone pot to a push-pull so I can change the tone cap value on the fly.
 
I replaced the previous 0.056uF cap with a Sprague Orange Drop 0.022uF (poly film). The new cap value is much better: much of the clarity returned.

Here is a quick demo (please forgive the ultra-cheesy MIDI drum loop), and since it's a Geddy Lee tribute I did a quick bass line from Mystic Rhythms:

Invalid Link Removed

Here is the signal chain:

1) Bass in series mode, everything wide open
2) Bass to Sansamp RBI, recorded clean DI signal on channel 1, and drive channel on channel two.
3) Mild compression on the individual tracks and entire mix to prevent clipping.
4) No other EQ or signal effects (other than track reverb).
 

Latest posts