• TalkBass has been independent since 1998. Add your voice.
    Create a free account to reply to discussions, view embedded media, and browse with fewer display ads.
    Join freeLog in
    Want zero display ads or expanded classifieds tools? Compare plans.

1st Single Cut

So I just broke ground on my first single cut. This is my own bass so progress will most likely be pretty slow. Here are some specs:

Body: (7 piece)
Walnut Core
walnut and maple veneers
flame maple front and back

Neck: (either 3 or 5 piece...haven't decided yet)
Maple and walnut
Walnut flat radius fretboard
24 frets

Electronics
2 Nordstrand dual coils pickups
Bartolini NTMB 4.6 A/P preamp
4 wooden walnut and flame maple knobs
2 flame maple pickup covers

Hardware:
Black hipshot indi-bridges
Black tunning keys (haven't decided on a brand yet)

Here a a few progress pics and I'll be updating as I go. I'm making a huge effort to take more pictures and hopefully start to put a few tutorials on as well. (I'll also be trying to post better quality images ...sorry)
Today I was able to plane the two bookmatched sets to equal thickness and cut the body shapes out.


The design
000_0050.jpg


The Cut out (front)
000_0051.jpg


The cut out (back)
000_0053.jpg


The headstock piece (I cut out a small bit of one of the bookmatched sets so that I can make a matching headstock veneer when I begin working on the neck.
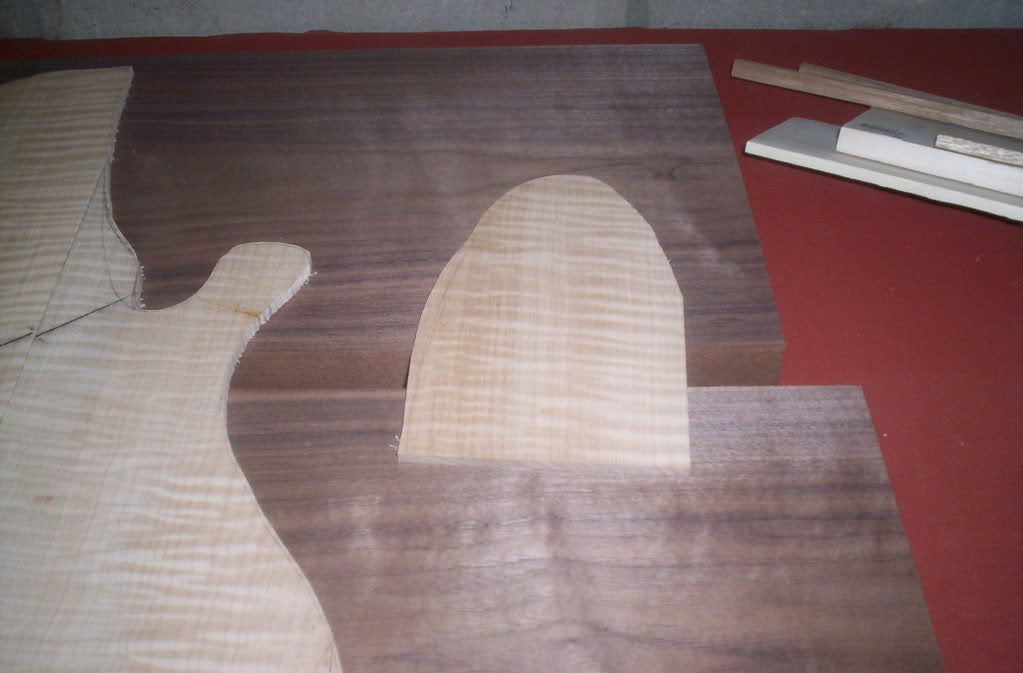
000_0052.jpg
 
thank you... believe it or not I spent a few weeks finalizing the shape. I had a few ideas in my head and it took me a while and several drafts to finally get a design that I liked. I plan on shaping the body highly. You'll be able to see 4 layers of the body at once when I'm finished.
 
Some more work done...

I got the body pretty much glued up. In fact, as I am tying this the two wings are drying up. I'll post a picture of the body with the clamps removed when I work again... probably sometime tomorrow.

Once again, sorry about the bad pictures. My camera has no macro mode. I'm working on a way to correct this.

So here we go:

Here is the walnut core rough cut on the band saw:
000_0054.jpg


So now both the front and back flame maple are rough cut (within 1/16th of the template) along with the walnut which is over cut by about 1/8th. I leave more excess on the core to allow for glue spread and veneer buckle.

It is also important at this point to make templates for gluing. Here I just cut 2 mock wings out of MDF, I think it's 3/4 inch but I can't recall off hand. This particular shape only requires one set of wings that can be used on both wings. You'll see what I mean in a bit.

Here are the templates cut out:
000_0055.jpg


Unfortunately, I couldn't get any shots of me actually gluing but I'll do my best to describe it. I put down one template, then the walnut core spread some glue, put down a rough cut (with a razor blade) maple veneer, more glue, a rough cut walnut veneer, more glue, and the flame back (in this case), some water and then the other template. The reason for the water is so that the maple doesn't buckle as there is a lot of water in the glue itself. The key here is to use a ton of clamps...
000_0056.jpg


When the glue was all dried I took them off and I cut off the excess material (using the maple as the guide) and snapped some quick pics...
000_0057.jpg

000_0058.jpg

000_0060.jpg


Then i did the same thing for the other side since the pattern is the same for the top and back. Some builders like doing this all in one step, but I like doing it in 2. I feel like I have more control of the "tightness" of the shape.
000_0061.jpg

000_0062.jpg


Then I took the clamps off and trimmed the excess once again. This is an important note: i made the top maple a bit tighter to the pattern than the back because it was the second part I glued on. This way, if the veneers shifted when gluing, I had a bit of play to cut off later on.
000_0063.jpg

000_0064.jpg

000_0066.jpg


Then I repeated the same process for the bottom wing and I was left with the complete shape of the body:
000_0067.jpg

000_0068.jpg


Then I just needed to run the wings through the joiner to make a right seal for gluing. I took a picture of the wing after joining to give an idea of what the sides of the bass will look like when finished. It came out a bit blurrier than expected though
000_0070.jpg


I picked this tip up from wilser, and it works GREAT!! (thanks wils ;)) I put 2 staples in the body sides, being mindful of where I will be drilling and routing and shaping later, cut the "cross beam" off with snips and then glued the wings together. The clamping pressure makes the metal of the staples pierce the wood and prevents sliding when tightening. Here I have the current status of the body, clamped and glued and drying. I do wish I had more clamps for the body and because the shape is slanted, it make it rather difficult to find good clamp positions. It should be fine though.

000_0071.jpg


More to come... stay tuned
 
Thanks for the kind words everyone. It's been a while since I've built from scratch. Lately I've been fixing up old projects, using some spare parts like necks and bodies I had lying around and doing some set ups for my church's gear. Now that my classes are over I finally have a bunch more free time to build. It's nice to hear that I'm doing something right...

I'll be setting up the website hopefully by the end of the summer... hopefully... There is still so much to do in way of church projects. I have become the unofficial "oh you should have him look at that" guy when it comes to instruments and my church's big kick is, ironically enough, music and media...
 
A bit more work done... I got the clamps off and sanded the front and back to a flat surface and got rid of the glue. I spent a lot of time with my belt sander and block sanding this thing down...

Before:

000_0072.jpg


000_0073.jpg


After:

000_0075.jpg


000_0074.jpg


Next up I'll be spending some time with my oscillating spindle sander to get the sides sanded down to the correct shape.
 
Last update for the day... I'm spent... I did a bunch of house work today and I had a few extra minutes so I figured I'd go ahead and sand the sides down to get the final silhouette of the bass. I gotta say... I love that spindle sander... it makes sanding sides so incredibly easy and fast.

Anyway... here is a full body shot (not much of a difference)

000_0078.jpg


You can really see the affects of the sanding on the sides

000_0077.jpg


000_0080.jpg
 
Soooo....... a little tiny update....

I passed the rounding bit over the edges of the bass. The key here is to do it in several steps. I usually pass 4 or 5 times lowering the bit about 1/16" every time.

The results:

000_0084.jpg


000_0081.jpg


000_0083.jpg


I also got this great piece of Zebra wood for a transition block but I don't know if I can use it. I Think I might be allergic to it. Every time I touch it I break out and get itchy... I know people are often allergic to wenge but I've never heard of zebra wood...

000_0086.jpg


Also... can I get some opinions on a the zebra wood and on a fretboard? I really just can't decide what will look good. I think I'm changing the neck to wenge and birdseye maple, but I just can't decide on a fretboard. Suggestions?