• TalkBass has been independent since 1998. Add your voice.
    Create a free account to reply to discussions, view embedded media, and browse with fewer display ads.
    Join freeLog in
    Want zero display ads or expanded classifieds tools? Compare plans.

Black Limba, Rosewood 4-String Bass 1st Build

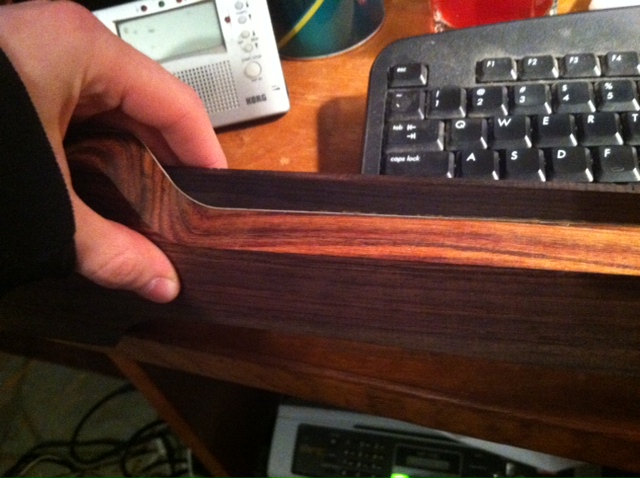
I unclamped it today when I got back home, it was hard to get pictures to show what it looked like. I'll get more when I get the fingerboard to the same size as the rest of the neck. But at least for now, you can see what the veneer will look like!
2la3p8y.jpg


I got better with my glue application, as I had waaaaay less squeeze out gluing the fingerboard on than I did gluing the body pieces together.
 
I found a little more time to work on the bass over this weekend. My brother came home to celebrate my birthday with me, and it was nice to be able to do some guitar work with him again.

I got the fingerboard to the same size as the neck, the veneer was an excellent choice.

3448g7q.jpg


I did that with a quick jig I made, a piece of mdf on two limba offcuts with a bearing bit with the bearing on the bottom.

nmj920.jpg


Unfortunately when I got it to size, I realized the nut slot I cut is deeper than the other. It looked the same on the outside before trimming the fingerboard so I'm not sure what happened. But I will use some glue and dust and fill it before finishing the nut slot. Next time, I will wait to cut that slot until I have it trimmed, no big deal.

2sb8ju9.jpg


Since my fretboard slightly overhangs the neck, I shaped the end of it by hand.

ih5shz.jpg


Then I trimmed the headstock to size. I was originally going to do a larger tele headstock, but the rosewood board I bought wasn't wide enough. I planned on using an offcut and gluing it on the edge to get it wider and be able to do that type of headstock, but none of the grain would match real well. So I decided a smaller headstock would make me happier than a poor grain match.

fy36tk.jpg


Thicknessed and transition roughed in.

29v9me.jpg


And here's my favorite part. I test fitted the neck in the body, and it is veeerrrry tight. I'll need to do some sanding before finishing for sure. But man does it look great!

2vmy5xt.jpg


Thanks for following along with me, I'll be back within two weeks hopefully!
 
Small update...

Today I drilled for & installed the dots on the fingerboard. They're 5mm gold pearl from stewmac, and I will put the matching side dots in soon. I accidentally almost super-glued one of the inlays to my finger haha! Any advice on how to do the side dots? I'm using stew mac super glue and stew mac dots, I don't wanna lose any or glue them to my finger or something stupid. They're so small I'm just worried about what can go wrong lol.

7251tf.jpg


Installing these inlays made me realize it really is the small details that matter. Look how much cooler this bass looks with them! :)

svt5jp.jpg
 
Any advice on how to do the side dots? I'm using stew mac super glue and stew mac dots, I don't wanna lose any or glue them to my finger or something stupid. They're so small I'm just worried about what can go wrong lol.


I've never used glue for any of my side dots. Most of my builds have used 2mm or 3mm abalone dots from LMII, but I bet your StewMac dots are similar. I just drill the hole the "right size", and then gently tap them in, using a scrap piece of maple between the dot and the hammer (can't remember what you call this...). Nice and tight, then sand flush.

Looks great!
 
I ended up gluing the side dots in. What I did to avoid gluing them cock-eyed or to my fingers was I used a center punch. I aligned the little inlay in the glue-filled hole, put the punch over it, and had a small piece of maple on top of the punch so I wouldn't mess up the point. Then I just hammered them into place, it worked perfectly.

212d2k6.jpg


Here the inlays are sanded flush, and the board was sanded up to 1200 grit. It has a nice shine & reflection now.

4t3di0.jpg


Then I started fretting, which was a bit more difficult than anticipated. Most likely due to my piece of **** fret bender I made. I didn't want to pay 80 bucks for one or whatever stewmac charges, so I tried to make one. It didn't work very well and I think it made installing the frets more difficult because it bent the frets sideways a little as it radiused them. So I had to straighten many out before they would stay in the slot. But I made it work, and they're looking pretty damn good.

2n83ksi.jpg


Here it is, fully fretted. Next will be shaping the neck, then I think I'll be on to final touch ups before finishing! :bassist:

2rqivww.jpg
 
Neck shaping today. I drew a center line, heel shape, head shape, and a few other lines outside of the center line. I carved a bunch of angles into the neck, then sanded it to become round. I think that's called faceting, but I could be wrong...

So here are process pics:

98zg41.jpg


2dkdetu.jpg


x2jqq1.jpg


And here it is done.

o7j2ah.jpg


r1cvp3.jpg


I also realized today that taking pics outside in natural light really captures the detail much better than indoor light. I will have to start taking final pics this way more often, so many of my pics are too dark and don't capture what it truly looks like in person. I'm pretty happy with the neck shape, it is around 7/8" thick at its thinnest point, and a little under an inch at its thickest. So it's rather thick, and I wanted to go thinner, but it was taking so long and it seemed like a pretty comfortable shape so I stopped. I may come back and re touch the transitions before finishing when I do final sanding. Whenever I find time again though, I'll be onto the finishing stage!
 
I also did my first successful refret today. I accidentally dented the 5th fret, and it was pretty deep. I figured it wouldn't really come out during the fret leveling so I figured I should just replace it since I have plenty of fretwire left over. So I used my soldering iron on the fret, and gently used the fret pullers I bought recently, and slowly lifted it out. It didn't really even chip much.

2uiej2u.jpg


Clean the slot out, tap & press another one in... and no one will have to know!

21mzsl3.jpg
 
So.... I've run into an issue.

2aa0yg9.jpg


If you look at the truss rod route, its slightly curved which I just noticed only this morning looking at it. That means that my piece of bubinga that I used for my guide wasn't as straight as I had thought.... F$@^!!! :rollno: :scowl: So I'd like some advice. Basically, I would think that a slightly curved truss rod route would be a very bad thing. It seems like it would cause twisting, and basically be useless. Is that true? And if it is, should I just forget about the rosewood and try again? I can use that piece of bubinga, I just need it cut into two halves, because its like 1 7/8" thick or something. I figure it's good that I noticed this now, because I haven't glued the board down and put the truss in place, so it's not a complete waste. Should I just stop with this neck and let it be a learning curve? Or is it not as big of a deal I think it is, and maybe is still useable?

I tend to rout using one of the edges of the neck blank as a guide. I make sure that one edge is exactly parallel and straight and I use this as my datum for anything neck related. I leave the tapering and carving of the neck until I don't need that datum any longer. There's always something which goes a little awry with a hand crafted bass. It's a simple fact that this isn't a machined / mass produced item, but something which has been carved , cut and finished from big lumps of blank wood. These days, many instruments are blank boards put into a cnc router...push a button, choose A , B or C and out comes your finished wood work. Bang the frets in, paint the body and solder the electrics and it's done.

Lovely work by the way. A nice choice of woods and your general workman ship looks very strong. It'll be a bass to be proud of!
 
I tend to rout using one of the edges of the neck blank as a guide. I make sure that one edge is exactly parallel and straight and I use this as my datum for anything neck related. I leave the tapering and carving of the neck until I don't need that datum any longer. There's always something which goes a little awry with a hand crafted bass. It's a simple fact that this isn't a machined / mass produced item, but something which has been carved , cut and finished from big lumps of blank wood. These days, many instruments are blank boards put into a cnc router...push a button, choose A , B or C and out comes your finished wood work. Bang the frets in, paint the body and solder the electrics and it's done.

Lovely work by the way. A nice choice of woods and your general workman ship looks very strong. It'll be a bass to be proud of!

I did route it before cutting out the neck. The only problem with that suggestion for me is that I don't have a jointer or a router table. So I can't reference an edge unless I make a jig that attaches to the router. But then I'd still need to get a jointer. I really want to get a router table eventually, it would make a lot of things much easier and less stressful. You are right, and for being a first timer, this has gone incredibly well. I haven't had any drastic mistakes.

Actually it's kinda funny - earlier today I was sanding the tear out on the upper horn, and once I was done I had to touch up the roundover since the shape changed a little. And I accidentally put a 1/2" roundover bit instead of 3/8" which is the correct roundover. I was too excited to just get this thing done, and didn't think about it. I started just a little of the roundover on the back, and was swearing at myself when I realized there was a big awkward dent now in the roundover. I got lucky, though, because I was able to extend the tummy cut a little and its completely gone.

Anyway, I did some work, but don't have pics. I sanded out the tear outs and jig saw marks, and sanded up to 220 grit. I decided today that I won't finish the neck, at least not yet. I most likely just won't, because it is Indian Rosewood which doesn't require a finish. This way, I can sand the neck up to a high grit, and never have a sticky finish feel. If it feels sticky, I can just sand it again and not have to worry. Also, if I'm not happy with the neck shape once it's together, I can just re-shape it and not have to refinish it. But I will oil the body, which I'm hoping to start this weekend.
 
I started the oiling today! I got the face done, and am still in the process of checking it every hour until tonight.

dnk313.jpg


Here you can see how it darkened up a little better:

10qmom0.jpg


And here you can see the upper horn no longer with tear outs!

dy3lp0.jpg


I'm hoping to get one coat finalized over the weekend, then I won't be able to get the next coat on until Friday. I really only get Friday-Sunday to work on this because my schedule is so busy lately. But I will try to keep you guys updated, and hopefully soon I can put the thing together and hear it finally, that's all I want!!!

Also, the neck pickup cover is much shinier than the bridge pickup cover. The MM style pickup is flat black, but the J neck is shiny like any jazz bass pickup cover. Could I possibly dull the neck pickup cover down without getting rid of the Seymour Duncan logo, or should I not bother? Thanks!
 
Working on the second coat of oil this weekend. The pores are definitely starting to get filled, as they are really darkening up.

fk4fb6.jpg


For comparison sake, (again...) here is one offcut next to its matching section on the body after two coats of oil. The offcut is unfinished.

2wp8inn.jpg


Here it has two coats oil on the top & sides. Gonna work on the back tomorrow. The lighting really changes how dark it appears.

nvtdo4.jpg


And here's something unrelated but you may find interesting. My girlfriend has mentioned she wants a necklace with one of my guitar picks on it (I'm mainly a guitarist, but started playing bass as well 3 years ago). My dunlop picks are nothing special to look at, so I decided to make one out of a limba offcut for our 1-year anniversary coming up in May. She has found my whole attempt at building an instrument from scratch really cool, and is into music as well, so I think she'll like this. It's slightly larger than my picks so that it is easily recognized as a pick from far away. It'll be a necklace as soon as I get a chain for it!

izqkut.jpg
 
Up to 400 grit with the sanding-in oil method.

25qt3io.jpg


2hhhzq0.jpg


I don't know why the pictures make it look kind of ******, it looks great in person. My phone camera just doesn't capture the color right. I'll be doing the final coat with 600 grit soon, and the next update will probably be when this baby has been waxed!
 
I've been doing a little work as the oil cures. I thinned out the neck just a little more, and changed the shape of the transitions to make them look a little better. Like the headstock transition:

ot291s.jpg


11sjsk7.jpg


I leveled, crowned, and beveled the sides of the frets; though it was hard to picture.

1tq791.jpg


And I've been applying the shielding paint I bought from stewmac a long time ago in the control cavity.

2zp41sj.jpg


So close to completion... ahhhh!!!! :hyper: