• TalkBass has been independent since 1998. Add your voice.
    Create a free account to reply to discussions, view embedded media, and browse with fewer display ads.
    Join freeLog in
    Want zero display ads or expanded classifieds tools? Compare plans.

Custom P/J for Davey Angelo

Here is a new build I've been asked to post.

Bass - Custom P/J 4 string

Body - Swamp Ash (made in USA by Allparts)
Pick guard - Tort
Neck - Maple/Maple Allparts - USA Fender Replacement neck MIJ
Electronics - Passive V/V/T
Pickups - Nordstrand NPJ4
Bridge - Gotoh 201B
Tuners - USA Fender "F" tuners


I've been asked to come up with a "different" take on Fenders legendary P/J bass. So, here is a pic of the parts before I start the finishing process.
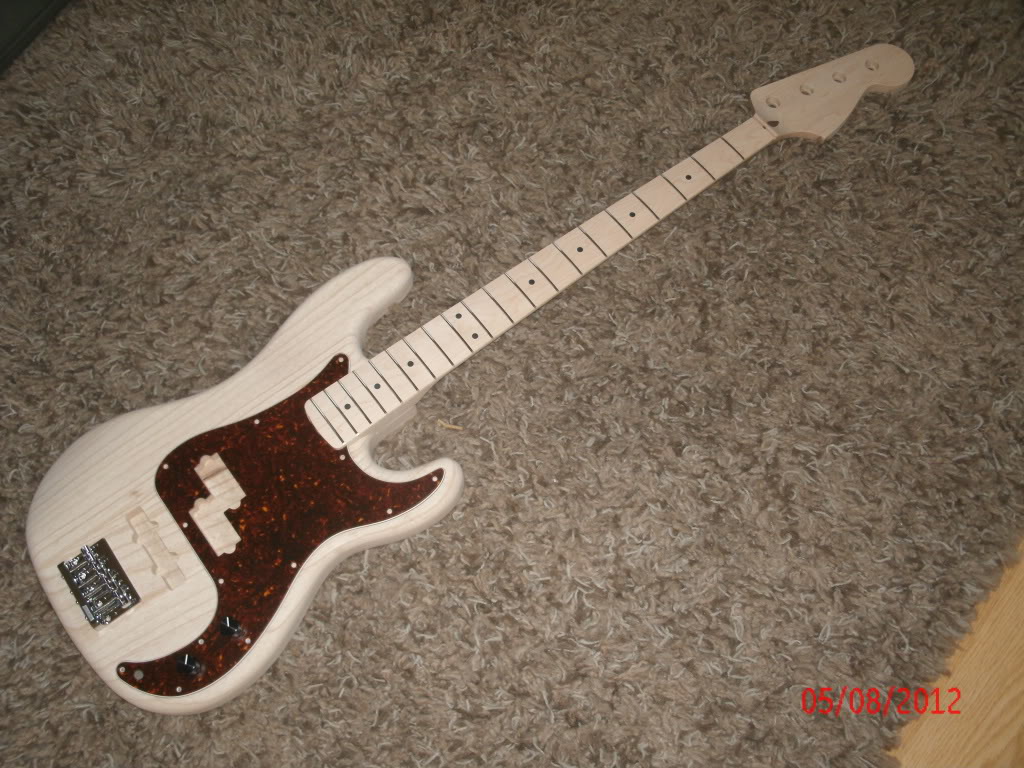
GEDC0024.jpg


The body will be finished in a "burnt" orange dye with black grain highlights and topped off with Sam Maloof's Oil/wax finish. It will look and feel very "Warwick-ish".

Hope you enjoy.
 
Started today by rounding the fret board and makeing sure the fret ends are dressed. Allparts does a great job on their fret work. No fret dressing needed here.

On Rosewood Fretboards I use a razor blade to shave the fretboard, but on maple it doesn't work as well, so I use a sanding block.

GEDC0026.jpg


Once I have the fret board nice and rounded for that great "broken in" feel, I'll start with 2 coats of True Oil (Gun Stock oil). This will give it a less "vanila" look.

Sorry for the crappy photos. Can't seem to find my tri-pod.
 
Sorry for the long lapse in time, but after a crazy weekend and Monday, I thought I'd get some therapy and sit in the garage working with some wood. Sanding has now become therapeutic for me. :hyper:

So, today I've decided to start work on the body. This finishing technique has worked out to be both cost effective and simple to do. It does take some time and prep and some sanding, but it also makes for a nice finish.

Here is the swamp Ash body in its raw state from Allparts. It is sanded and ready to finish but does not have any sealer or oils.

GEDC0068.jpg


Made in US
GEDC0069.jpg


The body is going to be a "burnt Orange" custom Trans finish with minwax wipe on poly as a clear coat.

The first thing I wanted to do is to darken the grain so that the grain really pops when the finish is applied.

Here is how I do this.
1. Wet the body down using water. (don't soak it, just get it wet on the surface) this will keep the wood from "scaring".
2. I dilute the dye in Denatured Alcohol. The alcohol keeps the dye from penetrating the wood too far. Remember we only want this dye in the deeper grain.

GEDC0070.jpg


Here is the body with the dye after drying for 10 minutes.

GEDC0072.jpg


Once dried, I sand back till the black is gone except for the deeper grain.

GEDC0073.jpg


Once I am done sanding, I blow off using canned air, then I wipe clean using Paint thinner. This also shows me where I need to sand a bit more. Notice how the grain is now darker.

GEDC0074.jpg


At this point I am not worried about finish sanding. I only want to get the dye off. Next dye will be a custom "Burnt Orange". I will "finish" sand the body in the next few steps.

TTFN
 
I don't have the necessary dye to continue work on the body this morning, so I will do some more work on the neck.

So far the neck has 2 coats of True-Oil and 2 coats of wipe on Poly (headstock and heal and Fret board only) I use 0000 steel wool and buff with old denim between Oil coats and before the first coat of poly. This gives me a good base for my Poly coats.

GEDC0075.jpg


The logo goes on very easily. I won't bore you with the details, but here is a pic after it's been installed and before any more poly coats.

GEDC0080.jpg


Notice the orange peal. This will be covered and eliminated by the 16 to 20 coats of wipe on poly and wet sanding that will follow.

Every bass is hand signed and numbered by me. The heal is then tagged with the owner's name. (if it is a custom ordered bass like this one)

GEDC0083.jpg


GEDC0081.jpg
 
The lines between building and assembling are pretty blurry. When a person builds a car, he usually doesn't start with billet steel and do all the shaping and forming himself. So when a person builds a bass, he doesn't necessarily have to start with raw lumber or even body/neck blanks.

I would call what Syco is doing here assembly and finishing. He seems to have a great eye for detail, so I would not denegrate his abilities at all. I prefer to start from lumber, but in my opinion, my products don't come out as clean and well-put-together as Sycos.
 
What do you mean when you say build? ... I'm new to this and the language of building... looks to me that ur assembling...true?

Thanks for the comment dremy, but I would rather not derail this thread to start talking about the logistics of "building" vs. "assembling"

I do believe that I am "building" this bass. HaMMerHed's analogy is a good one.

Sadowsky, Valenti, Lull, and many others have all, at one time, and still do at times, use parts from outside sources to build their products. I am no exception.

I hope you all enjoy this thread. More pics to come later today.

Cheers.
 
Here is what I got to do last night.

Remember, always "wet/condition" the wood before applying the dye or you will "scar" the wood and it will leave a mark. This time I used water to dilute the dye, vs Alcohol. I want the dye to penetrate the wood deeper. The alcohol evaporates quicker and the dye does not penetrate deep. This allows you to sand it off easier.

Before I apply the final color, I need to drill a channel for the ground wire. Allparts does not provide this.

GEDC0087.jpg


GEDC0089.jpg


The I apply the dye to the body.

GEDC0090.jpg


Here is what it will look like with the tort pickguard.

GEDC0092.jpg


I will let this dry overnight and sand with 320 grit and 600 grit sand paper before I start applying the clear coat.

Peace.
 
Sorry for the long lapse time between posts. I don't get to work on the basses I build every day. Plus I have several basses in the works at the same time. Anyway, here are some of the updates on the body finish.

I decided to use the Sam Maloof oil/poly blend for my base coat. I use as many coats as it takes before the oil stops soaking into the wood. This piece of wood took 4 coats. the first 2 soaked in in only a few minutes. The 3rd coat took the majority of a day and the 4th and final coat took over night tonight dry. So now I am switching over to Minwax Wipe on Poly.

Here are some pics:

After 2 coats of Sam Maloof's
GEDC0101.jpg


After 3 coats:
GEDC0105.jpg


And the last coat of Sam Maloof's; notice that the finish is starting to take on a gloss look.
GEDC0108.jpg


The process is simple. Use some cheep "blue" shop towells and wipe it on. Make sure to use even strokes going with the grain. It's ok to overlap but keep the build up to a minimum.
 
Davey wanted this bass to be a collaboration, so I decided to make this bass a "Davey Angelo" signature series. His autograh is on the back as well as my usual initials.

The process is pretty simple and you can find tutorials on You tube. Make sure you use a gentle touch not to rip the decal.

Here is Davey's new "signature series" headstock.
GEDC0111.jpg
 
I forgot to show how I located and drilled the holes for the bridge.

I took an existing bass and measured the location of the front edge of the bridge. I made sure the base plaste of the bridge I am using matched the base plate of the other.

I measured from the neck pocket to the base plate.
GEDC0097.jpg


I then marked that location on the new body.

GEDC0098.jpg


Using a square, I run a centerline down from the pickup through the area where the base plate will be. I will use that center line for the middle hole on the base plate.

Here are some pics;

GEDC0099.jpg


GEDC0100.jpg


The "+" is where the front edge of the base plate goes, and the line down through is where the "middle" hole (for a 5 hole bridge) is located.

Feel free to ask questions if for some reason I haven't detailed this process enough.
 
Here is a pic of the body with 2 additional coats of Poly. I'll add two more before I wet sand with 1000 grit.

GEDC0115.jpg


GEDC0112.jpg


I will basically be applying 4 coats of Poly, then wetsand, until I get the desired result. I usually end up with 12 to 20coats total.

I will update again after my first round of wet sanding.

Thanks for looking.
 
After letting the body "cure" overnight, I decided to rub out the body using 0000 steel wool rather than wet-sand. I think at this point the poly is still too thin to wet-sand. I don't want to rub through the finish. So after rubbing down with steel wool I use a magnet to get up the big stuff then I clean up using paint thinner or denatured alcohol. I don't' think there is a big difference when it comes to clean up. Alcohol will evaporate quicker.

Here are a couple of pic's after the 5 coat of poly. So now that makes 4 coats of oil/poly blend, plus 4 coats of poly, then rub down, and 1 more coat for a total of 9 coats of finish. She is really starting to get a nice shine.

GEDC0132.jpg


GEDC0133.jpg


I should be able to add 2 more coats today and asses the progress in the morning.

peace.
 
Is it just the picture, or did the end grain soak up more dye than the top of the body. It looks like there is a hard line at the bottom. The reason I ask is that I ran into that problem with ash before on a non instrument project I was working on. Ash can be a royal pain sometimes.
 
Hopkins said:
Is it just the picture, or did the end grain soak up more dye than the top of the body. It looks like there is a hard line at the bottom. The reason I ask is that I ran into that problem with ash before on a non instrument project I was working on. Ash can be a royal pain sometimes.

In my experience "end grain' always picks up more dye than top grain. Wish I could avoid it, but I have not found a way to keep it from happening. I think it gives the bass some character. Just my opinion.
 
In my experience "end grain' always picks up more dye than top grain. Wish I could avoid it, but I have not found a way to keep it from happening. I think it gives the bass some character. Just my opinion.

I kind of got away from using dye on the wood, and started using a tinted lacquer for that reason.

