
• TalkBass has been independent since 1998. Add your voice.
    Create a free account to reply to discussions, view embedded media, and browse with fewer display ads.
    Join freeLog in
    Want zero display ads or expanded classifieds tools? Compare plans.

Ergonomic bass build "Twisted Sister"

Ok guys, I have made a mistake. I should have noticed it earlier, but I didn't. Arghhhh.

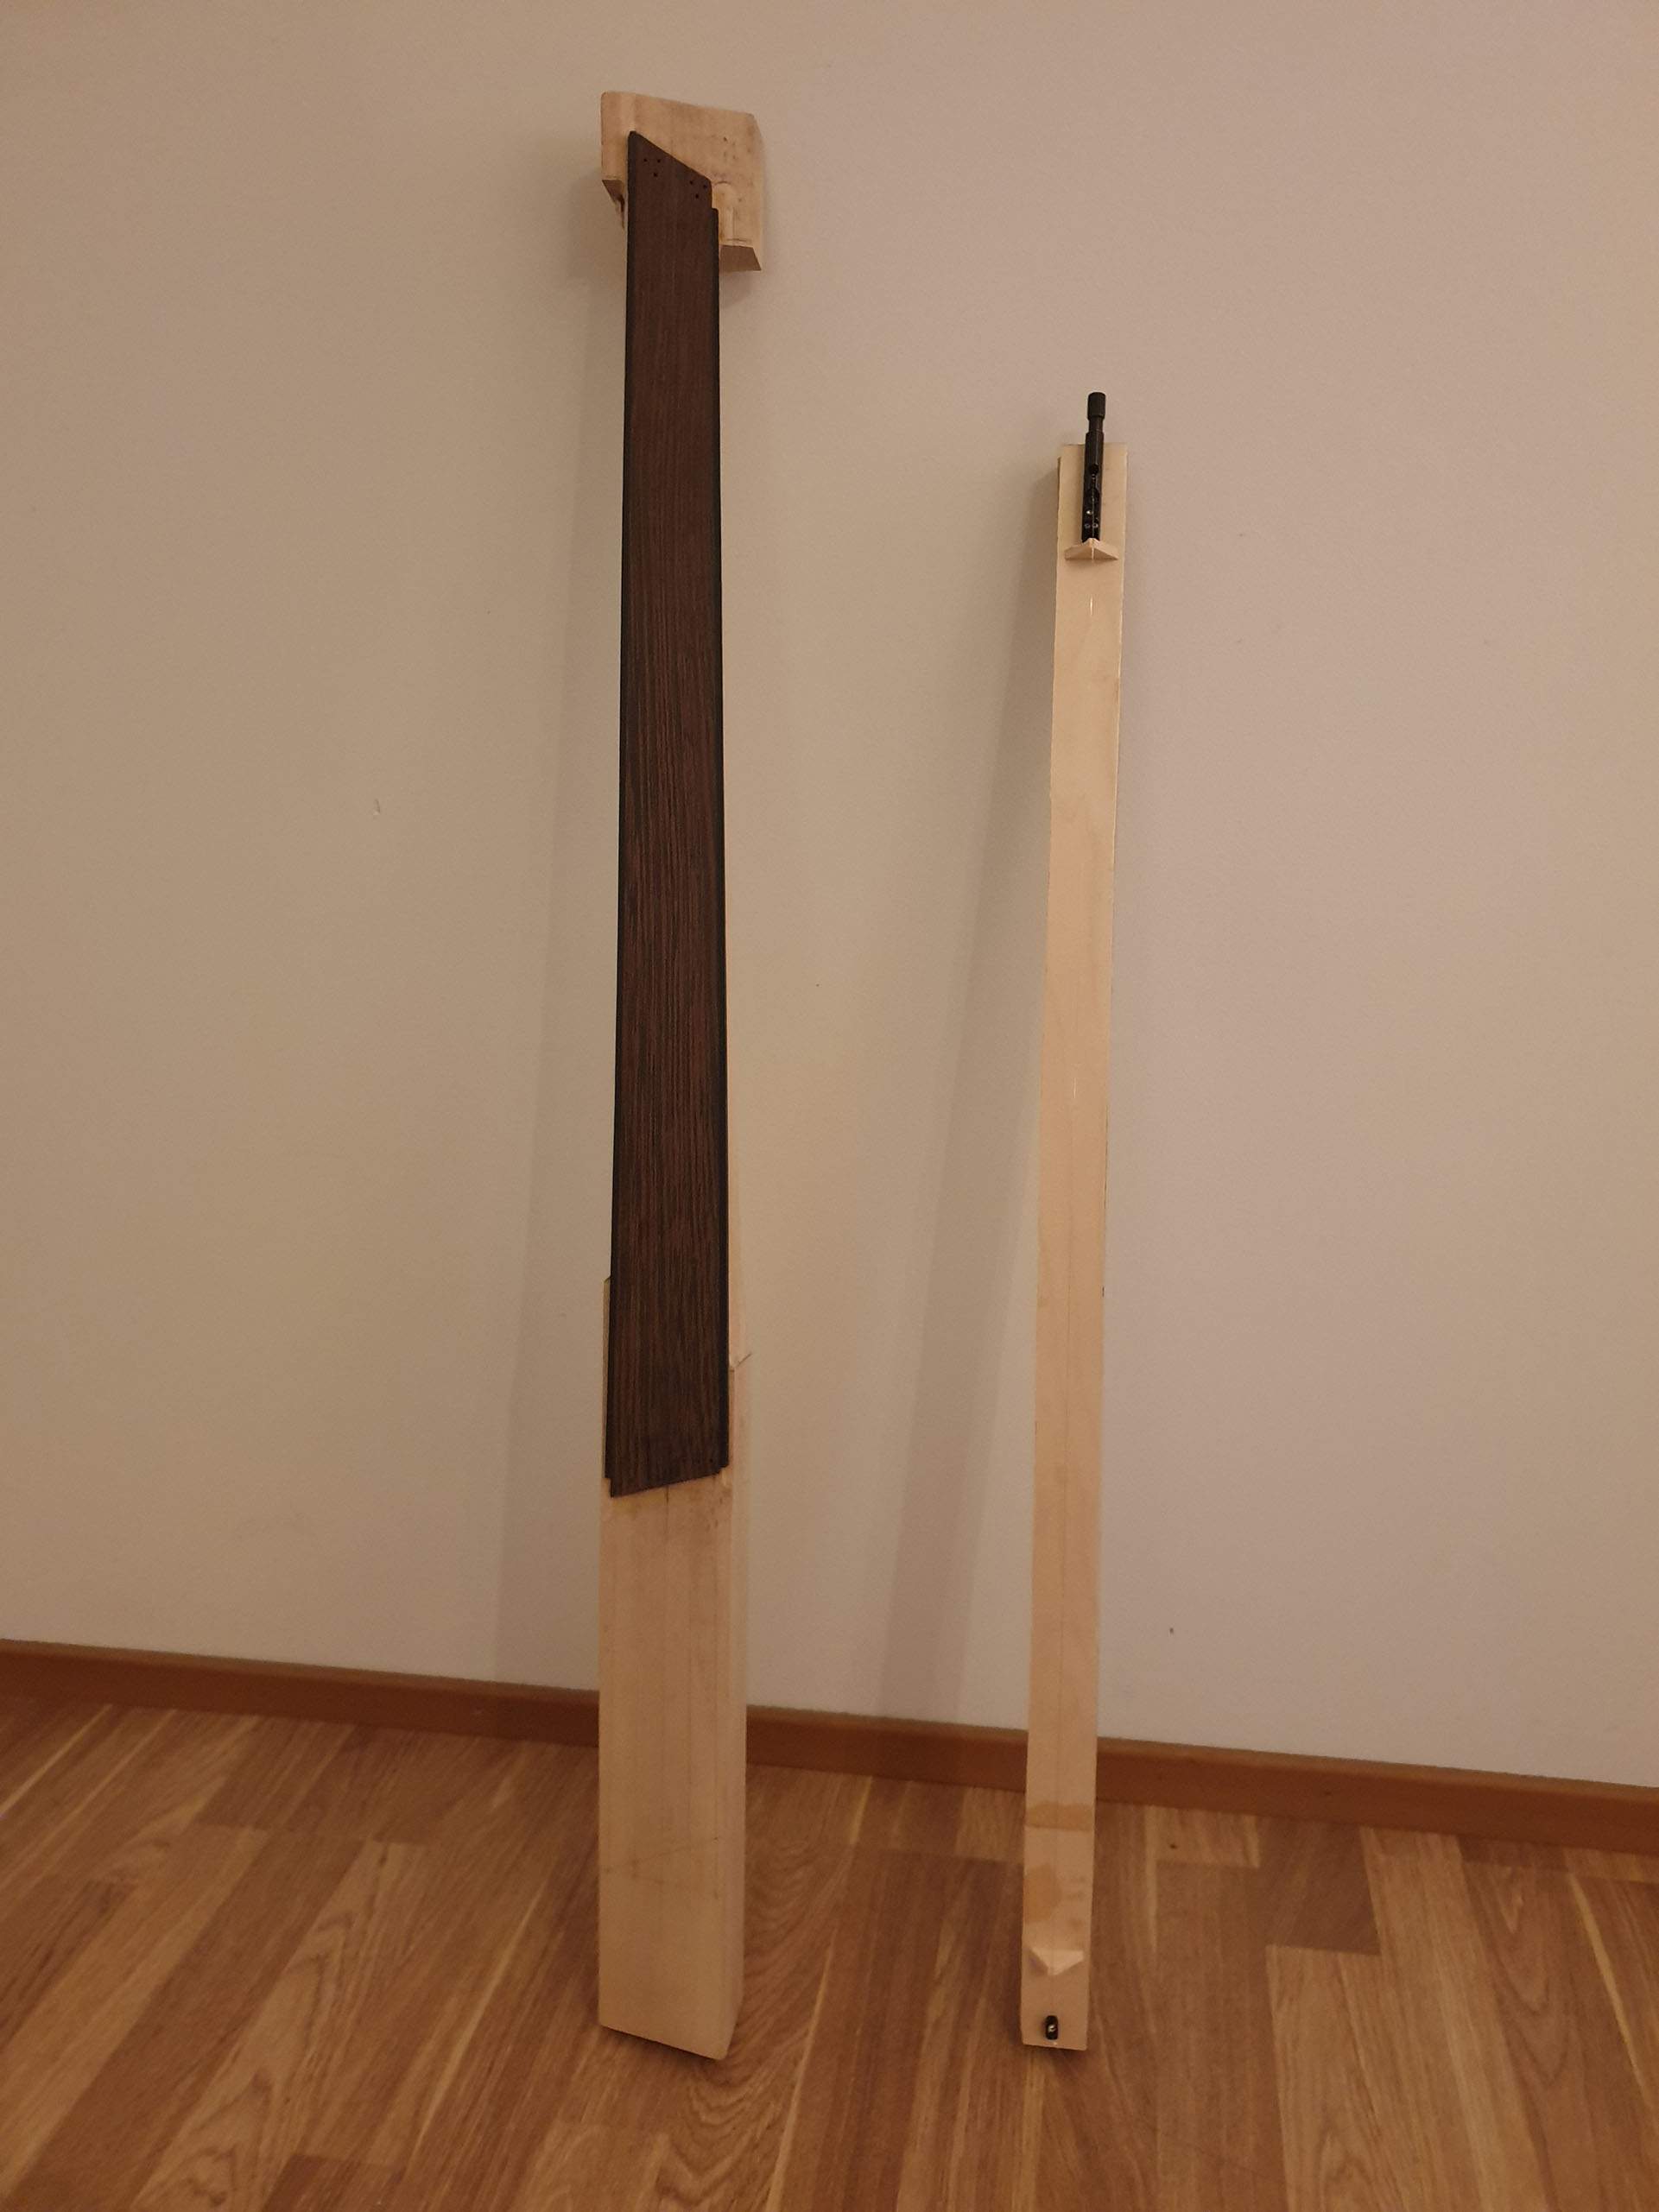
Here's the story: To check if the fretboard is straight, I attached a headless tuner and a headpiece to a 1.5"x1.5" plywood beam. Then I put a 10 gauge guitar string on it, and gave some clearance with two "nuts" made from pine cutoffs. This gives me a suspended tight string, which works much better than just pulling a thread over the fretboard. It's essentially a diddly bow, but I'm not going to join a hillbilly bluegrass band anytime soon. Here it is next to the neck. I tune it to B flat.
20220228_210807.jpg


So when I used it to check the fretboard along the centerline, I realized that it wasn't straight at all. Theres a 2mm gap in the center, so it has significant upbow. ****!

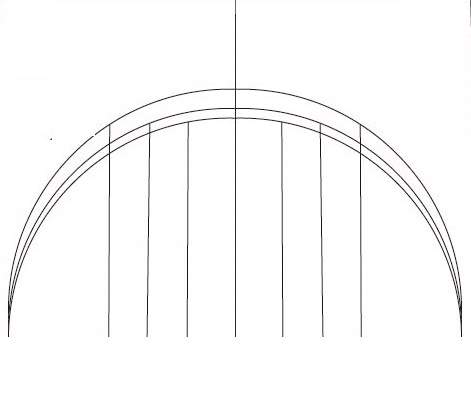
What went wrong? Turns out the radiusing router jig with the curved sled only works for parallel rails. My jig, however, has tapered rails to account for the twist parallel to string paths (which fan out towards th bridge). I noticed that the sled was sitting higher at the body end of the fretboard, but I thought I could just shim the neck and it would be ok, but it's not. The problem is that the router sled is rising higher as the rails go further apart, and it is a non-linear rise. This means that the router sled stays fairly level between the nut and 12th fret, but lifts more drastically towards the 24th. Here's a graphic to explain this mess:
radius_problem.jpg

This figure shows a centerline and three equidistant rail widths with the same radius. As you can see, the radius touching the wide rails sits significantly higher, and the radius of the medium width rails is not (!) halfway in between the narrow and the wide one. That's where the upbow comes from. And this is also why there's a flat spot at the 24th fret. Ha!

Okay, now that we've figured out the reason, let's think about what can be done, here are my ideas so far:

- I cranked the trussrod and the neck goes almost flat, but this is obviously without string tension. It likely won't have enough adjustment left to get it straight with strings on.
- Re-routing the fretboard, option I. To get it straight with a radius, I would need complex curved rails, which is difficult. Not impossible, but difficult.
- Re-routing the fretboard, option II, a flat board. Ditch the radiused sled and use the flat one. This doesn't create an upbow. IIrc, @MPU did this with his twisted build.
- Flattening it by hand. Lots of sanding and constant checking with the straight guitar string. Wenge and ebony are both very slow to sand, so this is a rather desperate solution.

If you guys have any ideas, PLEASE let me know!
 
Ouch, sorry to hear about the problem. It's never fun to get partway through something and have a significant issue.

Having said that, 2 mm is a pretty small problem in the grand scheme. If it were mine I would do option 4. You can rasp off the bulk of the material so it really shouldn't take too much sanding. After rasping go to sanding with something really coarse (60?) and then onto finer grits. You should be able to get it flat within a few hours and still maintain your original design. Having now played a flat board (my fretless) and finding it plenty comfortable, rerouting option 2 (3rd item in the list) would be my second choice.

One consideration: if the board ended up 2 mm too thin in the middle, rather than too thick at the ends, then you will need to make sure you can still get your action low enough at the bridge. Based on your diagram it looks 2 mm to thick at the ends so the better kind of problem.

Good luck!
 
rather than too thick at the ends, then you will need to make sure you can still get your action low enough at the bridge.
I haven't established the neck angle yet, so I have plenty of room to adjust the bridge height to wherever I want it to be. As long as the fretboard is straight, I can deal with it.

I think I will first try the sanding approach as you suggested. I can remove more material from the nut end than from the body end, because the top fretboard layer is getting pretty thin there at the edges. I might use the straight router sled to flatten the board around the centerline, then I'll have a reference how much I have to sand the different sections of the neck.

Looking at the bright side, this will get rid of the flat spot ;)
 
I thought of one more possible solution. Since I know that the fretboard has 2mm upbow and I can get it close to flat by tightening the trussrod, here's what I could do: Turn the trussrod the opposite way, actively increasing the upbow to 4mm. Then I mount the neck back into the jig and rout the fretboard radius again. This leaves me again with a 2mm upbow. Then I release the trussrod and the neck flexes back 2mm, leaving me with a fretboard that is close to straight. If it doesn't go back to a perfectly straight position, I could still tweak it by sanding.

I believe that this would be less work than doing everything by hand and I could get pretty close with the router. The only concern would be that the trussrod could force an uneven bow as it flexes more toward the nut than at the body end. But even if it's not perfect, it could help me remove most of the material while keeping the correct radius.
 
urn the trussrod the opposite way, actively increasing the upbow to 4mm. Then I mount the neck back into the jig and rout the fretboard radius again. This leaves me again with a 2mm upbow. Then I release the trussrod and the neck flexes back 2mm, leaving me with a fretboard that is close to straight.
Ok, forget about this idea. I cannot achieve the necessary upbow with the trussrod. Hand sanding it is.
 
  • Like
Reactions: Jeff Siddall
Dear LC,

I'm sorry that I haven't posted an update in over two months. I had a lot of things going on, including covid and a few other unrelated build projects. More about those later.

During the last days I finally had time to straighten the fretboard by hand. Luckily, most of the upbow was in the areas close to the heel and close to the nut. I took the fine side of a shinto sawrasp and started removing material from both ends of the fretboard, I followed this up with a lot of hand sanding with the mini radius block from post #98. I got it pretty close to flat, definitely less than 10/1000" of relief. I think I can deal with that when fine sanding. For now I'm calling it straight. With jumbo frets I could even take care of that during fret leveling. I don't have a new picture of the fretboard, it looks about the same as before, just straight.

Now for the other projects, I'm not gonna leave you hanging.
An amp enclosure built for a kit-built tube guitar amp, going straight to the practice space. If this pops up as "please identify this amp" on TB in 10 years, you'll know what it is.
20220413_210053.jpg


And, just to get artsy, a sculpture carved from a block of obeche:
sculpture.jpg

That's all for now, I promise the next update won't take as long.
 
The ToneMonster Red/Tweed Covid-Edition Amp - we saw it here first. :thumbsup:
ToneMonster, I like that. That logo is just my initials, but ToneMonster has definitiley more zing to it.

Fun fact: When Phil X developed his signature amp with Fretted Americana, he wanted to call it Tonemonster, but Fender threatened to sue them because it's apparently too close to the Fender "Tonemaster" trademark. Oh, Fender. In the end they called it "Evil Robot".
 
Last update for the weekend. I established the headstock angle with rasps and a sanding block. On the right you can see the ebony veneer for the front and back of the headstock. With the wenge/ebony fretboard, the black tusq nut (on the left) the ebony veneer and the gold headpieces it's gonna be a classy look.
headpiece_angle.jpg

I might have to add a small piece of maple to the end of the headstock, I have to make a template and then we'll see.
 
Weekend update: I routed the neck angle and bound the end of the fretboard. Small steps, but still progress.

For the neck angle I put the neck back into the jig with a shim under the bridge end. Then I routed the body section of the neck beam under this angle, following the twist. This should give a bout 12mm clearance for the bridge, which is good for the ABM individual bridges.
20220514_154916.jpg


And here's a better view of the actual neck angle. With this angle the body has a constant thickness on the treble side, but of course tapers towards the bridge on the bass side.
20220514_200900.jpg


And the last piece of fretboard binding:
20220514_200951.jpg


This concludes the twisted neck section of this build. From now on it will be more traditional bass building, with the headstock and body wings coming up next.
 
Last edited:
It's headstock week on my workbench. Headstock, you may ask, wasn't this going to be headless? Yes it is, but there is a little headpiece to mount the string holders on, maye 1/3 of the size of a normal headstock.

The idea of having a little headstock came after I started working on the blank, so it was a bit short. I added pieces of leftover ebony to the end:
20220521_151159.jpg


It felt a bit overkill to have a thicknessing router jig for this small piece, but here we go:
20220521_152434.jpg


And here it is with the headstock veneer glued and trimmed:
20220521_201613.jpg


The trussrod access is from the back side of the headstock. It requires a long hex key, but it looks clean from the front and back.
20220521_201640(0).jpg


The volute is still rough and chunky, I'll shape that next weekend. As an Alembic-inspired bass it will of course have a back veneer, too.
 
Guys, I have the following problem:

The back of the headstock is flat, but there is a small volute underneath the nut. I want to have a volute not for structural reasons, but as a visiual indicator "neck ends here" while playing. There will be a back veneer/backstrap on the headstock, which will have to follow the upward bend of the volute. I have some 1.5mm (1/16") ebony veneer. I have carved the basic shape on the headstock and I have a form-fitting sanding beam that I'll also use as a clamping caul, but I think it will crack if I just clamp it into the bend all the way. The bending radius is about 2".

Does anyone have experience with bending ebony? I know it's generally quite brittle, but there are ebony acoustics out there with bent sides, so it must be possible. I can think of these two options:
1. Thinning the veneer to, say, 1mm or below. I don't have a thickness sander, so I'd need to plane it with the router. That's tricky at this thickness.
2. Steam and/or heat. Steaming the veneer and then bending it into shape, perhaps using a hot metal tube. Does this work with ebony?
3. Both of the above

I'm leaning toward 2, but the problem is that once I have started bending it, I cannot make it thinner anymore.

20220522_230445.jpg
 
I made the decision to make the veneer thinner, because it was incredibly stiff. Even with heat and steam it would likely have been an uphill battle.

So I mounted it into my router planing fixture with masking tape and superglue. I was shooting for 1mm thickness, but accidentally set the router too low and ended up with 0.5mm (0.020"). I had no idea that the router fixture was this precise, but it's an even thickness all around and looks good. It's quite flexible, too.

For looks it would have been cool to have the back veneer in a similar thickness as the front, but I suppose it is much safer to bend now.
 
  • Like
Reactions: Matt Liebenau
Success! I glued the back veneer to the headstock yesterday, it came out perfect. I am so glad that I thinned the veneer, I still had to pre-bend it a bit even at 0.5mm but it was fine. I would have been absolutely miserable trying to force the 1.5mm veneer into the volute.

I cleaned it up with a scraper and sandpaper. Here it is, nice and dark:
20220524_223624.jpg
20220524_225354.jpg


The glueline came out tight, no visible gaps:
20220524_223544.jpg


This was the first time I made a backstrap. I like it, it's certainly not the last one. I'll shape the volute when I get to neck profiling. For now I call the headstock complete. On to the body wings...
 
Alright, before shaping the neck and heel I want to work on the body wings and see how they join together. Sooo, let's make some wings.

The elephant in the room is obviously the body profile. Not the shape, but the cross-section profile. The neck blank has an angle on top, and I have to blend that in with the body wings. [Invalid or Expired Link Removed] have a distinct "step" underneath the neck that allows the bottom half of the body to be at a normal thickness. I don't want to copy that design, but I admit that it's a great looking solution.

I have also been inspired by the [Invalid or Expired Link Removed], which features a very rounded body profile. Combining these two, I drew up this:
20220601_211831.jpg

It features flat surfaces on the front that are rounded to blend into the neck. On the back we have a concave radius like on a spector bass. This way I can tilt back each front of the body wings (eliminating the need for an arm contour in the process), while keeping the body at a reasonable thickness. The maximum thickness of 50 mm is on the treble (right) side just below the neck, with the edges of the body being quite thin at 15mm (bass) and 20mm (treble). I guess I will put a moderate roundover on the edges.

The only thing I haven't figured out yet is the "horns" around the bridge. Looking at this cross-section, we would have one thin and one thick horn. That could be weird, right?:help:

As you can see in the sketch, it's gonna be a swamp ash body with a rather thick wenge top. I don't actually have a wenge top, but I have an oversize wenge neck blank that has developed some cracks and splits. I don't want to use it as a neck blank, so I can cut it up to make a top. The front grain pattern is quite plain (like typical quartersawn wenge), but the side features some wild grain. Using the side, I could use three pieces per body wing, glued together with thin maple veneers. Yeah, that could work.
20220601_212115.jpg


