
• TalkBass has been independent since 1998. Add your voice.
    Create a free account to reply to discussions, view embedded media, and browse with fewer display ads.
    Join freeLog in
    Want zero display ads or expanded classifieds tools? Compare plans.

Double Bass Fingerboard traditional and innovative techniques

Sebastianus

Commercial User
May 19, 2024
7
3
Hello, My name is Sebastian I am new here

I was an pro art sculptor, than technican furniture constructer but I let it be as a boring period of my life and now I am working on guitars and also repairing some violins and trying to run business in field of violin family instruments because I truly love it.

NOW I am working on my first 3/4 double bass made from scratch going through critical part of making good fingerboard.

Methodology of fingerboard work as I did:

- Flattening my good quality radial hard wood timber and cutting out sides for basic shape of FB
- Drawing radius from template on both sides and making profile (series of cuts) on table saw for ease work on the radius
upload_2024-5-19_12-27-27.jpeg

- Planing the radius with big handplane basically connecting the top and bottom radius with straight line in the axis of strings
- Grinding the perfect flat surface with large aluminium leveling beam (with sandpaper on it)
- Making longitudal scoop depth CAD drawing giving me the exact scoop depths in various parts of fingerboard length with deepest one on the octave 2mm on E side, 1,3mm on G side.
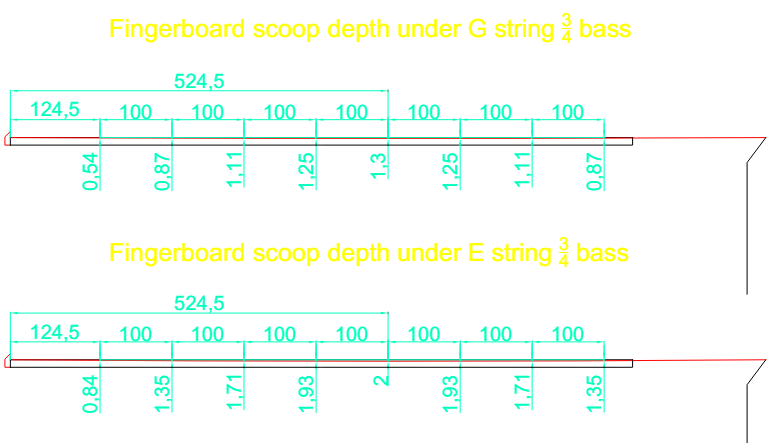
upload_2024-5-19_12-26-55.png

- Making precise depth cross grain cuts along the FB measured according to the technical drawing.
upload_2024-5-19_12-35-33.jpeg

- Handplaning rough scoop not deeper than my reference cross grain cuts, than taking off rest of scoop with scrapers.
- In this phase I made a special tool for getting exact radius of longitudal scoop preventing any peaks on fingerboard. Took an straight square iron profile and put basic corner brackets at the ends and joined them with thread rod. Tighteneing the nuts on thread rod The profile gets bended in exact precise radius.
upload_2024-5-19_12-36-35.jpeg

- I adjusted it right for the radius I need for finishing the fingerboard scoop and get a 60 grid sandpaper on it. Grinding ONLY in the axis of strings, adjusting exact arch that is required for the fingerboard scoop making it perfect.
upload_2024-5-19_12-36-52.jpeg

This is the technique I use and it is working pretty well for me.

What is your opinion on that?

 
well, it looks time-consuming and you need to make all those jigs. I'm sure you could arrive at a very accurate result but I think it would probably take longer than the traditional way. Also I suspect that working with Ebony and working with just hardwood are going to require different tooling.

Most luthiers will start with a preshaped Ebony or hardwood blank rather than starting with a square piece of lumber. The blank is oversize but close to the usual dimensions.

A trained luthier will do that shaping job with two or three planes, sandpaper and scrapers and a Straight edge. And maybe a template for each end.

I have made fingerboards from square stock but I used a jointer to remove the bulk of the timber instead of a table saw.

How are you planning on hollowing the back of the board?.
 
Yes, definitely agree it is too time consuming for pro work but I have to develop some skills with hand tools like planes and scrapers for trying to get nice result that way. Last decade I worked only on big machines for furniture constructions.

Actually is kind of design experiment with this mountain grown plumb wood with purple-red fire structure. It is definitely harder than any of classic wood species like oak or maple. Density of it moves around 800kg/m3 similar to the tropical species for guitar fingerboards like palisander, but of course it is not that hard like ebony... Also purfling is made from this plumb fun.

I don´t think I will hollow the end of the board, because when I put it on the edge of table and apply lot of force on the very end it seems to bend slightly. I will glue it now to the neck just on the edges with hide glue so it will be easy to unglue in case it will not work.

Is there possibility perhaps of supporting the weak FB with carbon rods or something like that?
 
I am not a luthier, but there are luthiers here who routinely use carbon fiber support in the double bass neck which also affects the fingerboard. Hopefully one will speak up.

Maybe you're already aware of it, but there are subtleties about the compound curve of the radius-ed fingerboard combined with relief (curve, scoop, etc.) for the length of the neck that relate to the kind of strings that are going to be used on the double bass.

For example, thick low tension strings require more relief than thin high tension strings. It's more complicated than this, but generally for each string, the relief for the length of that string's fingering track should at the octave harmonic have the depth of about the thickness of that string.

But this is one of the final fingerboard adjustments, often determined at the time that the strings are on the instrument or when the string type is changed. One of the results of too little relief is buzzing, while one of the results of too much relief is strings that are harder to stop on the fingerboard than necessary.

For critical players, having a luthier do relief touch-ups on the fingerboard with string changes wouldn't be unusual. Also, replacing a well used fingerboard may be needed in order to achieve proper relief and other proper fingerboard geometries -- so it becomes imperative to use the proper adhesive to attach the fingerboard.

Best of luck with this project!
 
You can't set the scoop in the fingerboard till the thing's joined to the neck and under full string tension.
How to simulate the string tension impact than during the scooping process?

Just glued the FB to neck and scoop seems unchanged. FB was perfectly flat before gluing. IDK but, it seems to me pretty logical that the string tension wraps the neck somehow gradually so it won´t create an single high or low trouble spot on FB, or am I wrong?

However there is an solution also mentioned by dhergert to add some carbon supports in neck or even in FB. Anyway, I will test the whole bass and see all these stuff, than dissasemble it and adjust everything before final assemble and finishing aplication.
 
  • Like
Reactions: Don Hergert
The string tension alone is only going to warp the fingerboard if the neck or the 'board, or both, is too thin. I am no luthier, but my understanding is the warp, the relief, has to be planed in as part of the finishing/set-up process. I've never heard of a bass coming from the factory with a completely flat fingerboard.

I've also encountered basses, far too many basses, where the fingerboard was heavily dressed between the nut and the fifth stop, creating all sorts of problems for getting a comfortable playing action the entire length of the fingerboard. And these were on student instruments, mind you. If you want a way to discourage a kid from playing bass . . .
 
How to simulate the string tension impact than during the scooping process?

Just glued the FB to neck and scoop seems unchanged. FB was perfectly flat before gluing. IDK but, it seems to me pretty logical that the string tension wraps the neck somehow gradually so it won´t create an single high or low trouble spot on FB, or am I wrong?

However there is an solution also mentioned by dhergert to add some carbon supports in neck or even in FB. Anyway, I will test the whole bass and see all these stuff, than dissasemble it and adjust everything before final assemble and finishing aplication.
No need to simulate string tension, just wait till the thing's strung up to tension. The actual thing is always better than a simulation.
 
  • Like
Reactions: Don Hergert
I made a special tool for getting exact radius of longitudal scoop preventing any peaks on fingerboard. Took an straight square iron profile and put basic corner brackets at the ends and joined them with thread rod. Tighteneing the nuts on thread rod The profile gets bended in exact precise radius.
upload_2024-5-19_12-36-35-jpeg.5452395

- I adjusted it right for the radius I need for finishing the fingerboard scoop and get a 60 grid sandpaper on it. Grinding ONLY in the axis of strings, adjusting exact arch that is required for the fingerboard scoop making it perfect.
OK that is super cool

i suppose one could complain that the perfect curve for the fingerboard may not in fact be an arc out of a circle but instead a section out of an ellipse (so more radius in some sections but less in others) but that is still super cool
 
OK that is super cool

i suppose one could complain that the perfect curve for the fingerboard may not in fact be an arc out of a circle but instead a section out of an ellipse (so more radius in some sections but less in others) but that is still super cool
Interesting. Do someone have some illustrations or measures of actual path of the string motion? I know from The Czech accoustics science book, there is an Helmholz string motion with bow playing that seem to be more circular and for playing with hand there is a more eliptical potencial of string motion. I can copy the illustrations from that book here:

Bow:
upload_2024-5-22_13-23-50.png

Hand:
upload_2024-5-22_13-25-44.png
upload_2024-5-22_13-26-12.png
 
  • Like
Reactions: walterw
Don't overthink it.

I make fingerboard blanks from large square blocks of hardwoods all of the time, almost always with a few simple planes, a clear head, and a steady hand. Shape a bit, string up and play some tunes on the instrument. Give it a little time to breathe, repeat. The bass will tell you everything it needs.

Home shop torrefaction of lesser woods like maple and walnut will help the hardness & stability tremendously and is easier than making a pizza.
 
Last edited: