• TalkBass has been independent since 1998. Add your voice.
    Create a free account to reply to discussions, view embedded media, and browse with fewer display ads.
    Join freeLog in
    Want zero display ads or expanded classifieds tools? Compare plans.

First Bass Build. 5 String Fretless Neck-through

I recently picked up a commission to do a fretless 5 string for a talented musician in an all-girl (mostly) Philippians based band.

This is my first bass build after 8 or so strats and teles. It's also my first neck-through.

Here's the concept based off an Ibanez which is what she wanted. I torqued the dimensions a little after tracing.
2019-04-09 11.36.09.jpg

She wanted all black but I talked her into a grey burst with tiger stripe maple.
Ebony board with black pearl inlays.
The bass clef cat is a tattoo she has.
Ash body painted black.
High figured maple neck with either ebony or walnut strips.
Scarf jointed head with body matching veneer (tbd)
Thinking about using the coiless Lace sensors. Anyone have experience with those?

I've got 2 tiger stripe maple boards to choose from arriving Monday and a trip to Woodcrafters tomorrow.

It's been awhile since my last build. Really looking forward to jumping back in.
 
I've been working this project for about 5 weeks now.
I'm capturing this build on my channel and trying to make it interesting.
I'd love to have some fellow luthiers follow along and maybe add to the convo.
Here's the first of the 5 completed episodes.
 
  • Like
Reactions: Beej
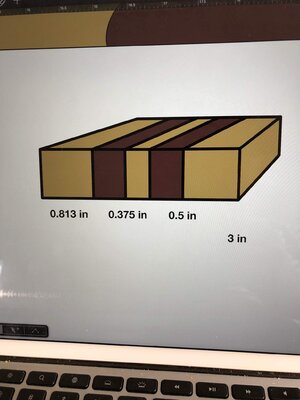
Here’s the plan for putting the neck blank together.
7E24E1E9-E284-40F9-BBAA-552D1235B379.jpeg
I used the flame maple that I got from CurlyMapleWood.com for the outside parts and of course the wenge strips. I opted for a cheaper nonfigured maple center strip.
686DE5F2-E158-44DF-BF0C-35AAEC8E409A.jpeg
Dimensioned it down to the widths I wanted with the thickness sander and clamped it up.
3F50BC12-68EC-4E2F-96FC-0E50F7B25D89.jpeg C5B26C89-94B5-4F6A-BB4A-DA5468C3419F.jpeg 80F7C720-2265-4AF1-AF8E-CA11ED08C154.jpeg
More details here.
 
  • Like
Reactions: BishopJP
I'm interested to hear everyone's best practices for executing their scarf joints on your necks.
I've never had much trust in my band saws or miter saws (much less had one that can cut a sharp enough angle) so I go strictly hand saw. But inevitably it is never perfectly executed. How do you all go about cleaning up and leveling and squaring the joining faces of your neck?
Scarf Cut.JPG Scarf Cut1.JPG Scarf Cut.JPG Scarf Cut1.JPG Scarf Cut2.JPG Scarf Cut3.JPG Scarf Cut4.JPG
 
Well that about covers every possible way to pronounce it.

Not quite! I'll finish off the list. WEN-guh, as in a germanic "e" like you'd hear in Porsche or Luftwaffe.

I cut my scarf joints with a sliding jig on a table saw. Easy to make. Produces accurate and true cuts. Blank is clamped to a cleat set at the correct angle so there's no guesswork. I clean them up by clamping in a router planing jig.
 
  • Like
Reactions: BigRyg
What I did was to glue some pine to the edges of the blank along the angle I needed to square up and used some 90 degree aluminum on that pine to create a sanding berrier. The rails didn't need to be this long. I just didn't want to cut them down in case I needed them in the future.
Scarf1.JPG

Using my repurposed sawless table saw, I used some sandpaper stuck down with adhesive spray to take the jointing face down to the rails.
Scarf2.JPG

I found that a card scraper was pretty effective to finish off the task.
Scarf3.JPG
Nice and clean, level, and consistant.
Scarf4.JPG
I'm opting to shape the head before I do the scarf joint.
What do you all do here? Shape before or after?
Scarf5.JPG

 
When you screw up and it turns out to be a good thing...

Since I made the scarf joint cut I decided to go ahead and finish shaping and finishing the head before I made the joint since it would be so much easier to work with a small and flat piece.

I had 2 designs that I templated with the laser but the one I preferred didn't quite fit what I'd left myself to work with on the neck.

I use a cnc router. In fact, this was my first time using it on a guitar build. (who else here uses cnc and laser)
So I had built a dummy replica out of pine to test the two process cut. Thinning and then shaping. You see here I had to glue on ears to add material to the edges.
CNC1.JPG

All went well with the dummy cut. Actually, I learned the lesson that just because I designed to dimension doesn't mean that the design imported into the machine software at dimension. So after a false start and false cut I went back to dimensioning.

Things were going well until my wife called me away toward the end. Evidently the piece got loose from the bed which caused the router to dig into the higher unmachined portion of the wood and snapping the $22 bit.
CNC2.JPG

So there was my opportunity to rebuild the top portion of the neck to the dimensions I needed for the preferred shape.
CNC3.JPG

CNC4.JPG

CNC5.JPG

Now to see how round 2 goes.

Spoiler alert: It went great! But that's in the next episode.