

Enjoy the benefits of a premium membership!
Upgrade Account
-
TalkBass has been independent since 1998. Add your voice.
Create a free account to reply to discussions, view embedded media, and browse with fewer display ads.
Join free Log in
Want zero display ads or expanded classifieds tools? Compare plans.
You are using an out of date browser. It may not display this or other websites correctly.
You should upgrade or use an alternative browser.
You should upgrade or use an alternative browser.
Four string fretless acoustic/electric (chambered)
- Thread starter Jisch
- Start date
More options
Who Replied?
Thanks! I'm really excited by how it's coming out so far, I am trying really hard to keep moving at an appropriate pace, it's so tempting to rush and cut corners to get to the goal line. I have to keep reminding myself that the goal is an awesome instrument, not just one that makes sound.
Today I glued up the laminate for the headstock:

And I got the floating bridge made out of ebony and ash - I am sure I'll need to adjust this as I get it strung up, the nice thing is it will be very easy to adjust things as needed. I will carve string slots in with adjustments for intonation.

I took the ash and routed a slot in it, then fitted the ebony into the slot. I am hoping this will transfer a lot of vibration through to the top - the strings will come through the top without touching it (theoretically).

I'm considering putting a cover over where the strings come through the body, but I'll have to see how they look first.
Today I glued up the laminate for the headstock:
And I got the floating bridge made out of ebony and ash - I am sure I'll need to adjust this as I get it strung up, the nice thing is it will be very easy to adjust things as needed. I will carve string slots in with adjustments for intonation.
I took the ash and routed a slot in it, then fitted the ebony into the slot. I am hoping this will transfer a lot of vibration through to the top - the strings will come through the top without touching it (theoretically).
I'm considering putting a cover over where the strings come through the body, but I'll have to see how they look first.

CHaoZ
Guest
- Jan 27, 2015
- 101
- 66
- Disclosures
- Can't even sell my stuff for what it costs in parts alone
I love how you designed the shape to follow the wood instead of making the wood fit some preconceived shape
The headstock is the same, I can't wait to cut it out so you can see the shape following the grain. I cut up a relatively large piece of wood to get that headstock laminate, which was pretty wasteful, but the result should be good.
It's kind of a lazy day here and I decided to spend some time fine tuning some things. I used a combination of sandpaper and a dremel with a sanding cylinder on it. It worked out pretty well. I like tools that take enough material off, yet allow me for control - the dremel seemed to be that for this level of tuning.
I worked out the heel, I'm coming to terms with the bolt on look, I think this is pretty close to final. I will carve in a belly curve on back and round off with a 1/2" round off bit, I'll need to integrate what I did today and the round off once I get that done. I also spent a bit of time fixing some tool marks in the neck and finalizing the shape, it's much rounder now and feel pretty good top to bottom:

This is not finalized, but I got it basically cut out. I'll need to straighten it up on the oscillating table sander:
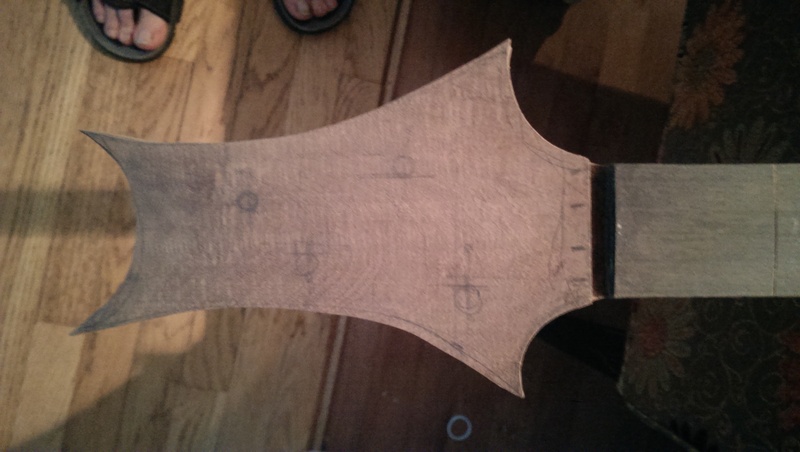
I smoothed out the back of the neck including the top near the headstock. I'm taking a bit of a risk here with no volute, I may glue something on, not sure yet:

I need to get the tuning pegs installed before I can drill the holes in the top of the body where they will come through - I could do it without them installed, I have an idea for how to plan for where they need to be.
I worked out the heel, I'm coming to terms with the bolt on look, I think this is pretty close to final. I will carve in a belly curve on back and round off with a 1/2" round off bit, I'll need to integrate what I did today and the round off once I get that done. I also spent a bit of time fixing some tool marks in the neck and finalizing the shape, it's much rounder now and feel pretty good top to bottom:
This is not finalized, but I got it basically cut out. I'll need to straighten it up on the oscillating table sander:
I smoothed out the back of the neck including the top near the headstock. I'm taking a bit of a risk here with no volute, I may glue something on, not sure yet:
I need to get the tuning pegs installed before I can drill the holes in the top of the body where they will come through - I could do it without them installed, I have an idea for how to plan for where they need to be.
Last edited:
I got the headstock shaped and the tuners mounted:

I rounded over the back with a 1/2" roundover bit. I'm not 100% sure what I'm doing on the front yet.

This is how I figured out where I needed to put the holes for the strings to come through:

Front holes installed (do you install holes?):

Maybe hard to see, but there is some serious deflection of the top with two strings on it (and they weren't up to tension). I'll need to do bracing for sure - have to figure that out, I have the bridging material - I might need to also put a bridge plate on as well:

Even with the sides clamped there was still deflection:

I am having an issue where the bridge doesn't want to stay in place, it appears that the strings should have come through from further back in the body so the pressure would be more down and less pushing. I'll need to either fasten the bridge to the body or figure out how to move the holes back and put a cover over the existing ones. Something to think about when I can't sleep. Right now I'm thinking I'm going to fasten it to the face somehow.
I rounded over the back with a 1/2" roundover bit. I'm not 100% sure what I'm doing on the front yet.
This is how I figured out where I needed to put the holes for the strings to come through:
Front holes installed (do you install holes?):
Maybe hard to see, but there is some serious deflection of the top with two strings on it (and they weren't up to tension). I'll need to do bracing for sure - have to figure that out, I have the bridging material - I might need to also put a bridge plate on as well:
Even with the sides clamped there was still deflection:
I am having an issue where the bridge doesn't want to stay in place, it appears that the strings should have come through from further back in the body so the pressure would be more down and less pushing. I'll need to either fasten the bridge to the body or figure out how to move the holes back and put a cover over the existing ones. Something to think about when I can't sleep. Right now I'm thinking I'm going to fasten it to the face somehow.

That's more like a classical bridge than an archtop. I'd glue it.
As for bracing, I'd use two parallel bars like on an archtop, with a couple of laterals dotted about
As for bracing, I'd use two parallel bars like on an archtop, with a couple of laterals dotted about

Looks great so far!
Gonna recommend full width spars again, or perhaps a modified x-bracing.
Gonna recommend full width spars again, or perhaps a modified x-bracing.
I read a lot about bracing and came up with the basic idea that there's the standard x-bracing, but lots of people who disagree about it and how to tune it. X-bracing seems to make the most sense to me, but that's just staring at it, I have no experience here. Any other votes?
Here's what I'm thinking, sorry it's a bit hard to see, but the bridge is where it will be on the top and you can see the pencil line of the sound hole. Any thoughts on this? (oh and these are just the slats I used to fill in the fret lines, I have spruce for he actual bracing)
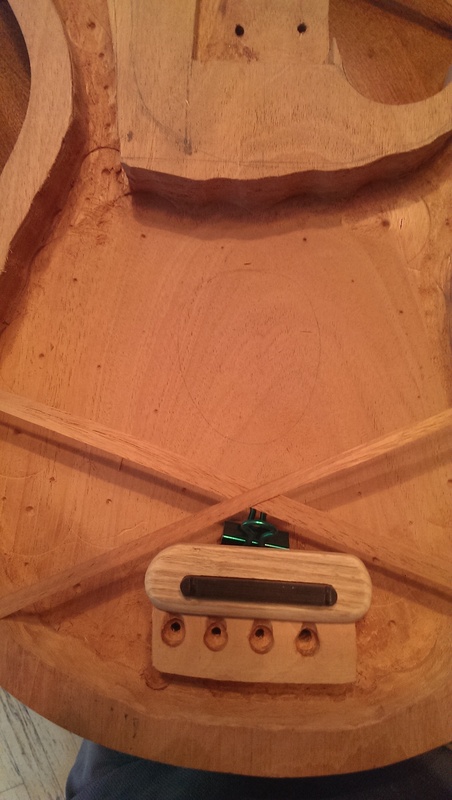
I strung it up this morning to check how the bracing would impact the deflection from string tension. With the E and G string in place and at tension there was zero deflection. I put on the other two strings (not quite up to tension) and still zero deflection. I think I'm good to go. I need to figure out how to attach the bridge. Certainly I will glue it, but I think I'll put dowels in as well. I suspect I've ruined these strings with the kinks I've put in them to do the tests, oh well, easy enough to buy another set I suppose. Stringing it is a bit more difficult than a regular bass as there is space between the ferrules in the back and the holes in the front, but it's really not that hard.
The strip of mahogany on top is just there to hold the bridge in place while I did this test - obviously the ebony is way too tall right now, so that will help things as well:
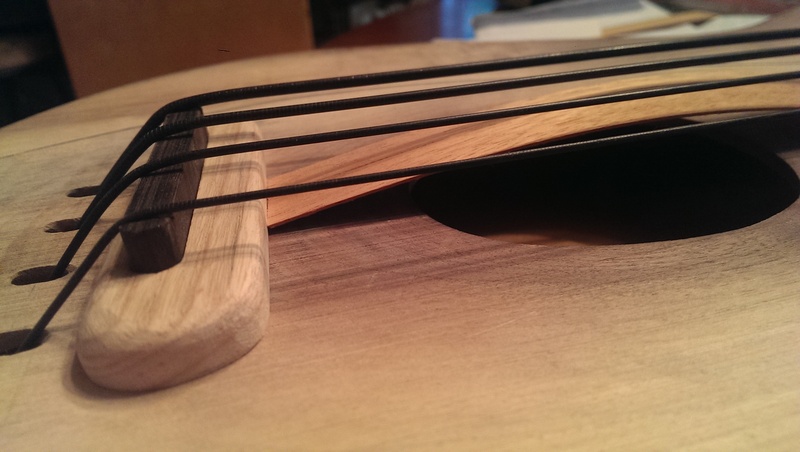

Ava has concerns:
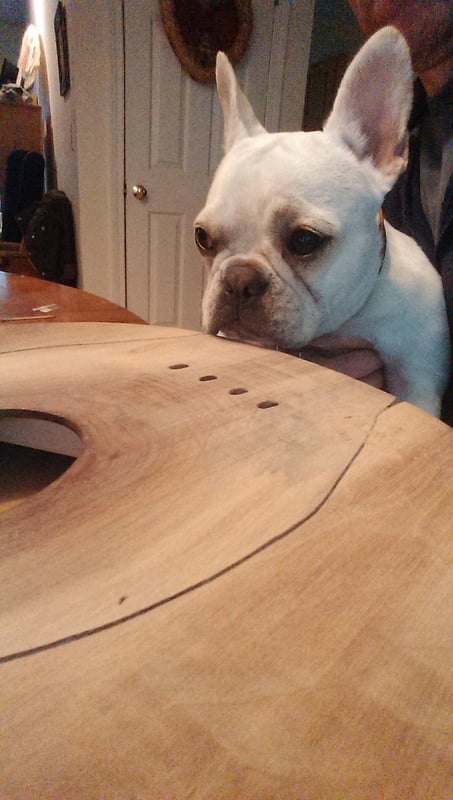
The strip of mahogany on top is just there to hold the bridge in place while I did this test - obviously the ebony is way too tall right now, so that will help things as well:
Ava has concerns:
I really would glue the bridge down, as it's more like a classical guitar bridge than a floating bridge anyway.
As for the braces, they look great! But you can definitely afford to lose a lot of that wood. Braces are strong in their height, not the overall material. If you thin them down but maintain the same height, they should be just as strong.
Super cool build!
As for the braces, they look great! But you can definitely afford to lose a lot of that wood. Braces are strong in their height, not the overall material. If you thin them down but maintain the same height, they should be just as strong.
Super cool build!
Thanks, I was planning on shaving those braces down, glad to hear confirmation that is ok to do it - leaving the height is a good suggestion that I might not have considered. I am planning on gluing the bridge down, but I was thinking adding something like dowels would help as well, I guess the problem there is that there is not much material underneath for the dowels to glue into. I guess I'm concerned that the glue alone won't be strong enough to hold it over time (though I guess I can address that down the road if I need to).
Thanks, I was planning on shaving those braces down, glad to hear confirmation that is ok to do it - leaving the height is a good suggestion that I might not have considered. I am planning on gluing the bridge down, but I was thinking adding something like dowels would help as well, I guess the problem there is that there is not much material underneath for the dowels to glue into. I guess I'm concerned that the glue alone won't be strong enough to hold it over time (though I guess I can address that down the road if I need to).
Titebond ought to hold it.
Look at guitar bracing on google images, that's the kind of profile you're going for
I looked at a lot of images before I did bracing - Probably following this thread it seems like I just went for it.
This is the image I used to approximate the width of the bracing - it's one of many that were similar. Of course my application is significantly different than this one, so I had to make adjustments. I'll scallop the bracing and thin it down on the top at a minimum. I probably should have done that before installing it on the top, but I had to make sure it would work first.
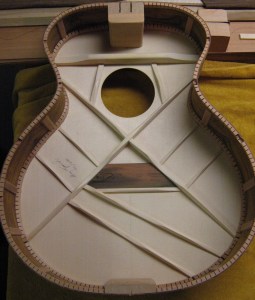
This is the image I used to approximate the width of the bracing - it's one of many that were similar. Of course my application is significantly different than this one, so I had to make adjustments. I'll scallop the bracing and thin it down on the top at a minimum. I probably should have done that before installing it on the top, but I had to make sure it would work first.

Hopkins
Commercial User
Dowels are totally unnecessary for gluing that bridge down. A good glue joint would be stronger than the wood itself, and there is very little lateral force being applied to the bridge. The string are mostly pushing down on it, which is why a floating bridge stays in place.


