• TalkBass has been independent since 1998. Add your voice.
    Create a free account to reply to discussions, view embedded media, and browse with fewer display ads.
    Join freeLog in
    Want zero display ads or expanded classifieds tools? Compare plans.

Fret Tang Grinding Machine

Bruce Johnson

Gold Supporting Member
Commercial User
Feb 4, 2011
16,066
56,978
70
Fillmore, CA
www.xstrange.com
Disclosures
Professional Luthier
On a few other threads, we've talked about working with binding on the sides of fingerboards, and the problem of notching the tangs at the ends of the frets, so they overlap the binding. There are several pliers-type tang notching tools available, but we've never really liked them. Keith has one of the Stew-Mac tools. It kind of works, but it's not consistent, and the fret ends often need some additional hand filing. And they are painful on the hands to use. All of us here in the Lab are doing more of these bound fingerboards, and we need a better way to notch frets.

So, I decided to make a special little machine just to do this job. I figured that it was best to grind the tang, rather try to clip it.
IMG_6118B.jpg


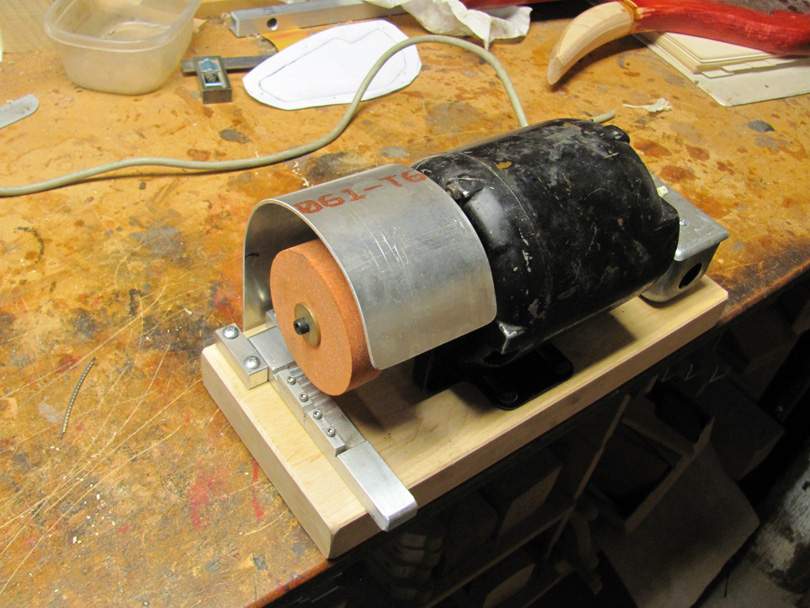
I looked in my stash of surplus electric motors, and picked out this little old Westinghouse. A nice small size, 1725 rpm, with enough power to do the job. On Amazon, I bought a 3" diameter grinding wheel for about $8. It's a replacement wheel for a Neiko Mini Grinder. In my metal lathe, I machined up an arbor from stainless steel to mount the wheel on the motor shaft.
IMG_6119B.jpg


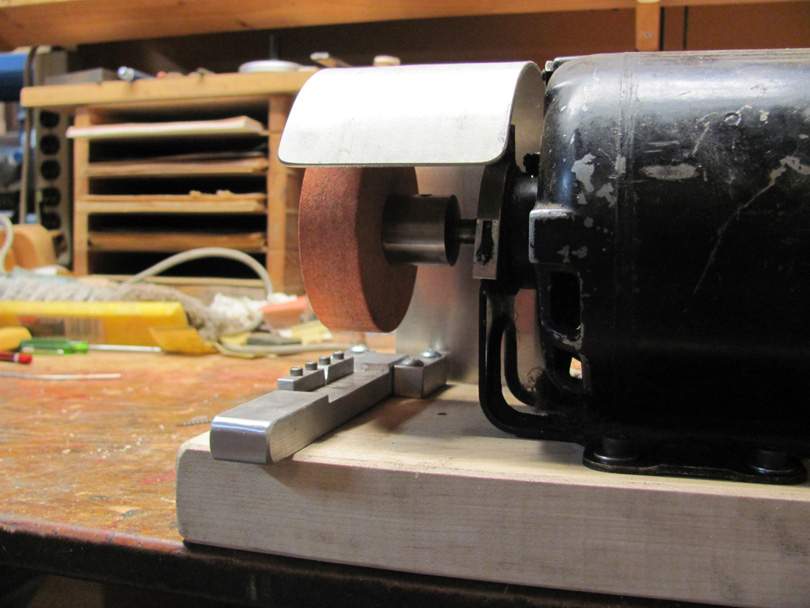
I made up this aluminum arm to hold the fret and apply it to the stone. I figured that it would be best to hold the fret, tang up, under the wheel, and lift it up into the wheel with a lever arm.
IMG_6120B.jpg


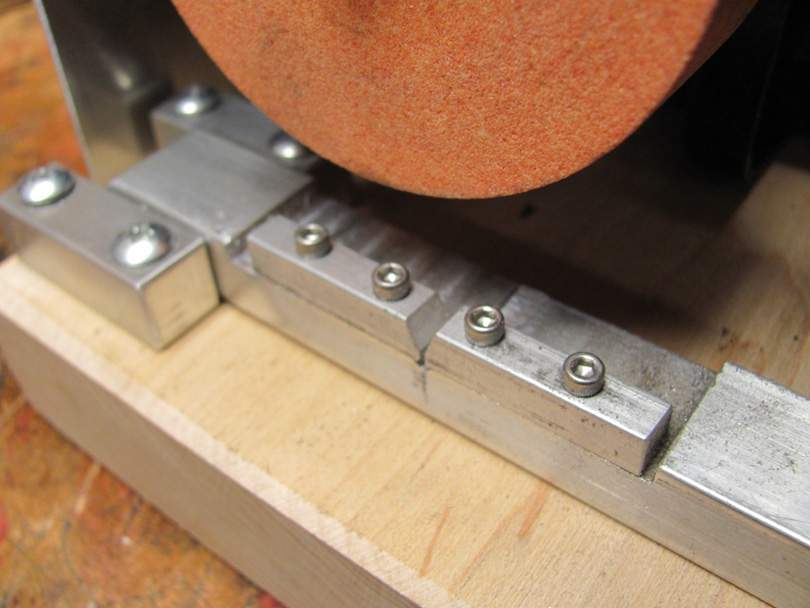
The bar has a shallow half-round notch that supports the crown. I made it by drilling a hole in the side of the bar to a fixed depth, then milling away the upper surface of the bar leaving only a shallow notch. The end of the fret stops against the end of the slot, fixing the width of the notch. Note how it's only grabbing the last 7/16" of the fret, so that the fret can be pre-curved, even to a tight radius.
IMG_6121B.jpg


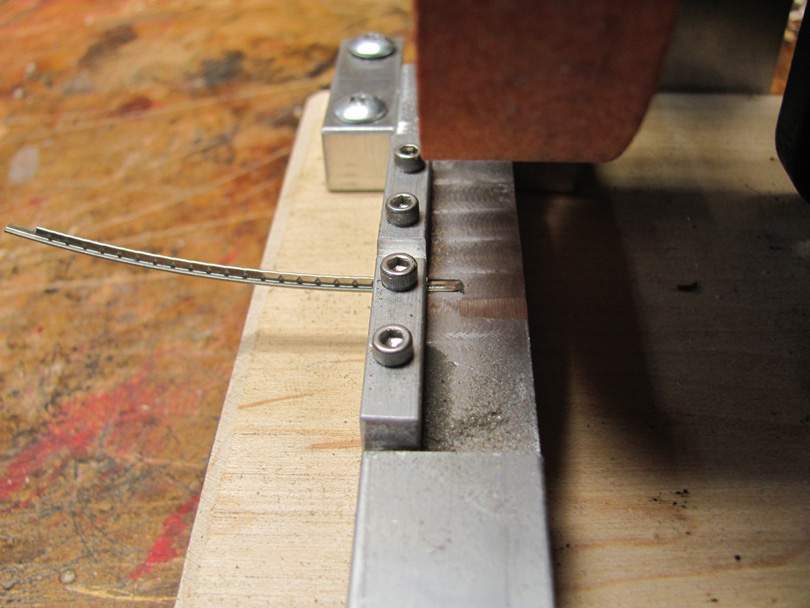
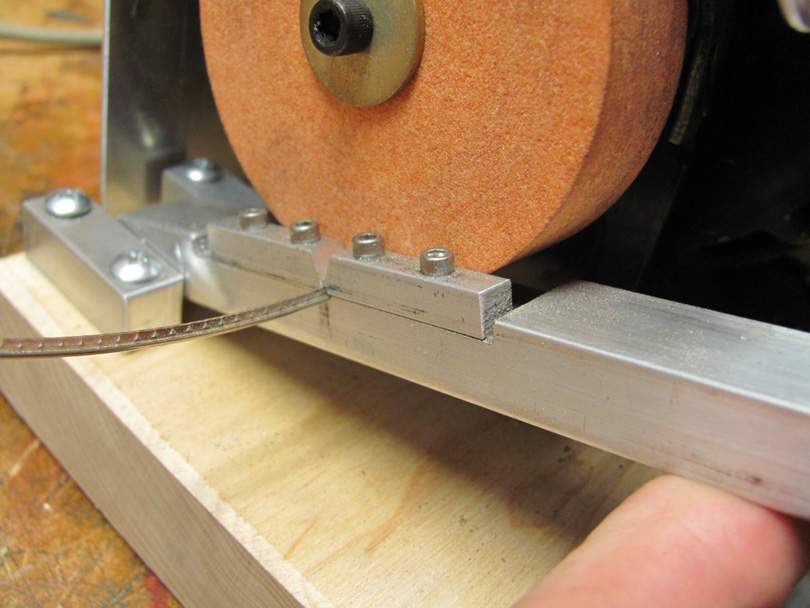
The two small blocks of 1/4" square aluminum hold the tang upright. The holes for the screws are slightly oversize, so I can adjust them over a small range to fit the tang. Lifting the end of the bar grinds the tang.
IMG_6122B.jpg


IMG_6123B.jpg


A little out of focus, but there's the result. The tang is ground off flush with the underside of the crown, at a fixed distance from the end. I did a couple, and it took only a few seconds each. That's Jescar 34080 stainless wire.

So far, so good! Keith and I both have a bunch of fretting coming up, so the machine will get some heavy testing in the next few weeks.

You are all welcome to take this idea and make your own.
 
So you have to control how far you grind? I mean is there a way to make some kind of adjustable stop for the lever. Then you could just grind until the lever reaches the stop instead of worrying if you grind too far.
How much does the fret heat? I’ve burnt my fingers more than once when grinding tangs off.
 
So you have to control how far you grind? I mean is there a way to make some kind of adjustable stop for the lever. Then you could just grind until the lever reaches the stop instead of worrying if you grind too far.
How much does the fret heat? I’ve burnt my fingers more than once when grinding tangs off.

I thought about adding a stop for the vertical travel of the lever; a bracket with a screw. But, from my testing so far, it doesn't seem to be necessary. Pressing up lightly on the underside of the lever, I can tell by the sound and the feel when the wheel has ground off the tang and contacted the underside of the crown. I think it's when the wheel touches the other side of the bar, to the right of the fret end. It kind of changes the sound. When we start running batches in the coming weeks, we'll see if we have any problems with inconsistency.

Also, when lowering the lever down, I can clearly see the area where it's ground. A quick glance before I pull the fret out tells me if it's flush. That's the main reason why I put the arm down below the wheel. You can see from the picture that it's a pretty clear view.

I haven't noticed any real heat buildup so far in the fret. No problem pulling the fret right out, reversing it, and grinding the other end. I intentionally made the bar from a good sized chunk of aluminum, so it acts as a heat sink. The end being ground is pressed right against the rounded slot in the aluminum. I guess it's working.

This wheel is a medium grit, running at 1725 rpm. It only takes about 2 seconds of grinding.

I could have gone with a larger coarser wheel, spinning faster. But I didn't want this machine to be big and noisy and irritating to use. As it is, it runs quietly and smoothly, little vibration. Pleasant to use at a bench. I also wanted to make it a small portable machine. Store it on a shelf, pull it down when I occasionally need it. The other guys can borrow it and take it over to their shops when they are doing fretting. No reason for them to make their own.

A related machine that I also need to build: A good fret wire cutting machine that will cut the rolled wire into accurate lengths for all the fret positions. Fast and adjustable. I've got it roughly sketched out in my brain.
 
Last edited:
Ingenious Gadgetry! I had the same thought about a stop, but maybe it’s overkill. With my glacial output, I’ll stick to my dremel cutoff disc, but I can see that coming in very handy in a production situation. I wonder how mass production guitar makers do it? CNC?
 
Great work - ingenious!

That aluminium clamp probably acts as a pretty good heatsink

By the way, those aluminum blocks don't really clamp the fretwire. The tang just slides between them. I'm not tightening them against the wire. I just slide the wire in and hold it while I lift the lever and grind the tang. Then pull it out and turn it around.
 
  • Like
Reactions: chinjazz
Did you try wedging the arm in place when you have it at the perfect final height, then feed wire into the slot from the side to grind from the end inward -- if you get the arm in the perfect position, you might be able to speed up the grinding process and also achieve a consistent result on every fret with less fret-by-fret judgment.
 
Did you try wedging the arm in place when you have it at the perfect final height, then feed wire into the slot from the side to grind from the end inward -- if you get the arm in the perfect position, you might be able to speed up the grinding process and also achieve a consistent result on every fret with less fret-by-fret judgment.

I appreciate your suggestion, but I think that would actually slow the process down. Lifting the fret up into the wheel with the bar is actually quite fast. And I'm not having any problem with consistency, so far. It grinds the tang down flush with the crown every time. The aluminum bar itself is acting as a positive stop, when the side to the right of the fret end touches the wheel. I can feel it quite obviously in my finger, while lifting the bar up. I may eventually have a problem with the aluminum wearing, and need to add a positive screw stop. But for now, it's not necessary.
 
Did you try wedging the arm in place when you have it at the perfect final height, then feed wire into the slot from the side to grind from the end inward -- if you get the arm in the perfect position, you might be able to speed up the grinding process and also achieve a consistent result on every fret with less fret-by-fret judgment.
This would also have some potential for more wear on the corner of the stone, I think, and anyway is using the stone in the "unapproved unless it's a cup stone manner" of grinding on the side (yes, I've done it too, but it's not how you are supposed to use a normal stone) rather than the face.
 
This would also have some potential for more wear on the corner of the stone, I think, and anyway is using the stone in the "unapproved unless it's a cup stone manner" of grinding on the side (yes, I've done it too, but it's not how you are supposed to use a normal stone) rather than the face.

Yeah, I agree. Not really an issue here, because the loads and material removal are pretty tiny. But, if you were to design the machine specifically like lethargytartare is suggesting, where the grinding action is pushing the fret sideways into a hole, then theoretically you should use a cup-style stone.

For those of you not familiar with grinding machines, cup-style grinding wheels are designed to have the grinding load applied to the side; the flange of the open side of the cup. They are designed to safely take the load that way. A regular cylindrical grinding wheel is designed to take the load only on the outside circumference. You generally shouldn't grind on the side of a standard grinding wheel. Under high speed and load, you can explode a grinding wheel that way. Which can be quite dangerous.

But in this case, I'm running a 3" diameter wheel at 1725 rpm. Not even remotely close to the danger zone. And I've found that the open side face of the wheel is handy. The clipped end of the fret is sometimes distorted enough that it won't fit into the hole in the aluminum bar. So I touch it for a second against the side face of the wheel to remove the burrs. Then, pop it in the bar and grind the tang.
 
  • Like
Reactions: T_Bone_TL
An update on this machine:

About a month ago, Keith gave this machine a workout, grinding the tangs on about 8 sets of frets. After about the first set, we noticed that a notch was wearing into the grinding wheel. Kind of a surprise; I didn't think it would wear that fast. It must be a pretty soft wheel. But not a big worry, these wheels are only about $3 each on Amazon. And I can flip it over and grind down the other side. You can see how much it's worn after the 8 sets.

IMG_6177B.jpg


But this wear on the wheel was interfering with the depth of grinding; the bar coming up against the wheel. So, I milled away the right side of the bar so it doesn't touch the wheel.

Now, there's no real stop to limit the depth or length of grinding. But Keith found that it really isn't necessary. By eye and feel, it's very easy to tell when the tang is ground off and you've hit the underside of the crown.

Also, note that we removed the forward small guide block on the guide arm. Not necessary. It's faster to just hook the crown under the rear block, hold it in place, lift the bar and grind.

After getting these bugs worked out, it was only taking him a few minutes per fret set. Clipping them by hand was 20+ minutes per set.

As he got up to speed, he was finding that the frets were heating up and burning him. He kept a cup of water there and dipped the end in before flipping over to the other end. He was doing mostly NS wire and it was interesting that the NS seemed to heat up more than the stainless. That seems odd.
 
That’s a cool tool, Bruce! I was using this little Dremel table I built a while back. The rotary tool is loaded with a tungsten-carbide tipped bit. I adjust the height by adding tape to the bottom of a grooved wooden wedge. It’s a really crude device, but the tungsten-carbide tool makes pretty easy work of the SS fret wire. I don’t know that it’s as dead accurate as your setup, and probably not too good for production. Someday, if I’m really bored, I’ll set to improving this implement.

img_5400-1.jpg


img_5401.jpg
 
Last edited:
That’s a cool tool, Bruce! I was using this little Dremel table I built a while back. The rotary tool is loaded with a carbide-tipped bit. I adjust the height by adding tape to the bottom of a grooved wooden wedge. It’s a really crude device, but the carbide tool makes pretty easy work of the SS fret wire. I don’t know that it’s as dead accurate as your setup, and probably not too good for production. Someday, if I’m really bored, I’ll set to improving this implement.

View attachment 3264790

View attachment 3264791

Cool set up Freekmagnet!

I can as thinking about getting a carbide tipped bit for my Dremel as well.

I’m curious how you mounted the dremel under the table?

I was thinking about a sideways holder for the dremel but yours looks good :)

Thanks!
 
Cool set up Freekmagnet!

I can as thinking about getting a carbide tipped bit for my Dremel as well.

I’m curious how you mounted the dremel under the table?

I was thinking about a sideways holder for the dremel but yours looks good :)

Thanks!

It’s actually tungsten-carbide. I corrected it in my text.

I basically built an 8”x10” table with a hole in it. Beneath it is a clamp that consists of two pieces of MDF with holes in them that are each sawed in half, bisecting the holes. All three holes, table and two clamps are centered. The idea is to hold the tool perpendicular to the table. I use that little table for all sorts of weird little Dremel jobs.
 
Last edited:
  • Like
Reactions: Beej and chinjazz
That’s a cool tool, Bruce! I was using this little Dremel table I built a while back. The rotary tool is loaded with a tungsten-carbide tipped bit. I adjust the height by adding tape to the bottom of a grooved wooden wedge. It’s a really crude device, but the tungsten-carbide tool makes pretty easy work of the SS fret wire. I don’t know that it’s as dead accurate as your setup, and probably not too good for production. Someday, if I’m really bored, I’ll set to improving this implement.

Yes, that's another option, using a tungsten-carbide Burr (that's what they are called) as the cutter, in place of the grinding wheel. I could switch this machine over if the wearing of the grinding wheel bothers me too much. So far, we like the way the grinding wheel is working. I'm going to be grinding three neck-sets of frets with it this afternoon.
 
  • Like
Reactions: Freekmagnet
Another update on this machine:

Because of the problems I showed above with the pink wheel wearing down quickly, I bought it a higher quality grinding wheel. This is a Norton MVBE series aluminum oxide grinding wheel, 3" dia x 1" wide, 60 grit, right out of McMasters catalog. It cost $12 whereas the pink wheel was $8.

I had to quickly machine up an adapter sleeve for it, got it mounted, and tested it out.

IMG_7566B.jpg


So far, so good. It took about 2 seconds to grind off the tang of my usual stainless fretwire.

IMG_7567B.jpg
 
Last edited: