• TalkBass has been independent since 1998. Add your voice.
    Create a free account to reply to discussions, view embedded media, and browse with fewer display ads.
    Join freeLog in
    Want zero display ads or expanded classifieds tools? Compare plans.

G2220 Mods - Part 1

I bought my G2220 for about the same price as a kit bass. So I figured that I could start learning how to work on guitars with this one. My proposed list of mods is:
- Replace knobs (complete)
- Replace tuning machines (compete here in Part 1)
- Replace pickups
- Print new truss rod cover (complete)
- Print new pick guard (compete)
- Replace bridge
- Install flat wound strings (compete here in Part 1)
- refinish body (natural wood?)
- rewire to VVT
- change to all black hardware?
- Add Straploks (complete)

Next step was to replace the tuning machines since the OEM machines hold tune for about 30 minutes. Pretty unimpressive. I ordered a set of Gotoh GB350. The stock holes were not quite big enough for the threaded barrels. So I picked up a 15mm hand reamer.


But I figured that I really wanted to make sure I stayed orthogonal to the head stock. I drew up an alignment bushing and 3D printed it, clamped it to the headstock, and carefully reamed out the holes. It did not take much at all (~1/2mm). The new Gotohs dropped right in nice and tight.
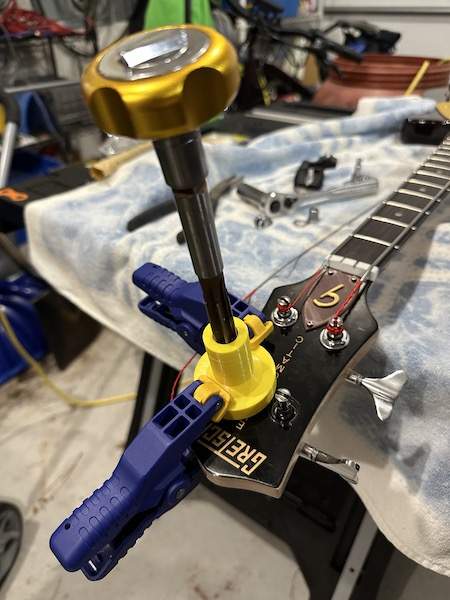
IMG_6268 copy.JPG


I then installed a set of LaBella 760FL-S Light Flat Wound strings (first time I have ever done strings--another lesson learned). I really love the way they feel on this bass--almost to the point I pick this one up more often than my Sire U5.

I was out of the country for the past month. I picked up the bass yesterday and it was still in tune. That is a huge improvement over the OEM experience I had. Very pleased with the results of both the tuners and strings.
 
  • Like
Reactions: Murch
So the next step is to look at reshaping and refinishing the body. After I do that, I will likely replace the ‘Whateverbucker” pickups with TV Jones units.

The slab body has a semi-transparent finish, and I could see that there was some interesting grain underneath the color. I also did not like how angular and uncomfortable the body edge was where my forearm would rest.
IMG_6191 copy.JPG


I marked out a relief cut based upon my other basses and what I have seen and felt. I am not ready to do all the electronics work at this point, so I bagged the rest of the body to keep most of the dust out (yeah, I know, probably not the best idea. But I figured since I am replacing the electronics at some point anyway, how much harm could I really do?!? LOL).
IMG_7126 copy.JPG


IMG_7128 copy.JPG


Interesting find. It looks like there might be mahogany on top of the basswood? I was not expecting two layers under the finish. Should I have been?
IMG_7129 copy.JPG


I kept sculpting with my random orbit and some sanding sponges until I got a profile I thought might work. It is a huge improvement in feel! I like that.
IMG_7132 copy.JPG


It even has a curve that is not too out of whack visually.
IMG_7133 copy.JPG


Now I am struggling with what to do next. I was thinking it was only basswood underneath the finish. I was going to stain it a light cherry wood color, let the grain pop a bit, and keep it as a natural finish. But now I am not sure if that grain is actually the veneer on top of the basswood? I sure would appreciate any thoughts or suggestions you might have.

Apologies in advance if I have this in the wrong location. I am happy to move it, but I would need some help how to do so.
 

Attachments

  • IMG_6268 copy.JPG
    IMG_6268 copy.JPG
    39.5 KB · Views: 40
Last edited:
  • Like
Reactions: Murch
I posted on your other thread..... No need to rehash that.

Perhaps some slight cutaways here where I put circles? I would do it slowly with a hand rasp/file so it wouldn't mess up neck pocket/bolts. but smoothing it out would be great, albeit mostly for your thumb. I remember it was a bit pointy on that corner on back of body.

IMG_6191 copy.JPG


Edit: and since you did great with the forearm cut.... perhaps a tummy cut?
 
Last edited:
I posted on your other thread..... No need to rehash that.

Perhaps some slight cutaways here where I put circles? I would do it slowly with a hand rasp/file so it wouldn't mess up neck pocket/bolts. but smoothing it out would be great, albeit mostly for your thumb. I remember it was a bit pointy on that corner on back of body.

View attachment 5002213
Thanks for those thoughts. At this point, I am delaying the edge routing and refinishing based upon what I found yesterday with the multi-layer wood body. Not sure that I want to strip it all down if that grain is in mahogany rather than the basswood underneath. I was hoping for a honey-colored natural wood body at the end of this. Darker veneer would not help me there, and taking all the veneer off would dramatically change the dimensions and I do not want to deal with laying on a new veneer.

So, at this point, I am going to keep sculpting on the arm relief to get it just right. Perhaps stain the relief a red mahogany to be close to the veneer, then cover with Tru-oil for some protection. But, I sure do appreciate any other input from more experienced folks.
 
  • Like
Reactions: mrperkolator
Thanks for those thoughts. At this point, I am delaying the edge routing and refinishing based upon what I found yesterday with the multi-layer wood body. Not sure that I want to strip it all down if that grain is in mahogany rather than the basswood underneath. I was hoping for a honey-colored natural wood body at the end of this. Darker veneer would not help me there, and taking all the veneer off would dramatically change the dimensions and I do not want to deal with laying on a new veneer.

So, at this point, I am going to keep sculpting on the arm relief to get it just right. Perhaps stain the relief a red mahogany to be close to the veneer, then cover with Tru-oil for some protection. But, I sure do appreciate any other input from more experienced folks.

Use it to make a template... Then you could remake the body any way you want.
 
Thanks for those thoughts. At this point, I am delaying the edge routing and refinishing based upon what I found yesterday with the multi-layer wood body. Not sure that I want to strip it all down if that grain is in mahogany rather than the basswood underneath. I was hoping for a honey-colored natural wood body at the end of this. Darker veneer would not help me there, and taking all the veneer off would dramatically change the dimensions and I do not want to deal with laying on a new veneer.

So, at this point, I am going to keep sculpting on the arm relief to get it just right. Perhaps stain the relief a red mahogany to be close to the veneer, then cover with Tru-oil for some protection. But, I sure do appreciate any other input from more experienced folks.

OH! Yeah sorry I missed that bit on the mahogany veneer. As I stated in the other thread.... woodworking is not my strong suit when it comes to repairs/mods. wiring? I got ya.
 
OH! Yeah sorry I missed that bit on the mahogany veneer. As I stated in the other thread.... woodworking is not my strong suit when it comes to repairs/mods. wiring? I got ya.
Excellent! I am a mechanical engineer so don't believe in electrons. When I get to the VVT mods, I might ping you. I did see the post by @Kev1955 about the pot shafts. If it gets to that, I can quickly draw up and 3D print any spacers or bushings I need to make stuff fit.

I think that refinishing the entire body is off the table for right now. Once I get the geometry of the relief the way I want it, I will likely stain the basswood--either a dark mahogany to try and match the veneer, or perhaps something more red to match the rest of the body. But there is also always the option of a lighter stain to pretty up the contrast. Not sure yet. I have a little time to decide.
 
  • Like
Reactions: mrperkolator
Excellent! I am a mechanical engineer so don't believe in electrons. When I get to the VVT mods, I might ping you. I did see the post by @Kev1955 about the pot shafts. If it gets to that, I can quickly draw up and 3D print any spacers or bushings I need to make stuff fit.

I think that refinishing the entire body is off the table for right now. Once I get the geometry of the relief the way I want it, I will likely stain the basswood--either a dark mahogany to try and match the veneer, or perhaps something more red to match the rest of the body. But there is also always the option of a lighter stain to pretty up the contrast. Not sure yet. I have a little time to decide.

VVT mod would be insanely simple if you keep current pickups. Just follow a jazz bass single coil diagram. Squint a bit so the jazz pickups look fatter and shiny. Only thing you can get wrong with single coils is polarity.... and then you just swap the + and - leads. OH!!! that wont work with the current G2220 pickups as they are likely similar to the rest of us, and are both bridge pickups. So no RWRP. Humbuckers could be fun with wiring though. Then you can play with stuff.
 
I posted on your other thread..... No need to rehash that.

Perhaps some slight cutaways here where I put circles? I would do it slowly with a hand rasp/file so it wouldn't mess up neck pocket/bolts. but smoothing it out would be great, albeit mostly for your thumb. I remember it was a bit pointy on that corner on back of body.

View attachment 5002213

Edit: and since you did great with the forearm cut.... perhaps a tummy cut?
What I do with my bolt on necks is do a bevel from where you have it circled. It gives easier access to the upper register. You may have to get some shorter screws.
bass.JPG
 
What I do with my bolt on necks is do a bevel from where you have it circled. It gives easier access to the upper register. You may have to get some shorter screws.
View attachment 5002401
Thanks. At this point I am not making any mods to the back. Also, my skill level is still keeping me much further out the fretboard than that area. I could see, however, that making some relief around the neck bolts could be beneficial. I appreciate the feedback.
 
  • Like
Reactions: mrperkolator