• TalkBass has been independent since 1998. Add your voice.
    Create a free account to reply to discussions, view embedded media, and browse with fewer display ads.
    Join freeLog in
    Want zero display ads or expanded classifieds tools? Compare plans.
Help teach Jeff Berlin BBQ!

The real question is, does anyone make a nice offset that's not a 'trailer rig' in size or price. You know...
Dave Klose out of Texas makes a great pit.
http://www.bbqpits.com/
Horizon out of Oklahoma makes a good pit also.
Invalid Link Removed
Teach Jeff BBQ Lesson #1a continued...
Another pit worth considering is a ceramic cooker. These are very heavy ceramic cooking chambers that use a small fire in the bottom. They can be used as grills (direct heat) or a diverter stone can be placed over the coals for indirect heat.
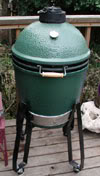
BGE.jpg

They are very efficient in terms of fuel consumption. They use lump charcoal and wood chunks or chips. One neat thing I like about a ceramic cooker is that you can get them very hot for searing steaks or grilling pizza or bread. They will also run for at least 15 to 20 hours without any tending. Big Green Egg, Primo, and Kamado are a few manufacturers. A pizza on a stone at 650 degrees is awesome off of these pits.
Another way to go is the lazy man's cookers. These are gas, electric, and wood pellet cookers. Pellet and electric cookers will give you a light smoke flavor. Gas and the type of pits with the coals in the same chamber as the meat (bullets and ceramics) will give you a medium smoke flavor. Offset pits give you the deepest, richest smoke flavor.
Jeff's BBQ lesson #1b... Fire control.
Perhaps the most important thing one needs to master when cooking on any type of pit is proper fire control. The most common mistake of beginners is they light too much fuel, the pit gets too hot, then try to close the pit up to control the temperature. This leads to a smoldering fire and can make the meat bitter tasting. A small, hot fire will always give you the best flavor.
As wood heats up, the first thing that happens is the moisture is driven off in the form of water vapor. This happens between 200 and 400 deg f. The wood will begin to char and you will see a white cloud coming out of the exhaust. This cloud is condensed water from the steam and will become less dense as the water is “boiled off” and the wood approaches 450 deg. F. Once the water is gone, the wood expels yummy gases between 550 and around 750 deg F. These gases are what gives smoke it’s pleasant aroma and flavor.
{Smoke, occurring in the “bbq” range of temperatures, is laden with compounds like vanillin (sweet scent), isoeugenol (clove-like scent), acetic acid (vinegar), and dozens of others that make up the flavor profiles of the different types of wood.}
Between 750 and 950 deg, most of the desirable gases are beginning to get completely broken down and above 950 deg. F. there’s very little left but carbon monoxide. At this point the wood has been converted to almost pure carbon and provides plenty of heat but no flavor.
This is important because a fire that is not burning hot enough will cause an undesirable yellowish or grayish smoke. The dark colored smoke is full of large droplets of tars and unburned chemical vapors (sometimes called creosote) that will condense on your meat and produce a bitter taste. The goal is to build a small, hot fire that feeds your cooking chamber. A good bed of coals is necessary to finish the process of converting heavy particulates and tars into desirable gases as they pass through the layer of heat above the coal bed.
Rule#1 for beginners...Always leave the exhaust wide open and control the temperature where the air comes into the pit. More later, I've got to run chord inversions now.
Squirtle
 
:D
Dave Klose out of Texas makes a great pit.
http://www.bbqpits.com/
Horizon out of Oklahoma makes a good pit also.
Invalid Link Removed
Teach Jeff BBQ Lesson #1a continued...
Another pit worth considering is a ceramic cooker. These are very heavy ceramic cooking chambers that use a small fire in the bottom. They can be used as grills (direct heat) or a diverter stone can be placed over the coals for indirect heat.
BGE.jpg

They are very efficient in terms of fuel consumption. They use lump charcoal and wood chunks or chips. One neat thing I like about a ceramic cooker is that you can get them very hot for searing steaks or grilling pizza or bread. They will also run for at least 15 to 20 hours without any tending. Big Green Egg, Primo, and Kamado are a few manufacturers. A pizza on a stone at 650 degrees is awesome off of these pits.
Another way to go is the lazy man's cookers. These are gas, electric, and wood pellet cookers. Pellet and electric cookers will give you a light smoke flavor. Gas and the type of pits with the coals in the same chamber as the meat (bullets and ceramics) will give you a medium smoke flavor. Offset pits give you the deepest, richest smoke flavor.
Jeff's BBQ lesson #1b... Fire control.
Perhaps the most important thing one needs to master when cooking on any type of pit is proper fire control. The most common mistake of beginners is they light too much fuel, the pit gets too hot, then try to close the pit up to control the temperature. This leads to a smoldering fire and can make the meat bitter tasting. A small, hot fire will always give you the best flavor.
As wood heats up, the first thing that happens is the moisture is driven off in the form of water vapor. This happens between 200 and 400 deg f. The wood will begin to char and you will see a white cloud coming out of the exhaust. This cloud is condensed water from the steam and will become less dense as the water is “boiled off” and the wood approaches 450 deg. F. Once the water is gone, the wood expels yummy gases between 550 and around 750 deg F. These gases are what gives smoke it’s pleasant aroma and flavor.
{Smoke, occurring in the “bbq” range of temperatures, is laden with compounds like vanillin (sweet scent), isoeugenol (clove-like scent), acetic acid (vinegar), and dozens of others that make up the flavor profiles of the different types of wood.}
Between 750 and 950 deg, most of the desirable gases are beginning to get completely broken down and above 950 deg. F. there’s very little left but carbon monoxide. At this point the wood has been converted to almost pure carbon and provides plenty of heat but no flavor.
This is important because a fire that is not burning hot enough will cause an undesirable yellowish or grayish smoke. The dark colored smoke is full of large droplets of tars and unburned chemical vapors (sometimes called creosote) that will condense on your meat and produce a bitter taste. The goal is to build a small, hot fire that feeds your cooking chamber. A good bed of coals is necessary to finish the process of converting heavy particulates and tars into desirable gases as they pass through the layer of heat above the coal bed.
Rule#1 for beginners...Always leave the exhaust wide open and control the temperature where the air comes into the pit. More later, I've got to run chord inversions now.
Squirtle

Well done Brother!
 
For fajitas, make a marinade of beer and grapefruit juice. Your fajitas will be tender as veal!

Brisket, chicken, and ribs should all be done with a dry rub. Never, ever apply sauce while cooking. Sauce should be served at plating, on the side.

Cook these meats low-n-slow. If you don't have ready access to mesquite, buy some mesquite chips at the store. There is no better wood for bbq!

"Barbeque makes old ones be young. Barbeque makes everybody someone! If you're feelin' puny, and don't know what to do, help yourself to some meat. Eat some barbeque!" -- Rob't Earl Keen.

Cherie :)
 
If I'm grilling a steak I like to use misquite ,it gets nice and hot. If I'm smoking which is what I do about every weekend ,I use soaked hickory and regular old Kingsford charcoal.
My standard temp for eveything is 225. Brisket & butts I'll let go for 12-14 hrs depending on size.Ribs about 5 hrs.Chicken 1/4's between 2.5 to 3 hrs.
I use the same rub for everything, I can't give you the exact amounts because I don't measure anything.....but it's Spanish paprika,salt,pepper,garlic powder,onion powderand light brown sugar.If at all possible, dry rub the meat the night before you plan to smoke .
 
Fuels and Wood...
The two most common fuels for bbq are charcoal briquettes and lump charcoal. Wood that has been partially burned, long enough to burn off the moisture and other unwanted substances, is called lump or hardwood charcoal. It is almost pure carbon and produces very little ash. Charcoal briquettes are lump charcoal that had been pulverized and has other types of coal and binders added, then shaped in molds to be uniform in shape and size. It leaves quite a bit of ash when burned. Briquettes will burn longer and cooler than lump and gives a light smoke flavor. They are more suited to longer cooking sessions like ribs or turkeys. Lump will burn a little hotter, light quicker, and have very little smoke flavor. It is primarily used for high heat grilling though it can be used for extended cooks. A charcoal chimney is a good way to start your fuel. It holds about 70 to 90 briquettes.
There are quite a few ways to get the charcoal started in a chimney.

1.Crumple two sheets of newspaper and stuff them in the bottom section, then light the newspaper. The coals will be ready in 20 to 30 minutes.
2.Roll up the newspapers and form them into a circle (like a doughnut). Put the paper into the bottom section and light. The airflow in the center will make the charcoal light quicker. Add a little cooking oil to the paper to speed things up even more.
3.Place a starting cube or fireplace starter stick under the chimney to eliminate the need for paper.
4.Add a few handfuls of wood chips in with the charcoal and you’ll be cooking in even less time.
I rarely use starter fluid. Many people claim that the food will have a chemical taste to it if starter fluid is used. I guess it's all in how sensitive your taste buds are. If I wait at least 30 minutes after lighting, I've never tasted the chemical taste.
Another type of fuel that is gaining in popularity is wood pellets. These are compressed sawdust pellets that are used in a pit with an automatic feeder to maintain a constant temperature. These pellet cookers have the advantage of being a “set it and forget it” cooker. You put in the meat, fill a hopper with sawdust pellets, flip the switch, and come back ten hours later and your brisket is done. The produce a nice color on the meat, and a very light smoke flavor (the biggest complaint I here about these cookers is there is not enough smoke flavor). I've cooked on many different pellet cookers and have never had enough smoke flavor for me. Gas and electric, well... that's not really bbqing, is it.
Wood Selection.. I usually don't try to match a wood flavor with a type of meat. I think that's usually a bunch of bull. The way I like to look at wood is by how strong the flavor is given a constant temperature. You can use almost any hardwood for smoking. The rule of thumb is that if the tree produces nuts or fruit, you are pretty safe using it. I've found (for me anyway) hickory is the strongest. Next on my list comes oak, pecan, cherry, apple, then alder. Alder is commonly used for fish because it's mild. Cherry and apple gives me a sweeter flavor. Cherry gives me a deep red color. Oak and pecan are probably my favorites, I use as much as I want on everything. Hickory I like to limit to about one third of my smoke flavoring. Most often I use a blend of woods. Hickory for that sharp tast (think Bacon). Cherry for the color, Pecan is in the hickory family but it's milder. Oak smells awsesome. Mesquite is a good wood for grilling. I find it way too strong for classic bbq smoking. There are dozens of other woods for cooking depending on where you live. Here in Kansas City, you can't swing a dead cat without hitting an oak or hickory tree.
Well it's time for ear training. Maybe we'll go over meat selection In “Teach Jeff to BBQ Lesson #3).
 
Around here (Kansas City), ribs are pork ribs. There are usually three different types of ribs sold around here. Spare ribs are the largest and come from the rib cage section that is joined at the breastbone. Back, or loin ribs are cut from off of the spine and are the other half of the hog's rib. Where the rib cage joins up with the shoulder, there are a few very short ribs that butchers leave some extra meat on and they call them Country Style ribs. If these tricky butchers keep the band saw running and cut up the shoulder into strips, they will package these as country style ribs also. They are not ribs at all but are still good eating when cooked long enough. Here is some country styles. The loin cuts can be grilled, the shoulder countries are best if slow cooked a longer time to break down. The loin sets on top of the back ribs so the meat on the true country styles is tender. On the fake countries, you can see the bone running through the middle of the alleged rib. This is the blade bone from the shoulder. The shoulder muscles gets quite a workout on a pig and so the meat is tougher than the loin muscle which is mostly just along for the ride.
Countrystyleribs.jpg

When buying spares or back ribs, look for slabs that have no bones showing on top. We call these “shiners”. If the slabs come in cryovac, a little fluid in the package is OK but there should not be any bubbles in the fluid. This means that the bacteria is multiplying at a pretty good rate and the meat is well on it's way to being spoiled. If I buy any meat that was wrapped in your supermarket in those little trays with thin plastic, I always pop a hole in the plastic and smell it. If it smells OK,(there should be almost no odor in fresh pork) I buy it. If it stinks I give it to the butcher and tell him it's going bad. If he's honest, he appreciates it. If he's not honest, he waits until I'm gone, calls me an ass@#$% and re-wraps it to sell to someone else. (Just a word here about an alarming trend in the meat industry. Meat producers have been slowly introducing meat that has been pumped full of saltwater. It's common now in the poultry and pork industries and is working it's way into the beef markets. The next time you buy meat, check the label, it might say “Flavor enhanced or Tenderness guaranteed, or Moistness enhanced”
The manufacturers inject a solution of sodium phosphates and water and various other chemicals into meat. I've seen it as high as 12 percent. So you are usually getting 90 percent meat and 10 percent salt water. They make more money because water is cheaper than meat, and the meat can stay on the grocery shelves longer because it is a way of preserving meat. The grocers have less waste. Just remember this...MEAT SHOULD NOT HAVE AN INGREDIENTS LIST !!!!! It makes me an angry bass player. If you can only get enhanced meat you may want to cut back on your salt in your rub recipe.)
Now, you've got your slab. Turn it back side up and you will see a membrane. Take the handle of a spoon and shove it between the membrane and one of the bones. Pry the membrane up until you can grip it with a paper towel and pull the membrane off. Take a little oil and rub the slab with it. You want to make a surface that the rub will stick to. Some people like a little mustard for this step. It's a good glue and you won't taste the mustard after it's cooked.
Basic BBQ Rub
1 cup brown sugar
1/3 cup Lawry's seasoned salt
2 T. paprika
1 T garlic powder
1 T onion powder
1 T black pepper
1 T chili powder
1 tsp lemon pepper
2 tsp cumin
1 tsp cayenne
This is a basic BBQ rub that I would use on most meats. You can change it up to suit your own taste. For example, for pork, I would add more cumin, for brisket I might add celery salt or ground celery seed. For chicken, I'd add rosemary or thyme, sage, or whatever I liked. I like a little allspice in my rib rub. Try it out, then play with it. Everyone has different tastes. Sprinkle the rub on the slab, top and bottom so it's well covered. The longer the rub sets on the meat, the more flavor you will get into the meat's interior. I like to let it marinate in the rub for about an hour. This will give you time to get the smoker going. Get a good bed of coals going, then add some wood. I use a ratio of about 90 percent charcoal (briquettes, lump, or coals from wood) to 10 percent seasoned wood chunks or logs. In a small backyard pit, two or three wood chunks the size of your fist will be enough. Set up your pit for indirect cooking and shoot for a temperature range between 250 and 275 degrees F. Remember..keep that exhaust open and control the temperature with the air intake. If you are a beginner like Jeff, let that pit run for about 45 minutes with the exhaust wide open and the intake halfway open. If your pit temp is where you want it, remember how much fuel you started with. If the temp is too low, or too high, you will know how much more or less fuel to start with next time. You are going to maintain your pit temp with the correct amount of fuel and use the vents to fine tune the temperature maybe plus or minus ten to twenty degrees. If you need greater adjustments you should manipulate the coals. Adding or removing some. Now your pit is around 250 and you are set up for indirect cooking with just a wisp of smoke coming out of the exhaust. Slap them ribs on bone side down. Let them cook for about two hours so that the rub sets up and the ribs start to look a little dry. At this point you need to decide if you are a sprayer, or a baster. Some like to make up what is called a mop. It's a liquid baste that is mopped on during cooking to help keep the meat from drying out and add a little extra flavor. You can find lots of mops on the internet. I am a sprayer. I like to fill a spray bottle with apple juice and spray the ribs every 20 minutes. The water in the juice helps moisture retention and the sugar in the juice helps form a nice bark, or crust on the meat. I like to turn the ribs every once in a while to spray the bottom also.
Depending on whether you bought spare ribs or back ribs, they will take from four to six hours to cook.
If you cook a slab of back ribs that runs about 2 to 3 pounds it may take around four hours. A big old five pound slab of spare will take a lot longer. The one thing that will separate you from the pack of backyard bbqers is the ability to tell when the meat is done.
Method 1
After 3 hours into the cook, grab the slab with your tongs halfway up the slab so that you are holding it from one end. Notice how the end that hang down is stiff. As you get towards the end of the cook, there will be less bounce as you pick the slab up. The slab is done to perfection when you pick up the slab this way and the end will droop and you see the meat start to develop a crack as the meat pulls away from the bone.
Method 2
Take a toothpick and poke the ribs between the bones. Do this a few times while you are spraying towards the end of the cook. You can feel the resistance the meat offers as you slide the toothpick in and out. As you get closer to the end of the cook, the resistance will decrease. When the ribs are done, there will be very little resistance. It will feel like going into warm butter.
Method 3
Get a meat thermometer and pull the ribs off at 205 degrees F. Make sure the thermometer is accurate. Check it in boiling water. Get a pot of water to a full boil. Insert the thermometer. It should read 212 degrees at sea level. If you are not at sea level, here is a Boiling Point calculator.http://www.csgnetwork.com/h2oboilcalc.html

If you want sauce you can apply it now and put the ribs back on for about 10 minutes to set the sauce up.
 
Brisket – One Tough Hombre
Back in the old days, they used to boil it into submission. It wasn't fit for the grill. In Ireland as far back as the 1600's, they would “corn” it (let it cure in salt for a few days) before they boiled it. More recently, a German butcher in Texas, tossed a brisket into a smoker that he used for smoking sausages and Texas BBQ Brisket was born. Before then, the brisket was cut up for stew meat and such. Anyway, that's the most common legend.
If selecting a brisket for bbq, you should try to find what's called a “packer cut”. This will have two large muscles separated by a layer of fat and comes sealed in cryovac. Here in KC, you can get them at Sam's Club or Costco. DO NOT BUY A TRIMMED BRISKET. You will need the fat left on to protect the meat. Don't worry about your diet, you'll trim off the fat after the brisket is cooked. Beef is graded by quality. Prime is best, choice is next, then comes select. Most of the beef you buy in grocery stores is select beef. Most of the prime beef is sold to restaurants or shipped to Japan, They like beef a lot over there. They've been eating nothing but fish and pickled vegetables for thousands of years. The Sam's and Costco sells choice beef here. Try to find choice if you can. If you can't, select will do.
Look for a brisket with hard, white fat and as much marbling as you can get. The bottom half of the brisket is called the flat. There should be very little fat on this side. The top half of the brisket will be covered in fat. At one end, under the fat will be another, rounder muscle called the point. This “point” is what you will make “Burnt Ends” out of. The “flat” will be used for slicing. Cooking is pretty simple. Trim the fat side down leaving about ½ inch of fat on top. Rub some oil or a thin layer of mustard all over, top, bottom, and all sides. Sprinkle heavily with bbq rub. You can leave it marinate in this rub overnight for more flavor if you like. Get the pit going at 250 degrees with a few wood chunks.
Put the brisket on fat side down. Remember from Jeff's last lesson...LEAVE THE EXHAUST OPEN, adjust your temp where the air comes in. After about four hours spray with apple juice every half hour. The hardest part of cooking a brisket is keeping your pit temp up for the length of the cook. Depending on the size of the brisket, it can take anywhere between 10 and 16 hours. You can add a few wood chunks every hour or so during the first half of the cook for smoke flavor. When is it done??? Take your meat thermometer
(that you checked in boiling water from your rib cook) and check the internal meat temperature in the center of the flat after 8 hours into the cook. It will read anywhere from 160 to 170 or so. The brisket will be done at around 200 degrees internal. You will just check it every 20 minutes or so towards the end of the cook. WARNING: If you check the temp during the cook and come back two or three hours later and it still reads the same temperature, do not panic. After you place your brisket on the pit, it will increase from room temperature to around 165 degrees (plus or minus 5 degrees or so) in three to four hours. Then the temperature will get “stuck” in what we call a plateau. This is normal. Nothing is wrong with your pit. Just keep it at 250 degrees and after another four or five hours, the temperature will start to climb again. There is no “perfect” done temperature. I always go by feel. Kinda like the toothpick test in Lesson#3. At 190 degrees, take your meat thermometer or a metal skewer or something similar, and insert it into the center of the brisket flat from the top. There will be some resistance going in and as you pull it out, the brisket will lift off the grill slightly. The longer you cook it, the easier it will slide in and out until at some point it will slide in easily and the brisket will not ”hold on” as you pull it out. Sounds a little complicated, but once you do it, it will be obvious. The final temperature will vary slightly, but it usually occurs at around 200 to 205 degrees. This will give you brisket that you can slice thick like we do in competitions. For slicing thin and piling high on a sandwich, I would take the brisket off a little early. Some restaurants will stop cooking at around 190 degrees. That way the meat won't fall apart as they run it across a meat slicer. But they slice very thin so it is easy to chew.
Now that the brisket is off of the pit, let it rest for a half an hour. Turn it fat side up and trim the fat off. The flat and the point can be separated now. Just find the fat layer between the two and run a knife through it. Scrape all of the fat off of the separated flat and point. Slice the flat across the grain to make sandwiches. Cut the point into 1 inch cubes. Sauce up the cubes and put them back on the pit with some smoke for an hour for some “Kansas City Burnt Ends”. Now I'm a hungry bass player.
 

Latest posts