• TalkBass has been independent since 1998. Add your voice.
    Create a free account to reply to discussions, view embedded media, and browse with fewer display ads.
    Join freeLog in
    Want zero display ads or expanded classifieds tools? Compare plans.

Losing Confidence

Well I am in the very final stages of completing my first bass. I would have regarded myself as a reasonable tools worker going in and pride myself on taking time, pre planning and being very well researched.

This build has pushed every ounce of my skill (lack thereof) and i have had to fix up that many errors that i am almost at the stage of not being able to complete the project successfully.

My major errors were,

Design body scale too small overall
Cavity is a mess lol
neck pocket too large
finishing flaws...many
finish sanding
major tear out of knob holes (did this last night and I am wrecked lol)
slight pickup cavity errors
recesses for neckbolts too large and uneven
recess for battery box messy

My biggest mistakes were:
Starting with expensive/rare/special wood
finishing too early (I stupidly finished before pickup cavities and knob holes were completed
rushing..rushing..rushing..rushing..
I don't mean rushing as in cutting corners but more just having high expectations that i could get things done ok. For example in finishing When i dyed the body a fair few flaws were exposed. I did not go back and resand and remove these minor flaws and in final finishing they are greater....I now understand that the prep work prior to stain has to be perfect. so that finish staining can be correct.

Anyway i could ramble on...My main problem is that i have accumulated some really exciting and interesting hardware and electronics (also very expensive) and some beautiful wood for another two builds but my confidence in building has really wavered greatly.

My aim is to build a Wal copy 6 string. I have roughed out number 2 but i am struggling to find the confidence to go again...My issue is that i have really cool custom multicoil pickups and an ACG EQ01 preamp sitting here looking at me..

Any motivations, advice or musings would really help
 
90105211_238103707327754_8051941886081892352_n.jpg


This is not very long ago since this stage i have done the pickups and ripped some lovely big tears for the knobs..that the knobs don't hide so that is cool...not

This photo is much better than the flesh..kind of the wood is truly special and i regret so deeply that i have not done it the justice it deserved
 
That's a beauty! :thumbsup:

We got your back, man. This community will be here for you if past experiences are any indication. :D

Everything you listed will have some workarounds to solve the issues; some probably more complex and involved than others. Luthiery is just problem solving, and many times "repairs" will look like cool intentional details. :smug:

My suggestion is to slow down, give yourself at least 3 months to address everything and dont give up. The extended time frame may help it not feel as rushed. :)

If you can bring yourself to do it, I'd love to see more pics of where you're at right now; it will probably help some solutions be forthcoming from the LC. :D
 
It’s rough, for sure. Sometimes, maybe most times for me anyway, if you make a mistake just step back and think about it. Give yourself a day or two before you try and correct it. I’ve had many times that I botched something and, almost frantically, did the first thing I thought of to fix it only to realize that made things worse yet. There are even times when it could be helpful to work on something else for a week or two and come back with some fresher eyes. I know that doesn’t help get it done on a schedule but, there it is.

All that said, there are some great people and great builders here and you can probably get several different solutions to any difficulties you are having.
 
Well this, for one. Also happens to be my prescription for "social distancing time" presently.


You made mistakes. OK.

Some of them were expensive, such as using exotic wood on build #1 - OK.

Some of them are easier to note than to really fix next time, such as rushing. OK, but make yourself fix that, however you need to do that. Habits are harder to change than just grabbing some affordable wood to practice on, so expect to need more effort than you expect to solve that one.

Learn, move on (or #1 aside for now, to come back to later), build #2. Perhaps you might learn from #1 that you wish to set the exotic wood aside for now until you learn more. Unless you totally booger it up, expensive hardware can usually be removed and re-used. Expensive wood can be salvaged and turned into parts of another build if the build itself can't be salvaged.

Everybody has heard that "practice makes perfect" but hardly anybody likes to practice it in practice. I'm a firm believer in the value of making some bits that are not even trying to be the end product, which will end up in a woodstove or barbecue or back in the scrap bin if they are big enough to salvage from to PRACTICE techniques that need practicing, or to work out how to do something. even if it means "wasting" perfectly good (but generally inexpensive) wood to do so. It also takes time, which the "rushing" problem won't like, but "haste makes waste" and "doing it right once is usually faster than doing it wrong five times."

You don't get good by not doing it. You don't get good by being perfect. You get good by doing, and you get good by making mistakes, and fixing them. The folks you might think are perfect are more likely just really good at dealing with mistakes/problems when they do happen (and they do) as well as having a lot of experience filed away somewhere - which might not be in Bass Guitars, specifically.
 
Oh man. As everybody else has said, and as I firmly believe, we learn best by our own mistakes.

My very first build was super-crap. But I learned a few things.

My next build was super-crap, but not quite as bad as the first one. I learned a few additional things.

My next build was crap.

My next build was sorta decent, or so I thought at the time. Later I discovered it was mostly crap with some good bits thrown in.

My next build was sorta okay.

My next build was alright.

My next build wasn’t too bad.

My next build - well, you get the idea. I think I’m somewhere around twenty builds now, and I’m getting kinda good now. Just. I can be a slow learner sometimes....

It’s always a shame to bork up a nice expensive piece of wood, but it’s part of the learning process, and it’s only money. Most important thing is to keep all of your fleshy bits safe, and learn from every mistake.

Enjoy the creative process!
 
My major errors were,

Design body scale too small overall
Cavity is a mess lol
neck pocket too large
finishing flaws...many
finish sanding
major tear out of knob holes (did this last night and I am wrecked lol)
slight pickup cavity errors
recesses for neckbolts too large and uneven
recess for battery box messy

Any motivations, advice or musings would really help

Design body scale too small overall
Doesn't look too bad to me, actually?

Cavity is a mess lol
recesses for neckbolts too large and uneven
recess for battery box messy

The whole lot could be redone by planing the back down about 5mm and gluing on a bookmatched board. Then drill new neck-mounting holes, rout a new battery box and cavity top.

neck pocket too large

Too deep or too wide? Veneers can be glued into the sides of the pocket, or wider pieces and then re-rout the pocket from scratch.

major tear out of knob holes (did this last night and I am wrecked lol)
Depending on how much damage, maybe wider knobs? Or do a bowl routing of the entire knob location and remove the tearout?

slight pickup cavity errors
Some folks have located larger pickups and then rerouted new holes for the larger ones, clearing the previous error sides. Others have made custom pickup covers that in effect do the same thing, enabling a larger pickup. Covers made with that body core wood would look cool IMHO.

finishing flaws...many
finish sanding

It's some work, but you'll probably be happier taking it back to 120 and working back up through grits to get it smooth. Finishes are only as good as the prep IME. :)
 
I really am overwhelmed with the responses and the sheer quality of information and advice given. It all resonates very strongly with me. Stepping back and walking away when mistakes are made is going to be my number 1 mantra when building from now on @Matt Liebenau . I think that the more I think about it that I truly am majorly passionate about this and this makes the failure far greater.

I don't regret using expensive wood but I think that it definite added a level of expectation and pressure that was more than what my skills/patience was ready for.

Moving forward I am going to reflect and document all of my mistakes and put them up in my workshop as reminders.

@Beej Thankyou for going to the effort to offer tips when I gave little information so I thought I would show a few more pics to give clarity. The more I reflect on the words given here the problems that i perceive issues are not as great as my mind makes them.

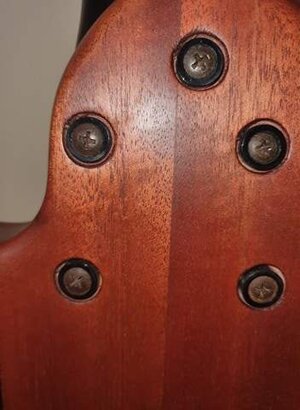
The neck pocket is slightly wider and slightly uneven I have thought about a few veneers definitely.

I want to get the router out on the cavity and redo the cavity edge to fix where it has not worked well. I actually snapped the cavity cover i made accidentally so i have to remake one anyway so changing the shape is not that big a deal.

The neck bolt recesses aren't that bad they're just obvious which is infuriating and right where the contrast makes it stand out.

Bigger knobs is a awesome idea!! I have stuck some tape over the small bits of salvaged tear out to try and do a fill job and couldn't bring myself to remove them lol.

I think in the end I probably will strip it again.

Thankyou for the wisdom and speech link @T_Bone_TL it is sometime hard to remember this at times that's for sure.

Thanks again guys I will sit on this sucker for a while and get cracking on number 2!! Legends

90032455_2956103077782510_9007883524635623424_n.jpg

90057628_3313431978684149_389838788295131136_n (1).jpg 90125922_146428246663555_394368260805492736_n (1).jpg 90128470_197627768208239_8952657636847779840_n (1).jpg 90678024_513079182738904_8102367924578156544_n (1).jpg
 
You've already been told most of the things I could think up about fixing the things you've got going on with this project, but I wanted to add one more: Don't hesitate to ask questions on here, before you do a given step, even if you have an idea of what you think you need to do. This community is deeply experienced, creative, and always ready to help.

Even after years of woodworking, there were steps in instrument making that I was not prepared to do well at - sure I had an idea of how to do it, but my ideas might have been difficult, risky, wasteful, time consuming, or otherwise bad. But meanwhile, people on here have half a dozen WAY BETTER solutions already thought out and ready to go for those steps! All it takes is asking "I'm about to do X step and I don't know the best way to do it" and you'll get access to all those great ideas! I can't tell you how often I've scrolled through a thread on here and found myself thinking, "wow, that's a way better way to do that step than I could have ever come up with!"
 
I really am overwhelmed with the responses and the sheer quality of information and advice given. It all resonates very strongly with me. Stepping back and walking away when mistakes are made is going to be my number 1 mantra when building from now on @Matt Liebenau . I think that the more I think about it that I truly am majorly passionate about this and this makes the failure far greater.

I don't regret using expensive wood but I think that it definite added a level of expectation and pressure that was more than what my skills/patience was ready for.

Moving forward I am going to reflect and document all of my mistakes and put them up in my workshop as reminders.

@Beej Thankyou for going to the effort to offer tips when I gave little information so I thought I would show a few more pics to give clarity. The more I reflect on the words given here the problems that i perceive issues are not as great as my mind makes them.

The neck pocket is slightly wider and slightly uneven I have thought about a few veneers definitely.

I want to get the router out on the cavity and redo the cavity edge to fix where it has not worked well. I actually snapped the cavity cover i made accidentally so i have to remake one anyway so changing the shape is not that big a deal.

The neck bolt recesses aren't that bad they're just obvious which is infuriating and right where the contrast makes it stand out.

Bigger knobs is a awesome idea!! I have stuck some tape over the small bits of salvaged tear out to try and do a fill job and couldn't bring myself to remove them lol.

I think in the end I probably will strip it again.

Thankyou for the wisdom and speech link @T_Bone_TL it is sometime hard to remember this at times that's for sure.

Thanks again guys I will sit on this sucker for a while and get cracking on number 2!! Legends

View attachment 3750099

View attachment 3750100 View attachment 3750101 View attachment 3750102 View attachment 3750103
I don't see anything here that is not salvageable. I lot of good suggestions have been put forward. I happened across some of these neck mounting ferrules that might work. They fit in to the hole but have a flange that would be above the surface. If they are large enough they would work to cover your neck mounting holes. Sorry I don't remember where I got them but do a search. You may even find larger diameter ones as well or possibly someone here knows where to get. Honestly your first is heads above my first I ever built.
IMG_6316.JPG
 
The opportunity to inlay some fancy bling is another way to deal with various cosmetic errors, but that one DEFINITELY needs some off-instrument practice first, IMnsHO. Make some large diameter pearl, pearloid, abalone "dots" into "washers" to tidy up holes with edge issues. Or use non-round shapes. Crushed turquoise, other stone, or some sythetics set in with epoxy is another technique and can look stunning.

"Make it a feature!"
 
  • Like
Reactions: Haroldo and Beej
Those pics don't look too bad to me. Maybe you're being too hard on yourself? I would take a step back, but definitely finish it off, even if it's not perfect. There's a lot of value in finishing IMO, then you can just try to do better next time. I made huge strides between my 1st and 2nd build, but I still enjoy looking at that first build, warts and all. Just keep going...
 
Welcome to the learning process, you can't step over it.

But you're also learning and incredibly useful task when building:
Improvisation

Things like body size, sorry to say that's just poor planning.
Use paper and pencil and make a pattern.

Like most things, it looks really easy on paper and video when things are going well.
The real challenge is to fix your problems/mistakes, and sometimes you'll end up with something
you could have never planned for, but it might be great too.

Now if you don't learn from your "challenges" or at least discover areas of improvement, then there is no hope.

Congrats, you've gone farther than a lot of people do, many won't even try.

Don't let it bum you out, keep moving forward!
Dirk
 
  • Like
Reactions: MynameisMe and Beej
If you are not happy, consider it a learning experience and move on. #2 will be better from your lessons learned. From experience, the worst thing you can do is let the correction add on disease waste another 200 hours of your time trying to recover and still not be happy in the end. 'Better to cut your losses and work on something you are happy with.

Lastly: BURN IT!!!!! Do not leave a constant source of frustration hanging on the wall that will still bum you out for another decade. Move on. I offer all this with the experience of having built 350+ instruments and burned 6. Every one of those six I held on to for far too long and wasted valuable life energy. Five minutes after they burned up, I felt like the weight of the world fell off my shoulders. #6 was just this weekend!


bassfire3c2a9davidmoenkhaus-edit.jpg
 
Yeah, I'm gonna echo a lot of stuff that is already mentioned here so this will come as nothing new. Keep in mind that I haven't started my first build yet, but it's coming!

Personally I don't find the body size to be too small. Hey, you own a Spector and a Warwick, I find those brands to be some of the dinkiest bodies ever, and people love them! As long as the bridge is mounted at the proper position for scale, what does "too small" even mean? Looking at your photos, I think you're being overly hard on yourself here.

As for the finish, my advice would be, take it apart and start over. It's wood, you can do that. I've read threads where guys have done just that because they weren't happy with it. I do custom swirl paints myself and I've had 2 now that I had to strip and start over after they came out with a perfect swirl. The final clear finish got muffed and I had to go back to bare wood. Trust me, on a swirl it hurts when you get that swirl pattern really sweet and then have to strip it back down to bare wood. But it's part of it man, and when it's done it's even sweeter.

I think a lot of it is just learning as you go. Like many have said, half of this is figuring out how to hide your mistake. I've learned a lot of ways to hide mistakes just by reading what others have done. Don't give up, and don't give up on this one either. Step back, think it through and then return with a fresh set of ideas.

Also, I like the control plate idea posted by @Skillet. I'd pursue that if it was me. ;)