• TalkBass has been independent since 1998. Add your voice.
    Create a free account to reply to discussions, view embedded media, and browse with fewer display ads.
    Join freeLog in
    Want zero display ads or expanded classifieds tools? Compare plans.

MIK Squier II Precision Bass - Build Log

I just picked up this new to me bass, a Made in Korea Squier II Precision Bass. I have been eyeing one of these for a little while now. I like the color scheme: black body, white pickguard, maple neck/fretboard. I also like the fact that it is somewhat unique/uncommon at least from your typical Squier and that it was much cheaper than even a used MIM Fender. I just got it, but it feels pretty nice and seems to play well so it should be a great start for a build into exactly what I want. I'll be using this thread to document the build process. (I've always wanted to do something like this!)

I will add pics in the next post.

The intention of this bass is to be used mostly for rock music. Think Green Day, Blink-182, Rise Against, etc. So I will be going for a super bright, chime-y tone. As it sits now the bass is all stock as far as I can tell, currently strung with flats. So, its got a long way to go. I plan to replace basically everything.

This is my preliminary parts list:

-Seymour Duncan SPB-3 Quarter Pound pickups
-CTS 250k volume pot
-CTS 500k tone pot
-output jack?
-Hipshot KickAss Bridge w/ steel saddles
-tuners?
-DR Lo-Riders
-pickguard?

I'm not looking to spend a ton of money, but I think this will get me there. I haven't done any research on output jacks so that's still up in the air, does it matter? Tuners I'm not sure about either. I really don't want to spend a ton of money on tuners, I'm thinking some Fender replacements? I'm hoping not to have to drill for new tuners but with the stock "box" style tuners I may not be able to get around that. So I'll be looking for some help on what to get. Also I'd like to replace the pickguard with a new white one, but I don't know where to get one that will fit this 12 hole one? I would prefer not to have to drill or cut anything myself.

Well that about wraps it up for now. I'm sure I will need this forum's help so thanks in advance. I'll do my best to keep this thread updated, and stocked with pictures of the progress along the way, and maybe even some sound bites if I'm not too embarrassed of my playing!
 
  • Like
Reactions: alanloomis1980
Starting Point:
0526201237_HDR.jpg
0526201238_HDR.jpg
0526201242a_HDR.jpg
0526201241_HDR.jpg
0526201241a_HDR.jpg
 
I used one of these bodies for a DIY refin project several years ago. Bought the semi-loaded body on Ebay, and I ended up changing out everything except the knobs and stock pickup. I had to get a pickguard made - there isn’t an aftermarket version that will drop right in. Since you have the original, there are plenty of companies that can do that.

I’ve been really happy with my project, but the stock pickup is hot! I also have to dial the bass and low-mids back a bit since it’s a bit boomy, but it doesn’t sound bad at all.
 
Update 1

Ok, so I started work on the bass today by removing the strings and checking out my tuner situation. The stock tuners seem cheap, dirty, and have some play to them. I was a little worried since they are the closed or sealed back type and I wasn't sure what the post hole size was. I was really hoping not to have to go too drastic on the headstock.

I removed one of the tuners and discovered that a 3/8" drill bit fits very loosely in the hole, and fits perfectly in the tuner bushing. So I was hoping I would be able to drop in 3/8" tuners.
0527201137_HDR.jpg

0527201139_HDR.jpg


But then I discovered that the hole needs to be larger to accommodate the tuner post bushing. It seems for 3/8" tuner posts you need a 9/16"(14mm) hole to fit the bushing. So I measured the hole and it seems I'm only at 12mm.
0527201336_HDR-2.jpg


I guess I'm a little confused, because if my 3/8" drill bit fit in the stock bushing which obviously fit in the hole, then that means just the bushings for aftermarket 3/8" tuners are thicker, thus requiring the larger hole? Although I suppose the reverse could also be true, that the cheap stock tuner bushings are thinner than typical.

Regardless, it seems that if I want to upgrade my tuners I'm going to have to enlarge my tuner holes to 9/16"(14mm). So I'll have to figure out how I'm going to go about that.

As far as the tuners themselves, I was hoping to use the Gotoh GB11W. However, since the holes on this korean squier are so close to the edge of the headstock I just don't think they will work. I'm going to have to go with a smaller tuner. I prefer a clover style key over the Y shape so the Gotoh GB707 is out as well. For now, I am looking at the Hipshot Ultralite 3/8" tuner, probably the licensed version to save a buck.
0527201202_HDR.jpg

0527201338_HDR.jpg
 
  • Like
Reactions: alanloomis1980
Update 2

While waiting on parts to arrive the other day I decided to go ahead and polish the frets and just do a general cleaning of the bass.
0528201919_HDR.jpg


Today, some parts started to arrive! I went ahead with the Hipshot Kickass bridge, because I thought the price was decent and I liked its ability to adjust the string spacing. Its certainly a lot nicer than the stock bridge. I have 2 nitpicks with the kickass bridge. First, when I opened the box it came in it was nice to see a quality control mark with a name on it, however, I think Hipshot may want to invest in some white gloves since the bridge had some smudges on it and just didn't look as pristine as it could have. Second, and more importantly, although the provided bridge screw threads were a match to the originals I kind of expected the screws to have polished/chrome heads but they did not. Its the little things like that that could kick things up a notch. Other than those nitpicks at this time, I'm hoping with all the adjustability I won't run into any other issues with it.
0530201758_HDR.jpg

0530201803_HDR.jpg

0530201813_HDR.jpg

0530201827_HDR.jpg


I was surprised to see that large hole under the stock bridge. Any one know what that is for?
 
  • Like
Reactions: alanloomis1980
Update 3

More parts have started coming in and I finally had everything necessary to handle the tuners. I don't trust myself when it comes to drilling/reaming wood so my dad was nice enough to help me out. I wish I would have been able to take more pictures of the whole process but I was taking up his time and wanted to get it done.

A mistake I believe I made was with the reamer that I bought. I saw a reamer that was 9/16" and had a nice tapered end. I thought that would work great. According to my dad however that reamer was made for metal and not wood. I wouldn't know the difference, but we decided to go ahead and use it anyway. It actually worked out fairly well except for the fact that it scorched the wood (just on the inside of the holes).
0601202030a_HDR.jpg


Once the holes were reamed out (and the house smelled like burnt marshmellows!) the tuners set in nicely. Next came drilling the holes for the screws. This took a little bit of time as my dad was super cautious (and thankfully so) about not poking through the other side of the headstock. But eventually we were able to get the tuners secured on the headstock.
0601202029_HDR.jpg

0601202030_HDR.jpg


So now the tuners are done, and in my opinion, look great! I'm sure they will function much better as well.

The only things left to do now are pickups, pots, and wiring. I may be doing that today. And the pickguard. I have made a tracing of the original pickguard but I have not decided which company to go with yet, I need to do more research. But, I'm excited I could potentially be playing this bass with the new setup soon!
 
  • Like
Reactions: Paco Leon
Update 4

All my parts have arrived! Yesterday I was able to get all the wiring done and test it out. I began by desoldering the stock pickups and set them aside. Then I desoldered the bridge ground from the rest of the wiring and removed that. I followed the wiring diagram included with the pickups and everything went pretty smoothly considering my subpar soldering skills.

The old wiring:
0527201154_HDR.jpg


The old pots had some markings on them but I couldn't make any sense of them. They both measured out to around 500k. I decided to reuse the old tone capacitor, at least for now. It is green and stamped 2A683J. So it appears to be a .068uF cap.
0527201158.jpg

I had ordered 2 each of CTS 250k and 500k pots, both audio taper. Since I went with the seymour duncan SPB-3 Quarter Pound pickups I decided to go for the 250k volume pot to start, with a 500k tone pot. I thought a 500k volume pot with that pickup might be too much, but I decided to go with the 500k tone pot since a slight rolloff should put it around a 250k pot anyway. I also went with a new fender output jack and Gavitt wire. Since I don't have a new pickguard yet and I haven't drilled out the stock holes in the original pickguard I went ahead and soldered everything up sans pickguard. I probably left the wiring too long but it all stuffs into the pocket so I'm hoping I don't have any issues there.
0602201622_HDR.jpg


I did string up the bass and begin the initial setup, but I'll leave all that for a separate update. I did get to test it and play a bit, and I have a couple of thoughts. Everywhere I read said to go with an audio taper volume pot, so i did, but it seems to act more like an on/off switch then a taper. There's nothing almost halfway through the rotation and all the volume comes in the last little bit of turn. I don't really see myself doing swells or really messing with the volume pot much with this bass. However, I'm not sure I like the way it works and I may consider trying out a linear pot. The tone knob I am happy with, and I don't have much to say about the capacitor, I didn't really want to go that in depth with trying a bunch out trying to pick out small tonal differences etc etc. Maybe later, but for now I'm pretty happy.

Also, based on the parallel horizontal lines in this photo, I'm guessing that confirms that this is a laminate body?
0527201159_HDR.jpg


Well that wraps up this update. Like I said I have strung up the bass and began initial setup and I'll be bringing that update soon. Really the only thing left is to get a new pickguard. I have completed the tracing of the old pickguard I just need to pick a company and get the order in. I guess since I haven't done that yet I might be in for a bit of a wait to finish this project :( But once the new pickguard comes in I can get that installed and finish the setup and this project! Stay tuned!
 
Update 4

All my parts have arrived! Yesterday I was able to get all the wiring done and test it out. I began by desoldering the stock pickups and set them aside. Then I desoldered the bridge ground from the rest of the wiring and removed that. I followed the wiring diagram included with the pickups and everything went pretty smoothly considering my subpar soldering skills.

The old wiring:
View attachment 3853469

The old pots had some markings on them but I couldn't make any sense of them. They both measured out to around 500k. I decided to reuse the old tone capacitor, at least for now. It is green and stamped 2A683J. So it appears to be a .068uF cap.
View attachment 3853474
I had ordered 2 each of CTS 250k and 500k pots, both audio taper. Since I went with the seymour duncan SPB-3 Quarter Pound pickups I decided to go for the 250k volume pot to start, with a 500k tone pot. I thought a 500k volume pot with that pickup might be too much, but I decided to go with the 500k tone pot since a slight rolloff should put it around a 250k pot anyway. I also went with a new fender output jack and Gavitt wire. Since I don't have a new pickguard yet and I haven't drilled out the stock holes in the original pickguard I went ahead and soldered everything up sans pickguard. I probably left the wiring too long but it all stuffs into the pocket so I'm hoping I don't have any issues there.
View attachment 3853500

I did string up the bass and begin the initial setup, but I'll leave all that for a separate update. I did get to test it and play a bit, and I have a couple of thoughts. Everywhere I read said to go with an audio taper volume pot, so i did, but it seems to act more like an on/off switch then a taper. There's nothing almost halfway through the rotation and all the volume comes in the last little bit of turn. I don't really see myself doing swells or really messing with the volume pot much with this bass. However, I'm not sure I like the way it works and I may consider trying out a linear pot. The tone knob I am happy with, and I don't have much to say about the capacitor, I didn't really want to go that in depth with trying a bunch out trying to pick out small tonal differences etc etc. Maybe later, but for now I'm pretty happy.

Also, based on the parallel horizontal lines in this photo, I'm guessing that confirms that this is a laminate body?
View attachment 3853521

Well that wraps up this update. Like I said I have strung up the bass and began initial setup and I'll be bringing that update soon. Really the only thing left is to get a new pickguard. I have completed the tracing of the old pickguard I just need to pick a company and get the order in. I guess since I haven't done that yet I might be in for a bit of a wait to finish this project :( But once the new pickguard comes in I can get that installed and finish the setup and this project! Stay tuned!

Yes, definitely a laminate body. Mine looks the same in the cavities. I found the wood to be a bit soft, so I had to line a few of the screw holes with toothpick fragments when installing new hardware.
 
  • Like
Reactions: TommyGunz
I just picked up a Korean Squier II bass and was pretty surprised at the neck. It is a really nice neck, and one piece maple with laminated "wings" on the headstock. Truss rod worked great, and in a few minutes had the thing cranked back in shape and playing solid all the way up. These things should be giggable for life with the cookbook upgrades. Good luck with the pickguard.
 
Update 6

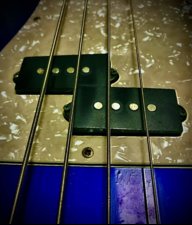
I finally got a new pickguard! I went with WD custom and got a new pickguard in 3 ply white/black/white. It needed just a tiny bit of trimming around the neck and it fit great. I was a little disappointed though, I had asked them to enlarge the holes to fit the standard 3/8" pots but they did not, they left the holes the same size as the stock squier guard. Oh well, quick job with the drill remedied that. I also decided to go ahead and use some copper tape to shield the cavity. I decided not to take pictures of the shielding because of my kindergarten arts and crafts skills ha. I decided to go with solid shaft pots so I went with typical fender screw on knobs. New pickguard screws complete the updates. Overall a very clean look:

0815201231_HDR.jpg


And finally the finished product:

0815201230_HDR.jpg


Final parts/work list:

-Seymour Duncan SPB-3 Quarter Pound pickups
-Hipshot KickAss bridge w/ steel saddles
-CTS 250k audio taper volume pot
-CTS 500k audio taper tone pot
-Fender output jack
-WD Custom pickguard w/b/w
-Hipshot Ultralite licensed tuners
-Dr Lo-Rider stainless steel medium gauge 45-105
-Fender telecaster/precision bass knobs knurled chrome
-Fender pickguard screws
-Frets polished
-Body cavity shielded with copper tape

I finished the setup today and oh man she plays and sounds great! The combination of the electronics and strings have this great metallic chime that I was really going for. There's still plenty of low end when I want it too. I like how versatile the sounds I can get from it. Playing a little closer to neck, closer to the bridge, thinner pick, heavier pick, tone up, rolled back a little and all the way off, and finger plucking all have their own sound. I like the action a little higher to avoid fret noise with heavy strumming but it is still very playable. I'm really looking forward to putting this thing through its paces and maybe looking for some other musicians to play with. Its nice to have an instrument this customized to suit your individual needs. Maybe if I'm not too embarrassed and anyone is interested I'll post some sound clips. But for now I'm very happy with it!
 
Update 6

I finally got a new pickguard! I went with WD custom and got a new pickguard in 3 ply white/black/white. It needed just a tiny bit of trimming around the neck and it fit great. I was a little disappointed though, I had asked them to enlarge the holes to fit the standard 3/8" pots but they did not, they left the holes the same size as the stock squier guard. Oh well, quick job with the drill remedied that. I also decided to go ahead and use some copper tape to shield the cavity. I decided not to take pictures of the shielding because of my kindergarten arts and crafts skills ha. I decided to go with solid shaft pots so I went with typical fender screw on knobs. New pickguard screws complete the updates. Overall a very clean look:

View attachment 3948937

And finally the finished product:

View attachment 3948940

Final parts/work list:

-Seymour Duncan SPB-3 Quarter Pound pickups
-Hipshot KickAss bridge w/ steel saddles
-CTS 250k audio taper volume pot
-CTS 500k audio taper tone pot
-Fender output jack
-WD Custom pickguard w/b/w
-Hipshot Ultralite licensed tuners
-Dr Lo-Rider stainless steel medium gauge 45-105
-Fender telecaster/precision bass knobs knurled chrome
-Fender pickguard screws
-Frets polished
-Body cavity shielded with copper tape

I finished the setup today and oh man she plays and sounds great! The combination of the electronics and strings have this great metallic chime that I was really going for. There's still plenty of low end when I want it too. I like how versatile the sounds I can get from it. Playing a little closer to neck, closer to the bridge, thinner pick, heavier pick, tone up, rolled back a little and all the way off, and finger plucking all have their own sound. I like the action a little higher to avoid fret noise with heavy strumming but it is still very playable. I'm really looking forward to putting this thing through its paces and maybe looking for some other musicians to play with. Its nice to have an instrument this customized to suit your individual needs. Maybe if I'm not too embarrassed and anyone is interested I'll post some sound clips. But for now I'm very happy with it!
Nice work! Glad you’re happy with the results too! :thumbsup: