

Enjoy the benefits of a premium membership!
Upgrade Account
-
TalkBass has been independent since 1998. Add your voice.
Create a free account to reply to discussions, view embedded media, and browse with fewer display ads.
Join free Log in
Want zero display ads or expanded classifieds tools? Compare plans.
You are using an out of date browser. It may not display this or other websites correctly.
You should upgrade or use an alternative browser.
You should upgrade or use an alternative browser.
New Rickenbacker Owner? Look No Further!
- Thread starter EtoG
- Start date
More options
Who Replied?
Awesome 5 string conversions.I been playing a long time too and was glad to see someone reference John Wetton as an influence.Live cut "Larks Tongue In Aspic" a must listen.Nastiest bass sound ever.
The pole spacing is not the same on any of my Rics. In the case of the bridge pickup it's about 4 mm wider across the whole pickup bobbin. A neck pickup may still work however, depending on how you cut your saddles.
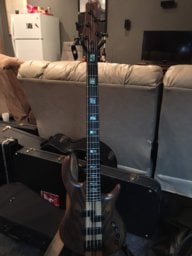
Hello, everyone!
Recently, many TalkBassers have acquired new Rickenbacker 4003's as a result of a pretty nice sale online. I thought I'd compile a useful list of links for Ric owners both new and old. I hope this helps. Feel free to contribute below!
Setup help regarding the dual truss rods and Ric bridge:
Joey's Rickenbacker Bass Guitar Maintenance, Setup and Wiring Diagrams.
Video of how to remove the treble pickup cover:
Rickenbacker 4003 Bass: Ditch That Icky Pickup Cover (Video)
Treble Pickup Assembly Diagram in PDF:
[Invalid or Expired Link Removed]
Schematics in PDF:
[Invalid or Expired Link Removed]
Serial Number Decoder (Manufacture Date):
[Invalid or Expired Link Removed]
Removed your treble pickup cover but don't like the gaping hole left behind in the pickup enclosure? Here are options to consider. They require no extra drilling, and are completely reverse-able should you want to go back to the factory configuration. DISCLAIMER: I am in no way affiliated with either of these sellers.
Trebel Bezel for Rickenbacker Bass Bridge Pickup - Pick of the Ricks
[Invalid or Expired Link Removed]
Again, if you feel that I've missed something, feel free to post it! These are just some links that I think might answer a few questions that are going around.
As always, rock on, and enjoy your new Rickenbacker!
Thanks for the great resource material. This morning after my first gig with my new Ric, I removed the pickup cover per the video instructions. Piece of cake. I did notice when the cover is removed, the pickup is a little crooked in the cavity when seated. Not a big deal, no effect on the sound.
Also, did a final truss rods work as well as set the action with the bridge. I normally play medium action, but I am impressed how low I can get this bass with no buzz. Very happy camper here. It sounded so awesome yesterday at the gig. The soundmen really liked the great trebly highs and the deep lows. They enjoyed mixing it.
Again, thanks for all the resource info. I have bookmarked this thread!
Thanks for the great resource material. This morning after my first gig with my new Ric, I removed the pickup cover per the video instructions. Piece of cake. I did notice when the cover is removed, the pickup is a little crooked in the cavity when seated. Not a big deal, no effect on the sound.
Also, did a final truss rods work as well as set the action with the bridge. I normally play medium action, but I am impressed how low I can get this bass with no buzz. Very happy camper here. It sounded so awesome yesterday at the gig. The soundmen really liked the great trebly highs and the deep lows. They enjoyed mixing it.
Again, thanks for all the resource info. I have bookmarked this thread!
I'm glad it was of assistance.
 Also glad to hear that the gig went well!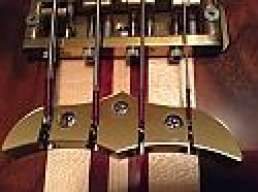

So I have a stupid question: On the front of the 4003's bridge there is an area with U-shaped channels where the strings pass through just in front of the saddles. What are those channels for, mutes? And what are the two thumbscrews on either side of the bridge in this area for?
The thumbscrews raise and lower the mute in that front compartment. It makes the bass sound like an upright or a sitar depending on how you set it.
EotG, thank you for mentioning my website amongst the other wealth of info you've posted.
Joshua: the admin of the RRF does approve everyone's registration to be a member.Usually takes an hour to a day, depending on how busy he is.
On another note, I think it's time I had a word with the moderator of this forum or maybe even the board owner about another matter.
Joshua: the admin of the RRF does approve everyone's registration to be a member.Usually takes an hour to a day, depending on how busy he is.
On another note, I think it's time I had a word with the moderator of this forum or maybe even the board owner about another matter.
Joshua: the admin of the RRF does approve everyone's registration to be a member.Usually takes an hour to a day, depending on how busy he is.
Agreed, I'm just trying to help this guy out... apparently he's having issues signing up.
EotG, thank you for mentioning my website amongst the other wealth of info you've posted.
Not a problem, Joey.
Thank you for such a great resource for Rickenbacker owners. All of the time you spend making videos and putting together your knowledge for all of us is well appreciated.
Rock on, brother!



I have and use a number of basses , including Rickenbacker , but would probably be described as a traditional Pbass guy that appreciates and loves a nice Ric . ( or an EB or a G&L etc etc )
The Resource forum does have some serious fanbois but you don't have to drink the cool aid . When I first bought my old 4001 I asked about the cap bypass on the Resource forum . John Hall answered my post . It was a week or two before I realized that it was THAT John Hall . I was quite surprised to see the company president take the time to answer a question about a thirty year old instrument . And grateful .
In the time since I have become pretty familiar with my old 4001 and how they are put together . I can thank the Resource for much of what I have learned . I'm not a frequent poster there , but I regularly check in .
The Resource forum does have some serious fanbois but you don't have to drink the cool aid . When I first bought my old 4001 I asked about the cap bypass on the Resource forum . John Hall answered my post . It was a week or two before I realized that it was THAT John Hall . I was quite surprised to see the company president take the time to answer a question about a thirty year old instrument . And grateful .
In the time since I have become pretty familiar with my old 4001 and how they are put together . I can thank the Resource for much of what I have learned . I'm not a frequent poster there , but I regularly check in .

john turner
You don't want to do that. Trust me.
The thumbscrews raise and lower the mute in that front compartment. It makes the bass sound like an upright or a sitar depending on how you set it.
I still don't quite understand: those U-shaped channels are where the mutes go and the screws push them down? I'm a noob with mutes, never used them before and never had a bass with a bridge anything like this.

The mute, or damper as it is called on the Rickenbacker component diagram, is a single strip of foam rubber, rather like a piece weatherstripping for a door. It is glued to a narrow brass plate that spans the channel cavity under the bridge in front of the saddles and is connected to the threaded thumb bolts. You raise (engage) or lower (disengage) the mute by turning the thumb bolts clockwise (engage) or counter-clockwise (disengage).I still don't quite understand: those U-shaped channels are where the mutes go and the screws push them down? I'm a noob with mutes, never used them before and never had a bass with a bridge anything like this.
Leo Fender did the same thing on the original P-basses, only he just glued a block of foam under the ashtray. This is the original reason folks took off the ash tray bridge covers on Fender basses -- to get rid of the foam rubber to get more sustain. Rickenbacker obviated the issue by making their mute adjustable, and it's been like that ever since.
Link to Rickenbacker's exploded view bass bridge component diagram:
[Invalid or Expired Link Removed]
The mute, or damper as it is called on the Rickenbacker component diagram, is a single strip of foam rubber, rather like a piece weatherstripping for a door. It is glued to a narrow brass plate that spans the channel cavity under the bridge in front of the saddles and is connected to the threaded thumb bolts. You raise (engage) or lower (disengage) the mute by turning the thumb bolts clockwise (engage) or counter-clockwise (disengage).
Oh, sweet, thanks, I got it now! At first I didn't even see the foam and thought maybe I was missing it, and I was turning the screws the wrong way, but I got it working, now. A cool little feature I didn't even know existed, awesome!
Oh, sweet, thanks, I got it now! At first I didn't even see the foam and thought maybe I was missing it, and I was turning the screws the wrong way, but I got it working, now. A cool little feature I didn't even know existed, awesome!
I don't know anyone who actaully uses the mute though.
Just curious, did you have an account there at another time? PM me your info (real name, user name you picked, email address etc). I'll see what I can do about getting your situation resolved.I signed up at rickresource, again (4th time?) and nothing happened.


