• TalkBass has been independent since 1998. Add your voice.
    Create a free account to reply to discussions, view embedded media, and browse with fewer display ads.
    Join freeLog in
    Want zero display ads or expanded classifieds tools? Compare plans.

Nomad98 build

Here we go again...

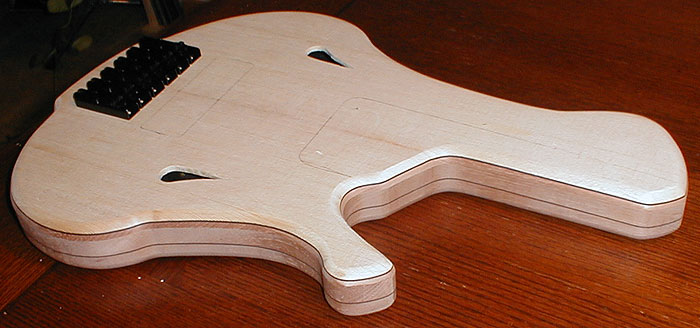
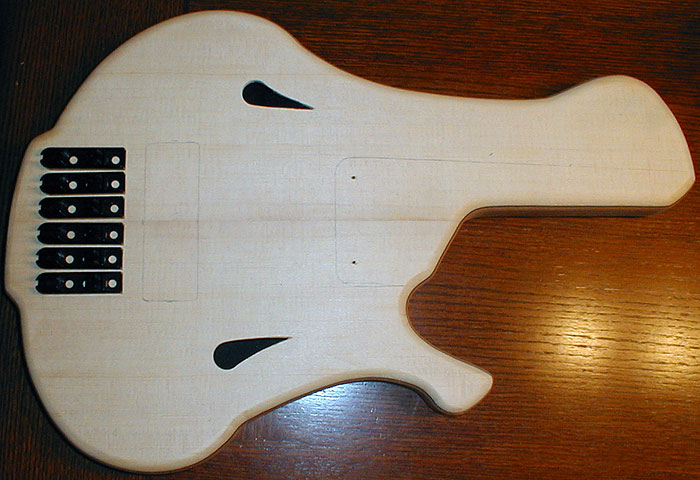
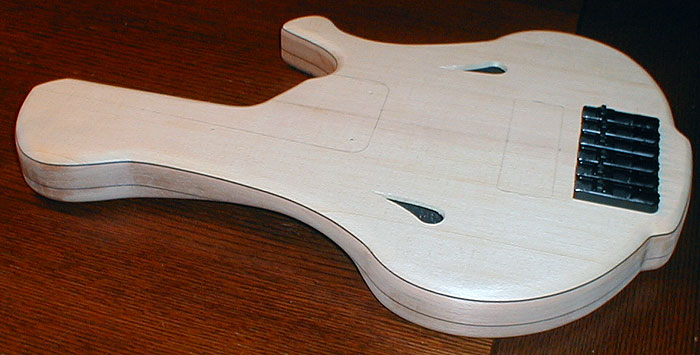
Started a new bass in the last month or so and thought I would post some picts... Nothing new as far as body style (just like the last build thread/bass). My goal for this bass is to up it a notch and eliminate the sloppy glue joint issues that have plagued me in my first to builds (mainly in the body joints).

Well, here is the result. I used black dyed veneer between the spanish cedar body layers and also between the sitka spruce top and spanish cedar core. In the past I glued the body together then when I cut the body blank to size... Ugh! The horror! thick glue joint (my remedy, dye it black to hide the glue joint).

This time there was no "unsightly" glue joint. I used more clamps and MDF plates to disperse the clamp pressure. There will be NO black burst on this bass body. All joints are clean and tight!

Bass Specs...
6 string
Semi hollow Spanish Cedar core w/ Sitka Spruce top
Clear finish
Fretted Rosewood (first attempt at frets)
Neck purpleheart/maple bolt-on (w/scarf joint, also a first attempt)
One bridge pickup with matching wooden cover (another first attempt)


As always thanks for looking... Nomad98
pic_1.jpg


pic_2.jpg


pic_3.jpg
 
Well the pickup cover is made and fitted...

Thanks to a T'Bers post on how to... "Pickup Covers" (sorry I can't remember who's post it was... just checked, Wilser did a tutorial thanks). I glued the spruce and black veneer onto a piece of spanish cedar, then routed out the backside that holds the pickup. After that, I cut the cover to size and shaped it. Then routed out the body!

Relatively easy (unless of course your router slips!).

pic_4.jpg


pic_5.jpg
 
Hey Nomad98, glad to see my ramblings helped! It looks like it's turning out great! BTW, I'm following a different method now, gluing up the walls and ceiling of the covers rather than a big block and routing it. It's just easier that way.

I did see that you posted that method also... just cant remember if the chicken came first or the egg?... or was it the cart before the horse??? I would follow with "you know what I mean..." but maybe you don't so!

OH! Much better. (had a big gulp "O" coffee)


Wilser -

Can you expand on that? I don't think I'm following the "walls and ceiling" part...

Wilsers method, if I may, is making the sides of the cover almost like a deep picture frame and capping the top. I was really thinking of trying this as opposed to the router method I used. I would like to think I was tackling my fear of routing pickup cavities. I always screw them up!

Anyway, thanks for the positive remarks _ Nomad98
 
That thing looks hot already! Nicely done!

Where did you get your spruce and about how much did it cost? (If you don't mind...)

I got them on ebay (user: burl.quilt). They were 3 sets for $25/shipping included. He put in an extra set "Free" written on it that was the worst of the lot. That is the one I used for this bass! There was one set that had a gouge in it so he sent me another set! So by the end of the deal I got 5 sets of Sitka Spruce tops for $25 bucks! I shoulda gone out to buy a Lotto ticket.

I am sure that you wouldn't want to use them on an acoustic (maybe you would) but my plan was always to use them on my semi hollow or solid body basses.

Nomad98
 
I got them on ebay (user: burl.quilt). They were 3 sets for $25/shipping included. He put in an extra set "Free" written on it that was the worst of the lot. That is the one I used for this bass! There was one set that had a gouge in it so he sent me another set! So by the end of the deal I got 5 sets of Sitka Spruce tops for $25 bucks! I shoulda gone out to buy a Lotto ticket.

I am sure that you wouldn't want to use them on an acoustic (maybe you would) but my plan was always to use them on my semi hollow or solid body basses.

Nomad98

Thanks! I love the "plainer" type grain of spruce and would love to top a bass with it, but could never find a cheap set.
 
Haven't posted any progress for some time since there has been little to post. But... for those holding their breath... exhail!

In the last month (or so) I finally got the neck pocket routed and the blank fitted. Nice and snug.

Installed the fingerboard/truss rod and yesterday I slotted the neck. It is almost ready for fretting (my first attempt at installing frets, how hard can it be?). I also have to cut a slot for the nut that holds the strings behind the zero fret.

Special thanks to "Son of Magni" (read about it here) for his slick use of styrofoam clamping and veneer! Tried it on the headstock with two layers of veneer and it worked great! Also added a logo...

Decided to use magnets to hold the access cover on the back of the body! Unless there is some unforeseen drawback to magnets, I will never use screws again! Not to sure about using CA to glue them in but if that doesn't hold I will use epoxy or, the next bass I make, I may glue them under a layer of veneer?

Here are the pics, Thanks for looking ~ Nomad98

pic_6.jpg


pic_7.jpg


pic_8.jpg


pic_9.jpg
 
The only theought I would have is that instead of attaching the cover plate "magnet to magnet", as those look like neodymium/rare earth magnets, and they are probably strong enough to pull themselves right out of the wood.

I would maybe use magnets in the body, and a thin piece of sheet metal (steel edging from the garden supply dept. at Lowe's or Home Depot would work... it's about .010" thick). Those magnets should be plenty to hold that on, and it would also act as shielding on the cover plate.

That's lookin' mighty fine, there... you do great work. More pics of the pickup cover, please!
 
The only theought I would have is that instead of attaching the cover plate "magnet to magnet", as those look like neodymium/rare earth magnets, and they are probably strong enough to pull themselves right out of the wood.

I would maybe use magnets in the body, and a thin piece of sheet metal (steel edging from the garden supply dept. at Lowe's or Home Depot would work... it's about .010" thick). Those magnets should be plenty to hold that on, and it would also act as shielding on the cover plate.

That is a GREAT idea! I am worried about the magnets coming out which is why I was thinking of epoxy and veneer over the magnets but do you think I would figure out the magnet to metal plate.... D'Oh! Live and learn! I will ride these out until they pull out of the wood but the next bass gets a metal plate.

Nomad98
 
Other way to do the cavity cover magnets is to leave them in the cover, and sink some small metal screws into the holes where you have the body magnets (make sure the screws are magnetic first, no brass!). That way if the magnets are still pulling too hard, you just sink the screws in a wee bit deeper. Save 50% on magnet costs!

Looking very nice BTW! :bassist:
 
Other way to do the cavity cover magnets is to leave them in the cover, and sink some small metal screws into the holes where you have the body magnets (make sure the screws are magnetic first, no brass!). That way if the magnets are still pulling too hard, you just sink the screws in a wee bit deeper. Save 50% on magnet costs!

OK... Believe it or not, I was just going down that road of "small metal screws" as I sit at my desk "working?" Of course I was thinking of putting them in the cover not the body? I may do that to this bass (screws in the body).
 
Although I was intimidated to start... I have completed my first fret install on a fingerboard. Was really easy and dare I say "FUN?" I tapped each side of the fret in and then smacked the mid section in using a rubber mallet with a wooden board between the fret and the mallet. (I am sure there are better ways to accomplish this but this was my method and it seemed to work.) It went very fast and time will tell, after I level and finish the frets, if it was a good/bad job.

pic_10.jpg


I also got the bolt-on neck done. I angled the two bolts that are on the upper horn (did that on my first build and tried going perpendicular on the second build... didn't like the second built results!) This time I set more of an angle to the bolts so I can take more of the body away from the back where the neck and the body meet. It feels really nice (lots of thumb room) and I am still going to take a little more of the body away.

pic_11.jpg

pic_12.jpg


More pics of the pickup cover, please!

Sorry it's taken so long to post more pickup cover picts but I wanted to post how the cover works... instead of just picts.

I decided that I really liked the clean look of no screws through the top of the pickup covers (I was originally going to go through the top). So I went through the back of the bass... The screws have little nylon black washers under them (back of the bass) and rubber springs between the body and cover (inside the pickup cavity).

pic_13.jpg


Worked really well but since it was an after thought one screw fell by the back access cover. Could have been worse, I thought it may go right into the magnet that holds the cover on!! Other than that the cover is just your basic routed out wood block with matching body veneer and spruce top. The pickup is going to be an EMG (since that's what I have laying around) that will have little tabs on the underside of the cover, to hold the pickup in place.

pic_14.jpg


Thanks for looking...
~Nomad98
 

Latest posts