• TalkBass has been independent since 1998. Add your voice.
    Create a free account to reply to discussions, view embedded media, and browse with fewer display ads.
    Join freeLog in
    Want zero display ads or expanded classifieds tools? Compare plans.

Peavey Frankenbass Refinish

Hola.

This is not high tech or the work of a Luthier, but I thought I would share some pictures of my refinish project.

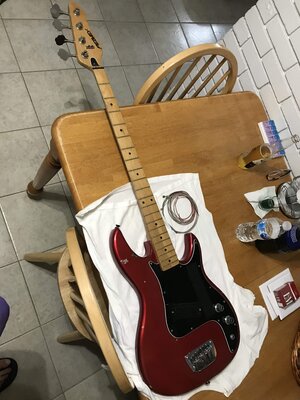
This is an 80's Peavey body and a 90's Peavey neck. It plays and sounds great but I wanted to make it a little more sexy. I am not looking for perfection!
 

Attachments

  • IMG_1284.JPG
    IMG_1284.JPG
    705.6 KB · Views: 94
  • IMG_1285.JPG
    IMG_1285.JPG
    597.1 KB · Views: 77
  • IMG_1286.JPG
    IMG_1286.JPG
    755 KB · Views: 84
  • IMG_1316.JPG
    IMG_1316.JPG
    702.4 KB · Views: 92
  • IMG_1322.JPG
    IMG_1322.JPG
    663.4 KB · Views: 85
Pieces and parts. I think I will swap the bridge with a badass bridge and replace the tuners. These work fine, but those replacements would be nice. I want to use this as my primary bass with my 3 piece band.
 

Attachments

  • IMG_1287.JPG
    IMG_1287.JPG
    588.2 KB · Views: 88
  • IMG_1288.JPG
    IMG_1288.JPG
    629.3 KB · Views: 87
  • IMG_1289.JPG
    IMG_1289.JPG
    586.2 KB · Views: 85
  • IMG_1291.JPG
    IMG_1291.JPG
    758 KB · Views: 82
  • IMG_1293.JPG
    IMG_1293.JPG
    539.5 KB · Views: 86
  • IMG_1296.JPG
    IMG_1296.JPG
    565.7 KB · Views: 85
  • IMG_1623.JPG
    IMG_1623.JPG
    858.7 KB · Views: 93
I bought some paint stripper. That stripper gave me wood. :)
 

Attachments

  • IMG_1311.JPG
    IMG_1311.JPG
    679.6 KB · Views: 92
  • IMG_1312.JPG
    IMG_1312.JPG
    433.1 KB · Views: 77
  • IMG_1625.JPG
    IMG_1625.JPG
    624.9 KB · Views: 86
  • IMG_1630.JPG
    IMG_1630.JPG
    685.5 KB · Views: 88
  • IMG_1631.JPG
    IMG_1631.JPG
    644.5 KB · Views: 85
  • IMG_1633.JPG
    IMG_1633.JPG
    678.9 KB · Views: 83
  • IMG_2170.JPG
    IMG_2170.JPG
    866.5 KB · Views: 78
  • IMG_2171.JPG
    IMG_2171.JPG
    931.8 KB · Views: 79
  • IMG_2172.JPG
    IMG_2172.JPG
    757.5 KB · Views: 83
Painted with sandable primer, white base coat, then the fluorescent green. The green nozzle got clogged and stopped spraying. I only used about a third of the can. Good news is it caused some splatter and gave it a texture really I like! I think I will let this dry for a week then start with the clear coats. Then sand and polish.
 

Attachments

  • IMG_3511.JPG
    IMG_3511.JPG
    789.3 KB · Views: 87
  • IMG_3512.JPG
    IMG_3512.JPG
    567.3 KB · Views: 90
  • IMG_3531.JPG
    IMG_3531.JPG
    976.9 KB · Views: 88
  • IMG_3537.JPG
    IMG_3537.JPG
    685 KB · Views: 94
  • IMG_3668.JPG
    IMG_3668.JPG
    770.1 KB · Views: 86
  • IMG_3930.JPG
    IMG_3930.JPG
    572.4 KB · Views: 85
  • IMG_3986.JPG
    IMG_3986.JPG
    685.3 KB · Views: 86
  • IMG_3987.JPG
    IMG_3987.JPG
    522.1 KB · Views: 91
So I have been busy with work so there is slow progress. The finish was too rough so I had to wet sand it back a LOT.

I am torn. Should I move on as is and re-apply the clear coats or try to paint another few coats of green? It looks good enough for rock and roll to be honest.
 

Attachments

  • IMG_4689.jpg
    IMG_4689.jpg
    47.9 KB · Views: 91
I am torn. Should I move on as is and re-apply the clear coats or try to paint another few coats of green? It looks good enough for rock and roll to be honest.
i get that --- i'd be inclined to leave it and rock on, but you might have an everlasting, special pride seeing how great you can make it. whatever you decide: nice job, neat color, great idea --- be sure to post the assembled ax! good luck with your deliberations! :thumbsup:
 
  • Like
Reactions: tonybassman
I decided to leave as is and clear coat. I then put a bunch of coats of Turtle Wax on it and it did not come out too bad. My buddy reassembled the bass and set it up. Plays great again, using it for my gig Saturday! It is far from perfect but I really like the look. Shown here with my Christmas guitar strap. :)
 

Attachments

  • IMG_4956.jpg
    IMG_4956.jpg
    518.8 KB · Views: 59
  • IMG_4957.jpg
    IMG_4957.jpg
    576.3 KB · Views: 65