• TalkBass has been independent since 1998. Add your voice.
    Create a free account to reply to discussions, view embedded media, and browse with fewer display ads.
    Join freeLog in
    Want zero display ads or expanded classifieds tools? Compare plans.

Redwood lace burl top

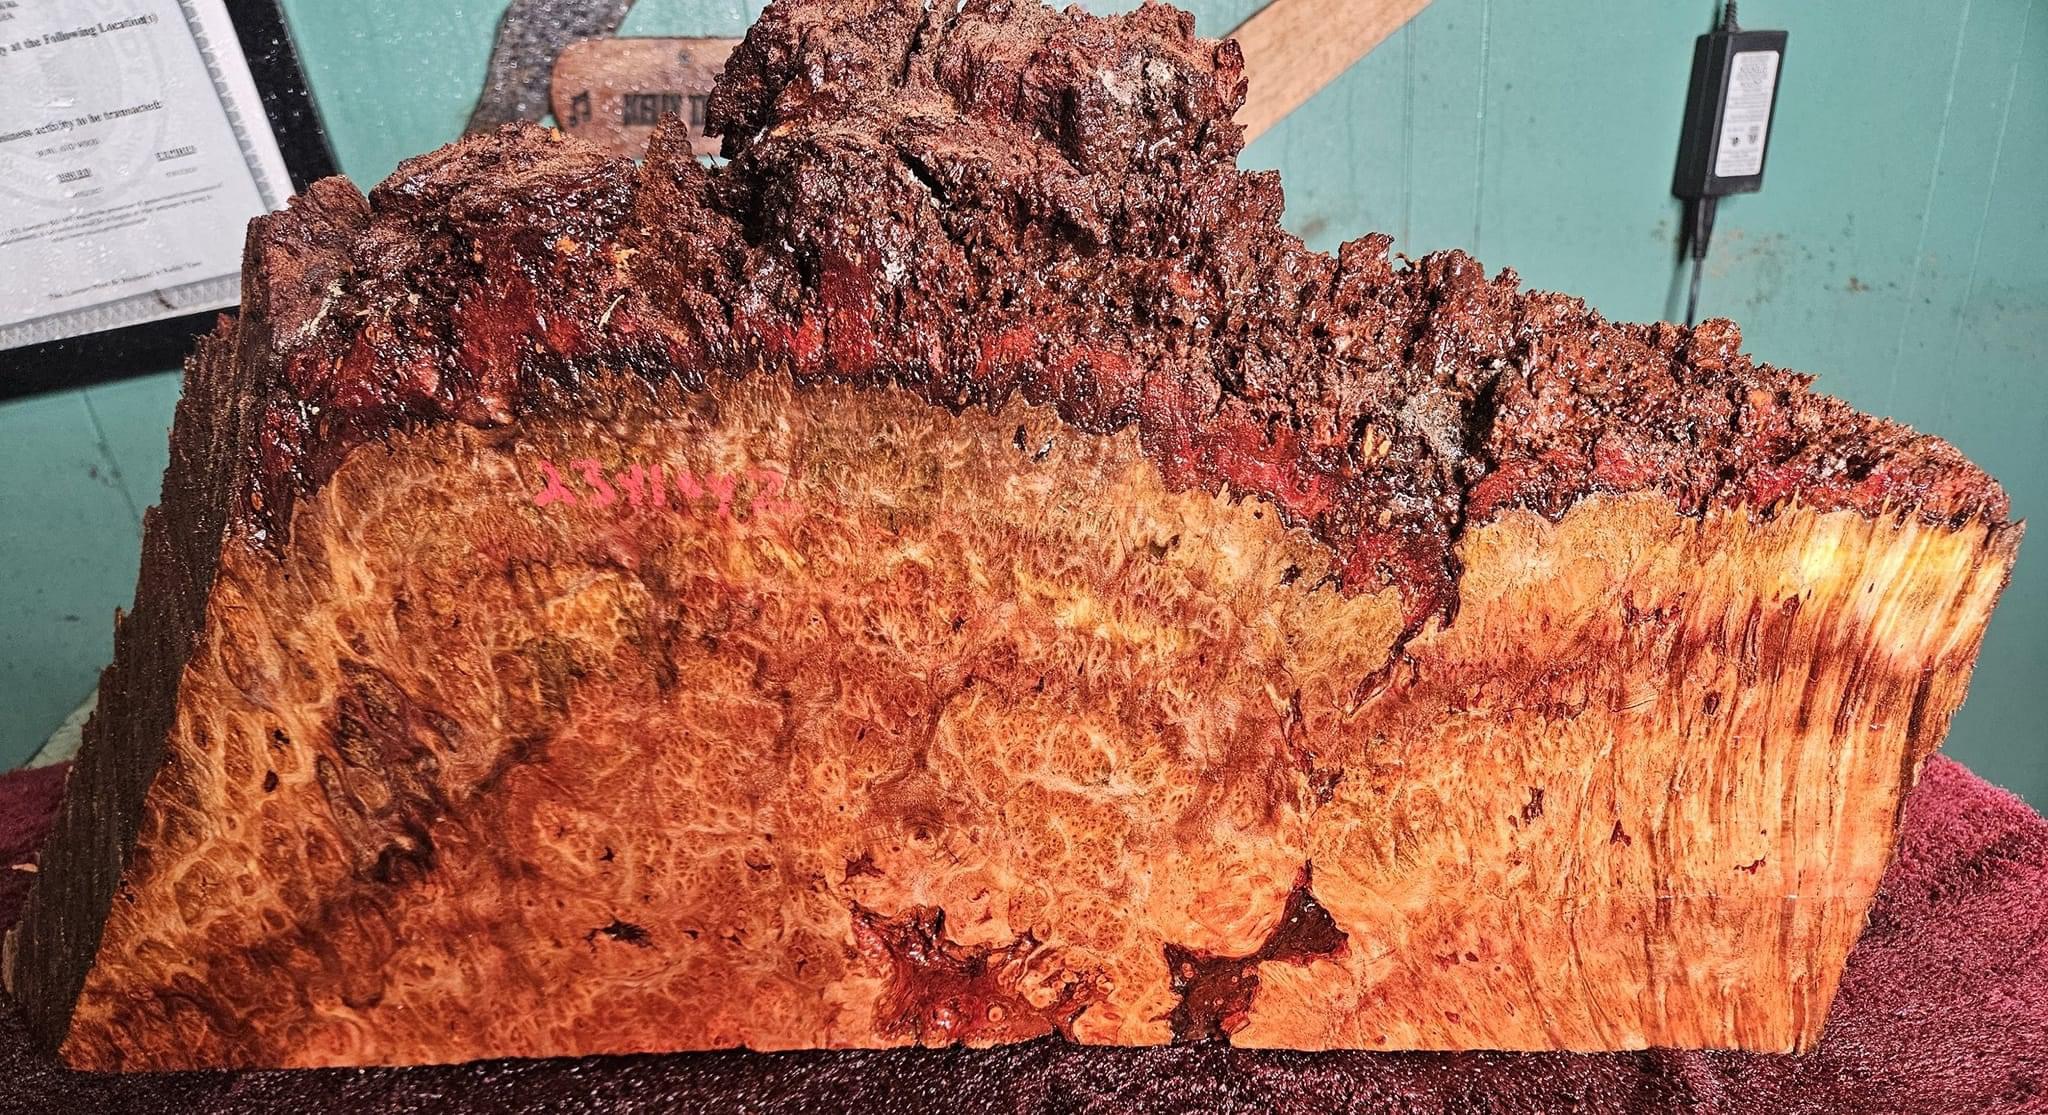
Hi all! Going to be building matching bodies with redwood lace burl tops, a bass for myself and a tele for my wife and I haven’t worked with burl like this before. Any tips/tricks you guys can offer before I start the actual build so I can avoid messing up a gorgeous piece of wood!? Pic of the burl for attention
IMG_7045.jpeg
 
Hi all! Going to be building matching bodies with redwood lace burl tops, a bass for myself and a tele for my wife and I haven’t worked with burl like this before. Any tips/tricks you guys can offer before I start the actual build so I can avoid messing up a gorgeous piece of wood!? Pic of the burl for attentionView attachment 5289718

(Shudder...) Redwood burl.....Yeah, it's beautiful, but it's the most difficult burl I've ever had the pleasure of working with. For about ten years, I was helping my buddy Mike Lipe with the burl-top bodies of his guitars. He would bring them to my shop to get the burl tops filled and bonded down. We did several hundred, with all different figured wood thin tops. I'm guessing that we did about 20 with redwood burl. Definitely the most difficult burl that we worked with, and they took so much extra time. Every time we finished one, Mike swore that he wouldn't do any more. But they were beautiful, and his customers kept demanding them, and were willing to pay extra.

The big problem with redwood burl is that, when you saw it into slices, it falls apart into little crumbs. A thin layer has almost no structural strength. You have to reinforce it with epoxy before you can even start cutting it.

Here's the approximate process that I used. Basically, you need to fill and reinforce each slice of burl before you saw it free from the block.

Starting with a block, like you are showing, I would first lay it down flat (on waxed paper) and begin pouring in CPES (Clear Penetrating Epoxy Sealant). These days, I like Total Boat's CPES. This is a very thin watery epoxy that's designed to repair rotted wood. It soaks down in deep and sticks everything together. It doesn't dry rigid, always stays a little bit rubbery. The redwood burl will soak it in like a sponge. It'll take several coats before it seems like it's starting to fill up. Let it cure for a day or two.

When it looks like it's roughly filled with CPES, start coating the surface with West Systems epoxy. It may take several coats. After curing, file or block sand it to an approximately flat surface. It doesn't have to be perfectly smooth, but it needs to be fairly flat. A hard surface of epoxy.

Then, stand the block up and resaw off that first slice. Carefully, because it's very fragile. I would usually saw them to about 1/4" thick, for a top that would be 1/8" thick when finished.

Lay the slice down, sawn side up. And lay the remainder of the block down, sawn side up. Do the epoxy process over on both. Apply CPES, let it cure, apply West Systems, let it cure, block sand the surfaces approximately flat. Then saw the second slice off of the block. Apply CPES and West Systems to its sawn side.

That gives you two slices of redwood burl, fairly well encapsulated in epoxy, and reasonable to work with.

There are still many more steps coming up.

But, I've got to get back to the shop. Let me know if this helps, and I'll continue with more details.
 
(Shudder...) Redwood burl.....Yeah, it's beautiful, but it's the most difficult burl I've ever had the pleasure of working with. For about ten years, I was helping my buddy Mike Lipe with the burl-top bodies of his guitars. He would bring them to my shop to get the burl tops filled and bonded down. We did several hundred, with all different figured wood thin tops. I'm guessing that we did about 20 with redwood burl. Definitely the most difficult burl that we worked with, and they took so much extra time. Every time we finished one, Mike swore that he wouldn't do any more. But they were beautiful, and his customers kept demanding them, and were willing to pay extra.

The big problem with redwood burl is that, when you saw it into slices, it falls apart into little crumbs. A thin layer has almost no structural strength. You have to reinforce it with epoxy before you can even start cutting it.

Here's the approximate process that I used. Basically, you need to fill and reinforce each slice of burl before you saw it free from the block.

Starting with a block, like you are showing, I would first lay it down flat (on waxed paper) and begin pouring in CPES (Clear Penetrating Epoxy Sealant). These days, I like Total Boat's CPES. This is a very thin watery epoxy that's designed to repair rotted wood. It soaks down in deep and sticks everything together. It doesn't dry rigid, always stays a little bit rubbery. The redwood burl will soak it in like a sponge. It'll take several coats before it seems like it's starting to fill up. Let it cure for a day or two.

When it looks like it's roughly filled with CPES, start coating the surface with West Systems epoxy. It may take several coats. After curing, file or block sand it to an approximately flat surface. It doesn't have to be perfectly smooth, but it needs to be fairly flat. A hard surface of epoxy.

Then, stand the block up and resaw off that first slice. Carefully, because it's very fragile. I would usually saw them to about 1/4" thick, for a top that would be 1/8" thick when finished.

Lay the slice down, sawn side up. And lay the remainder of the block down, sawn side up. Do the epoxy process over on both. Apply CPES, let it cure, apply West Systems, let it cure, block sand the surfaces approximately flat. Then saw the second slice off of the block. Apply CPES and West Systems to its sawn side.

That gives you two slices of redwood burl, fairly well encapsulated in epoxy, and reasonable to work with.

There are still many more steps coming up.

But, I've got to get back to the shop. Let me know if this helps, and I'll continue with more details.


That for sure helps a ton! Especially since I’m used to working with hardwoods. How do you think approximately 1/2” slices would hold up? Definitely wouldn’t have known to use epoxy before I resawed it! Thanks!
 
That for sure helps a ton! Especially since I’m used to working with hardwoods. How do you think approximately 1/2” slices would hold up? Definitely wouldn’t have known to use epoxy before I resawed it! Thanks!

How thick do you plan on making the finished top on your instruments?

On Mike's guitars, we made all the burl tops about 1/8" thick finished. We'd do the epoxy fill prep on the block, as I described above, cut slices off about 1/4" thick, and fill the back sides of the slices. Then, select them and decide how to arrange them to get the best bookmatched pattern. Joint the center edges with files and sanding blocks. Carefully flatten the back sides by hand with sanding blocks. You can't run them through a drum sander. The slices would get glued down to the body blank with more West Systems epoxy, still at something over 1/4" thick.

Once they were glued securely to the body blank, we would trim them down to 1/8" thickness. Usually with a router in a router planing fixture. Sometimes roughing it with an angle grinder and a sanding disk. You can't run it through a planer or a drum sander.

When it's down to thickness and fairly flat, it gets more West Systems epoxy. Fill it completely up to a smooth surface. Hand block sanded to smooth, up to 220 grit. Then, the rest of the routing and detail work to finish up the body. And it would go to Pat Wilkins for about ten coats of clear polyester. Polyester and polyurethane finishes will bond well directly to the epoxy.

Sometimes we would add color pigment to the West Systems epoxy, while filling the burl. Black would add more contrast and detail. I also remember tinting the epoxy yellow-orange one time, which made the burl look like a fireball.

These redwood burl topped bodies were beautiful, but they were a ton of work. And it took a lot of experimenting to get the process right.
 
Hi all! Going to be building matching bodies with redwood lace burl tops, a bass for myself and a tele for my wife and I haven’t worked with burl like this before. Any tips/tricks you guys can offer before I start the actual build so I can avoid messing up a gorgeous piece of wood!? Pic of the burl for attentionView attachment 5289718
That's a fabulous looking piece of wood! :drool: I hope you'll be posting pics as you go along? Can't wait to see how that looks as a top. Good luck, and enjoy!:thumbsup:
 
How thick do you plan on making the finished top on your instruments?

On Mike's guitars, we made all the burl tops about 1/8" thick finished. We'd do the epoxy fill prep on the block, as I described above, cut slices off about 1/4" thick, and fill the back sides of the slices. Then, select them and decide how to arrange them to get the best bookmatched pattern. Joint the center edges with files and sanding blocks. Carefully flatten the back sides by hand with sanding blocks. You can't run them through a drum sander. The slices would get glued down to the body blank with more West Systems epoxy, still at something over 1/4" thick.

Once they were glued securely to the body blank, we would trim them down to 1/8" thickness. Usually with a router in a router planing fixture. Sometimes roughing it with an angle grinder and a sanding disk. You can't run it through a planer or a drum sander.

When it's down to thickness and fairly flat, it gets more West Systems epoxy. Fill it completely up to a smooth surface. Hand block sanded to smooth, up to 220 grit. Then, the rest of the routing and detail work to finish up the body. And it would go to Pat Wilkins for about ten coats of clear polyester. Polyester and polyurethane finishes will bond well directly to the epoxy.

Sometimes we would add color pigment to the West Systems epoxy, while filling the burl. Black would add more contrast and detail. I also remember tinting the epoxy yellow-orange one time, which made the burl look like a fireball.

These redwood burl topped bodies were beautiful, but they were a ton of work. And it took a lot of experimenting to get the process right.
Got to say, Bruce, I'm no luthier - I can just about get through a set up :D - but your posts are fascinating. Also your willingness to share your expertise is to be admired. You should write a book, mate! Cheers.:thumbsup:
 
  • Like
Reactions: Markshan
Got to say, Bruce, I'm no luthier - I can just about get through a set up :D - but your posts are fascinating. Also your willingness to share your expertise is to be admired. You should write a book, mate! Cheers.:thumbsup:

Thanks, Wyrdlow. I have been writing a book.....right here on TalkBass. I've been writing threads like this since about 2010, hundreds of them. Search them out, they are free. Teaching advanced Luthier and machine design skills on here is my retirement hobby.
 
That for sure helps a ton! Especially since I’m used to working with hardwoods. Definitely wouldn’t have known to use epoxy before I resawed it! Thanks!
How thick do you plan on making the finished top on your instruments?

On Mike's guitars, we made all the burl tops about 1/8" thick finished. We'd do the epoxy fill prep on the block, as I described above, cut slices off about 1/4" thick, and fill the back sides of the slices. Then, select them and decide how to arrange them to get the best bookmatched pattern. Joint the center edges with files and sanding blocks. Carefully flatten the back sides by hand with sanding blocks. You can't run them through a drum sander. The slices would get glued down to the body blank with more West Systems epoxy, still at something over 1/4" thick.

Once they were glued securely to the body blank, we would trim them down to 1/8" thickness. Usually with a router in a router planing fixture. Sometimes roughing it with an angle grinder and a sanding disk. You can't run it through a planer or a drum sander.

When it's down to thickness and fairly flat, it gets more West Systems epoxy. Fill it completely up to a smooth surface. Hand block sanded to smooth, up to 220 grit. Then, the rest of the routing and detail work to finish up the body. And it would go to Pat Wilkins for about ten coats of clear polyester. Polyester and polyurethane finishes will bond well directly to the epoxy.

Sometimes we would add color pigment to the West Systems epoxy, while filling the burl. Black would add more contrast and detail. I also remember tinting the epoxy yellow-orange one time, which made the burl look like a fireball.

These redwood burl topped bodies were beautiful, but they were a ton of work. And it took a lot of experimenting to get the process right.

I was planning on having the tops end up about 3/8” thick, or as thick as the slab will let me make them rather.
Good to know about files and a sanding block to joint the edge! I had a feeling using a jointer was not a smart thing to do.

Thanks Wyrdlow! I’m right with you on seeing how it looks as a top! I’ll post photos throughout the build as I get time to work on it. Have to wait for it to finish drying first however.