As I'm working on my Cepheid 5 bass, one thing I wanted to make sure I did on this build is to cut a compound scarf joint. These are used on multiscale instruments where the headstock angle breaks just behind the nut the whole way along the slanted nut line. Instructions on how to make them are few and far between, and usually just buried in a build thread somewhere. Nothing wrong with that, but from all of my research, there isn't a treatment singularly on cutting the scarf joint. I was told there was an article in American Lutherie at one point, but it's a subscription article.
So, as a trained experimental physicist, I decided that I really wanted to understand what was going on. After I did, I thought I should post something that people can reference for a straightforward, illustrated reference, but also with equations to eliminate a bunch of guesswork and trial and error (NOTE: I'm not responsible for any error ). But before we get going, there are three (3) primary ways a compound scarf can be safely cut for a guitar or bass neck:
My requirements were to get the headstock and neck shaft from the same board with minimal waste. A lot of the recommendations online are to simply put the compound angle on the neck shaft and use a solid block for the headstock. That's cool and I have no issue with it, but my neck blank was not sufficiently long to do this, thus the approach for minimized waste. I haven't tried it on a laminated neck, but this may work for it, it would be cool if someone gave it a whirl at some point.
Basic Information
Now, when cutting the compound scarf joint, there are three angles that come in to play:
Cheat Sheet

Note how there are two cuts to be made. The first cut will result in the correct compound angle on the neck shaft. The second cut will result in the correct compound angle on the headstock. There will be a pentahedral piece of waste that results from these two cuts.
Procedure
Not being one to derive and run, I put the above to the test (actually, the tests came first, but I wanted to put the condensed version up above, so you don't have to read my rambling any further if you don't want).
I used a scrap of primed white pine for my final trial cuts and I took pictures, not only to document it for myself, but so that you could see how I did this. I made notes on the piece itself that may be useful, so blow them up is you like.
The basic steps for cutting are:
Layout
Laying this out correctly is key to correct execution. It saved me many wrong cuts. It's easiest to do this with a rectangular blank where the sides are true and parallel and the faces are clean. The way I approached layout was as follows:
Determine Beta
Any scientific calculator app can do this for you. Make sure you use the parentheses correctly. This part is super easy.
Setup
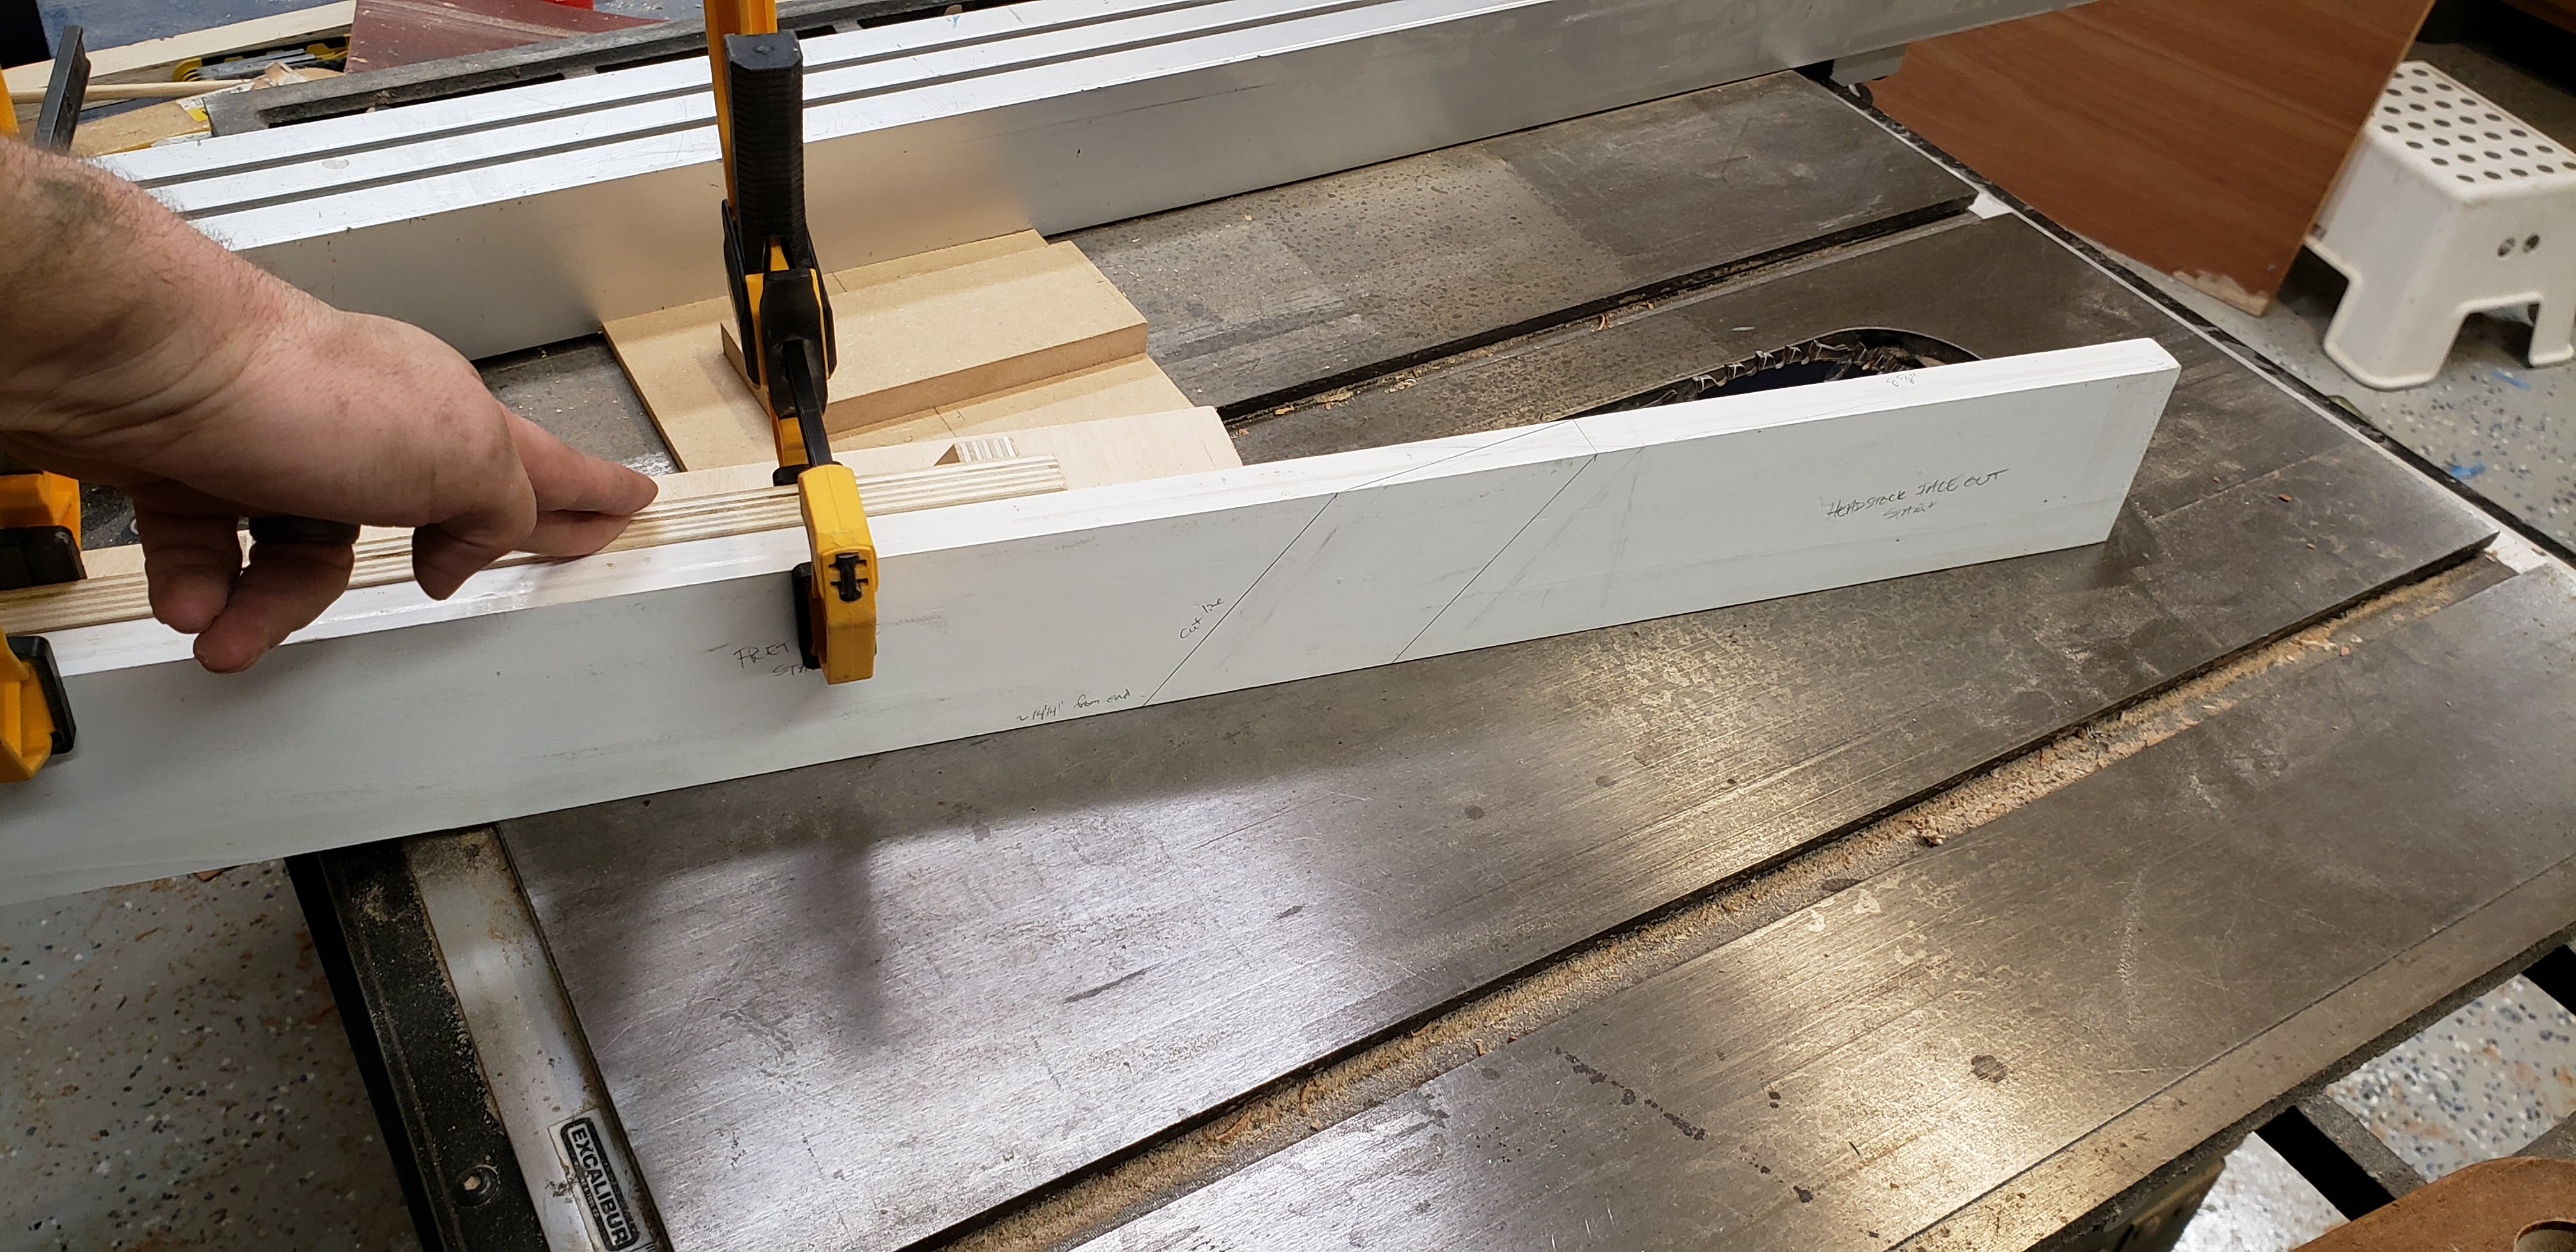
Next to the layout, the setup is the most critical part. A good setup can all but ensure success. What your setup will need:
The picture above shows how I did it. I used a large angled wedge along with a nice auxiliary fence, as my actual fence is not dead square (vertically) to the table.
Make the First Cut
Now comes the hardest part, because you are going to actually turn the nice, beautiful neck blank into three pieces, only two of which you will keep (at most!). To prepare for this anxiety inducing step, do thusly:
Flip Your Lid
Take that headstock you just severed from the neck and flip it end over end, meaning that the starting headstock face still faces to the right. Make sure it stays in this alignment. The way to know that it is right is that now top edge should project out over the now bottom edge.
Making the Cut, Again
We're on the home stretch now. Here's how to make sure you own it:

Whew!
Now, it's time to check that beautiful joint and admire your awesome handy work! This painted pine works really well for showing the cuts and transition region:
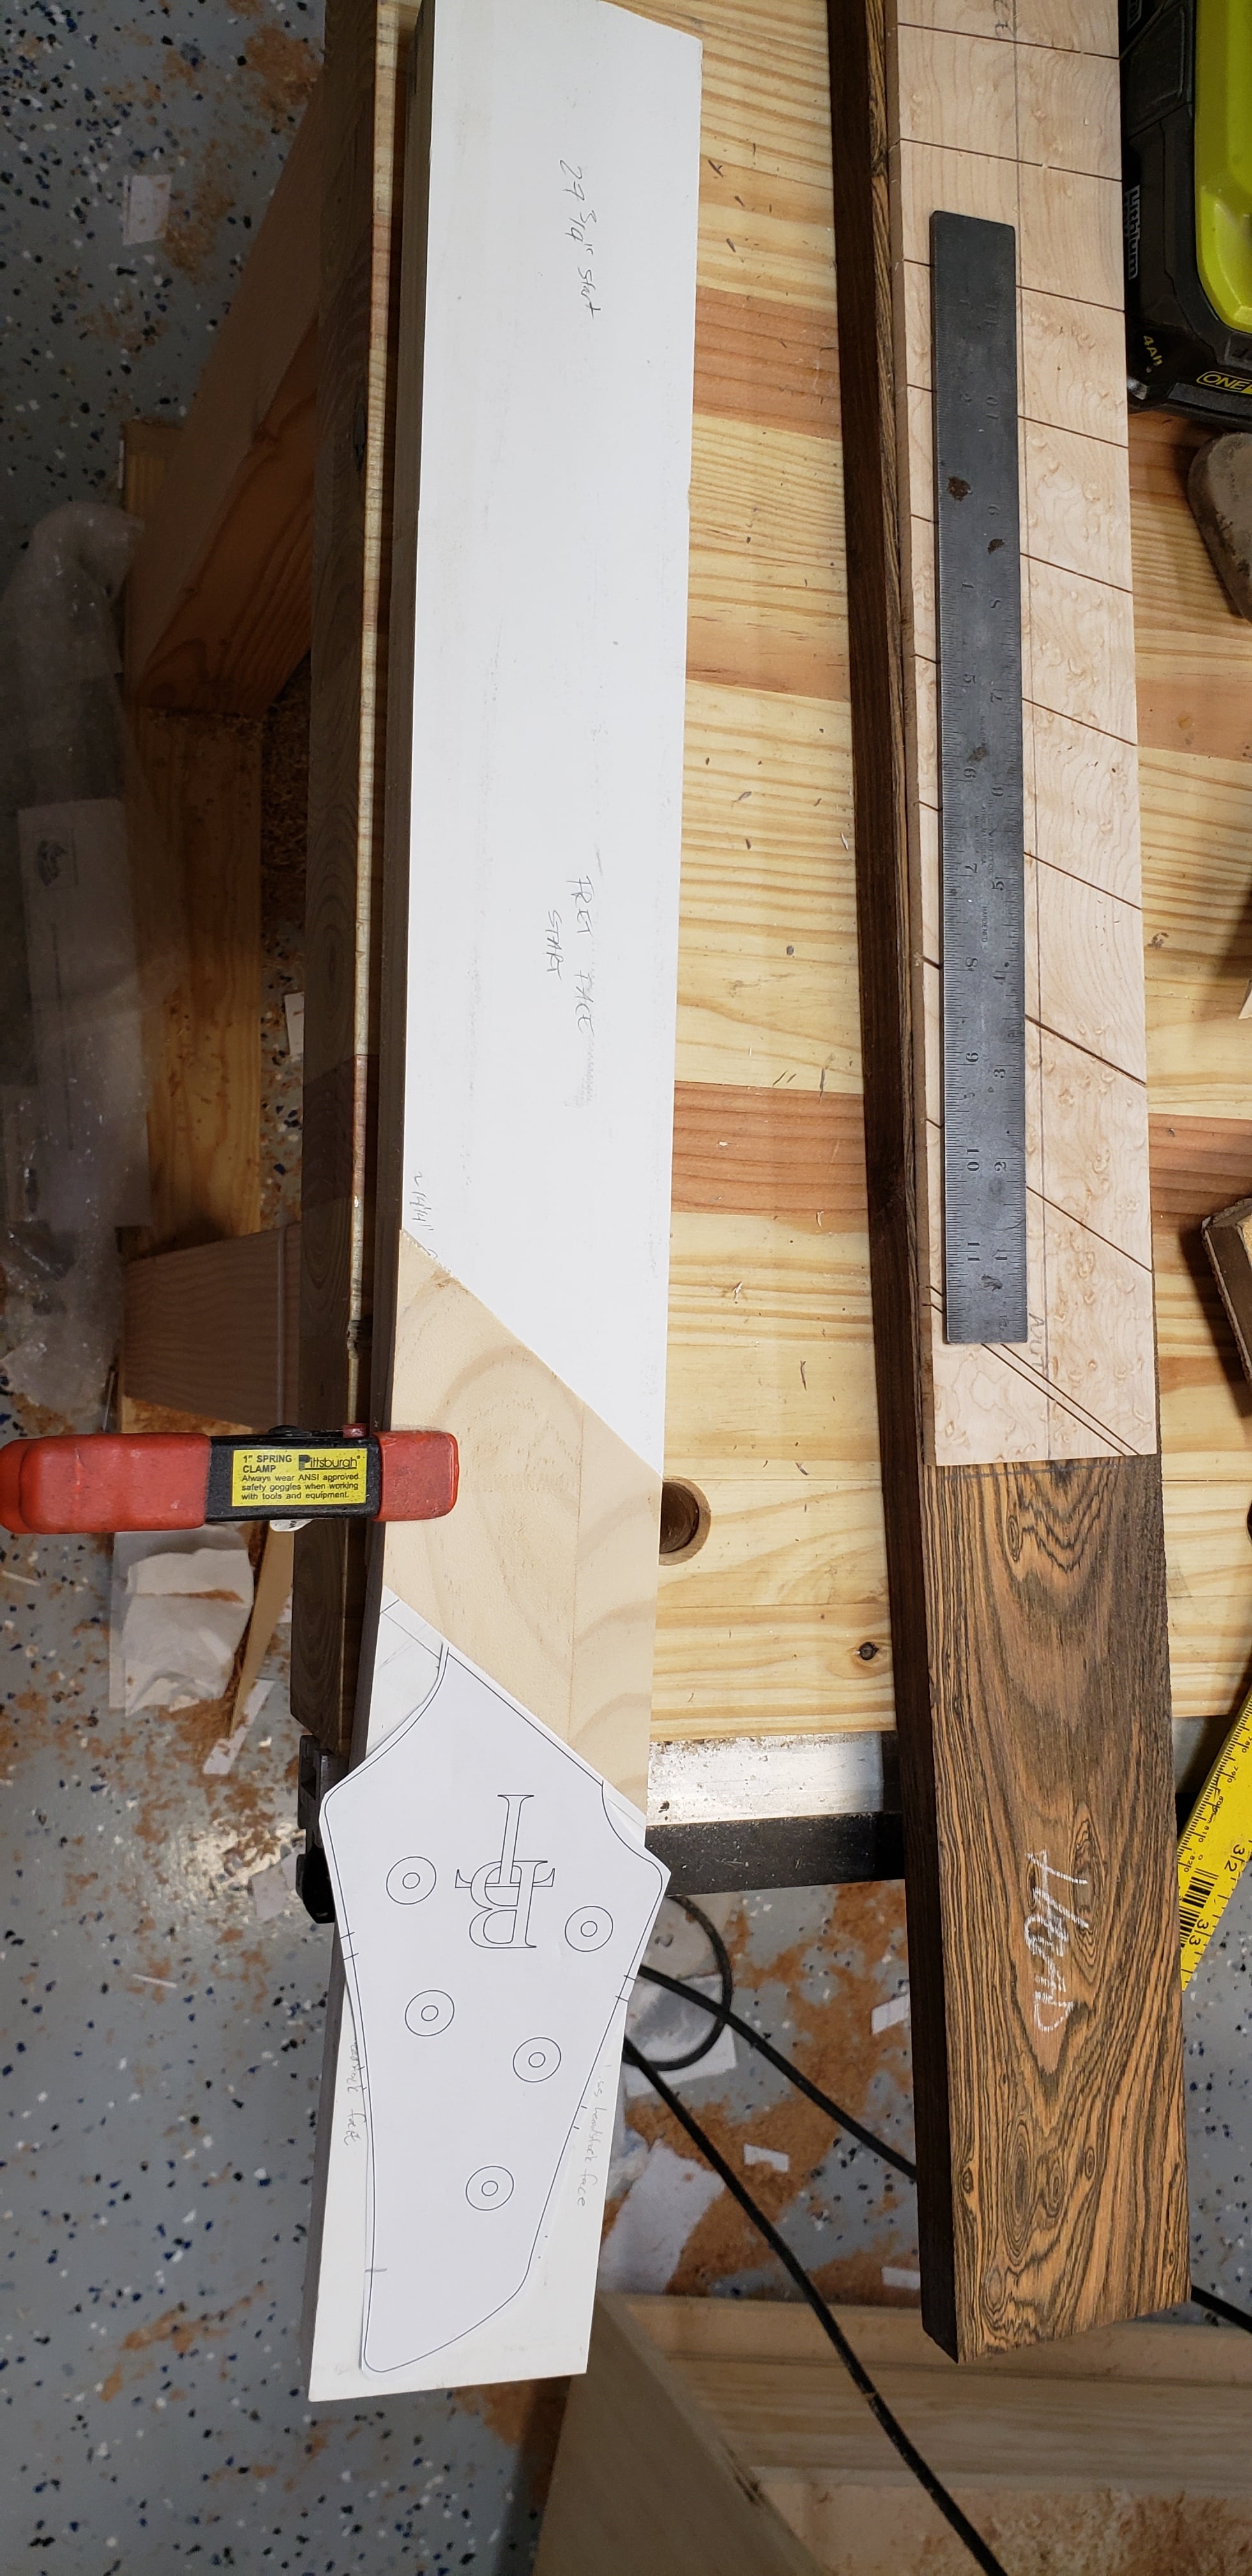
Check that sweet headstock action out! If you're a little crazy like I am, you might admire the waste piece that was cut off as well. When done correctly, it's a pentahedron that looks like this from the top down:
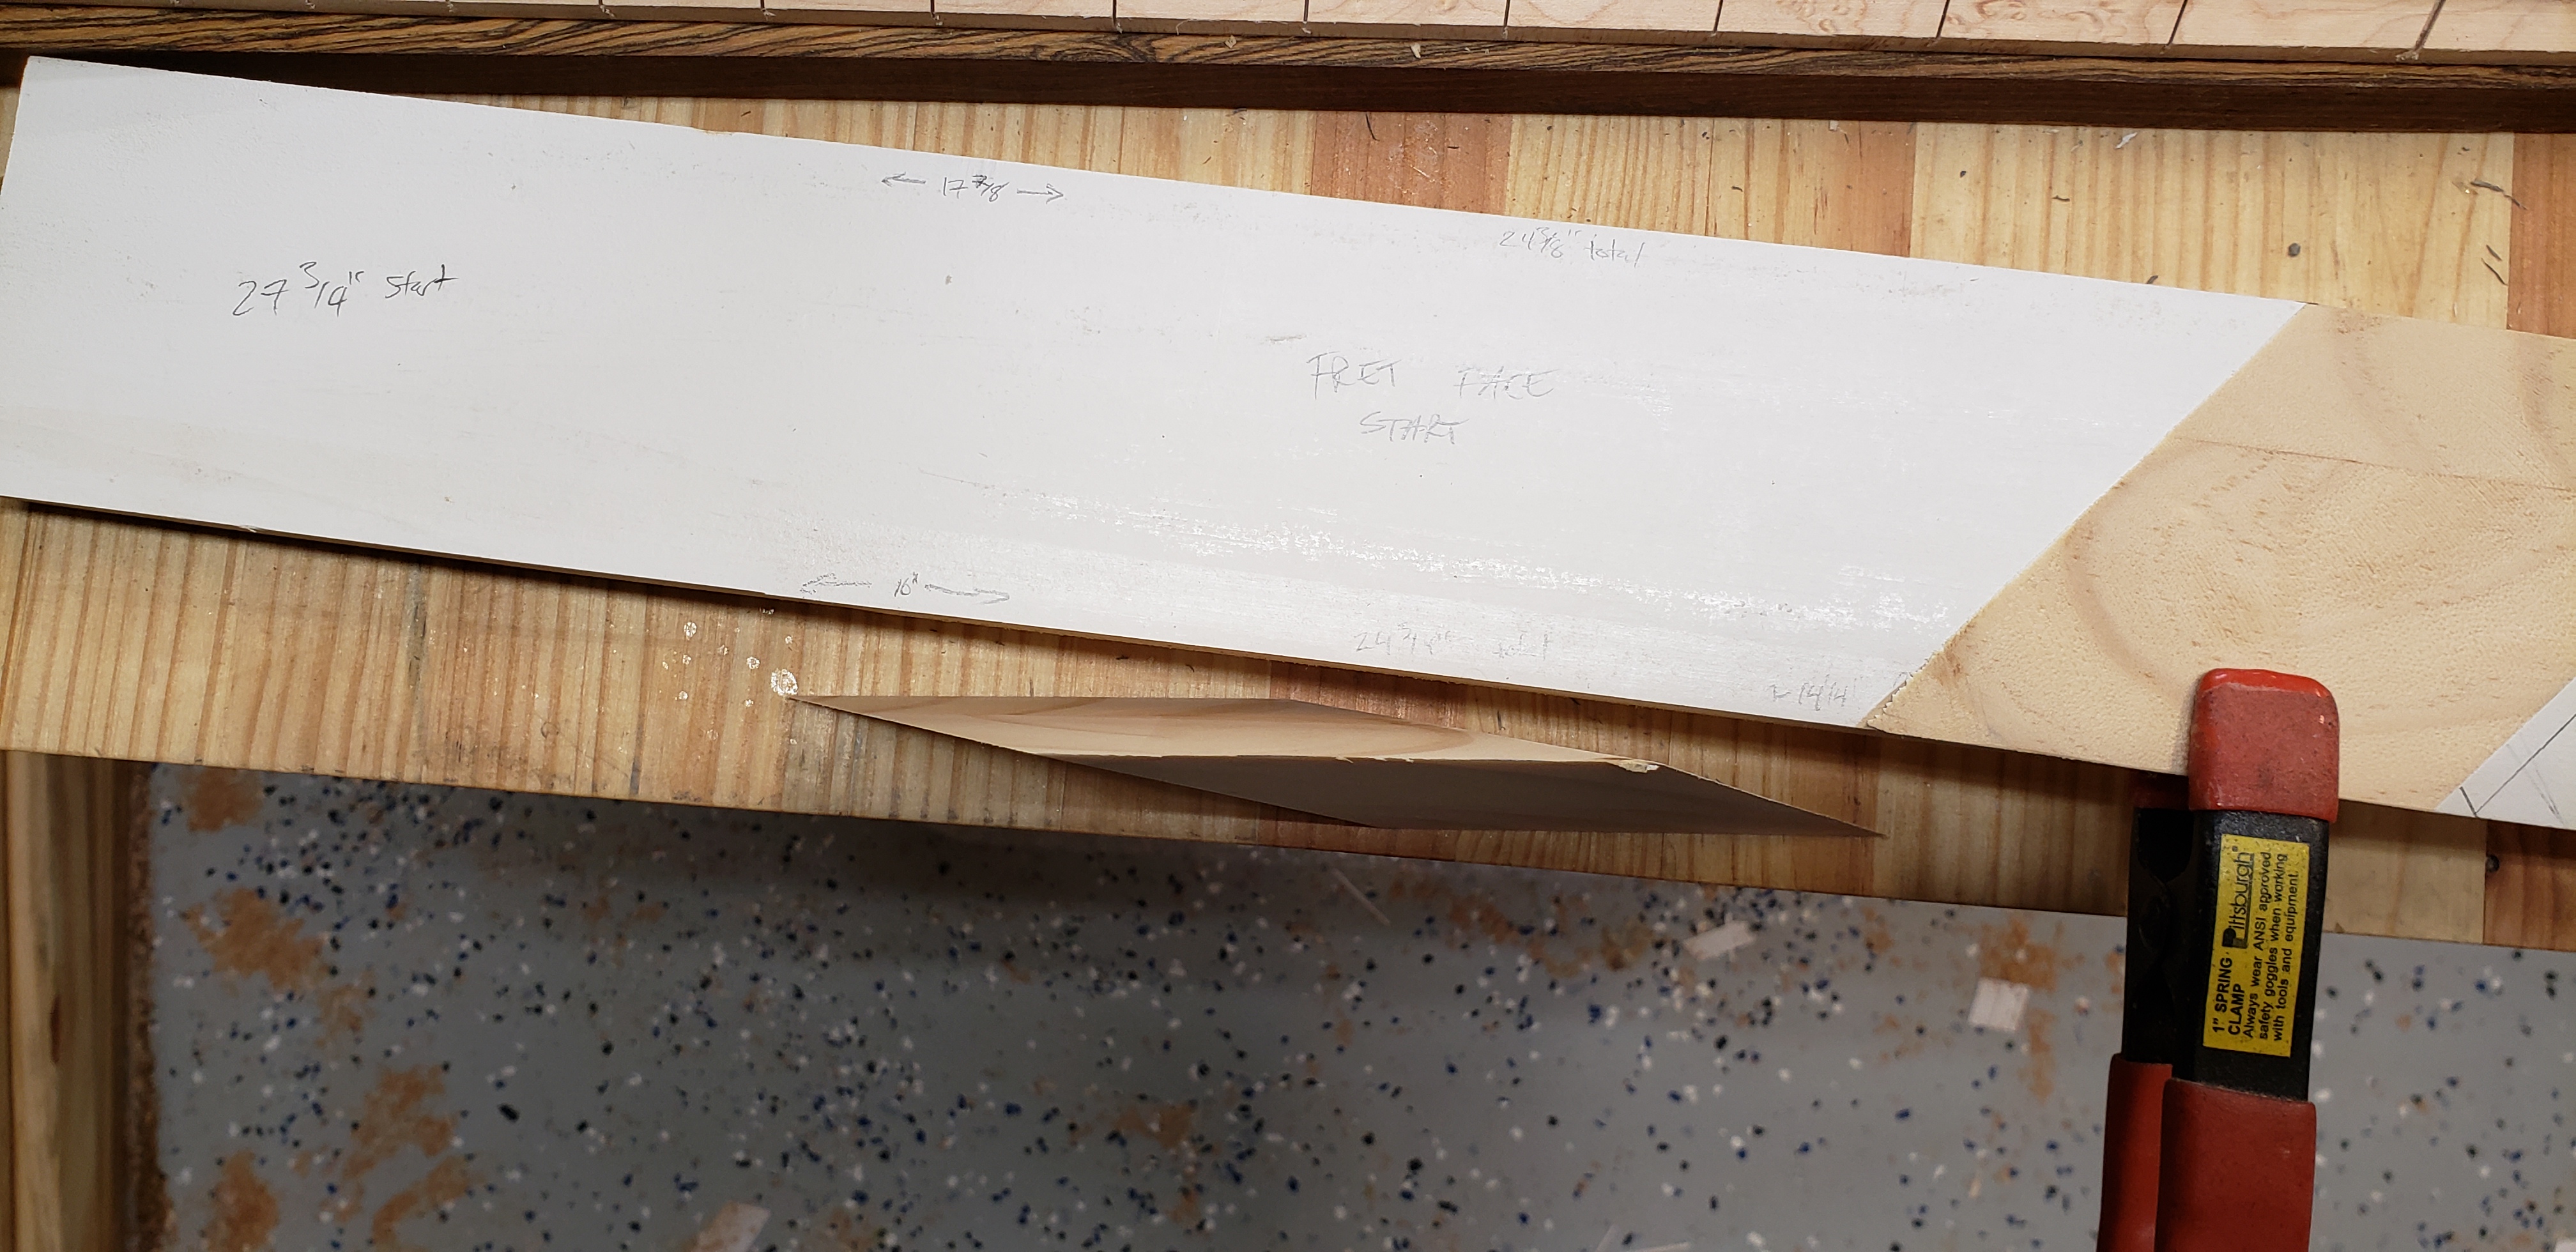
And the bottom will look like this:

Closing Thoughts
Congrats on making it this far! So here are a few thoughts or potentially useful tidbits you might like to know about:
So, as a trained experimental physicist, I decided that I really wanted to understand what was going on. After I did, I thought I should post something that people can reference for a straightforward, illustrated reference, but also with equations to eliminate a bunch of guesswork and trial and error (NOTE: I'm not responsible for any error
). But before we get going, there are three (3) primary ways a compound scarf can be safely cut for a guitar or bass neck:- Table saw with tilted blade
- Band saw with tilted table
- Router on sled wedges
My requirements were to get the headstock and neck shaft from the same board with minimal waste. A lot of the recommendations online are to simply put the compound angle on the neck shaft and use a solid block for the headstock. That's cool and I have no issue with it, but my neck blank was not sufficiently long to do this, thus the approach for minimized waste. I haven't tried it on a laminated neck, but this may work for it, it would be cool if someone gave it a whirl at some point.
Basic Information
Now, when cutting the compound scarf joint, there are three angles that come in to play:
- Tilt-back or headstock angle (theta): This is the normal headstock angle that one chooses. My examples use 12 degrees because that is what I wanted. This is assumed to be known.
- Zero fret or nut angle (phi): This is the angle from the line perpendicular to the center line (like the original nut line, which would be 0 degrees). This angle is given by the likes of fretfind2D and assumed to be known.
- Blade angle (beta): This is the tricky bit. This is NOT the same as the zero fret angle, as I first assumed. This actually is a trigonometric function of the other two angles. This is where I got confused and where there was zero concrete info. It seemed that the few examples I found determined this angle through trial and error, just like I did at first.
Cheat Sheet
Note how there are two cuts to be made. The first cut will result in the correct compound angle on the neck shaft. The second cut will result in the correct compound angle on the headstock. There will be a pentahedral piece of waste that results from these two cuts.
Procedure
Not being one to derive and run, I put the above to the test (actually, the tests came first, but I wanted to put the condensed version up above, so you don't have to read my rambling any further if you don't want).
I used a scrap of primed white pine for my final trial cuts and I took pictures, not only to document it for myself, but so that you could see how I did this. I made notes on the piece itself that may be useful, so blow them up is you like.
The basic steps for cutting are:
- Layout: This is critical. Make sure that you know how much finished headstock surface you need. This can actually change based on how thick the headstock is to start vs. when you are done with it. Make sure you mark the fretboard surface, the starting headstock surface, and the final headstock surface. If this is your first time, don't skip this part. If it's not your first time, don't skip it!
- Determine Beta: use the equation and your two other angles to figure out what your blade angle should be. This is how far to tilt the table saw blade on a table saw, or how much to tilt the bandsaw table if on a bandsaw
- Setup the saw: A tapering attachment is a very wise choice, you will notice that I did not necessarily do that. I got it cut fine, but it required a lot of care to make sure things stayed right.
- Make the first cut: Pretty self explanatory, but extremely nerve wracking when doing it on the real piece
- Flip the headstock piece end over end and move the taper jig to the other side of the blade
- Make the second cut: Extend the cut line beyond the end of the tapering attachment so that you don't cut your tapering jig. Trust me...
- Breathe a sigh of relief: You've earned it my friend!
Layout
Laying this out correctly is key to correct execution. It saved me many wrong cuts. It's easiest to do this with a rectangular blank where the sides are true and parallel and the faces are clean. The way I approached layout was as follows:
- Mark your surfaces. This will save you from cutting the wrong thing in the wrong place
- No seriously, mark the surfaces. Don't say I didn't warn you if you skip this part!
- Determine how much finished headstock surface you need. I needed 8" from where the G string crossed the nut. I printed out a paper template of my headstock to see where that fell. If you have the length, give it a little extra to be safe. I didn't have much extra, so I had to be basically dead on. (I hear you, "But how did it turn out?", go check the build thread)
- Draw a line along the face of the blank. This will be along the nut line, but just behind it (so you have room for a nut afterwards).
- Draw square lines on the sides from the points where the line from (4) hits the edges
- Draw a line along the headstock angle on the side of the neck blank so that it meets on the back surface with the lines from (5). Do this on both sides. No really, on both sides.
- Draw a line connecting where the two lines from (6) meet the front surface. THIS IS YOUR CUT LINE! You want the blade to exit on this line. If you have some extra length, cheat towards the heel side and give yourself some breathing room. I didn't have any, and it was stressful.
- Draw a line on the back surface that connects the two lines from (5). This is where your cut will start
- Check to make sure all the lines line up.
Determine Beta
Any scientific calculator app can do this for you. Make sure you use the parentheses correctly. This part is super easy.
Setup
Next to the layout, the setup is the most critical part. A good setup can all but ensure success. What your setup will need:
- Reliable way to hold taper. This will ensure proper headstock angle when all is said and done.
- Accurate blade angle setting. If this is off, the line across the neck blank will be off.
- Safe way of holding blank to the jig. Try to make sure that you can clamp the piece to the jig. Last thing you want to worry about is whether your fingers are going to have the correct compound angle cut in to them when you're done.
The picture above shows how I did it. I used a large angled wedge along with a nice auxiliary fence, as my actual fence is not dead square (vertically) to the table.
Make the First Cut
Now comes the hardest part, because you are going to actually turn the nice, beautiful neck blank into three pieces, only two of which you will keep (at most!). To prepare for this anxiety inducing step, do thusly:
- Clamp the blank to the taper jig with the fretboard face out
- Check the cut line on the back of your blank and ensure it sticks out past the end of the taper jig. Make sure you have enough room for the blade kerf as well.
- Set the fence position so that you cut on the side of the cut line that you intend to
- Check that it's set well by sighting down the blade and making sure it is on the correct side of the cut line on the side of the blank (you did draw these lines in layout step 6, right?)
- Say a little prayer that you got it right. It can't hurt anything, right?
- Fire up the saw and get it over with
Flip Your Lid
Take that headstock you just severed from the neck and flip it end over end, meaning that the starting headstock face still faces to the right. Make sure it stays in this alignment. The way to know that it is right is that now top edge should project out over the now bottom edge.
Making the Cut, Again
We're on the home stretch now. Here's how to make sure you own it:
- Drop the table saw blade
- Flip the taper jig side to side
- Move the fence to the other side of the blade
- Raise the blade
- Clamp the headstock to the jig. Leave enough extending so you don't cut the jig, but also position clamps so that they don't get cut. That would be what is colloquially known as "bad".
- Position the fence so that the bottom of the blade will just graze bottom edge of the headstock. I actually left a tiny bit of space and snuck up on the cut to make sure I kept as much useful material as possible.
- Git 'er Done!
Whew!
Now, it's time to check that beautiful joint and admire your awesome handy work! This painted pine works really well for showing the cuts and transition region:
Check that sweet headstock action out! If you're a little crazy like I am, you might admire the waste piece that was cut off as well. When done correctly, it's a pentahedron that looks like this from the top down:
And the bottom will look like this:
Closing Thoughts
Congrats on making it this far! So here are a few thoughts or potentially useful tidbits you might like to know about:
- If your table saw tilts left, just mirror the saw setup
- Since we started with square blank sides and have now cut a compound scarf, the headstock will not be square to the back of the neck blank. Here is a photo showing the effect. This angle is the same as the headstock angle. However, because this area typically is under frets 1-3 on guitars (and like, the first fret and half on bass), this will get cut away as long as you don't have a blank that is as wide as your nut width (can't imagine anyone doing that, but you never know...)
- If your final headstock will be thinner than your neck blank (which is likely), you will actually end up losing some of that transition (unpainted region in photo above) and gaining some headstock real estate (if you thin it down from the top, thinning from the back makes you lose both ways). To determine how much headstock you will gain, use the equation d_t/tan(theta), where d_t is the amount of material to be removed. The result of that equation is how much flat headstock surface you will gain. In my case, i will be removing .25" and have a headstock angle of 12 degrees, so I will gain about 1.17" in headstock length. To determine how much fretboard surface length you will lose, use the equation d_t/sin(theta). In my case, I will lose about 1.2" (since theta is so small, sin(theta) is also small).
- Please exercise all necessary precautions when doing this! There are some tricky procedures, so take your time, and if you are unsure of what to do, ask for help.
- As with regular scarf joints, there will be some cleanup of the joint prior to gluing. This guide is just to help you get the cuts made right without royally screwing something up, though that is still a possibility, I suppose!
Last edited: