• TalkBass has been independent since 1998. Add your voice.
    Create a free account to reply to discussions, view embedded media, and browse with fewer display ads.
    Join freeLog in
    Want zero display ads or expanded classifieds tools? Compare plans.

Winter Build-Off 2019--The DanoTele

I didn't want things to be unfair, so I gave everyone else a head start...

Been wanting to build a Danelectro baritone for some time. Also wanted to build a Telecaster Bass. Been intrigued by a Bass VI. When the Mash-Up theme arose, it came to me: The best of all possible worlds is to combine these into a single instrument: The DanoTele.

(Or, maybe, it will be the worst of all possible worlds. I guess I'll find out over the next several weeks.)

Really, I suppose the name should be The Way-Cool Switchable Bass VI/Baritone DanoTele Mash-Up, but that's too much of a mouthful for marketing purposes. The idea is a to make a guitar that I can switch from Bass VI to baritone by just changing strings. For purposes of this Build-Off, I'll first do it as a Bass VI.

In keeping with the Dano tradition of making a good-sounding, playable guitar for cheap, I'm trying to keep this as much of a "Home Despot" build as possible. I'm going to avoid Stew-Mac and other expensive parts and equipment as much as possible.

Anyway, here's the plan:

1. Body will be Telecaster shape, but built with a Danelectro structure (pine or poplar frame, hollow with Masonite (i.e., hardboard) front and back. I've built Teles before, so I already have a proven body template. Will have to modify it for the lipstick pickup routs, etc.

In addition to the wood in my entry pic below, I've got lots of thick pine scraps from stairway treads sitting in my garage. Those may be perfect for making the body frame. So what if they already have drips of stain all over them? They'll be on the inside! What could be more Dano-like than using leftover wood!

2. 30" scale neck, bolted on (like both a Tele and a Dano). I have some 3x3 Kluson knockoff tuners, so I'm planning on tuners on both sides of the headstock like this:
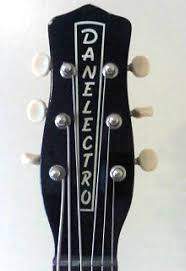
upload_2018-12-23_16-35-58.jpeg


If for some reason that doesn't work, I'll go with inline tuners and a Dano Dolphin-style headstock, which is kind of like a svelte Tele headtock:
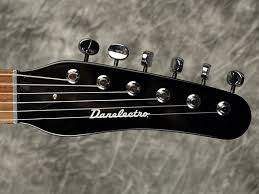
upload_2018-12-23_16-37-15.jpeg


And, if I don't totally forget when I get to that point, because "DanoTele" sounds vaguely Italian, I plan to paint the headstock in the colors of the Italian flag. (Purple and orange, isn't it? I'll Google it when the time comes, I guess.)

3. I read somewhere that some Danos were covered in linoleum. So, keeping with the cheapo Dano aesthetic, the body itself will probably be covered in wood-grain countertop laminate, unless I figure out something even tackier by the time I get to that point in the build.

4. I'm going to build the neck from scratch. Again keeping with the Dano oeuvre, I'm going to use poplar dimensional lumber from Home Despot. And an Oak piece from HD for the fretboard. Probably going to inset a couple of steel rods in the neck--again, Dano-style--instead of using an adjustable truss rod.

5. Going to angle the head to obviate the need for string trees. Going to (try to) fashion a screw-in aluminium nut a la Dano. (Yes, "aluminium". Sometimes I also spell color with a "u" just for the hell of it. My tribute to the British invasion. Or Monty Python, if I'm in that sort of mood.) The screw-in nut will allow the possibility of changing the nut, if need be, when I switch from Bass VI to baritone.

6. 2 GFS lipstick pickups. Will have a Tele 3-way pickup switch; not sure yet whether I'll do stacked pots like Dano or simply 2 single pots like a Tele. Regardless, pot values will be like Danos to encourage that Dano sound (1meg ohm Tone; 100K Volume) rather than the standard 250K Tele pots. Will probably mount all this from behind, Dano-like, rather than via a cavity on the front covered by a plate (Tele-style).

7. Not sure about a pickguard. If I have a laminate covering on the body, a pickguard on top of that would have no functional purpose. Guess I'll just see how things look when I get to that point.

8. Bridge: That's the big question. I may go with a Jaguar/Jazzmaster/Bass VI tremolo and accompanying bridge, but I've heard those are hell to keep in tune and I'm not really a tremolo kind of guy (not that there's anything wrong with that). I can't think of much else that will work for big bass-size strings, so I may need to fashion something of my own. Guess I'll have to figure this out at some point before too long...

Can you tell I'm making this up as I go along?

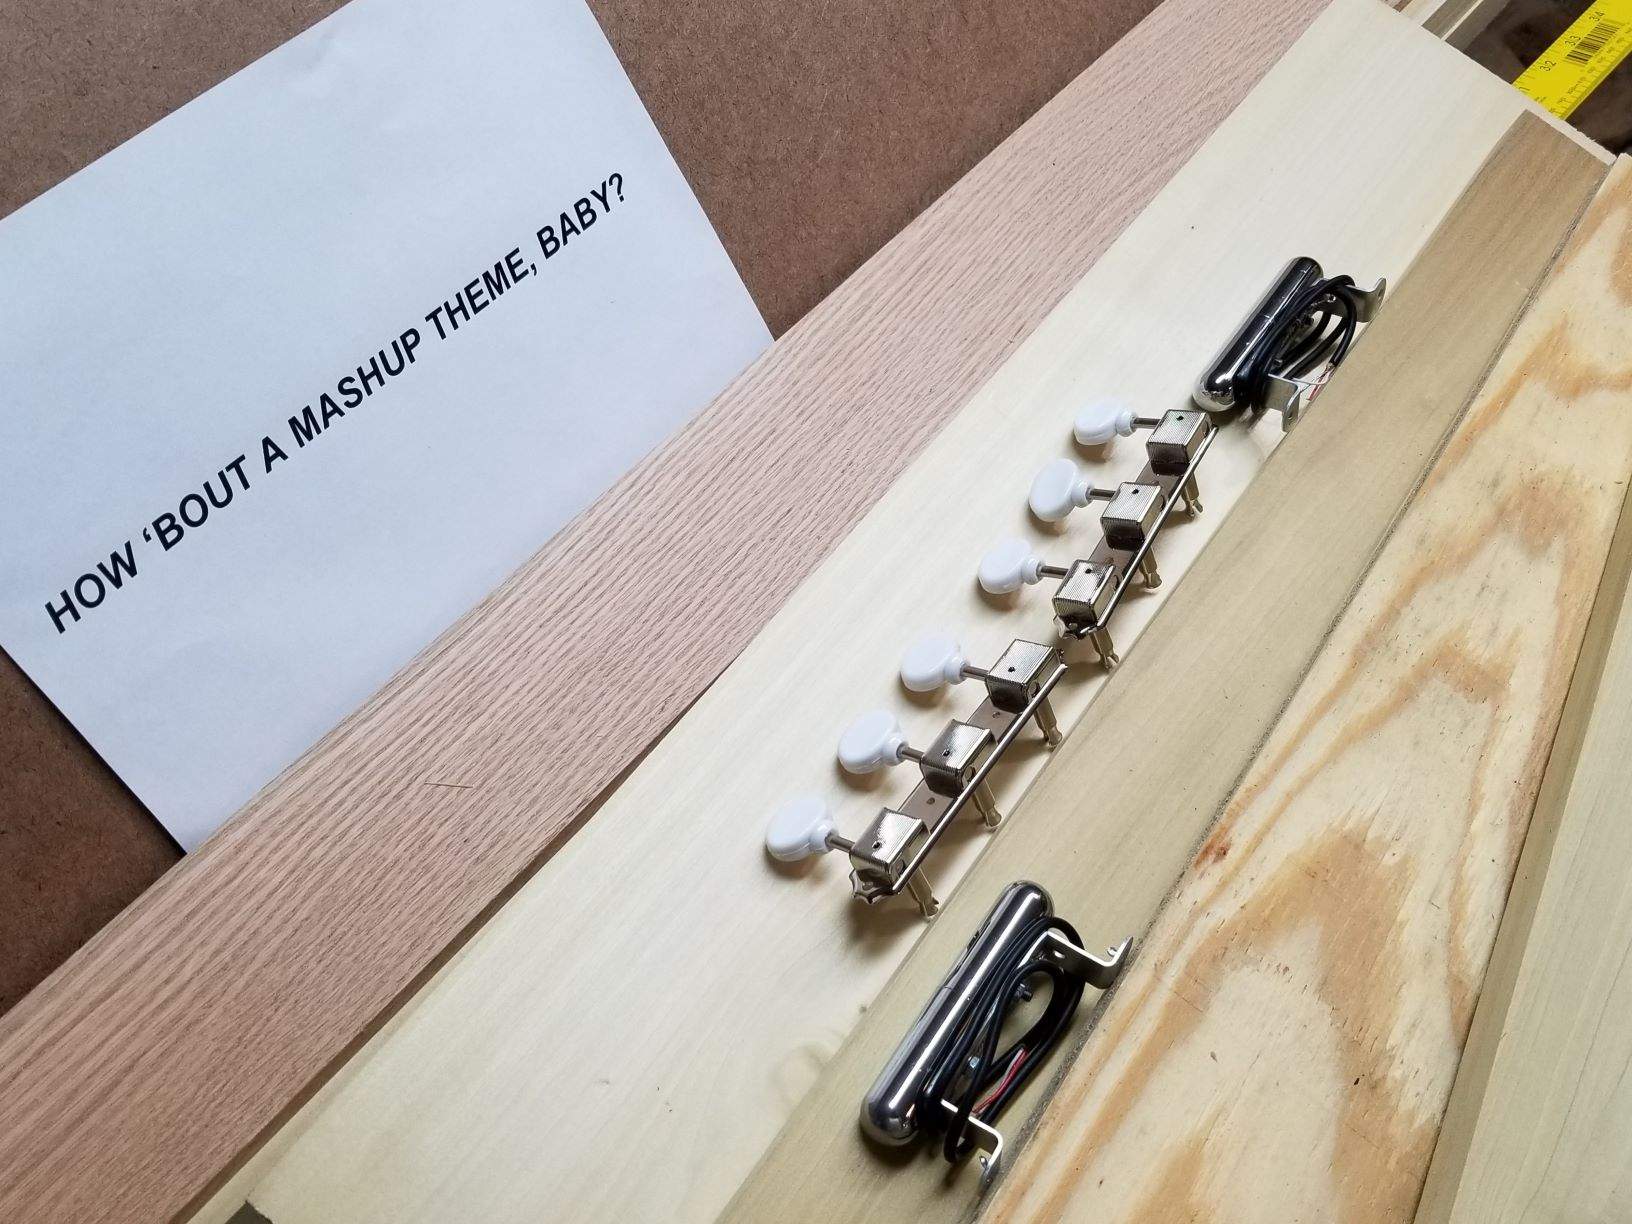
Last but not least is the pic of my enviable wood collection (ironically, for all my fussing about HD, this wood is mostly from Lowe's): dimensional pine & poplar, plywood and oak for the fretboard. Notice, also, the lovely Masonite in the background.
Mashup Pic.jpg


Wish me luck!

[Edited to correct a couple typos]
 
Last edited:
I didn't want things to be unfair, so I gave everyone else a head start...

Been wanting to build a Danelectro baritone for some time. Also wanted to build a Telecaster Bass. Been intrigued by a Bass VI. When the Mash-Up theme arose, it came to me: The best of all possible worlds is to combine these into a single instrument: The DanoTele.

(Or, maybe, it will be the worst of all possible worlds. I guess I'll find out over the next several weeks.)

Really, I suppose the name should be The Way-Cool Switchable Bass VI/Baritone DanoTele Mash-Up, but that's too much of a mouthful for marketing purposes. The idea is a to make a guitar that I can switch from Bass VI to baritone by just changing strings. For purposes of this Build-Off, I'll first do it as a Bass VI.

In keeping with the Dano tradition of making a good-sounding, playable guitar for cheap, I'm trying to keep this as much of a "Home Despot" build as possible. I'm going to avoid Stew-Mac and other expensive parts and equipment as much as possible.

Anyway, here's the plan:

1. Body will be Telecaster shape, but built with a Danelectro structure (pine or poplar frame, hollow with Masonite (i.e., hardboard) front and back. I've built Teles before, so I already have a proven body template. Will have to modify it for the lipstick pickup routs, etc.

In addition to the wood in my entry pic below, I've got lots of thick pine scraps from stairway treads sitting in my garage. Those may be perfect for making the body frame. So what if they already have drips of stain all over them? They'll be on the inside! What could be more Dano-like than using leftover wood!

2. 30" scale neck, bolted on (like both a Tele and a Dano). I have some 3x3 Kluson knockoff tuners, so I'm planning on tuners on both sides of the headstock like this:

View attachment 3257794

If for some reason that doesn't work, I'll go with inline tuners and a Dano Dolphin-style headstock, which is kind of like a svelte Tele headtock:

View attachment 3257795

And, if I don't totally forget when I get to that point, because "DanoTele" sounds vaguely Italian, I plan to paint the headstock in the colors of the Italian flag. (Purple and orange, isn't it? I'll Google it when the time comes, I guess.)

3. I read somewhere that some Danos were covered in linoleum. So, keeping with the cheapo Dano aesthetic, the body itself will probably be covered in wood-grain countertop laminate, unless I figure out something even tackier by the time I get to that point in the build.

4. I'm going to build the neck from scratch. Again keeping with the Dano oeuvre, I'm going to use poplar dimensional lumber from Home Despot. And an Oak piece from HD for the fretboard. Probably going to inset a couple of steel rods in the neck--again, Dano-style--instead of using an adjustable truss rod.

5. Going to angle the head to obviate the need for string trees. Going to (try to) fashion a screw-in aluminium nut a la Dano. (Yes, "aluminium". Sometimes I also spell color with a "u" just for the hell of it. My tribute to the British invasion. Or Monty Python, if I'm in that sort of mood.) The screw-in nut will allow the possibility of changing the nut, if need be, when I switch from Bass VI to baritone.

6. 2 GFS lipstick pickups. Will have a Tele 3-way pickup switch; not sure yet whether I'll do stacked pots like Dano or simply 2 single pots like a Tele. Regardless, pot values will be like Danos to encourage that Dano sound (1meg ohm Tone; 100K Volume) rather than the standard 250K Tele pots. Will probably mount all this from behind, Dano-like, rather than via a cavity on the front covered by a plate (Tele-style).

7. Not sure about a pickguard. If I have a laminate covering on the body, a pickguard on top of that would have no functional purpose. Guess I'll just see how things look when I get to that point.

8. Bridge: That's the big question. I may go with a Jaguar/Jazzmaster/Bass VI tremolo and accompanying bridge, but I've heard those are hell to keep in tune and I'm not really a tremolo kind of guy (not that there's anything wrong with that). I can't think of much else that will work for big bass-size strings, so I may need to fashion something of my own. Guess I'll have to figure this out at some point before too long...

Can you tell I'm making this up as I go along?

Last but not least is the pic of my enviable wood collection (ironically, for all my fussing about HD, this wood is mostly from Lowe's): dimensional pine & poplar, plywood and oak for the fretboard. Notice, also, the lovely Masonite in the background.

View attachment 3257828

Wish me luck!

[Edited to correct a couple typos]

DanoTeleBariBass VI!!!
Love it.
Lots of VIs this year.


Re: the headstock. I like the dolphin style for the Tele body but the coke bottle would give it a snake head Tele vibe.
 
  • Like
Reactions: Novarocker
The biggest challenge for me in this build is the neck--especially the fretboard. I've never built one before.

I'm way too cheap to buy the proper equipment from Stew-Mac, so I've instead spend untold hours combing the interwebs for DIY suggestions on building a fret-slotting jig. If I could make $2 an hour building guitars, it would probably have been cheaper to buy from Stew-Mac than to figure out how to do this myself on the cheap. But that would take the fun out of it!

A fret-slotting jig is basically a specialized miter box and saw with with a means of ensuring that you put the frets in the right places. (Given my level of guitar-playing skills, poorly-placed frets probably wouldn't hurt me much. But I like to think my level of craftsmanship is at least a bit above my level of guitar-playing.)

There are 3 parts of the fret-slotting jig, which I'll detail in this and the next 2 posts.

Part 1: The fret-slotting template.
Part 2: The saw.
Part 3: The miter box.

The Template:

As I mentioned above, I looked at dozens of websites for ideas. I wish I had made careful note of them so I could give links, but I didn't so I can't. Just take it from me that I copped virtually all of this from somewhere out there.

I bought this aluminium yardstick for $3 from Lowe's:

Invalid Link Removed

Then I went to FretFind (ekips.org - FretFind2D) and inserted data for a 30-inch scale and 22 frets.

It scared me when FredFind gave measurements between frets to 1/1000ths of a millimeter, but then I realized that it's just a computer doing what computers do and being very precise. Wood, as a practical matter, can't be machined to tolerances that fine, so I'd just do the best I can.

I printed out the fret scale and glued it to the ruler.

20181224_164218.jpg


Out of a couple scraps of 1x3 I had sitting around, I made a handheld vise/miter box to help me cut notches in the ruler for each fret:


20181224_163109.jpg


20181224_163158.jpg


20181224_163218.jpg


I bought a cheapo hacksaw from Harbor Freight with a small kerf blade:
image_7653.jpg


And used that to cut notches into the ruler at the appropriate intervals for each fret. Here is the ruler after notching.
20181224_165119.jpg


You can see the hand-held miter in the background. I ran a nut through it to help hold it together.

For those following along at home, this worked pretty well. But one thing I'd change next time is that I'd make the handheld vise larger. I used pieces of wood about 5" long. I think a foot long would have been better, as it would have been easier to hold--you need leverage on the ruler to keep it in place while sawing. I made due with the 5" version, but it was awkward to hold because it was so small (only about 2.5" on either side of the sawing kerf) so I had cramps in my hand for an hour or so afterward.
 

Attachments

  • upload_2018-12-25_18-50-52.jpeg
    upload_2018-12-25_18-50-52.jpeg
    5.7 KB · Views: 48
Last edited:
The Saw:

I bought a cheapo flush cut saw from Harbor Freight (are you sensing a theme here?) for $8.50.

image_25041.jpg


I've read that this has the same kerf as the Stew-Mac fret-slotting saw (.023"), so I'll hope HF hasn't re-designed or re-sourced this saw since whomever it was posted that on the Web.

Another keen idea I saw on the Webs was to attach some mechanism for depth control so the saw doesn't cut the frets too deeply. I had some acrylic sitting in the garage from an old project, so I cut out a couple pieces about the same size as the saw blade an super-glued them to the blade. (We'll see how well that holds over time, but I'm not building a house with the saw--just cutting a few frets--so I think the super glue will hold. If not, I can break out the epoxy.)

[EDIT: For a couple of reasons, the slot depth should be a bit deeper than the length of the tang on the fret. (i) In case there is a bit of debris in the slot, I don't want the fret sticking up. (ii) More importantly, when I radius the fretboard--which will be after the slots are cut--the depth of the fret slots at each side of the fretboard will shrink. If I don't make the slots deep enough now, they will be too shallow at the sides after radiusing.]

So, here is the saw in its current form with the acrylic on each side of the blade, each piece leaving open just a small amount of the blade at the bottom:

20181225_192824.jpg
 
Last edited:
The Miter Box:

A miter box is, basically, a flat surface with a couple of walls on either side at 90 degree angles, with an opening in the walls the width of a saw blade perpendicular to the surface. The idea is that if you cut something in the box, the cuts will be made at perfect 90 degreee angles.

For the cutting surface, I used some 1x4 PVC trim I had left over from an old project. I probably wouldn't have bothered with PVC if I didn't have it sitting around already, but since I had it I figured that PVC would add the benefit of stability (i.e., not warping). I used poplar 1x4s for the sides, then cut them down so they only stood up about 2". (So, I could have used 1x3s if I had thought about it, but I didn't want to run back to HD just for that.) I used a couple of scrap pieces of poplar to reinforce the opening for the saw.
20181225_192916.jpg


Note that the slot for the saw is cut exactly the width of the blade plus the pieces of acrylic on either side, so the saw slides cleanly without any side-to-side play.

Inside the box is a brad nail that I filed down so it fits into the notches I previously sawed in the yardstick.

I cut a scrap piece of 1/2" plywood down to a manageable size: 3 3/8" W, so it slides freely in the 3.5"W miter box (the plywood scrap happened to be about 38" long, which works fine with the yardstick). Then, I cut a rabbet into the plywood the same thickness as the yardstick. So, the yardstick sits in the rabbet on the plywood and the whole contraption slides through the miter box. The notches in the yardstick catch on the brad.

Here's the brad:
20181225_192942.jpg


And here's how the whole thing will fit together (with a small wedge on the opposite side from the ruler to make sure the notch doesn't slip from the brad):

20181225_193039.jpg


The fretboard will be attached to the yardstick assembly with double-sided tape, and thus will make its way through this apparatus to have fret slots cut. Amazon should deliver my double-sided tape in the next few days, so I hope to get started on the actual fretboard by the weekend.
 
Last edited:
The Miter Box:

A miter box is, basically, a flat surface with a couple of walls on either side at 90 degree angles, with an opening in the walls the width of a saw blade perpendicular to the surface. The idea is that if you cut something in the box, the cuts will be made at perfect 90 degreee angles.

For the cutting surface, I used some 1x4 PVC trim I had left over from an old project. I probably wouldn't have bothered with PVC if I didn't have it sitting around already, but since I had it I figured that PVC would add the benefit of stability (i.e., not warping). I used poplar 1x4s for the sides, then cut them down so they only stood up about 2". (So, I could have used 1x3s if I had thought about it, but I didn't want to run back to HD just for that.) I used a couple of scrap pieces of poplar to reinforce the opening for the saw.
View attachment 3260039

Note that the slot for the saw is cut exactly the width of the blade plus the pieces of acrylic on either side, so the saw slides cleanly without any side-to-side play.

Inside the box is a brad nail that I filed down so it fits into the notches I previously sawed in the yardstick.

I cut a scrap piece of 1/2" plywood down to a manageable size: 3 3/8" W, so it slides freely in the 3.5"W miter box (the plywood scrap happened to be about 38" long, which works fine with the yardstick). Then, I cut a rabbet into the plywood the same thickness as the yardstick. So, the yardstick sits in the rabbet on the plywood and the whole contraption slides through the miter box. The notches in the yardstick catch on the brad.

Here's the brad:
View attachment 3260042

And here's how the whole thing will fit together (with a small wedge on the opposite side from the ruler to make sure the notch doesn't slip form the brad):

View attachment 3260044

The fretboard will be attached to the yardstick assembly with double-sided tape, and thus will make its way through this apparatus to have fret slots cut. Amazon should deliver my double-sided tape in the next few days, so I hope to get started on the actual fretboard by the weekend.

The Harbor Freight flush cut saw get the job done. I know they have changed vendors at least once since I first bought one but still have the same kerf.

An option that I have used with FretFind is to print out the scaled fingerboard, use spray adhesive to stick it right on the board, and then use the mitre box to cut right on the printed fret lines. Kind of a pain getting the stuck on paper off but your slots are right on the money.
 
An option that I have used with FretFind is to print out the scaled fingerboard, use spray adhesive to stick it right on the board, and then use the mitre box to cut right on the printed fret lines. Kind of a pain getting the stuck on paper off but your slots are right on the money.

That makes a lot of sense. Seems like I made it more complicated than necessary with this Rube Goldberg contraption. If my version doesn't work, I'll try it your way!
 
  • Like
Reactions: Beej
So all these wonderful holidays came and went. I thought I'd get loads done on the DanoTele(TM), but alas no.

Some updates on the neck in a future post (see how I teased that?), but right now a question for both of you reading this thread: What should I use to drill out (i.e., widen) a couple of holes in my bridge?

Here's the bridge I got:
upload_2018-12-25_16-18-25-jpeg.jpg


It's an Allparts made for guitar, not bass, thus the small string holes. Since it's chrome, I assume the underlying metal is steel. I need to widen the two lower string holes to accommodate the E and A strings (E is 90 and A is 74). What tool should I use?

A. Drill bit in drill press? (If so, is a HSS bit enough or do I need carbide?)
B. End mill in drill press?
C. These high quality rasps from HF in my Dremel? (Or I could buy a HF die grinder, I suppose, if the Dremel doesn't have enough juice.) Invalid Link Removed
D. Other

I've done a bit of metalworking before, but never with chrome--and never with something I want to keep looking good after I'm done with it. In other words, I'd like to thrash the bridge as little as possible so it still looks presentable when I finish the DanoTele(TM).

I welcome any thoughts!
 
So all these wonderful holidays came and went. I thought I'd get loads done on the DanoTele(TM), but alas no.

Some updates on the neck in a future post (see how I teased that?), but right now a question for both of you reading this thread: What should I use to drill out (i.e., widen) a couple of holes in my bridge?

Here's the bridge I got:
View attachment 3269578

It's an Allparts made for guitar, not bass, thus the small string holes. Since it's chrome, I assume the underlying metal is steel. I need to widen the two lower string holes to accommodate the E and A strings (E is 90 and A is 74). What tool should I use?

A. Drill bit in drill press? (If so, is a HSS bit enough or do I need carbide?)
B. End mill in drill press?
C. These high quality rasps from HF in my Dremel? (Or I could buy a HF die grinder, I suppose, if the Dremel doesn't have enough juice.) Invalid Link Removed
D. Other

I've done a bit of metalworking before, but never with chrome--and never with something I want to keep looking good after I'm done with it. In other words, I'd like to thrash the bridge as little as possible so it still looks presentable when I finish the DanoTele(TM).

I welcome any thoughts!

I have drilled out guitar tuner posts for bass strings before.
If I were going to drill that bridge I would put it in a vise and use a cordless drill. Put it between a couple of scraps of wood to protect the chrome and to give the drill bit something softer than a vise to hit when it comes out. Take it slow and use several bits to work up to your final size. HSS should be tough enough.
 
  • Like
Reactions: wraub
I have drilled out guitar tuner posts for bass strings before.
If I were going to drill that bridge I would put it in a vise and use a cordless drill. Put it between a couple of scraps of wood to protect the chrome and to give the drill bit something softer than a vise to hit when it comes out. Take it slow and use several bits to work up to your final size. HSS should be tough enough.

From the "Well, that was easy--why was I even worried?" department: GeraldMcG's suggestion worked beautifully.

I was planning to get all fancy with the drill press, then thought I'd give the handheld drill a quick try.

"Like buttah," as Linda Richman once said.

The holes drilled out so easily I feared Allparts had made the bridge out of plastic!

Many thanks to GeraldMcG for the suggestion.
 
Has it really been a month and a half since I last posted? Yipes!

Partially due to being busy and partly due to issues with my bandsaw, I haven't go as much done as I'd liked.

(OK, the delay was also partly because a got a GoPro for Xmas so started videoing what I was doing and not taking pics. Then I found I didn't have decent software for video editing. Then I found that even with decent software I don't know what the hell I'm doing. So, actually getting visual evidence of the little I've been doing has been frustrating. If I can ever get the video in shape, I'll post it.)

So, a post or two to bring everyone up to date, using only the few still pics I have.

First, as part of my designing-on-the-fly theme, I have now decided to make this a neck-thru rather than a bolt-on. The wood I'm making the neck from is 4 feet long (longer than the guitar will be when it's finished), so it made little sense to me to cut out and bolt on a separate neck--with all the necessary fuss about properly fitting a neck pocket. I was planning to have support in the middle of the body to support the bridge and pickups, so I'll just keep the neck going straight through.

Second, as I noted earlier, I originally planned on using dimensional poplar for the neck. Basically, one of these 1x4s:

20181230_131734.jpg


Got to worrying how well that would hold up under string tension; also, warpage under humidity could be an issue.

Cutting to the chase: I got some 1/4 oak from HD, cut the oak and poplar into strips, and laminated them together. The result, after a few trips through the planer, is 3 1/4"W x 1 5/8"D x 48" L:

20190218_174707.jpg


That will work nicely as a neck-thru blank.
 
I have a bolt on longhorn neck. I bought two of them when GuitarFetish had them. I think they were $15 each or something. They are covered in a VERY thick poly (or whatever), in the amount of time it took me to sand that stuff off I could have built a neck. I made one neck into shortscale lined fretless, the other one sits in the attic until I find another use for it. The one I used I heavily modified the headstock to accommodate 2x2 bass tuners.
 
I have a bolt on longhorn neck. I bought two of them when GuitarFetish had them. I think they were $15 each or something. They are covered in a VERY thick poly (or whatever), in the amount of time it took me to sand that stuff off I could have built a neck. I made one neck into shortscale lined fretless, the other one sits in the attic until I find another use for it. The one I used I heavily modified the headstock to accommodate 2x2 bass tuners.

What jumped out to me "... $15 each..." for necks! GFS is cheap, but did you buy those back in the '50s or something!