• TalkBass has been independent since 1998. Add your voice.
    Create a free account to reply to discussions, view embedded media, and browse with fewer display ads.
    Join freeLog in
    Want zero display ads or expanded classifieds tools? Compare plans.

basses for newbies (SX batch build thread)

Status
Not open for further replies.
Jan 10, 2006
637
14
Albany, CA
www.studio939.com
Disclosures
Chunger basses by Studio 939
I heard throught the grapevine that a friend of mine who teaches bass recently played my cheap SX bass that I had done an extensive setup on and is semi-permanently parked at the studio serving tracking duties. He commented that he couldn't believe the price I paid for such a nice sounding/playing instrument.

When we met up, we got to talking and thought how nice it would have been to have such a low cost, nice-sounding instrument when we first started, and how much frustration it would have saved. I also figured a player can go quite a long way with one of these in learning, gigging, and studio work without "needing" to upgrade.

So, I suggested I build a few more and have some teaching friends keep one on hand and offer these instruments to students they feel might benefit from a nicely set up instrument.

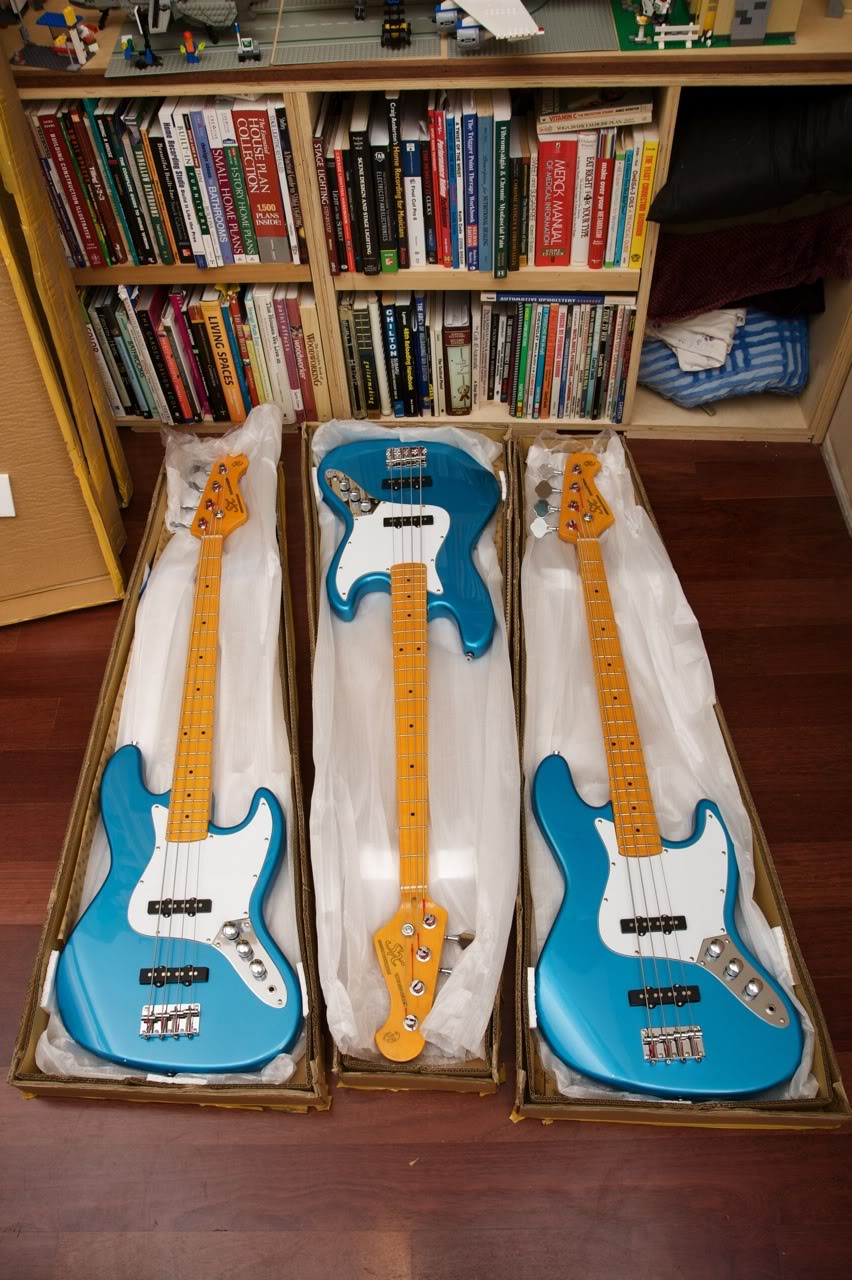
Well, today, I got some packages in the mail and am pretty excited about the whole idea :hyper::

IMG_4896.jpg
 
from a cursory inspection, the instruments all look to have survived their overseas journey without major damage.

2 of the 3 basses have slightly mis-aligned necks and all three look like they will need to have their neck pockets shimmed in order to facilitate low (as I like to set it) action. I like setting to ~2mm. I figure if it's setup and plays well there, the action can be raised to taste without major changes to other settings. One of the basses has a wonky pickguard and the front pickup on one seems to be a bit off. I'll have to check if re-aligning the neck fixes it or if I'll have to dowel the holes and re-set the pickguard. SX has never been terribly good on the assembly end, but I guess that's because they are "custom handmade" :ninja: haa haa. . . by monkeys with hand drills that is. . . sometimes, I'd prefer if they were made by machines.

Since the middle one had a slight mis-alignment, I figured I'd start off with that one. A quick trip to the amp confirmed that both pickups were working and gave me a baseline feel for the tone of this particular instrument.

And, off I go to address the neck joint first:

IMG_4899.jpg


I figured I would try to make it so I could shift the neck in the pocket a little towards the "top" of the instrument to close the gap on the long side of the neck pocket and straighten it out a bit. Because SX basses are screwed straight through both body and neck in one shot, I'd have to enlarge the holes on the body. Since that would theoretically make the joint a bit looser than when I started, I decided to try installing threaded inserts so that I end up with a stronger joint than I started with. Also, since the holes are not straight, I'll have to try and follow the existing holes with a hand drill. . . weeeee. . . exciting. I figure since these particular inserts only require a 15/64" hole, I could always drill out to 1/4", plug and start over if I completely muck it up.

IMG_4898.jpg


Holes are drilled. . . it was a bit nerve racking

IMG_4900-1.jpg


I carefully screwed the inserts in with a 4mm hex key. The first couple of turns are critical. I had to keep the inserts straight while twisting it in so that it threads in straight. I have a pretty steady hand, so eyeballing it worked for me, and I went slow.

IMG_4903.jpg


I'm using 8-32 screws that are 1 3/4" long. I ended up cutting about 1/8-3/16" off of the screws because they stopped engaging the threads and would be useless after that. Shorter screws also gave me a bit more wiggle room in case I mucked up the inserts in the neck. These screws fit perfectly into the existing holes in SX basses, so if I did not have to shift the neck, I could just assemble at this point.

IMG_4905.jpg


But, since I have to shift the neck, I need to enlarge the holes slightly so I have some wiggle room.

IMG_4907.jpg


Inserts or not, I don't like taking the neck on and off a lot, so I figured I'd shim the neck now, and hopefully, it'll not have to come off for quite a long time because I think I'll level and re-crown the frets with the body attached. I used a business card.

IMG_4908.jpg


IMG_4909.jpg


I put the neck back on, and lucky for me, the screws found their way into the inserts. The slightly enlarged holes in the body did their job and I was able to shift the neck into position and then tighten it down.

IMG_4911.jpg


Oh my god. . . the tone was different after the neck operation. The entire body felt more resonant and the notes rang out in a "bell-like" way. Attack and sustain were improved and the bass felt more lively, responsive, and even across the entire fretboard. THIS is a worthwhile mod. I would not have thought to do it unless the neck pocket was wonky like this one, but I will probably be doing this to all of the other ones. It was a little scary, but in the end, the install was not that difficult.

Sidenote: I bought 100 of these critters (inserts and 1 3/4" screws) and will not be doing 25 basses so if anyone is interested in buying some, very reasonably, please let me know. They are EZ Lok 800832-10 8/32 internal thread inserts and I have flat head stainless steel phillips head screws (because I couldn't find a good price on oval heads).

The neck position pickup still looks to be a bit mis-aligned. I'll see if I need to re-set the pickguard. I hope not, but I guess it's not that bad if I have to. If it is out, it's by a pretty small amount. That's all for now. Tomorrow I'll do the same for the other bass with wonky neck and move on to removing electronics and fret leveling. Amazingly, the action on this bass just happened to land at a hair over 2mm with the neck shim and the bridge untouched. Also, amazingly, the bass is quite playable with just few minor buzzes here and there with the action this low. I'm hoping I will not have to take much off to get this fretboard level. Of all the 9 SX basses I've seen lately (keepers and returns), this is a first for me. Most of the time, there are high and low frets all over causing buzzes unless you set the action pretty high.
 
While the plugs are drying, I figured I'd work on #3 because the neck was just slightly mis-aligned. In typical SX fashion, the screws are drilled and set crooked.

IMG_4916.jpg


Since I liked what threaded inserts did to the tone, I went ahead and installed them on #3 as well. Because the holes were crooked, drilling the neck was exciting again, but a light touch on the drill let me "feel" where the original hole was and follow it pretty well. Everything seemed to go smoother on this one since I knew what I was doing.

IMG_4919-1.jpg


IMG_4920-1.jpg


Shimmed this neck pocket as well while I'm in there. Notice how the pickguard is not fit very well on this bass, and there's a gap on the long side. More "custom handmade" goodness. Gotta keep in mind that at this price point, some soap in expected, and it doesn't effect function or tone.

IMG_4921.jpg


With this setup, I was able to adjust the neck to the proper position and then crank it down. . . here's how the flat head stainless screws look on the back side. Not the prettiest, but not bad. I feel the screw heads could be bigger and oval heads would look better, but these are perfectly serviceable. The screw holes being crooked doesn't help the look, but it's in.

IMG_4925.jpg


And, here we sit for now on #3. Pickup alignment looks good, neck pocket is good, frets are a bit buzzy, but they should level out nicely. So, 'til next post:

IMG_4923-1.jpg
 
I wish I knew how to do what you are doing. My Jazz could totally use this kind of attention. I've been thinking about buying an SX just to fiddle with and learn how to make these types of adjustments. This thread is really fueling that thought.

The low cost of entry on the SX basses gives courage to just go for it. I probably would not have been so cavalier with a hand drill on a more expensive instrument especially since many folks here have suggested a drill press as minimum requirement to drill and install threaded inserts. Another project for my personal jazz bass is stalled right now for lack of a drill press:

http://www.talkbass.com/forum/showthread.php?p=8507474

It's nice having forums like this to check in with. I've got a lot of help from the huge knowledge base and experience of the people who cruise around here.

I had a friend recently ask me to sort out neck issues on his ~mid 70's P-bass, and I punted to a more experienced tech. I don't want to mung up something high cost or irreplaceable. I'm just learning here, and am risking anyone else's property in the process :)
 
ran into a bit of a snag today. . . I was trying to sort out the pickguard and control plate repositioning on #2. . . figured I'd drill out the pot holes to 3/8" to accommodate regular large pots.

IMG_4927.jpg


IMG_4929-1.jpg


and everything was going fine. .

IMG_4944.jpg


Just before I drilled the new holes for the control plate screws, I thought to try the new pots and see if everything fits in the cavity . . . and it didn't. The tone pot was contacting the edge of the control cavity, and if I removed that pot, the input jack was contacting the cavity wall as well. . . so, out came the more drastic measures.

IMG_4946.jpg


IMG_4947.jpg


The same was happening on the yellow SX I had bought for myself, so I had to remedy that as well in similar fashion.

IMG_4949-1.jpg


And, finally, the controls are fitted.

IMG_4948.jpg


Finally, I can start to think about fret leveling. . . I started taking measurements to straighten out the neck as best I could reading first the fretboard and then the top of the frets to try and figure out the best way to level this thing while maintaining a "straight-as-possible" neck and removing the least amount of material.

IMG_4956.jpg


IMG_4958.jpg


So, after poking and prodding a bit, I'm going to take a step back, sleep on it, and come back tomorrow to start leveling. I like to think on it a bit before cutting so I go in with a sortof plan to deal with the various curves and compromises in straightening the neck.
 
  • Like
Reactions: Joshua M
leveled and crowned the frets on #2 today. . . I had the bass set up yesterday and thought about what was happening on the fretboard. I would have to deal with a gradual hump in the fretboard from ~4-7 frets, a dip in the fretboard from 13-16th fret and a pretty steep rise at the end of the fretboard at the 20th and 21st frets. I presume the sharp rise at the end of the fretboard could be caused by the neck shim and inserts pulling down hard. With the neck as straight as I could make it with the tools I have on hand, I got started by marking the frets with a sharpie.

IMG_4959.jpg


And I do my leveling with a 16" precision ground block from StewMac. Not that it's necessarily the best way to do it, but it's the only way I've known since the method seemed like one of the more idiot-proof ways to go.


IMG_4960.jpg


That dip at the 15th and 16th fret were the problem spots. The rest of the board was good to go, but these were still significantly low. I started to work some fall-off at the end frets by putting some tape down to create a different angle. . . Those last 2 frets got shaved down pretty hard, but I slowly worked swithing between grinding the fall-off angle and lowering the rest of the frets until I finally met at the 15th and 16th frets.

I seem to always end up in this same situation when leveling these SX basses. I don't know if it's a characteristic of all bolt-on necks.

IMG_4961.jpg


That ordeal being over, I re-marked the frets and started to crown them. I spend most of my time removing file chatter and am now wishing I had purchased a diamond file. I thought I was only going to do 1 bass, so no problems.. . . just get the cheaper file. Now, I regret it.

IMG_4962.jpg


After that, I went over each fret with a small flat file (to remove large chatter), 600 grit sandpaper, 1000 grit sandpaper, and then a felt polishing wheel on a dremel with some polishing compound.


The most involved operation is done on #2. It came out well. I think I'm getting better and faster at this with each bass I do. . . so, 'til next time, here we are on #2.

IMG_4965-1.jpg
 
  • Like
Reactions: Joshua M
If I understand correctly, because the four holes in the back of the heel of the neck are crooked, you had to use a hand drill instead of simply reaming the holes to the larger size, because they would then still be out of proper position, is that right?

In the absence of anything more sophisticated than a drill, could one use the neck plate as a template, lay it inside the neck pocket, trace it, and then drill?
 
If I understand correctly, because the four holes in the back of the heel of the neck are crooked, you had to use a hand drill instead of simply reaming the holes to the larger size, because they would then still be out of proper position, is that right?

In the absence of anything more sophisticated than a drill, could one use the neck plate as a template, lay it inside the neck pocket, trace it, and then drill?

I guess reaming would have been just fine to slightly enlarge the holes in the neck pocket on the body. . . i just use a drill because that's what I have around that looked like it would work. Wouldn't a reamer make a tapered hole though?
 
Status
Not open for further replies.