• TalkBass has been independent since 1998. Add your voice.
    Create a free account to reply to discussions, view embedded media, and browse with fewer display ads.
    Join freeLog in
    Want zero display ads or expanded classifieds tools? Compare plans.

Customizing the look of a pedal...

I've been thinking about doing this for a while, but I don't know where to start. I was talking to eyeballkid about this, but I thought I'd ask around to see what sort of options I have. He said I could have it painted, which would be nice, or I could print it off a picture and sticking it onto the pedal. Of course, this would require something clear on top to protect it.

I'm looking to customize my Bluebeard, which I have dubbed "The Zombie Fuzz". I want to put a picture of this on my pedal:
6305051011.01.LZZZZZZZ.jpg


All I want on the pedal is the zombie. I don't want anything else on it. I'm considering painting the rest of the pedal black just to make it look even more mysterious than it already is.

While looking around for ideas on how to do this, I decided to check out the SS/BS website where I find this:
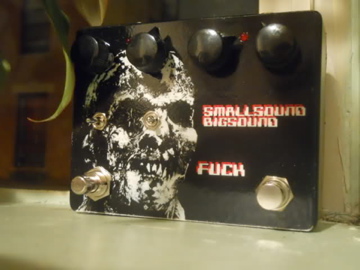
file.jpg


BEAUTIFUL. I'm mad Brian did it before me, but I'm still going to do it.

Any ideas on how I should attempt this? I could send it to someone to paint it (or find someone locally), but I'm curious to find out what else I could do.
 
Have a look at one of rick holts posts on diystompboxes, he sands the box down to make it look nice then prints the image onto a transparent film, like you use on overhead projectors, then spray clear coat over the top. If you can't find it let me know, I saved the link at home somewhere.
 
If you have access to a decent quality color printer than water-slide decals are an easy method for decorating pedals. Decal paper may even be readily available at a Staples, office store, or arts & crafts store, although it isn't cheap. Biggest problem with water-slide decals is that they are delicate. Even with two clear coats on top they are prone to scratching.

Here is a thread with instructions on applying decals:
http://www.talkbass.com/forum/f18/please-direct-me-decals-664424/

Below is a photo of a pedal I created using decals and spray cans. This was done in 5 layers;
1. white primer
2. black paint
3. decal
4. clear coat
5. clear coat

HexFuzzcomplete.jpg


if you look closely you can see damage to the decal around the base of the 'Tone' knob. Over-tightning the nut stretched the decal.
 
Baked-on powder coat finishes are the toughest. Although they seem limited in colors and design complexity. Not sure what kind of equipment is required for creating powder coats, or if it is available to consumer markets.
 
G.Bisson said:
Baked-on powder coat finishes are the toughest. Although they seem limited in colors and design complexity. Not sure what kind of equipment is required for creating powder coats, or if it is available to consumer markets.

There are some powder paints that you put on whatever then place in the oven and it bakes on. If you were paitent even I'm sure you could create a wicked picture.
 
Oh, pooh. That's unfortunate. Oh well. I'll probably go with a decal or something as opposed to finding someone to paint the image. That way if it gets messed up, I just peel it off and do it again!

The ones that Rick posted on freestompboxes.org are awesome. His steps are a little different than everything I've read, but he wasn't painting his pedals. Do I have to worry about sanding the pedal down at all or should I go straight to the primer?

My only concern about painting it is the top. I can take the knobs off, but with the Bluebeard it's not easy to take the guts out (even the knobs). I might have to tape everything up nicely so I don't screw it up.
 
I have absolutely no artistic ability. The easiest thing for me would be painting then printing out a decal. Even that has its risks because I'm a perfectionist, so I hope I get it on straight.

It's time to search my garage/basement for white primer. My cousin probably has a bunch because he's swirling his guitar.
 
Oh, pooh. That's unfortunate. Oh well. I'll probably go with a decal or something as opposed to finding someone to paint the image. That way if it gets messed up, I just peel it off and do it again!

The ones that Rick posted on freestompboxes.org are awesome. His steps are a little different than everything I've read, but he wasn't painting his pedals. Do I have to worry about sanding the pedal down at all or should I go straight to the primer?

My only concern about painting it is the top. I can take the knobs off, but with the Bluebeard it's not easy to take the guts out (even the knobs). I might have to tape everything up nicely so I don't screw it up.

Go over the box with sandpaper to rough up the surface. Don't have to go crazy removing metal, just enough to raise texture and create more bonding surface. Wipe the box clean of dust residue with a moist rag. Leave it to dry for a few minutes before spraying on primer.

Removing all the knobs, switches and LED's from the top is necessary. Take the guts out, keep them in a safe place away from your workbench. Cover the holes left behind with masking tape from the inside of the box. The decal will sag into these holes and possibly stretch. The more holes, the more difficult to slide the decal into position.
 
I don't know how if you can see it, but all along the inside is sealed.

Looks like hot glue, which is fairly easy to remove. Slice along the edges of the box with a knife then work the board loose. If the glue doesn't let go apply some heat with a solder iron (use an old worn out tip for this part). Be careful not to burn anything. Then change to a good tip and desolder the wires connected to the power plug socket. Should come out with some effort.
Not sure what that white cube numbered 538 is, or how difficult it would be to remove.??
 

Latest posts