
First of all, I'd like to introduce myself  I'm Travis, and I've been playing for about 5 out of 16 years, and i just thought it would be kind of cool to refinish a bass to make it really mine and just have fun in the process. I don't have much experience with refinishing anything, but i do build my own longboards (skating, not surfing) and have finished those, so some of that experience is applied to this, in addition to the great guides over at ReRanch, and reading about other members here on TalkBass who have refinished their basses. Overall, this was a pleasant experience with better than I expected results, and really wasn't a hard project to do, so have a look and if you do it too, have fun.
Finished Product:
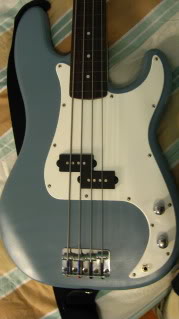
As a kind of preface, if this is viewed as a how to, i assume that you already have basic equipment, and a bass you want to refinish or defret, and if you choose to do so, you are doing this on your own terms, and i am not responsible for any damage you do to yourself or your instrument Also, as a note, only start this if you are sure you want to do it, and don't do it to a bass that you can't risk messing up and/or your only bass.
To start off, i had bought a Squier Affinity Series P Bass from my band's guitarist's little brother for $10 (great deal lol, it sounds really good which was a pleasant surprise). This bass hadn't been used for a while and really really needed to be fixed up, so i thought it was a perfect candidate to refinish.
First Step
NOTE: THE BASS I USED HAD A POLYESTER RESIN FINISH (thanks beej for the correction)
The first thing that should be done is get together all the supplies you will be needing. Here, in Arkansas, you have maybe 3 choices of where to buy any kind of supplies: Home Depot, Lowes, and Wal-Mart, and thus i chose Home Depot. The list is kind of long, but most of the things most people would already have.
Supplies:
Primer - Rust-Oleum Painter's Touch Grey Primer
Spray Paint - Rust-Oleum Painter's Touch (in whatever color you want)
Polyurethane Clearcoat - Minwax Fast-Drying Polyurethane Clear Gloss
Wood Filler - preferably in a tube
Crazy Glue

Sandpaper - Some really rough stuff, like anywhere from 150 to 300, and some fine stuff like 600
Steel Wool - 0000 grade
Tools:
Sanders - a palm sander and an orbit sander (or whatever you happen to have on hand, i used a palm sander and a Mouse sander)
Soldering Iron or Clothes Iron
Box Cutter
Assorted Philips (+) Screwdrivers
A Small Flathead(-) Screwdriver or Flat Metal Prying Tool (putty knife kinda thing)
Plastic Putty Knife
Painter's Tape
Nylon String (Fishing Line) and a screw w/washer that fits in the strap hole for hanging up the bass
Respirator - Fumes aren't good for you... especially if you're asthmatic like myself
Second Step
Remove the strings, hardware, and neck. I placed them in bags and labeled the bags just to keep up with it and make sure nothing got lost.

Third Step
Next up is sanding. Make sure to use your respirator.

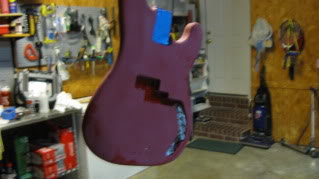
SINCE MY BASS HAD A POLYESTER RESIN FINISH (thanks Beej for the correction), all that needed to be done is take the rough sandpaper, on the palm sander for the flat parts and the orbital for the sides and curved parts and sand thoroughly until all the shine is gone. Once you think all is gone, wipe the bass down with with a damp cloth and look for areas that look shiny still by where the water beads for flows off. Your bass should now look like the picture below. (NOTE: I HUNG THE BASS UP BEFORE TAKING THE PICTURE, I'LL EXPLAIN THAT NEXT)
Fourth Step
Now, you should be ready to prepare to lay down your primer. To allow access to all parts of the body, i put a screw with a large washer in the strap button hole and then tied some fishing line to that and then tied other end to the raised garage door; anywhere high enough to get the body at a good level for you to access it all would work.

Next, i put some newspaper in the control cavity and painter's tape in the neck pocket just to make things neater. As a last preparation, i cleaned the body with some alcohol just to make sure it had a nice surface for the primer to stick, and to make sure there was no dust.
Fifth Step
Spraying the primer comes next. MAKE SURE ANY TIME YOU SPRAY, YOU USE YOUR RESPIRATOR. The most important part of this step is to read the instructions on your spraypaint can. My instructions consisted of shaking the can for a minute after the rattle ball starts being hear, so make sure to watch out for instructions like that. Before you start any painting, you may also want to read over some things that you might encounter while spraying. The following is from the ReRanch guide for refinishing solid colors at http://www.reranch.com/solids.htm :
"If the surface feels rough due to overspray or has "orange peel" sanding will be needed. Definitions are in order here. Overspray refers to paint on the surface that dried before it reached the surface. Orange peel is caused by the paint drying before it flowed completely smooth and flat. (The surface will appear bumpy and not unlike an orange peel). Overspray can be sanded off by lightly sanding with #600 or #800 wet sandpaper. Orange peel will take more aggressive sanding. Use #400 or #600 wet. Sand until the surface is smooth and all the bumps are gone. (When sanding to remove orange peel expect sand throughs that will need respraying)."
Now that we've covered the things that can go wrong, lets get started (don't worry, it'll be fine )
)
For this, we will be using around 5 coats, but if you can still see the old finish, use more. With the bass hanging in front of you, start spraying slightly away from the bass about 10 to 15 inches away and then move to over the bass and spray either side to side or up and down, whichever is more comfortable for you. (I say to start away from the bass because if you start spraying onto the bass, dried paint from the previous coat or use might get projected onto the bass.) After each coat, wait about fifteen minutes for it to dry and then proceed to the next coat. After your last coat, your bass should look like below.


Let the primer dry over night before applying the color coat. In preparation for the color coat, sand the primer lightly with the around 600 grit sandpaper attached to a block of wood or just really really carefully with your hand, then wipe down with a damp cloth. After the dampness has dried, you should be ready to start the color coat after a quick sanding down with the 0000 steel wool just to make it nice and smooth. The color coat is done in the same fashion as the primer, except this time, i did around 9 coats just to make sure no spots were missed and there was no primer showing through. After the last coat and letting it dry for another night, my bass looked like below. (NOTE: the color you see now will be slightly darker when done)

Sixth Step
While the color coat dries, i took the time to defret the neck.
To start off, i masked off all the frets and covered some of the headstock just in case with painter's tape.


Next, begins the actual defretting, make sure this is something you want to do before starting, it changes the sound of your bass, and will make slapping a whole new sound, so be wary of that if that's mainly how you play. To start, i used the soldering iron to head up the last fret (20th) for about twenty seconds, then put the flat metal putty knife kind of thing at the corner of the fret along the edge of the neck and wedged it underneath and carefully pried it up and down while moving along the fret to get it to ease out. I then moved up the neck, removing all the frets. Be careful at this part to not scratch your neck, and if a part chips, the tape should keep it in place, and when done with that fret, use some crazy glue to glue it back in place, it will be sanded in a second so don't worry about any excess glue.
Now, wrap some 600 grip sandpaper around a semi flexible ruler and sand the neck down pressing on either side of the ruler lightly. (Unless you have a radius block... then used that) Sand until the neck is smooth all the way down, top to bottom.

Once sanded, used the box cutter to clean the holes where the frets used to be, then wipe down with a damp towel and dry, and once again mask off all the holes where the frets used to be. The purpose for this is to make making the fret lines with the wood filler just a little bit easier for you.
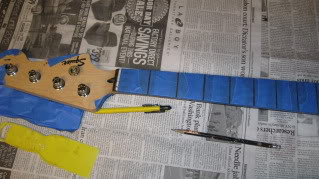
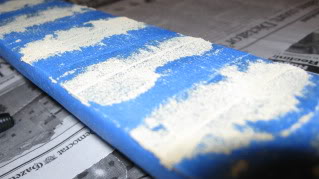
If you have the wood filler in a tube, then this step is really easy, just put it where you want it to be (over where the frets used to be) then press it in with your finger or the plastic putty knife, and repeat for all the frets. After, allow to dry for about an hour and your neck should look like below.
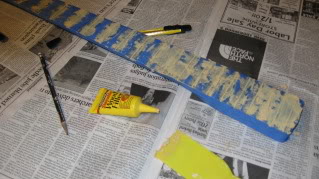
Remove the tape, and repeat the sanding of the neck to get the excess filler off.
(ALSO: If you want to paint the fret lines like i did, at this point mask off just the filler fret lines again, and spray 1 coat of primer and 2 coats of color over them. Make sure to cover your headstock and the back of the neck.)
Seventh Step
Finally, we have gotten to the last spraying step, clear coating the body and neck with the polyurethane spray. This should be done in the same fashion as the color coat and primer, but make sure to read the instructions on the back of your can of clear coat. For the Clear Coat, i used around 12 coats for the body to make sure it was nice and protected, and 6 coats for the neck.
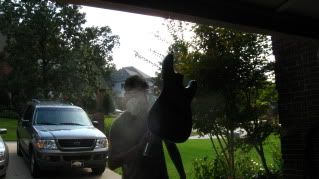
Wait about a week for the clear coats to dry really solid, but they can be moved inside after a good few hours to dry there.
After the week, reassemble all the hardware, and buy a new set of strings. Also, as noted by Beej, make sure you lower the nut slots (where the strings touch on the [probably] plastic piece at the top to do this, i used a needle file and lowered it a bit until the strings were not at a downward angle towards the bridge)
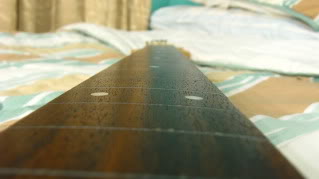
Neck after a week:
Body after a week:
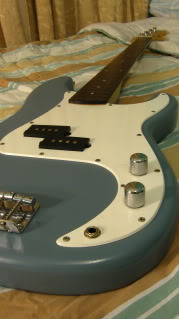
FINISHED PRODUCT!!!
After equipping a new set of strings, set your bass up by setting your action, intonation, pickups, and oiling your tuning heads.
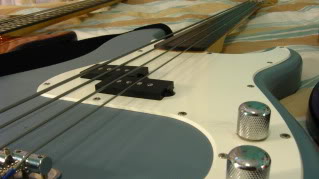
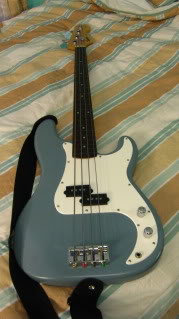

Family Picture

This bass sounds and looks amazing, and was really fun to refinish, and the defretting really gives you a whole new feel to an old bass.
I'm Travis, and I've been playing for about 5 out of 16 years, and i just thought it would be kind of cool to refinish a bass to make it really mine and just have fun in the process. I don't have much experience with refinishing anything, but i do build my own longboards (skating, not surfing) and have finished those, so some of that experience is applied to this, in addition to the great guides over at ReRanch, and reading about other members here on TalkBass who have refinished their basses. Overall, this was a pleasant experience with better than I expected results, and really wasn't a hard project to do, so have a look and if you do it too, have fun. Finished Product:
As a kind of preface, if this is viewed as a how to, i assume that you already have basic equipment, and a bass you want to refinish or defret, and if you choose to do so, you are doing this on your own terms, and i am not responsible for any damage you do to yourself or your instrument
Also, as a note, only start this if you are sure you want to do it, and don't do it to a bass that you can't risk messing up and/or your only bass.To start off, i had bought a Squier Affinity Series P Bass from my band's guitarist's little brother for $10 (great deal lol, it sounds really good which was a pleasant surprise). This bass hadn't been used for a while and really really needed to be fixed up, so i thought it was a perfect candidate to refinish.
First Step
NOTE: THE BASS I USED HAD A POLYESTER RESIN FINISH (thanks beej for the correction)
The first thing that should be done is get together all the supplies you will be needing. Here, in Arkansas, you have maybe 3 choices of where to buy any kind of supplies: Home Depot, Lowes, and Wal-Mart, and thus i chose Home Depot. The list is kind of long, but most of the things most people would already have.
Supplies:
Primer - Rust-Oleum Painter's Touch Grey Primer
Spray Paint - Rust-Oleum Painter's Touch (in whatever color you want)
Polyurethane Clearcoat - Minwax Fast-Drying Polyurethane Clear Gloss
Wood Filler - preferably in a tube
Crazy Glue
Sandpaper - Some really rough stuff, like anywhere from 150 to 300, and some fine stuff like 600
Steel Wool - 0000 grade
Tools:
Sanders - a palm sander and an orbit sander (or whatever you happen to have on hand, i used a palm sander and a Mouse sander)
Soldering Iron or Clothes Iron
Box Cutter
Assorted Philips (+) Screwdrivers
A Small Flathead(-) Screwdriver or Flat Metal Prying Tool (putty knife kinda thing)
Plastic Putty Knife
Painter's Tape
Nylon String (Fishing Line) and a screw w/washer that fits in the strap hole for hanging up the bass
Respirator - Fumes aren't good for you... especially if you're asthmatic like myself
Second Step
Remove the strings, hardware, and neck. I placed them in bags and labeled the bags just to keep up with it and make sure nothing got lost.
Third Step
Next up is sanding. Make sure to use your respirator.
SINCE MY BASS HAD A POLYESTER RESIN FINISH (thanks Beej for the correction), all that needed to be done is take the rough sandpaper, on the palm sander for the flat parts and the orbital for the sides and curved parts and sand thoroughly until all the shine is gone. Once you think all is gone, wipe the bass down with with a damp cloth and look for areas that look shiny still by where the water beads for flows off. Your bass should now look like the picture below. (NOTE: I HUNG THE BASS UP BEFORE TAKING THE PICTURE, I'LL EXPLAIN THAT NEXT)
Fourth Step
Now, you should be ready to prepare to lay down your primer. To allow access to all parts of the body, i put a screw with a large washer in the strap button hole and then tied some fishing line to that and then tied other end to the raised garage door; anywhere high enough to get the body at a good level for you to access it all would work.
Next, i put some newspaper in the control cavity and painter's tape in the neck pocket just to make things neater. As a last preparation, i cleaned the body with some alcohol just to make sure it had a nice surface for the primer to stick, and to make sure there was no dust.
Fifth Step
Spraying the primer comes next. MAKE SURE ANY TIME YOU SPRAY, YOU USE YOUR RESPIRATOR. The most important part of this step is to read the instructions on your spraypaint can. My instructions consisted of shaking the can for a minute after the rattle ball starts being hear, so make sure to watch out for instructions like that. Before you start any painting, you may also want to read over some things that you might encounter while spraying. The following is from the ReRanch guide for refinishing solid colors at http://www.reranch.com/solids.htm :
"If the surface feels rough due to overspray or has "orange peel" sanding will be needed. Definitions are in order here. Overspray refers to paint on the surface that dried before it reached the surface. Orange peel is caused by the paint drying before it flowed completely smooth and flat. (The surface will appear bumpy and not unlike an orange peel). Overspray can be sanded off by lightly sanding with #600 or #800 wet sandpaper. Orange peel will take more aggressive sanding. Use #400 or #600 wet. Sand until the surface is smooth and all the bumps are gone. (When sanding to remove orange peel expect sand throughs that will need respraying)."
Now that we've covered the things that can go wrong, lets get started (don't worry, it'll be fine
)For this, we will be using around 5 coats, but if you can still see the old finish, use more. With the bass hanging in front of you, start spraying slightly away from the bass about 10 to 15 inches away and then move to over the bass and spray either side to side or up and down, whichever is more comfortable for you. (I say to start away from the bass because if you start spraying onto the bass, dried paint from the previous coat or use might get projected onto the bass.) After each coat, wait about fifteen minutes for it to dry and then proceed to the next coat. After your last coat, your bass should look like below.
Let the primer dry over night before applying the color coat. In preparation for the color coat, sand the primer lightly with the around 600 grit sandpaper attached to a block of wood or just really really carefully with your hand, then wipe down with a damp cloth. After the dampness has dried, you should be ready to start the color coat after a quick sanding down with the 0000 steel wool just to make it nice and smooth. The color coat is done in the same fashion as the primer, except this time, i did around 9 coats just to make sure no spots were missed and there was no primer showing through. After the last coat and letting it dry for another night, my bass looked like below. (NOTE: the color you see now will be slightly darker when done)
Sixth Step
While the color coat dries, i took the time to defret the neck.
To start off, i masked off all the frets and covered some of the headstock just in case with painter's tape.
Next, begins the actual defretting, make sure this is something you want to do before starting, it changes the sound of your bass, and will make slapping a whole new sound, so be wary of that if that's mainly how you play. To start, i used the soldering iron to head up the last fret (20th) for about twenty seconds, then put the flat metal putty knife kind of thing at the corner of the fret along the edge of the neck and wedged it underneath and carefully pried it up and down while moving along the fret to get it to ease out. I then moved up the neck, removing all the frets. Be careful at this part to not scratch your neck, and if a part chips, the tape should keep it in place, and when done with that fret, use some crazy glue to glue it back in place, it will be sanded in a second so don't worry about any excess glue.
Now, wrap some 600 grip sandpaper around a semi flexible ruler and sand the neck down pressing on either side of the ruler lightly. (Unless you have a radius block... then used that) Sand until the neck is smooth all the way down, top to bottom.
Once sanded, used the box cutter to clean the holes where the frets used to be, then wipe down with a damp towel and dry, and once again mask off all the holes where the frets used to be. The purpose for this is to make making the fret lines with the wood filler just a little bit easier for you.
If you have the wood filler in a tube, then this step is really easy, just put it where you want it to be (over where the frets used to be) then press it in with your finger or the plastic putty knife, and repeat for all the frets. After, allow to dry for about an hour and your neck should look like below.
Remove the tape, and repeat the sanding of the neck to get the excess filler off.
(ALSO: If you want to paint the fret lines like i did, at this point mask off just the filler fret lines again, and spray 1 coat of primer and 2 coats of color over them. Make sure to cover your headstock and the back of the neck.)
Seventh Step
Finally, we have gotten to the last spraying step, clear coating the body and neck with the polyurethane spray. This should be done in the same fashion as the color coat and primer, but make sure to read the instructions on the back of your can of clear coat. For the Clear Coat, i used around 12 coats for the body to make sure it was nice and protected, and 6 coats for the neck.
Wait about a week for the clear coats to dry really solid, but they can be moved inside after a good few hours to dry there.
After the week, reassemble all the hardware, and buy a new set of strings. Also, as noted by Beej, make sure you lower the nut slots (where the strings touch on the [probably] plastic piece at the top to do this, i used a needle file and lowered it a bit until the strings were not at a downward angle towards the bridge)
Neck after a week:
Body after a week:
FINISHED PRODUCT!!!
After equipping a new set of strings, set your bass up by setting your action, intonation, pickups, and oiling your tuning heads.
Family Picture
This bass sounds and looks amazing, and was really fun to refinish, and the defretting really gives you a whole new feel to an old bass.



