I've received a number of inquiries about the finish on my Noah. Here is the detailed finishing method I used.
To achieve the results pictured below, do this:
1. Sand bare wood to 220.
Fill voids, etc., with Z-Poxy (not to be confused with epoxy resin glue). Z-Poxy is primarily a resin leveller/filler, not primarily an adhesive.
Sand to 220 again. Z-Poxy is available from LMI
2. Shoot 3 coats McFadden's Vinyl Sealer/Washcoat 30 minutes apart.
Lightly sand to 400 (Do not sand through the Sealer) THIS STEP IS CRITICAL TO ACHIEVING A FINISH THAT WILL REMAIN ADHERED TO THE INSTRUMENT FOR YEARS TO COME. DON'T SKIP IT.
3. Shoot color coats as needed. Do not sand the color coats.
4. Shoot 3 coats McFadden' clear nitro-cellulous lacquer 1-2 hours between shoots.
Wait 24 hours.
Sand/level with 220 or so. STAY AWAY FROM ANY/ALL EDGES. DO NOT SAND THROUGH THE FINISH. JUST A LIGHT LEVELING AT THIS STEP IS ALL THAT IS NEEDED.
5. Shoot 3 coats McFadden' clear nitro-cellulous lacquer 1-2 hours between shoots.
Wait 24 hours.
Sand/level with 400 or so. STAY AWAY FROM ANY/ALL EDGES
6. Shoot 3 coats McFadden' clear nitro-cellulous lacquer 1-2 hours between shoots.
Wait 24 hours.
Sand/level with 600 or so. STAY AWAY FROM ANY/ALL EDGES
7. Repeat step 6 as many times as you feel is necessary. A variety of factors too numerous to list can influence this decision. The bass pictured below ended up with 27 coats of clear. Don't let the number fool you . . . a lot comes back off with each leveling procedure.
8. After your final turn at step 6, be sure that you level the finish to 800 or so thoroughly. THEN HANG THE INSTRUMENT UP FOR A MINIMUM OF 14 DAYS TO CURE. THE MORE COATS APPLIED, THE LONGER THE CURE. Go take up Road Cycling and learn to suffer long, you'll need it for the final stages of finishing below.
9. FINAL FINISHING PROCEDURE. Up till now, we've been using over the counter 3M wet/dry sandpaper, using a wet (not soaking wet, just keep the paper unloaded) process. From now on, use Micro-Mesh abrasives along with a mister/spray bottle that has water with 3 or 4 drops of liquid dish soap per pint.
Get out a raft of your favorite CD's and put them on.
Start the coffee pot.
And begin:
with Micro-Mesh begin polishing the finish with 1500, 1800, 2400, 3200, 3600, 4000, 6000, 8000, 12,000 in that order. Micro-Mesh is available from LMI or direct from them. Use the provided soft-block to sand with. At around 4000 or 6000 the finish will begin to go high-gloss on you. Keep going through 8000 and 12,000
10. After you've gone through all the rubbing above, and have run out of CD's to listen to, you are ready to buff.
I use Menzerna Fine for the first pass, and Menzerna Ultra-Fine for the final pass.
I prefer to use a buffer running at around 800 rpm, altho I also have a 1725rpm buffer.
RANDOM NOTES:
MIST THE ABRASIVE, WIPE CLEAN ON A HANDY TOWEL, MIST ABRASIVE AGAIN AND RUBB. Don't mist the finish (apples & oranges; do what you want; this is how I do it).
SAND IN ONE DIRECTION ONLY. Do not use a circular pattern. Do not cross-hatch each grade.
Do not move up to the next finer grade of abrasive until you have completely removed the scratch pattern from the previous grade.
Occasionally wipe the sanding residue off the instrument. I like to use the blue paper shop towels by Scott. They are soft, lint-free, and very absorbant. They clean the sanding residue off nicely. ALWAYS CLEAN THE RESIDUE OFF OF THE FINISH BETWEEN EACH GRADE OF ABRASIVE.
The finer the grade you use, the less water you mist. Use your intuition, I did.
Final note and last cautionary word: when you are buffing, wear safety glasses & respiratory protection, and be very, very careful around the edges. You can catch an edge and either destroy an instrument (like my friend, James Olson did) or set yourself back 3 weeks in the twinkling of an eye. YOU CANNOT BE TOO CAREFUL AROUND EDGES AT ANY STEP OF THIS ENTIRE OPERATION. Edges hate you. They want to see you cry and cuss and kick the door of your shop.
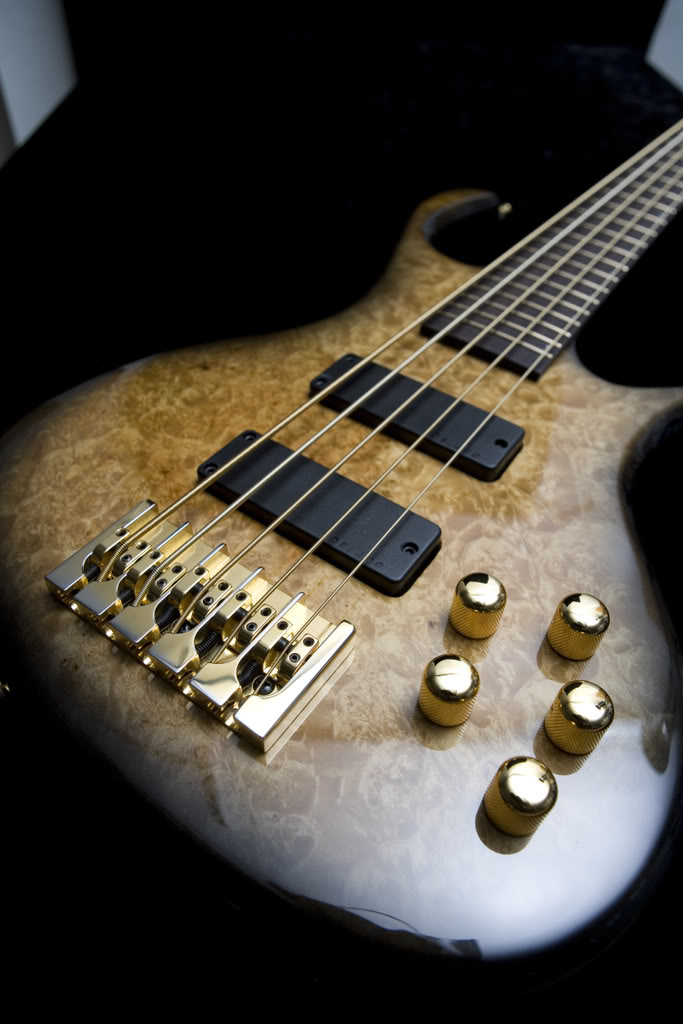
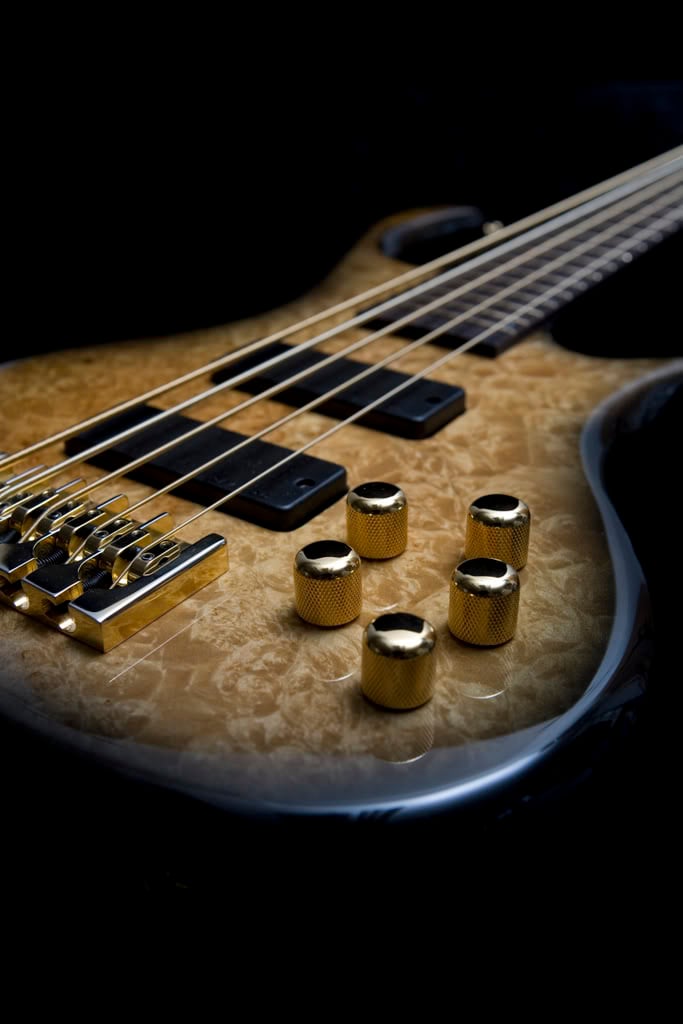
The final results of the above process produced this:
I think the results are worth it . . .
To achieve the results pictured below, do this:
1. Sand bare wood to 220.
Fill voids, etc., with Z-Poxy (not to be confused with epoxy resin glue). Z-Poxy is primarily a resin leveller/filler, not primarily an adhesive.
Sand to 220 again. Z-Poxy is available from LMI
2. Shoot 3 coats McFadden's Vinyl Sealer/Washcoat 30 minutes apart.
Lightly sand to 400 (Do not sand through the Sealer) THIS STEP IS CRITICAL TO ACHIEVING A FINISH THAT WILL REMAIN ADHERED TO THE INSTRUMENT FOR YEARS TO COME. DON'T SKIP IT.
3. Shoot color coats as needed. Do not sand the color coats.
4. Shoot 3 coats McFadden' clear nitro-cellulous lacquer 1-2 hours between shoots.
Wait 24 hours.
Sand/level with 220 or so. STAY AWAY FROM ANY/ALL EDGES. DO NOT SAND THROUGH THE FINISH. JUST A LIGHT LEVELING AT THIS STEP IS ALL THAT IS NEEDED.
5. Shoot 3 coats McFadden' clear nitro-cellulous lacquer 1-2 hours between shoots.
Wait 24 hours.
Sand/level with 400 or so. STAY AWAY FROM ANY/ALL EDGES
6. Shoot 3 coats McFadden' clear nitro-cellulous lacquer 1-2 hours between shoots.
Wait 24 hours.
Sand/level with 600 or so. STAY AWAY FROM ANY/ALL EDGES
7. Repeat step 6 as many times as you feel is necessary. A variety of factors too numerous to list can influence this decision. The bass pictured below ended up with 27 coats of clear. Don't let the number fool you . . . a lot comes back off with each leveling procedure.
8. After your final turn at step 6, be sure that you level the finish to 800 or so thoroughly. THEN HANG THE INSTRUMENT UP FOR A MINIMUM OF 14 DAYS TO CURE. THE MORE COATS APPLIED, THE LONGER THE CURE. Go take up Road Cycling and learn to suffer long, you'll need it for the final stages of finishing below.
9. FINAL FINISHING PROCEDURE. Up till now, we've been using over the counter 3M wet/dry sandpaper, using a wet (not soaking wet, just keep the paper unloaded) process. From now on, use Micro-Mesh abrasives along with a mister/spray bottle that has water with 3 or 4 drops of liquid dish soap per pint.
Get out a raft of your favorite CD's and put them on.
Start the coffee pot.
And begin:
with Micro-Mesh begin polishing the finish with 1500, 1800, 2400, 3200, 3600, 4000, 6000, 8000, 12,000 in that order. Micro-Mesh is available from LMI or direct from them. Use the provided soft-block to sand with. At around 4000 or 6000 the finish will begin to go high-gloss on you. Keep going through 8000 and 12,000
10. After you've gone through all the rubbing above, and have run out of CD's to listen to, you are ready to buff.
I use Menzerna Fine for the first pass, and Menzerna Ultra-Fine for the final pass.
I prefer to use a buffer running at around 800 rpm, altho I also have a 1725rpm buffer.
RANDOM NOTES:
MIST THE ABRASIVE, WIPE CLEAN ON A HANDY TOWEL, MIST ABRASIVE AGAIN AND RUBB. Don't mist the finish (apples & oranges; do what you want; this is how I do it).
SAND IN ONE DIRECTION ONLY. Do not use a circular pattern. Do not cross-hatch each grade.
Do not move up to the next finer grade of abrasive until you have completely removed the scratch pattern from the previous grade.
Occasionally wipe the sanding residue off the instrument. I like to use the blue paper shop towels by Scott. They are soft, lint-free, and very absorbant. They clean the sanding residue off nicely. ALWAYS CLEAN THE RESIDUE OFF OF THE FINISH BETWEEN EACH GRADE OF ABRASIVE.
The finer the grade you use, the less water you mist. Use your intuition, I did.
Final note and last cautionary word: when you are buffing, wear safety glasses & respiratory protection, and be very, very careful around the edges. You can catch an edge and either destroy an instrument (like my friend, James Olson did) or set yourself back 3 weeks in the twinkling of an eye. YOU CANNOT BE TOO CAREFUL AROUND EDGES AT ANY STEP OF THIS ENTIRE OPERATION. Edges hate you. They want to see you cry and cuss and kick the door of your shop.
The final results of the above process produced this:
I think the results are worth it . . .