• TalkBass has been independent since 1998. Add your voice.
    Create a free account to reply to discussions, view embedded media, and browse with fewer display ads.
    Join freeLog in
    Want zero display ads or expanded classifieds tools? Compare plans.

10 string Prat Bass

Hi, I am opnening this thread to show some kind of diary of the construction of my new bass... As some may know I am a luthier apprentice in Costa Rica. Oscar F. Prat has been great, first helping me with advice, then selling me amazing woods for my basses, and the most amazing detail, he invited me to his shop to learn the craft for a couple of months. So I decided that the best thing to do was ordering a Prat Bass! The best decision Ever! So here are the specs:
10 string Bass
Multiscale (reverse shape) 35"-32"
Tuned from F#-Eb
28 frets
Neck: 7 piece Wenge/curly maple
Body core:50 year old american walnut
Top and back: curly koa
Fingerboard:macassar ebony
Pickups villex
Preamp: mike pope flexcore
Piezo: ets with richter electronics control board
Wooden knobs, pickup covers, ramp, cavity covers walnut/koa
Koa block inlays
16mm string distance

So after some chat, I told Oscar I wanted a small instrument (as small as possible as a ERB) so he changed the desig on the reverse a bit, and it turned out amazing! Designed a headstock which I love, and we took on every detail... So i took a flight to US, and as soon as I arrived, we started the woodworking part. Will post some pictures of the process...
 
image-72976563.jpg

Here you can see the neck shape cut close to the shape...
 

Attachments

  • image-3260221766.jpg
    image-3260221766.jpg
    48.7 KB · Views: 213
  • image-2012479914.jpg
    image-2012479914.jpg
    25.8 KB · Views: 261
image-4088393457.jpg

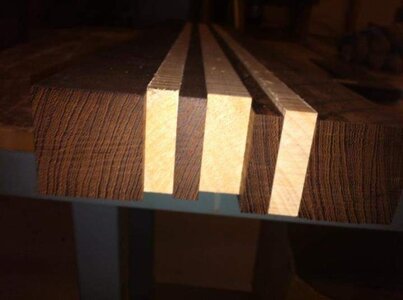
Here is the man himself standing before all we done the first day... Glued the neck laminates, cut the body tops, backs and core... Lots of progress in a couple of hours...
 

Attachments

  • image-1694943771.jpg
    image-1694943771.jpg
    47.6 KB · Views: 231
  • image-3610050544.jpg
    image-3610050544.jpg
    32.4 KB · Views: 236
So we finished the fretboard... Fret slots and block inlays ready... This thing is nice! The grain figure changes between the macassar ebony and koa blocks like a negative of a photograph... Can't wait to finish this bass!!
AD6FCA54-D19E-44FB-BD21-2F473DED9C1D-3460-000014FA83C102DC.jpg

2424E174-DC9B-4ABD-8032-6AB29F880A6F-3460-000014FA52C1C039.jpg

F2DB699F-192C-4CFD-886C-5D50924DAC7A-3460-000014FA33217F7A.jpg
 
Thanks guys... The idea on this one is to have the most compact ERB possible, so string distance at nut and bridge is very tight... I will have to play it a couple of months just to feel natural on it... Will keep the pictures coming! Triad thanks for your input, I still will make my 12 string twins next year, this will be like a prototype so the change from playing 7 & 8 string basses, feel more natural, and this way I can be sure, that everything fits on my 12 string design... For example on this one I used the 12 fret as parallel like in my 12's just less scale change...thanks!
 
Well, lots of progress to show... First, Oscar cleaned up the neck, and start shaping the volute, so we can have an idea of the final neck thickness....
947F2D4A-899D-4BFC-9BF2-862F75E82C91-5684-0000227ABEF7F05B.jpg

3FB03D31-0566-4B5E-A40E-D951070D7878-5684-0000227AC3367121.jpg

Then we glue the fingerboard
A70E3B9B-5E7F-4AF0-AB11-B0A6FD96D87F-5684-0000227AEACFCD38.jpg

FD6523DB-8F2A-4B19-8818-69F1CE024E8A-5684-0000227ADC2D862D.jpg

And after lettint it dry overnight, we glued the singlecut
6D278579-59E0-4F1A-BDC7-587887409E85-5684-0000227AB5000638.jpg

4B9E698D-29F9-4456-9CCF-B09AB83EB832-5684-0000227AB0806673.jpg

After letting it dry, we attached the other wing...
1E79C668-01F5-44CB-9167-8A8E6B6FEF09-5684-0000227A9F3E2976.jpg

F4FE430F-CFFD-4AAE-A5DD-9CA2C0222DC7-5684-0000227A8F0037B6.jpg

Still have some more advance to ahow... So I will do later... Thanks for stoping by and watch this...
 
Nice stuff! But I've never been comfortable shaping the neck with the body already glued on. To each his own method, I guess. ;) It's coming out very nice, you must be really excited! :)

 
Thanks Triad! Well, yes, there's different ways to do this.... This is Oscar's way, and actually I feel comfortable with it... Mostly because he does it like in stages.... Cutting, glueing, shaping, sanding, routing cavities, fretting, sanding for the finish, applying finish, assembly parts and setup in that order.... So we are now in the final shaping part, so I can start sanding a bit to take off all scratches and glue leftovers that might be, and level everything smooth ... And start routing fir pickups and electronics....
Actually I am pretty excited, I love bass as a whole, and I am learning a lot, but still the bass player within me can't wait anymore to have the bass ready and start playing... Thanks for the kind words Triad, I will continue with more pictures of the process!
 
So after tqking off clamps, we sanded top and back to get a perfect flush surface on both....
97439AA2-F41D-4BEF-A038-F6A2AA52A811-5684-0000227A702EEFA1.jpg

3223ECC0-293B-491F-914C-90B6238B5B1A-5684-0000227A6711268A.jpg

Then glued the headstock cap (yes, more koa hahahaha) and let it dry overnight
3863C93C-BC68-4EF8-A4E6-9E3CB0956326-5684-0000227A76EEAE63.jpg

64443617-4A21-46BE-B27C-8B89B73936EB-5684-0000227A6BCAB3F9.jpg

Then we start removing material form the neck-body joints and shaping the back of the singlecut
Here aoscar doing some steps with the router...
9DB6A93E-5A42-4D44-AA3C-EC6004DE6837-5684-0000227A5B74DEAA.jpg

DC883BA6-A1C6-48D5-B8A7-80B08CBA6C00-5684-0000227A48DCEE3F.jpg

Then we got the headstock close to it's shape, and I started doing hand sanding to the perfect shape and feel...
4D7D1773-944D-4A75-8E63-845F0794C223-5684-0000227A33642F83.jpg

69B1888A-35BF-4DC7-8A45-F417211263AB-5684-0000227A52B1A658.jpg

Finally we starr the shaping of the body front and back sides.... Giving some more design elegance, and comfort with the bass on...
02A9368C-2D9A-479C-B06B-97589296FDA5-5684-0000227A3DB63DD9.jpg

A49039BD-F796-4C12-9F3E-6164507698BC-5684-0000227A2E290286.jpg

03DCEEE8-3A5B-4C4B-8534-F04A9F47DE39-5684-0000227A38D33706.jpg

And finally a picture that worth a thousand words... The love story between the bass and me begins hahaha
51a680606ccf984529b1e006c29225c9.jpg
 
Hi, we didn't use clamps in the middle or a block, because it isn't veneer... Is a thick piece of koa, so it will hold a good presure all over it with good clamps all around... Then will sand it to final thickness...