• TalkBass has been independent since 1998. Add your voice.
    Create a free account to reply to discussions, view embedded media, and browse with fewer display ads.
    Join freeLog in
    Want zero display ads or expanded classifieds tools? Compare plans.

Double Bass 1938 Kay Neck Break

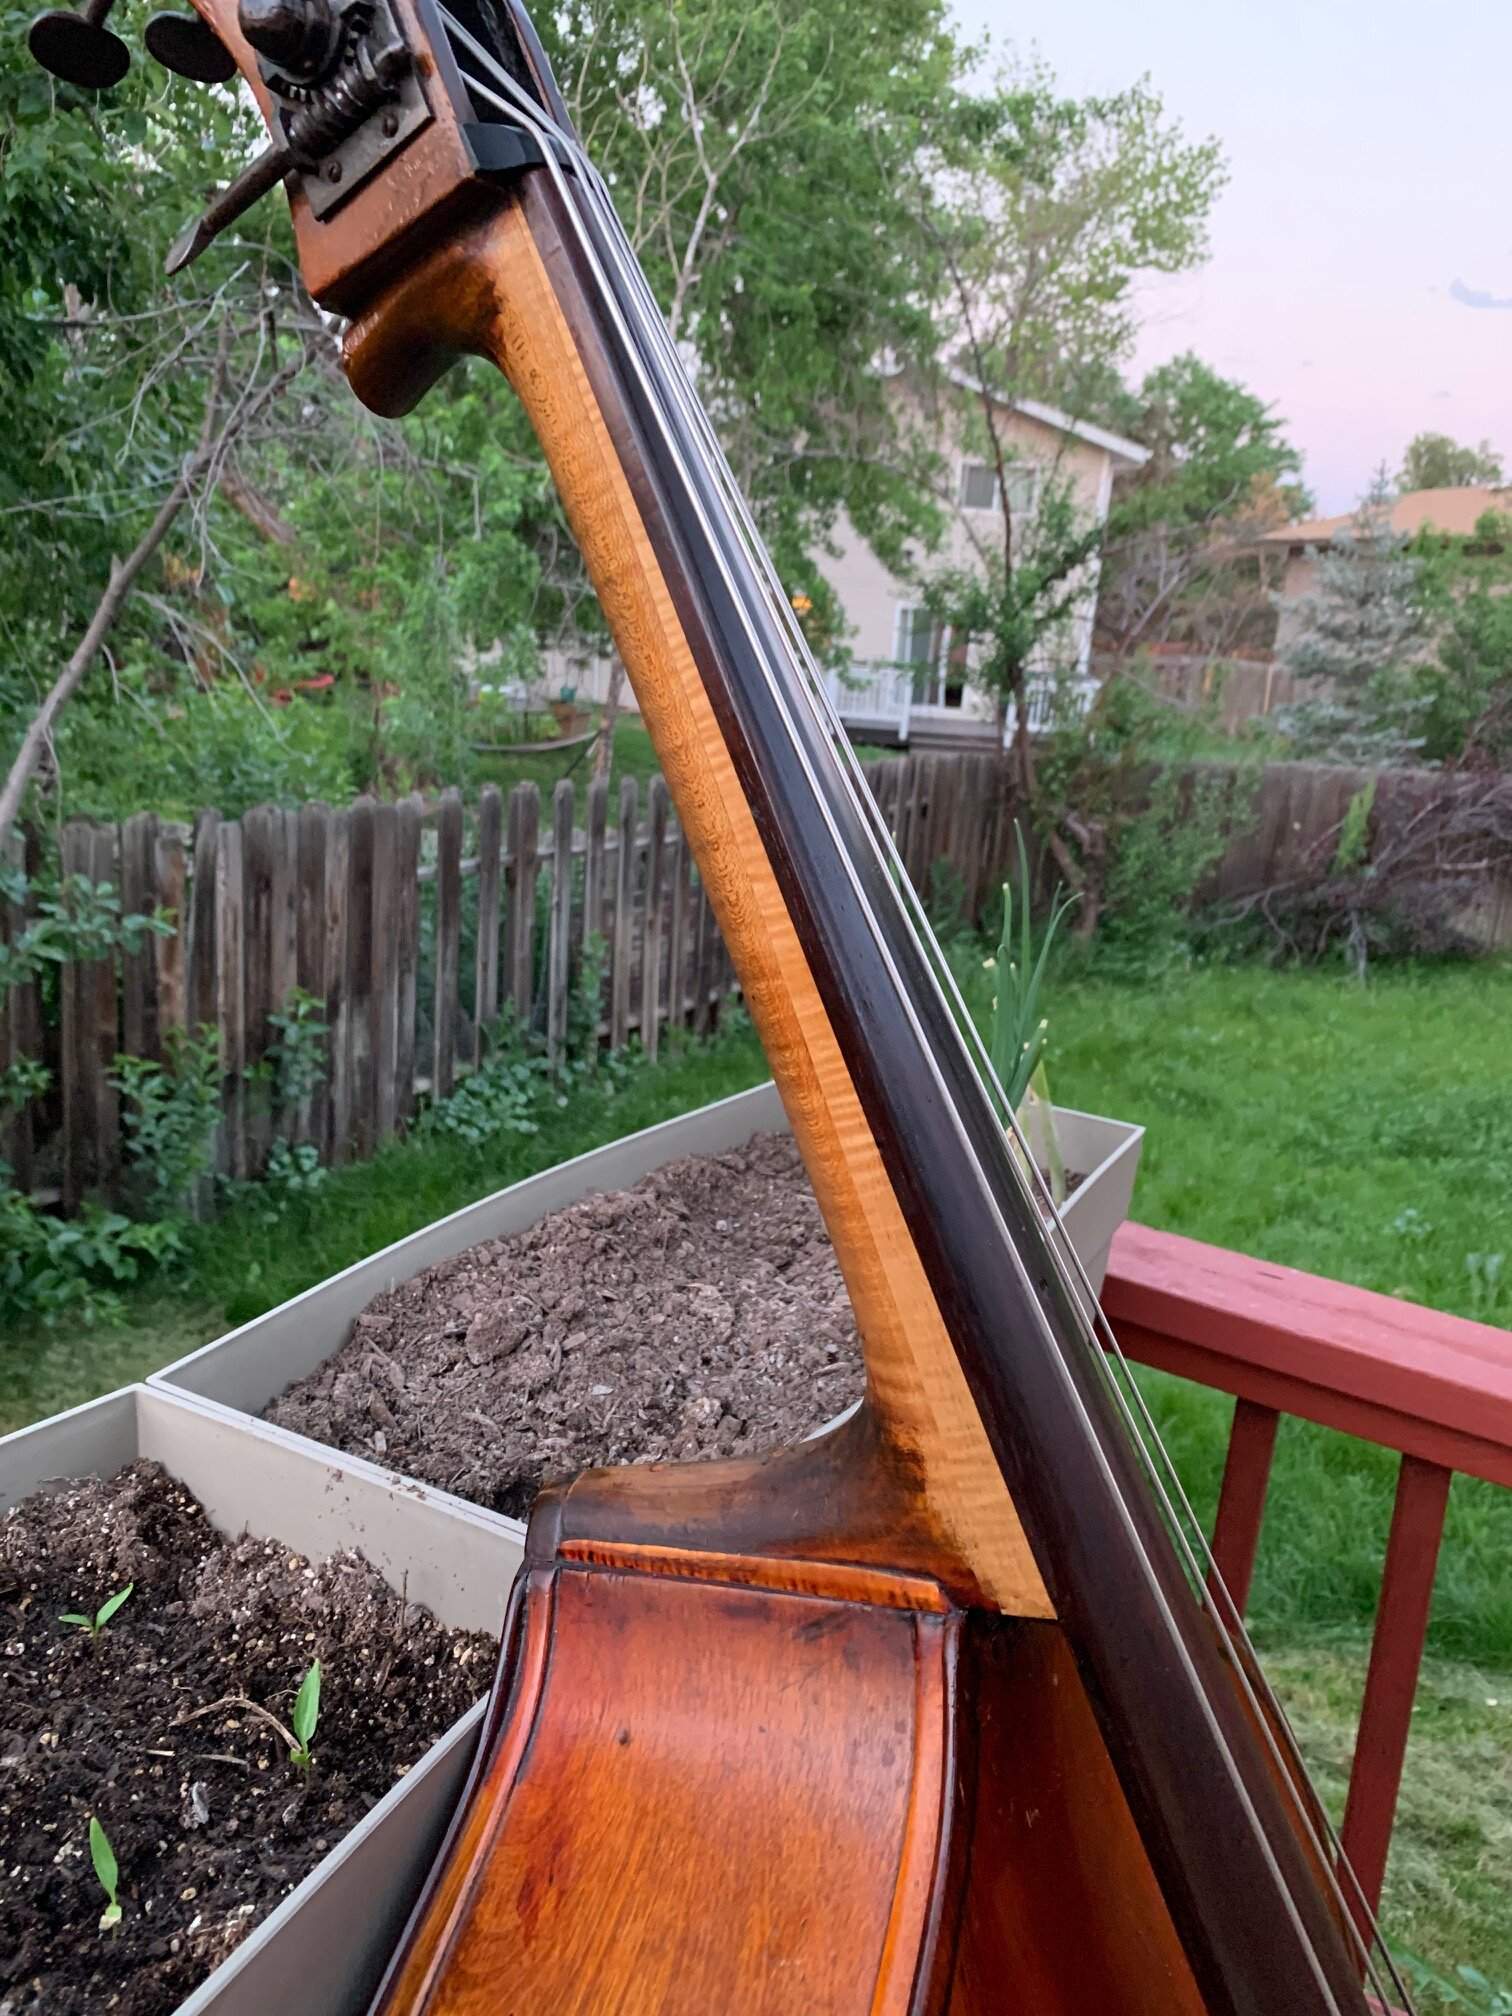
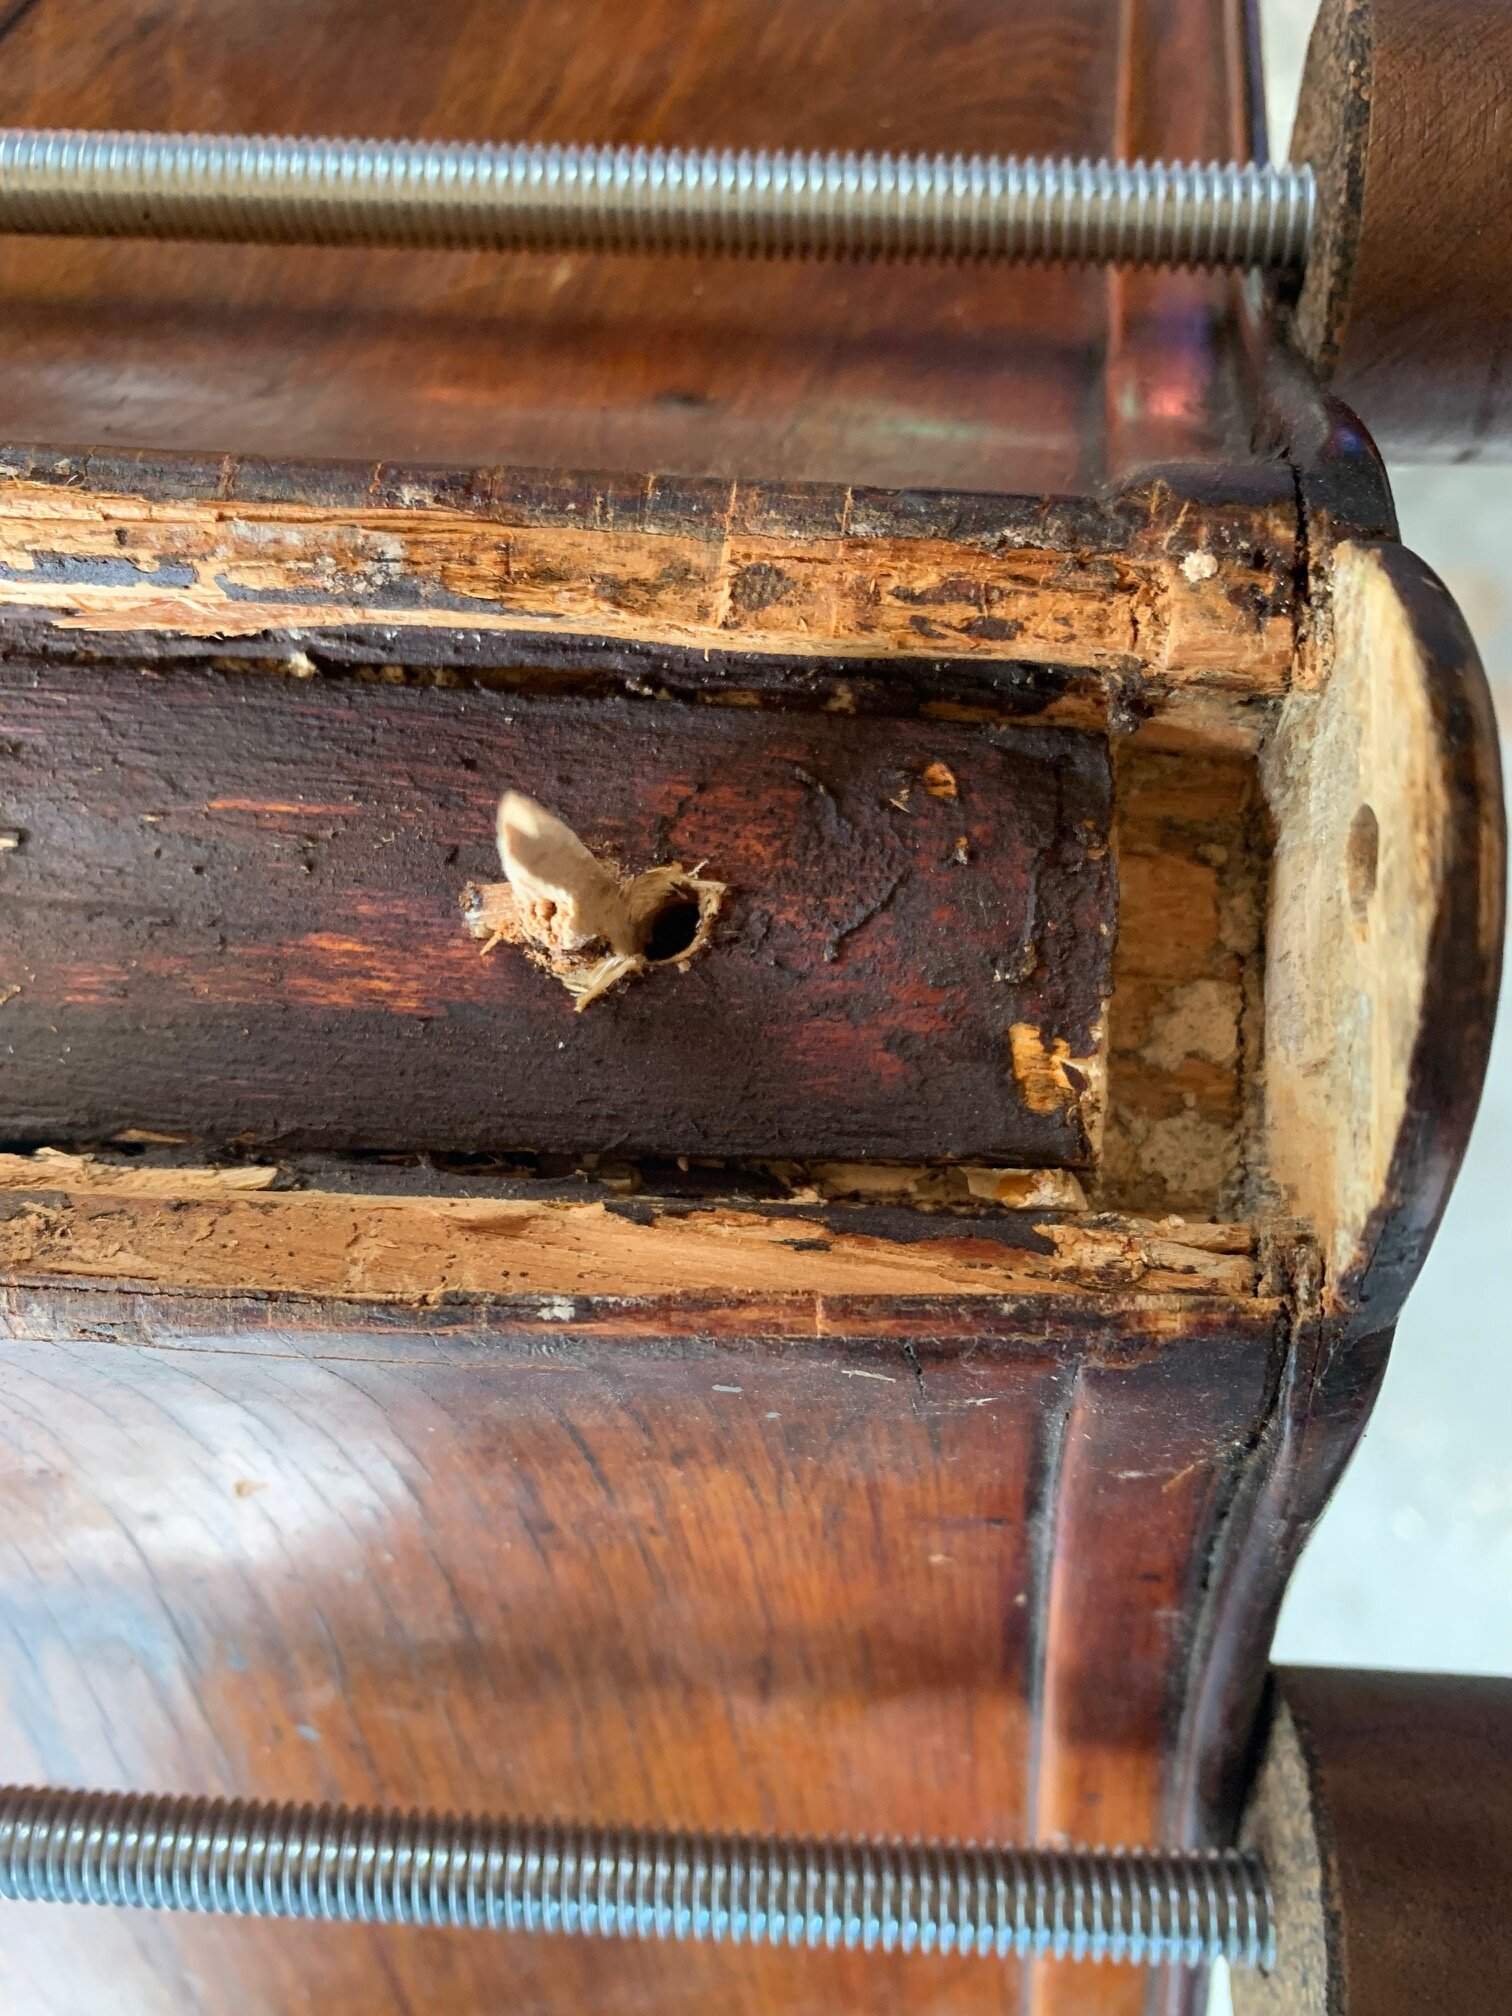
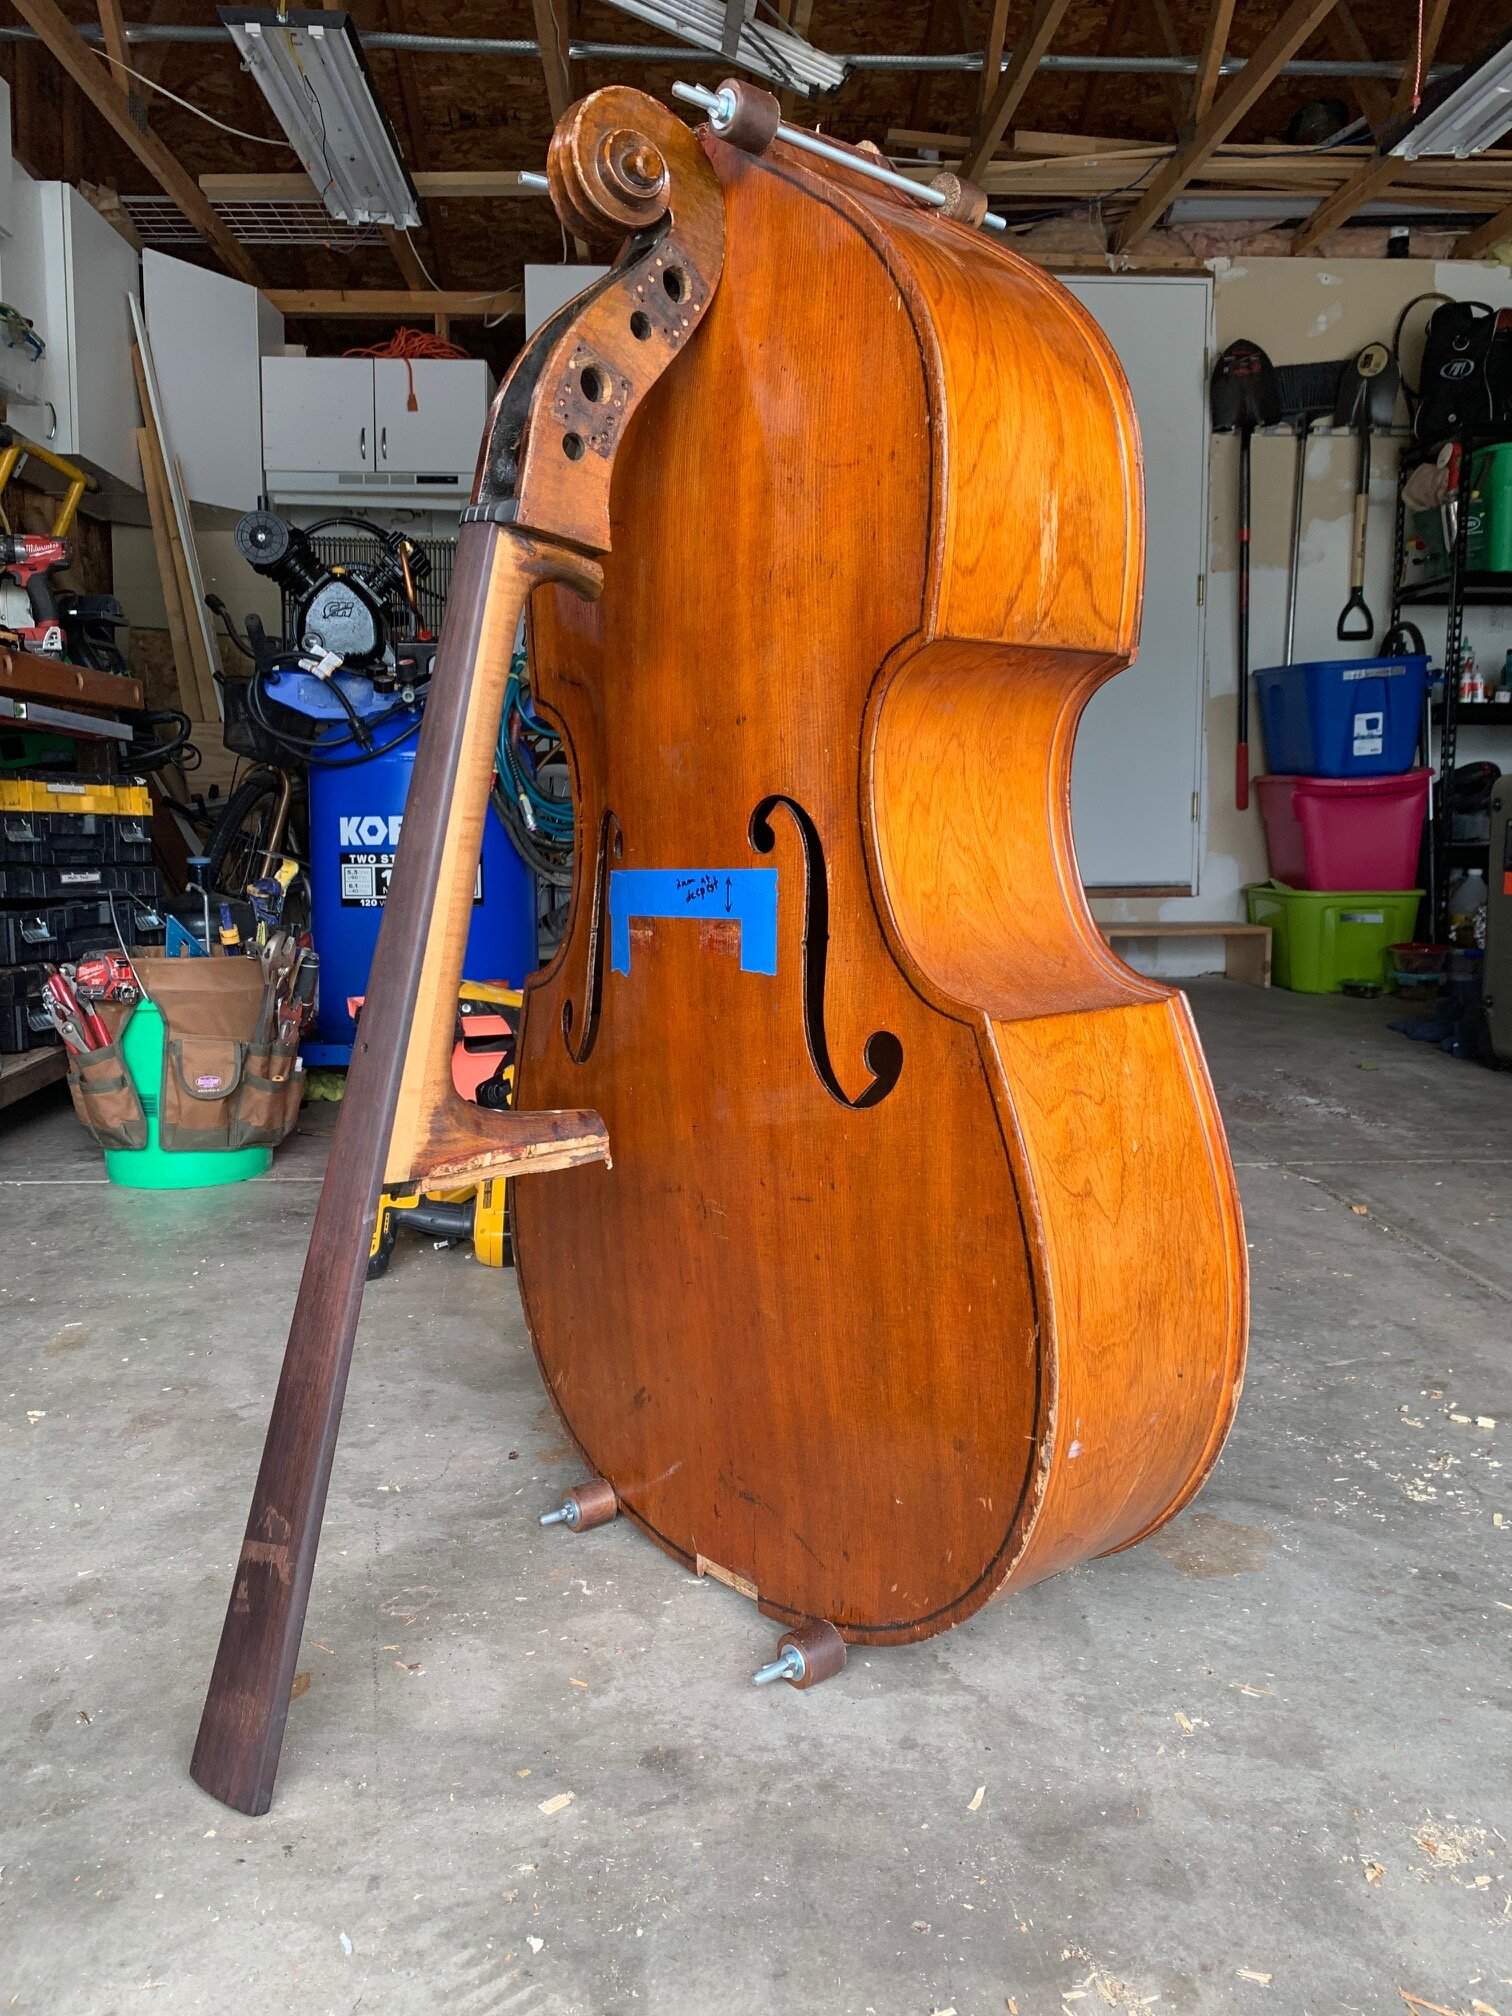
I brought my bass to my uncle's house to turn some new hat pegs. I went inside for a drink and when I came back to the garage, he had used a dowel to punch out a hat peg from the opposite side while the machine was still in the head. The neck had a major wobble from side to side, so while I appreciate him letting me use his lathe, I think he broke the neck! I took off the strips that concealed the joint to see if it would be an easy fix with some hide glue, but had to dig deeper to see what was really going wrong.

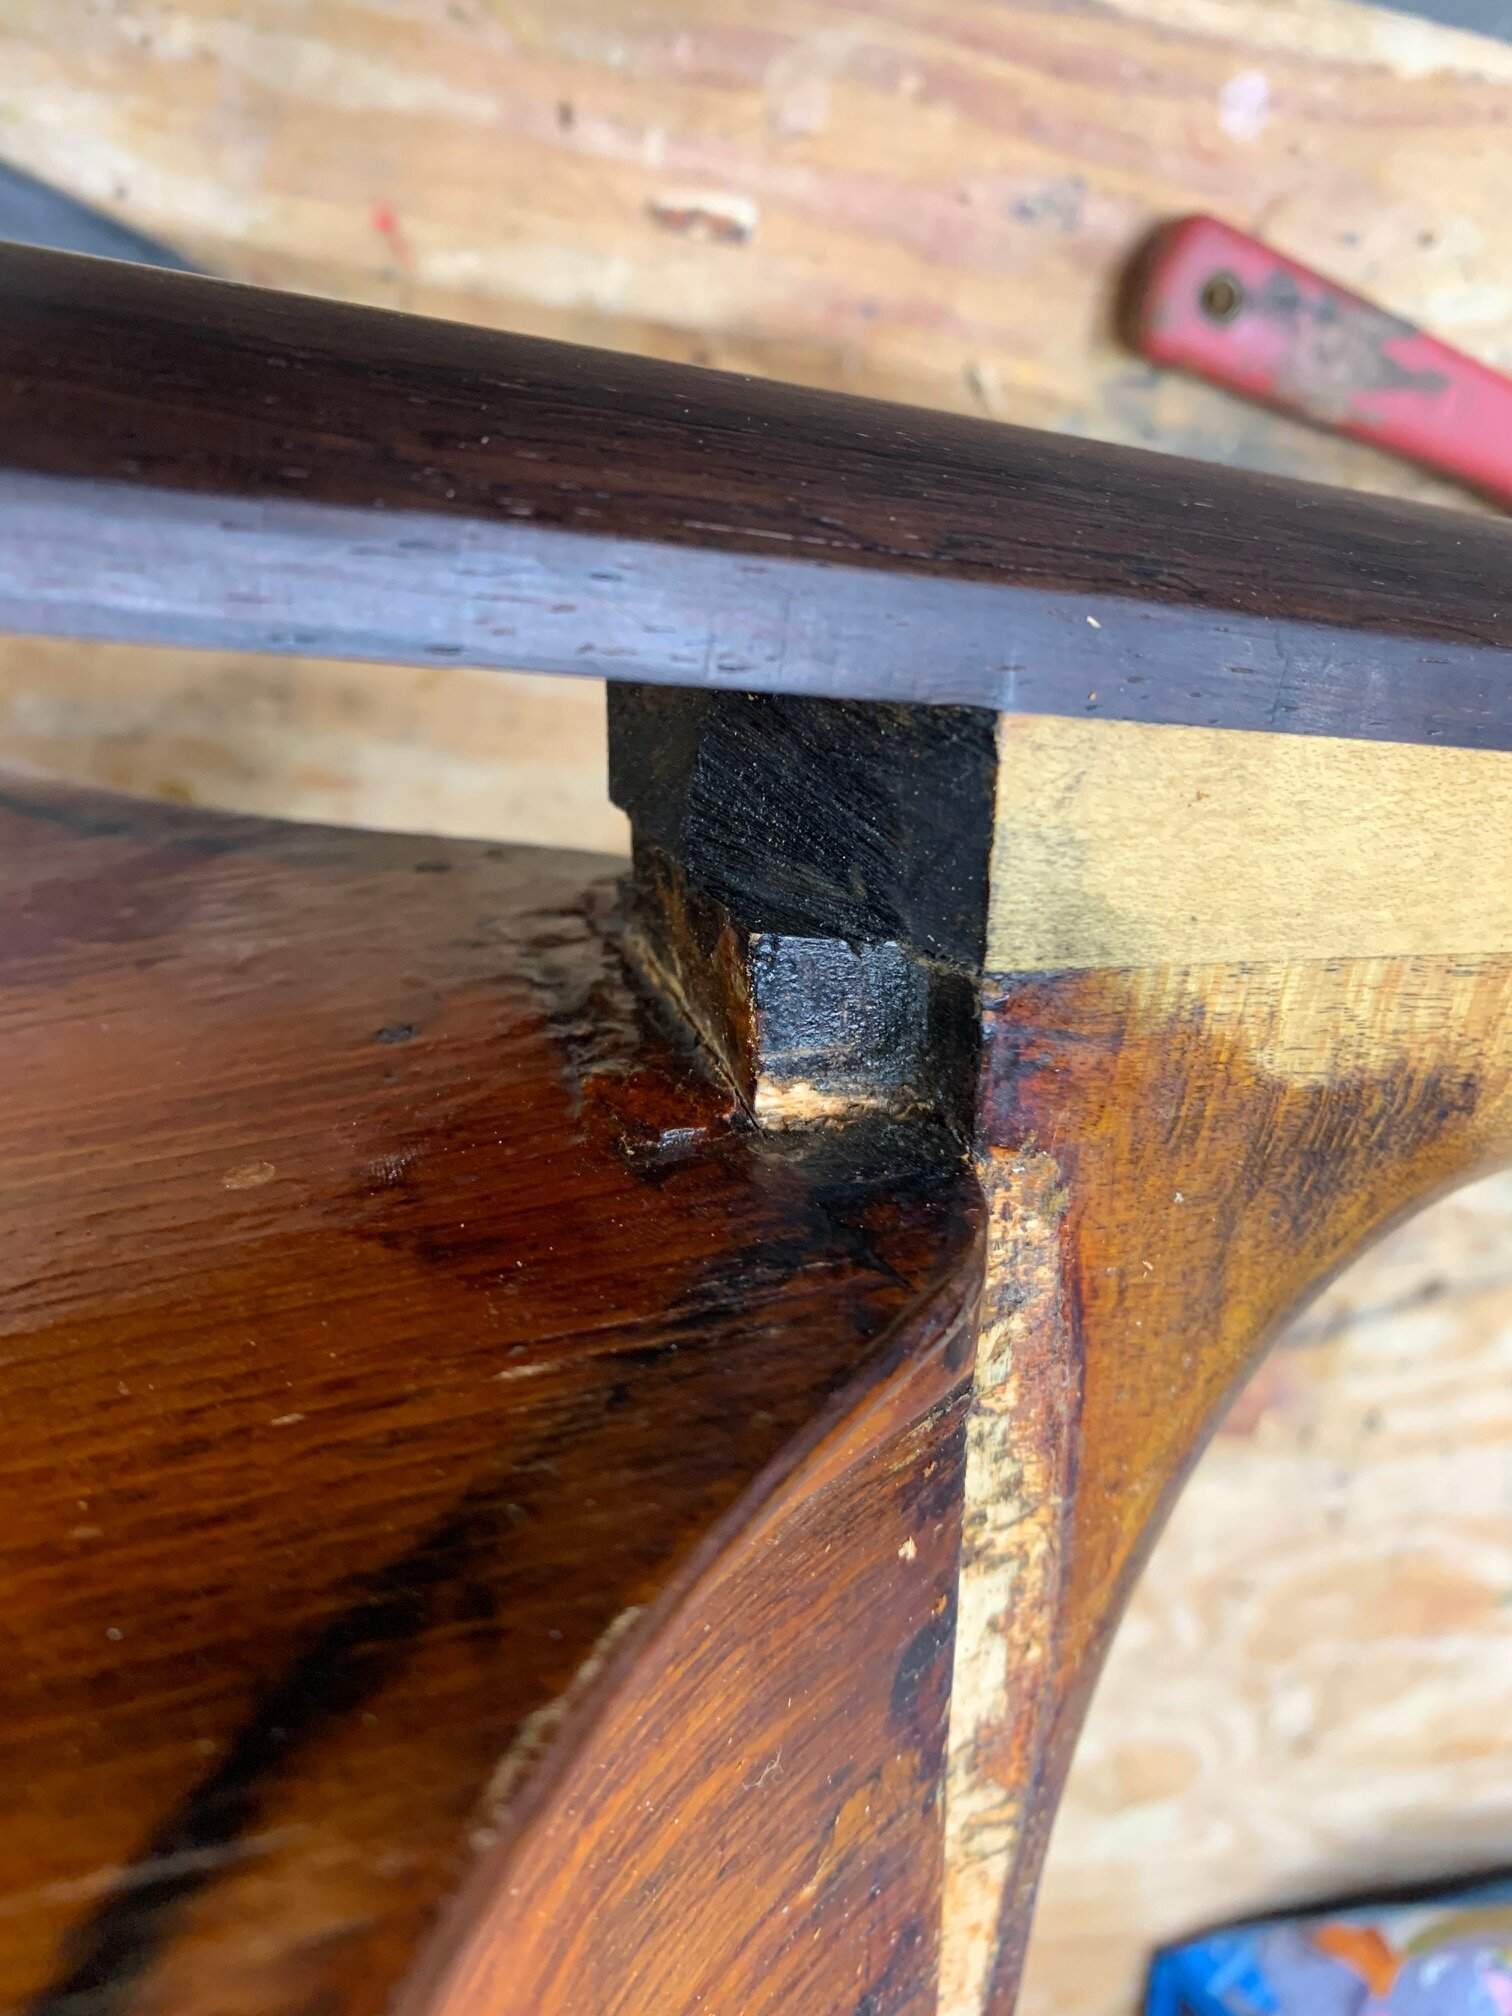
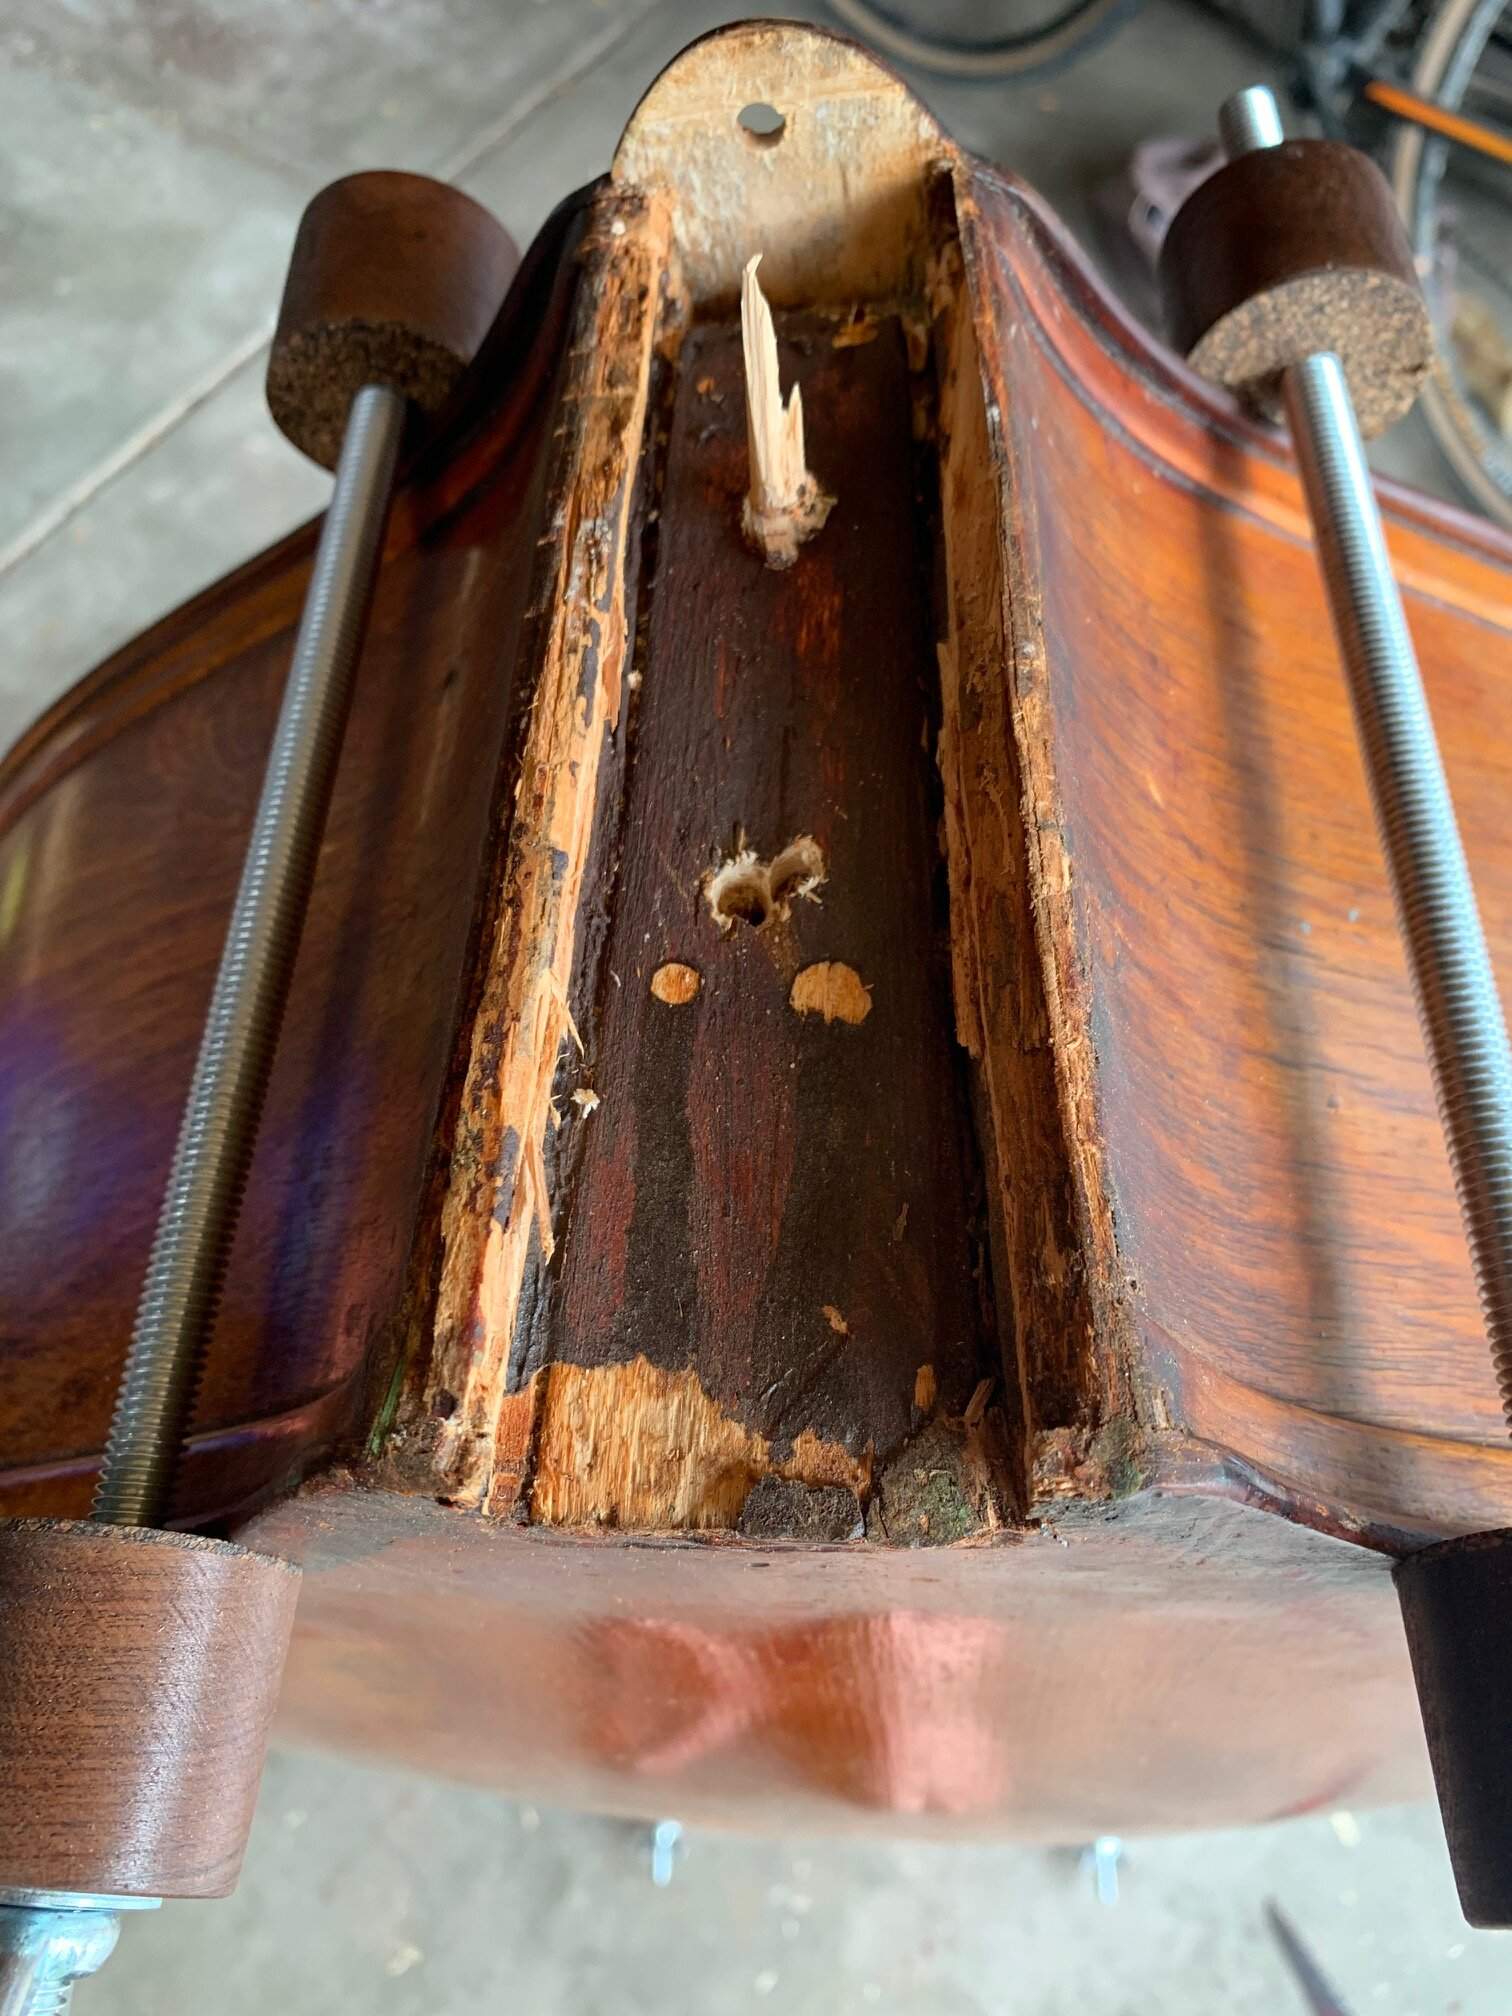
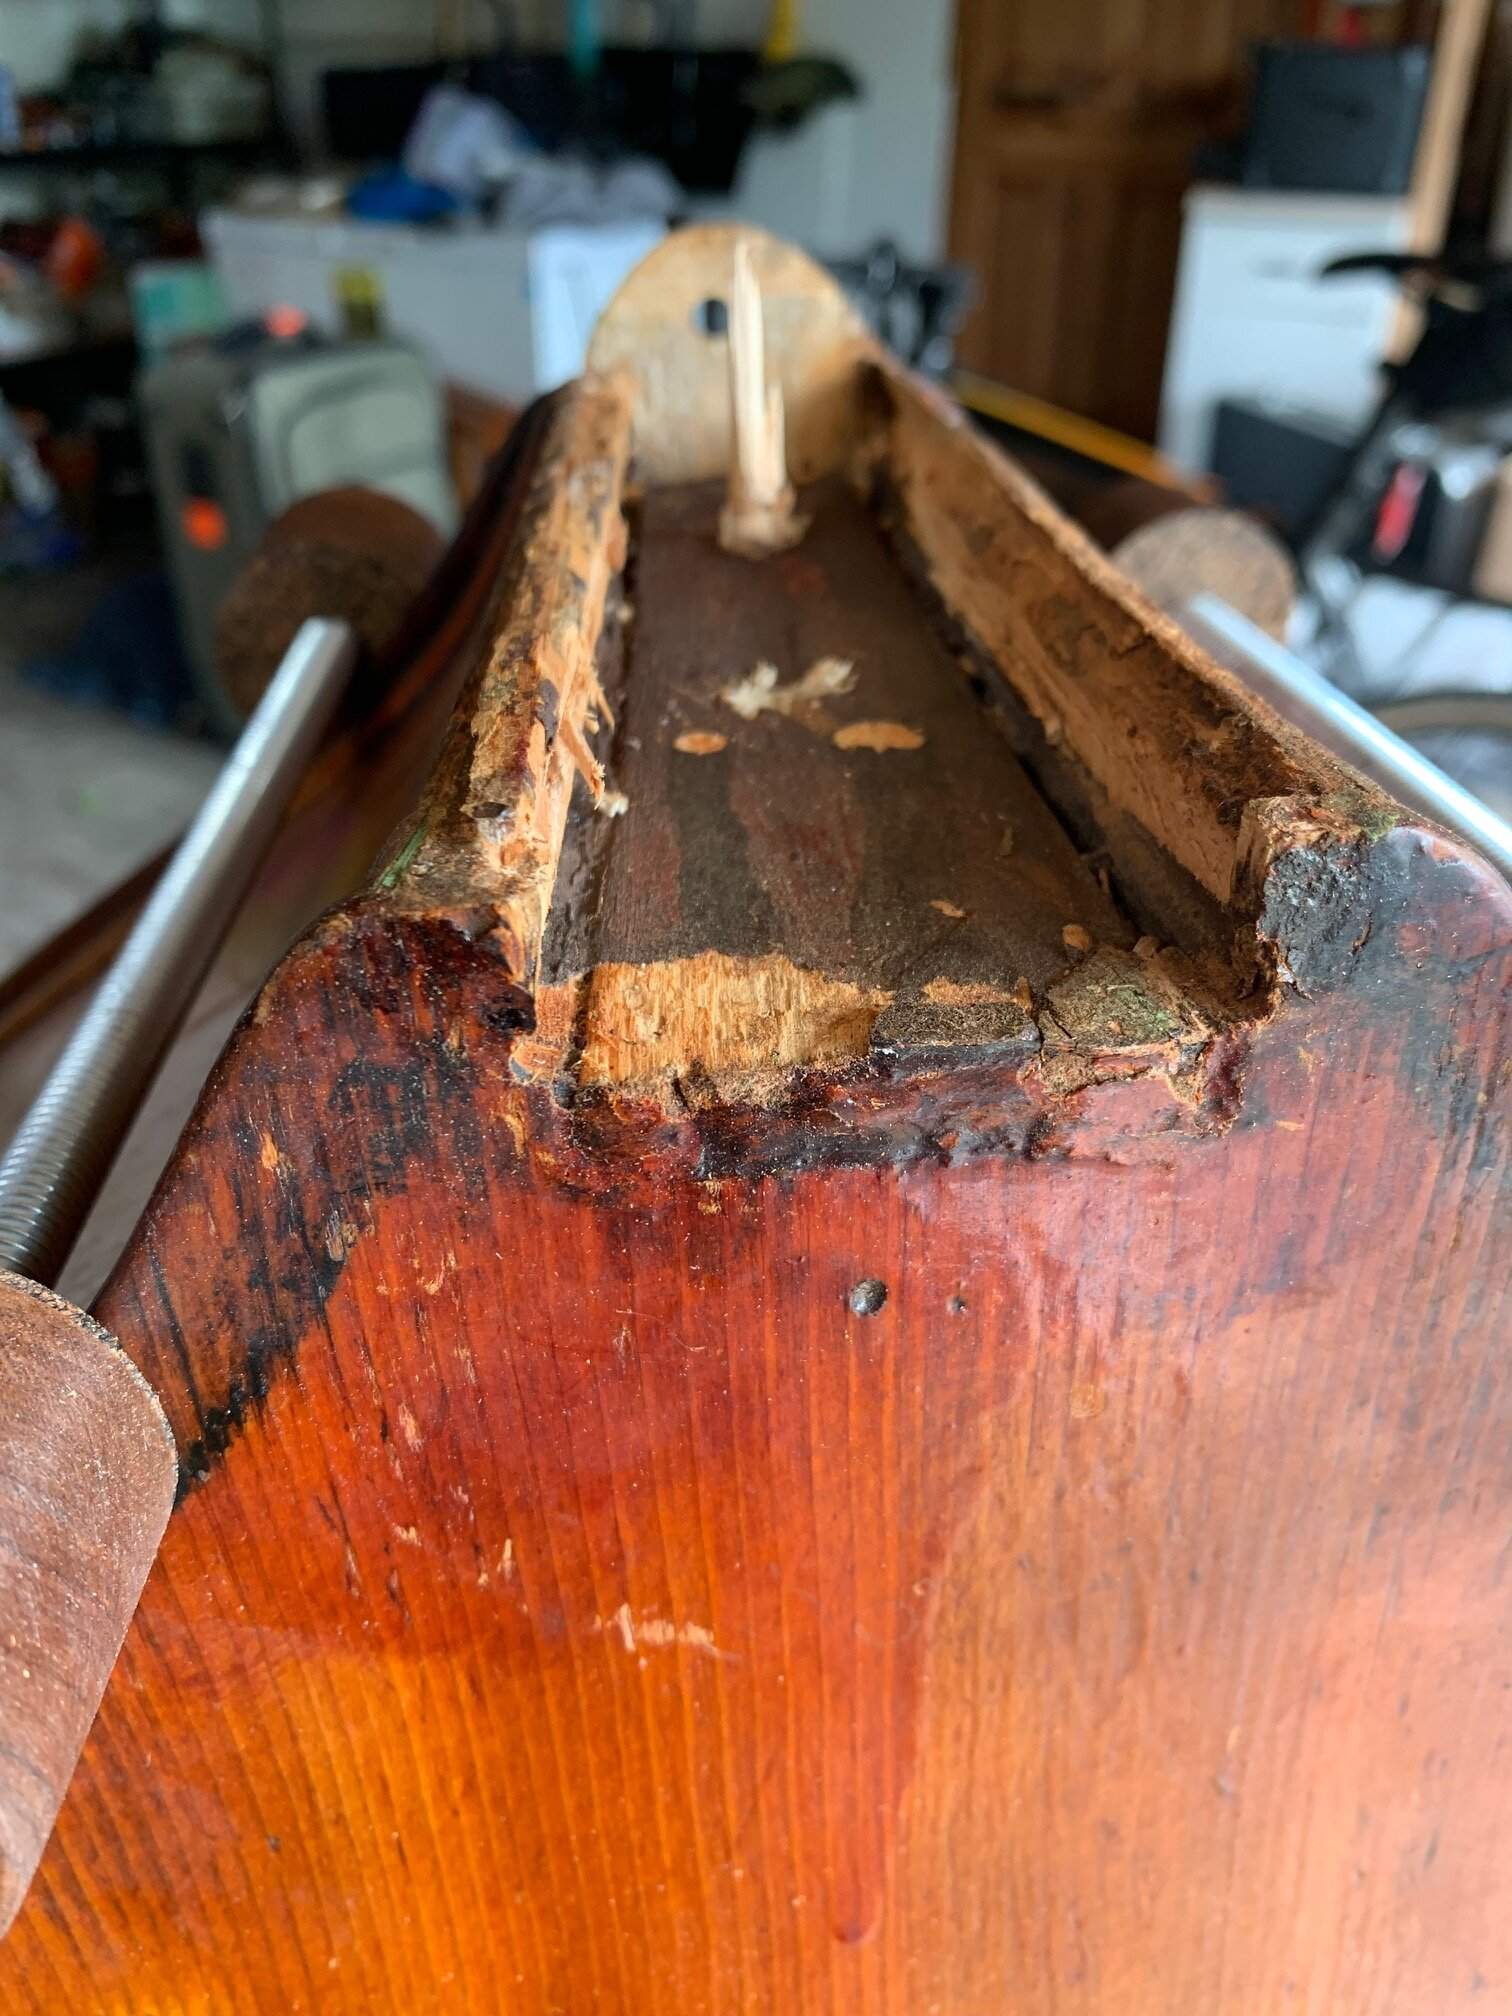
I tried my best to do a clean removal, drilling out the dowels that were in place. Of course it was impossible to align perfectly but after a few hours with some pallet knives, some cold chisels, denatured alcohol, and a few coffee breaks, I got the neck off. When I bought the bass a month ago, I knew the neck had been worked on and I wasn't sure of the quality of the work based on the chopped up block at the base of the heel. Now I can see the joint clearly, I am looking for advice on what direction I should go.

My idea is to take out the block that is attached to the neck block, clean up the sides, and glue in blocking that I can use to carve a new mortise to fit the existing neck so that there is no need for shims. I have some 3/4" maple boards that have been sitting for a decade that may be a good donor but would a softer wood be a better choice?
This joint is a real mess and as this is my only bass, I'd like to get it up and running as soon as I can with as little work possible to make a stable repair. I gig on a weekly basis and need this old gal to stay together on me!
IMG_3093.jpg
IMG_2843.jpg
IMG_3053.jpg
IMG_3084.jpg
IMG_3085.jpg
IMG_3086.jpg
IMG_3089.jpg IMG_3091.jpg
 

Attachments

  • IMG_2859.jpg
    IMG_2859.jpg
    272.2 KB · Views: 98
  • IMG_3054.jpg
    IMG_3054.jpg
    180 KB · Views: 93
  • IMG_3087.jpg
    IMG_3087.jpg
    308.7 KB · Views: 93
  • IMG_3090.jpg
    IMG_3090.jpg
    259.7 KB · Views: 83
First I have to say that if you get into a hurry on this you'll be in a world of hurt.

Others may see this more clearly than I, but I think this neck block has already been worked into the ground. A lot of work has gone into this to increase overstand, including both a boost at the heel and a fingerboard wedge. In the same process, I expect, the luthier boxed the dovetail to create a traditional straight mortise. This is not a bad idea in theory; the badness came with going around the work of a new block and adding all those little dowels and furring strips trying to salvage some suboptimal carpentry in rotten wood.

Another bit of badness is that it appears the luthier recut the neck tenon, reducing the heel height and therefore its strength — and these necks were never all that strong to begin with. (BTW, increasing overstand adds stress to the heel.)

On the upside your 89 has a carved scroll, on this model found only on early examples (as the hatpegs attest), as well as a spruce top and nice rosewood fingerboard, both upgrades. This tells me the top has probably been replaced long ago.

Every stick of wood you add to this joint will actually weaken it, with more glue joints that together will likely fail for a bunch of reasons. Doing this right means reducing the number of parts and fixing the weak bit, which is the block. Most of these are poplar that doesn't age well, so this would be a good investment for the future. But I wouldn't recommend the process of removing, carving and installing a block to a non-pro. It's a lot of work that has to be precise.

Short of that you'll be compromising at every stage, and it will eat a lot of time, even for someone with experience. If you don't have a month to work on it and the right tools, you'll be way happier taking it to a qualified shop — where it'll still take a month or more. Think about renting or borrowing in the meantime. This puppy needs a hospital.
 
That’s what I feared. I’ve been doing woodworking and carpentry for over a decade and am currently in a mechanical engineering program, so I’m hoping my skills will allow me to do these repairs myself. I searched threads and found a reference to Tom Link being a potential supply for Kay replacement neck blocks, which would certainly make the job easier. Tweaking a fabricated block vs cutting one from scratch is very appealing!
 
Here is a photo of the glued in block removed. With some careful routing to fit an insert block to recut the mortise into, is saving this block still out of the question? It held up for at least 20 years with a cubic foot of airspace in the joint, 3 dowels, and a couple dabs of glue. I found a YouTube video by Rosa String Works who used the same repair method, albeit with Titebond, and it seemed to go well - whether it would hold up 5 years later, I don’t know.
3508914E-BDE0-450B-B6E9-0E4087C4B9F6.jpeg
 
Re PM from OP: Sorry, I should have remembered this one, you just registered it. For some reason I got the impression it's an 89; it's an Orchestra, which explains the spruce top.

The consensus is strong and clear: no Titebond, no epoxy, no super glue, no substitutes — For a neck joint, which has to come apart again at some point, only hot hide glue. The 'method' of the previous work amounts to flailing by someone who didn't know better. If it seems to need more parts to hold it together, it's done wrong.

It looks like your neck block could indeed be carved to fit a straight mortise, but it would still be made of punky trash wood, and the same thing will probably happen again, sooner. From the latest angle it appears that the mortise cheeks are cut back in a sort of dovetail, and the floor lowered by half an inch. The cut into the cheeks provided the purchase to rip out the top of the joint. Realistically there's not enough goodish wood left to work with.

Re Tom Link: He sold out and retired year before last, and Englehardt is no more. There is some indication that Upton Bass will start making parts again using the tooling it bought from Tom, but I've seen nothing solid yet.

For the repairs I have recs on Ross Double Bass in Wheat Ridge and Kolacny Music in Denver.
 
  • Like
Reactions: Tonecraft
I saw that same above mentioned video from Rosa strings. He certainly "fixed" his clients' broken neck by "rebuilding" the neck block mortice like the OP here is suggesting he could do. My impression of that video was that all of the work from this shop borders on "the hillbilly way". Yes, the self-taught workmanship was impressive, but the novel repair approaches, materials and glue decisions are questionable.

That said, I'm sure that I'm not the only one on this forum who has some experience with hillbilly luthiers! Ha-ha!
 
I went to both Kolacny Music and Bob Ross when I first got the bass to get it looked over and decide whether it was worth fixing up, or selling if it was a money pit. They both gave me the green light and said it was worth it to take care of the small issues it had - warped bridge, cracked saddle, open seams, cracked tuning pegs, and a slightly sunken top under the g side bridge foot. I took a look and saw the soundpost was kicked back at a very steep angle and have no idea how it stay up so long in that position. Now that I can see the neck joint clearly, it looks like this will indeed either be a money pit, or a lot more time that I was anticipating to get it up and running.

In reference to the video I mentioned, I am amazed by the fact that he uses wood glue on every single repair. I would think as a repairman, he would want to make it easy on the next guy! I bought a wax warmer and some hide glue a few weeks ago to fabricate and replace the saddle and will only be using hide glue on any repair I do. My plan was to take care of all the open seams but since they are all on the back, I'll save that for later after the block is replaced. If I ever have to undo a repair I make, I will know it can be undone with relative ease.

If a hillbilly repair could save me dozens of hours or possibly thousands of dollars, it might make sense on this particular bass. there are already 3 dowel holes in the neck.......not saying I'm going to, but I've thought about it!!

I found some resources on fitting blocks using a plaster mold, so I'll do some research and see what that entails to replace the block and do it the right way. I have an appointment at Sol Vista with James in a few days, so i'll just hang tight and not do anything stupid!
 
Last edited:
Any progress?

I don't believe that is an original Kay neck; neither the scroll work, volute, or heel look like an old Kay...but....on some of the very early models they were made by another source. It looks like an old European model that has been heavily modified. That whole thing is a masterclass in "the add on disease", but clearly someone with skills and an end goal worked on it and likely made it very playable in the past.

Youtube is loaded with people who have no respect for basses and treat them like a nuisance in the shop, so they do whatever possible to get them out the door as fast as possible. Please do not use them as your reference. If titebond and epoxy are your only skill set, maybe picnic tables would be better served.....

If it were in this condition and mine, I would re evaluate the whole plan. Getting everything back together like this will likely be a multi layered compromise. BUT- looking it as a nice clean original body that is a perfect candidate for a complete new neck to build up into a nice removable neck bass would be a great longer term goal. Call the shop and we can chat it up a bit.

images.jpg
 
Last edited:
  • Like
Reactions: Tonecraft
Sorry for the suspense! I got the neck on and then left for a 3 week work trip. I am back now and the last thing I have to do it drill the holes in the new hat pegs I turned on the lathe and fit the new adjustable bridge.

Here's how it went:
***I used 315 gram strength hide glue for everything, in different ratios of dilution***

I squared up the heel using a bench sander, the type with a 6" disk and 4x36 belt, and then glued on maple blocks to the base and back of the heel. My razor sharp chisels needed quite a bit of attention to stay sharp as this was some very hard maple, but I reshaped the tenon to a square taper. The neck is warped and whoever installed the shim accommodated for the warpage by making one side of the shim under the finger board thicker. They did a very good job and obviously put in more time and than whoever reset the neck but this made getting everything square a bit more difficult as I couldn't reference the shim accurately when shaping the heel. Lots of careful measuring involved in the layout process.

I made a jig that allowed me to use a flush bit on a trim router to square up the block. I glued in maple blocks on each side of the neck block and then chalk fit the neck using a laser level to help with alignment. I made a few mistakes along the way which really showed me the benefit of hide glue and its reversible nature! I glued in slightly larger dowels to replace what had been removed, and then promptly left for 3 weeks. when I got back, I glued in ebony strips leftover from turning the hat pegs and reshaped and varnished the neck. It isn't perfect but it does the job. I am very close to stringing it up and will be using Global Gut D and G and Evah Pirazzi Slaps for E and A, which are all very low tension. That is going to be a very tense moment for sure!

My goal here is to make the bass as playable as I can while spending as little as I must to accomplish that. Eventually, it will need a new block, neck, and fingerboard, but I am missing out on gigs and haven't played in over a month so if this repair holds up, I'm going to play it until it doesn't and then go from there. Is that going to be as soon as I string it up, one month, 1 year, 20 years? I'll find out soon! The previous joint held up for 20+ years strung with Spiro Mediums and barely had any glue in it. I took my time with this and while it is not flawless, I am certain my repair is better than the last, but is only a temporary substitute for a proper long term fix.

This bass has been an incredible learning experience for me. I want to thank the luthiers who encouraged me along the way: Bob Ross, James Connell, and James Condino. I was going to take it to a shop to do all the repairs but finances and my drive to learn pushed me to do it all myself. The only thing I took it in for was reaming the block for a new Ulsa 14mm hollow aluminum endpin.I have made new hat pegs, carved a new, taller saddle, did lamination and seam repairs, made ebony/leather bass bumpers, reset a neck, set a sound post, fit a new bridge, learned a lot about varnish, and justified some new tools for the workshop!

This is my bass, there are many like it, but this one is mine :D

Here are some pics of how it turned out:
IMG_3725.jpg
IMG_3736.jpg
IMG_3137.jpg
IMG_3187.jpg
IMG_3199.jpg
IMG_3634.jpg
IMG_3757.jpg
IMG_3758.jpg
IMG_3755.jpg
IMG_3756.jpg
IMG_3761.jpg