• TalkBass has been independent since 1998. Add your voice.
    Create a free account to reply to discussions, view embedded media, and browse with fewer display ads.
    Join freeLog in
    Want zero display ads or expanded classifieds tools? Compare plans.

30" scale Telecaster/ Esquire bass build (pics)

I posted this elsewhere but thought is should be here too.

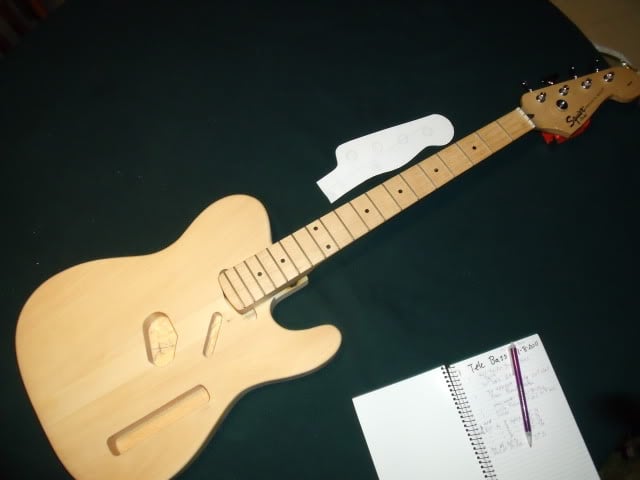
Winter project time is past winding down and I have to get moving on this thing. It’s going to be a short scale (30") Telecaster/ Esquire bass. I was inspired by some pics I saw of a bass Rhomco built that was laid out similar to this so I thought I would give it a go.

It will use an off the shelf 3 piece Alder Tele body from Rondo that was routed for standard Telecaster bridge and neck pickups but not drilled for the guitar string through bridge locating holes. To keep the overall length close to that of a guitar I am going to seat the neck deeper into the body by knocking through to the space routed for the Tele neck pickup.

DSCF3959.jpg


For the neck I am using a 20 fret Maple donor neck from a Squire Bronco. Its is a 30" scale that I picked up for $75.00. It was well worth that just for the neck. It's straight with well dressed frets The headstock will be re-profiled to the Telecaster style peghead.
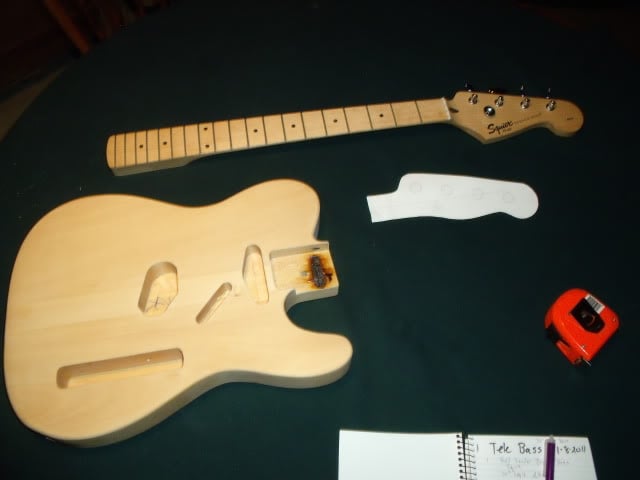
DSCF3964.jpg


Anyway... because the neck is maple the "theme" is going to be a cross between a 51 Fender Precision Bass and a early 50's Telecaster. There is no neck pickup so I guess this makes it an Esquire Bass ( if Fender had built a 30" scale in 1951 or 52). It will have black Bakelite pickguard and a Butterscotch or Blond body. The bridge is a string through body Fender Musicmaster bridge with individual saddles. I will have to rout a little room for a Lindy Fralin Split Coil 51 Precision pickup in what is now the Tele bridge position. Moving the bridge back to make it a bass means the bridge position hole is a great spot for the 51 P pickup.

DSCF3970.jpg


I started this in January and am quite a bit further along than this I just wanted to keep the posts in some order resembling a timeline.

JR
 
  • Like
Reactions: jafp
To get the neck to seat deep enough in the body I chiseled through the bottom of the neck pocket in to the space where a tele neck pickup would be.

.
DSCF3977.jpg

.
DSCF3980.jpg

.
DSCF3985.jpg

.
I had to open it up just a C hair to get a nice tight fit on the Bronc neck.
.
DSCF3989.jpg

.

The neck is next.

JR
 
Time to re-profile the peghead.
.
DSCF3976.jpg

.
There is just enough meat in the right places to get a 51 P bass/ Tele style headstock. I tweaked the profile a just little from the template. The Bronc peg head is way to long for it's own good. I need to lose 1/2 an inch to get this thing into a baritone guitar case.


It was roughed out with a coping saw and sanded the edges to 80 grit. I have to open up the tuner holes from 3/8 to 9/16 to accommodate the bushings on the replacement tuners. I'll finish sand after that step.

DSCF4035.jpg

.
DSCF4038.jpg

.


Now Plug the holes from the stock Squire tuners. The new tuners will be lightweight types to stave off neck dive. I dyed the neck a shade with amber dye to give it a bit more of vintage tint. final finish for the neck is Tung oil for warmth and then Tru Oil that has poly in it to seal it. It has a nice satin feel that won’t get sticky.
.
DSCF4048.jpg

.

All finished with lightweight tuners installed.
.
DSCF4070.jpg

.

JR
 
OK, time to get on with pre-assembly.

I am using a Bakelite pickguard and will have to lengthen the neck pocket opening to account for the neck being so much further into the body. This one came out OK but it's a little to sloppy so there will be another. (maybe red tortoise shell)
.
DSCF4079.jpg
.

The next step is to locate the bridge at the right distance to reach the 30" scale. It must also be properly centered so the strings are spaced evenly on the fretboard. Must find the center line.


Before I took the Bronco apart it took the critical measurements from the front of the nut to the bridge saddles. I transferred those to the blue tape.
.
DSCF4072.jpg
.

I am stringing fishing line to get the bridge in just the right spot. Once I mark the spots on the tape I can drill pilot holes for the mounting screws.

.
DSCF4085.jpg

.
DSCF4086.jpg

.
DSCF4087.jpg

.

.
The Musicmaster bridge is a string through body design and not having a drill press makes getting the holes evenly spaced on the back a little more difficult. To get them close I used Rhomcos trick and drilled 1 and 4 string holes all the way through. The hole for the 2nd and 3rd string was only drilled a 1/2 inch deep from the top. I flipped the body over and used the bridge as a template and marked and drilled the 2nd and 3rd string centers based on where 1 and 4 emerged. When I open up the holes in the back the 2nd and 3rd string holes in the back will meet the ones from the front and the pattern in the back will be as evenly spaced as I can make it.

I counterbored the holes in the back to uniform depth to use some long bass ferules I found. The short ones came with the musicmaster bridge.
.
DSCF4096.jpg

.
.
DSCF4178.jpg

.
DSCF4183.jpg

.
.
Drilling that hole for the bridge ground wire was a nail biter. A footlong bit and I made it just to the bottom of the control cavity without hitting any of the screw holes. I thought about going to the cavity via the endpin and the dropping a hole to it from under the bridge and them plugging the endpin hole. In the end I just did the hole straight from the bridge.

DSCF4143.jpg

.
.
DSCF4160.jpg

.


Now I have the bridge installed and I can string this thing up to work on the Pickup location and angle. This is also the first chance to get a feel for it and I like it. The shorty feels great. Low string tension and easy spacing between positions. The tone was lively and it intonated just fine so the bridge location is right. I did have to use a neck shim to raise the neck a little so the bridge saddles were not bottomed out.
.
IMG_0223.jpg

.
...........Next is finishing the body and I can tell the sealer that is on this cheap imported body is going to be tough to sand out.


JR
 
@ badstone. If you mean use a 34" scale neck and set it deeper into the body, I'm sure you could do that. It would end up a couple inches shorter than The ASAT bass'es that G&L have put out in the past.

I think the reason full length Tele bases never catch on is because of neck neck dive ( the 51 P has an upper horn for a reason) and asthetics. The full length neck on a Tele body is not easy on the eye. This is why I am making it as stubby as possible.
 
So I got this imported “ Alder” body from Rondo for $40.00 because it had not been drilled for guitar bridge holes. I thought it was a bargain but I am reminded that you always pay in the end.

There was a most tenacious sealer in this wood. ( disclaimer; If I had been painting this, I would have been all set. Because I was committed to and oil finish the sealer had to come off) No chemical warfare would touch it. (Kleen, Citri strip) I had to sand it off and it was nasty. 60 grit felt like it was bouncing off at first. I caved after a few attempts and bought a sander with a replaceable wedge/ prong doohickey at the front to get inside the horn.

It came out the other side as a flat top. I considered leaving it that way but then knocked the radius down a little.


DSCF4159.jpg

.
DSCF4171.jpg

.
DSCF4162.jpg

.
.

DSCF4167.jpg


In retrospect using alder for a dye job with an oil finish was not the best idea. I am comfortable with the techniques from working on lots of surplus M1 stocks. I had not read up on alder and now understand it’s properties don’t make a great candidate for a dyed natural finish on account of it grain pattern can look splotchy under dye. None the less I am committed
And will give it a thinned conditioning coat before the dye goes on.

JR
 
I already picked up a Fralin split coil 51.

Because of the shorter scale and slightly more narrow string spacing the 51 P bass pickup will have to be at a greater cant than on a 51 P bass.
.
DSCF4116.jpg

.
.
DSCF4115.jpg

.


I used a curved chisel and then a dremel sanding drum to open up the pickup route to accept the 51 P bass pick up.
.
DSCF4141.jpg

.

I need help thinking through this next part.

I will have to jack the pickup up on something as this rout is way deeper than I need. I suppose a block trimmed to fit under the PU is one way but would be nasty to shield over.

I was trying to think of other ways to uniform the bottom and raise it as a single plane. A puddle of epoxy came to mind.

Any other ideas I should consider?

JR