• TalkBass has been independent since 1998. Add your voice.
    Create a free account to reply to discussions, view embedded media, and browse with fewer display ads.
    Join freeLog in
    Want zero display ads or expanded classifieds tools? Compare plans.

8-string build

I like the headstock as is. Don't change it.

Lots of character in the simplicity of the design.

EDIT:

The most I would do would be to get an inlay on the front, like your last name initial.

^ Seconded! I think it has a certain elegance about it. Love the choice of colour on the body as well - you're right, the pickguard complements it beautifully. I tell you, I wish I had even a fraction of your woodworking skills...
 
*blush* Seriously, guys, I'm still a noob at this. It's like anything - with a little natural aptitude, and a good amount of practice, you can get decently skilled at almost anything! This is only my third build (with another stillborn), and my first time making my own neck. Next one will be even better!

Thanks so much for all of the positive comments. There's a part of me that wants to veneer the headstock and tint it red to match the body. There's a part of me that wants to just leave it. Definitely not ready for inlay yet...
 
Okay, so I've been playing this one quite a bit in rehearsals over the past couple of months, and I decided to make three relatively major modifications.

1. Neck profile - It became pretty obvious pretty quickly that I left this neck quite a bit chunkier than I should have. I was a little paranoid, not wanting to accidentally break into the truss rod route, but wow, this thing was a baseball bat. So, after some careful measuring, I took my Shinto to it, and took a little more than 1/8" thickness off the neck. The profile is flattish, which may need further refinement, but this should help playability a lot.

2. Headstock veneer - Purely an aesthetic choice, but I decided that the peghead needed a mahogany veneer stained to match the body. It's a little fussier to add the veneer after the headstock is finished, but it turned out pretty well. I put two coats of stain on the veneer before gluing it on, and I masked off the edges of the headstock to handle any excess glue. I used a scrap piece of ply as a caul, and a little bit of the glue seeped through the veneer and stuck to the caul, but a sharp rap separated the two, with only minimal sanding/restaining necessary. Before removing the caul, I scribed around the headstock with a sharp knife, which worked really well to trim the veneer to shape. Then I hand-twisted the right-sized drill bits through the tuner holes (brad-point bits, which scribe cleanly around the perimeter of the hole), which worked reasonably well. The same sharp knife cleared away the truss rod route, then I hit it with two coats of the same tung oil (Formby's) that I used for the body.
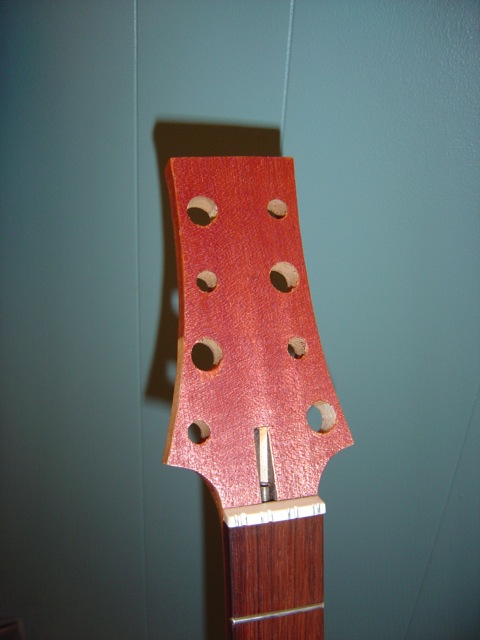
DSC00393.jpg


DSC00396.jpg


3. Electronics - The Villex PRTB is a seriously cool little gadget. But it wasn't cutting it for me on this instrument. It thickened up the bottom like it should, but the result was still too midrange-focused for my liking, with not enough adjustability. So I installed an Aguilar OBP-1. Never used one before, but it's two-band, boost-only, which seemed to me was exactly what was needed. First I pulled the existing wiring completely. Then I routed for the double battery box, and installed it. I used a 500k push-pull pot for the volume knob/passive bypass (still paranoid about relying on batteries during a gig), and purchased a 25k/25k concentric pot from bestbassgear.com - it's actually an EMG volume pot, and so it has audio tapers, but this wound up working to my advantage, as I believe this provides a more gradual boost for the first half-turn of the knob. Didn't want to drill another hole, and I really didn't have room for one anyway, so the concentric was necessary, but I also had to change the knobs, so my bestbassgear order also included two chrome knurled ones. They don't look quite as good as the original vintage-styled ones I used, but they do look pretty good, with the other chrome hardware on the bass. Finally, after lots of soldering (not my favorite activity), and a bit of troubleshooting with the multimeter, I stuffed it all in and buttoned her back up. Preliminary impressions are positive, but I won't really know how well I like it until the next few rehearsals. I am definitely excited, though! :bassist:

DSC00388.jpg


DSC00398.jpg


I'll report back in a few weeks with a more informed impression!

 
Last edited:
Two rehearsals yesterday - the Aguilar is officially awesome! Deep when I need it, bright when I need it. Or both.

I had installed a set of Chromes for the fundamentals for a while, trying to get a little more fullness to the tone, but it never quite sounded right. With the Aguilar, I went back to the XLs, and now it sounds like it should!
 
Man, I really need to work on my photography skills. How's this:

DSC00415.jpg


I must confess, this is my first venture into the world of active basses. I'm finding myself fascinated and amazed at the wide tonal palette of the single DarkStar paired with the OBP-1!
 
Last edited:
Can we hear it? Pleeeease? :D

Absolutely - I'll work on that in the next week or two. :)

Looks good Todd....

Thanks! It means a lot to receive a compliment from a real luthier. :hyper:

Wow, that's something. It about 10 years, that thing is going to look like it was built in the '60's.

I mean that as a compliment, it has a really good old school vibe to it.

Thanks for that - I've always loved old Gibsons, and the double-cut LP Special shape in particular. When I discovered that the very first Gibson EB-0 was also done in this shape, I was stoked, and the project crystallized in my mind. I plan on playing the snot out of it, so in ten years, it should have some honest wear & tear on it as well!
 
I took some close-up, detail shots (my wife showed me how to use "macro" mode on the camera...).

These are meant to illustrate the curvature on the front of the body:

DSC00417.jpg


DSC00419.jpg


DSC00423.jpg


This one shows how the mahogany grain lights up the scarf joint under certain angles of light:

DSC00439.jpg


DSC00443.jpg


Detail of the string anchoring:

DSC00445.jpg


DSC00448.jpg


LMII black pearl dots:

DSC00453.jpg


DSC00454.jpg


DSC00458.jpg


DSC00460.jpg


All in all, I'm very happy with how this one turned out. :)
 
Last edited:
Thanks for all the cool comments, guys!

Yes, the bridge saddles are handmade, out of 1/4" aluminum bar stock. I still need to fine-tune the string-to-string heights, and I still need to file in the compensation for the fundamental strings, but I hope to get to that this weekend.
 

Latest posts