• TalkBass has been independent since 1998. Add your voice.
    Create a free account to reply to discussions, view embedded media, and browse with fewer display ads.
    Join freeLog in
    Want zero display ads or expanded classifieds tools? Compare plans.

Acoustic Upright Bass Build

Oct 14, 2009
833
159
Ohio
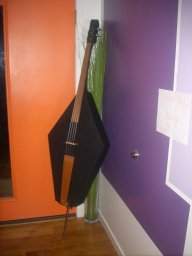
I didn't do a great job of documenting the build process so I'll keep it brief. I needed an acoustic bass (that would be amplified, so not sure what the point is) for an upcoming show and had just received a pile of scrap luan plywood. My other tonewoods were poplar and oak from the big box store. And it came out like this:

UprightAcousticBass001.jpg


I don't have a reliable way to bend wood, so the diamond shape it had to be. Or coffin. I didn't want a coffin, but the shape worked out. I built up the box on the floor like this:

UprightShortscaleBass002.jpg


Carved a neck from poplar and added a thick slab of oak as a fb, like this:

UprightAcousticBass006.jpg
 
  • Like
Reactions: T_Bone_TL and SLJ
Yes, that is a sloppy glue joint on the back. The front isn't any better.

I set the fb radius at 12in with a wooden radius block to match my last build. I made up the bridge, tailpiece, and tailblock (?) of oak, dyed the whole mess orange (amber) with some analine dye we had around.

UprightAcousticBass007.jpg
 
  • Like
Reactions: T_Bone_TL
And, why yes, that is part of a broken hi hat stand serving as the peg. Glad you noticed. I knocked a cork plug in the bottom to save the floor!

Finally, after literally hours of hard labor, almost two weekends worth, I strung it up with some D'Addario NS flats I'd aquired from a kind sould with a relationship to the company, and it breathed life! Now to amplify it.

I taped a few spare pickups to it and just wasn't happy with the sound. Dashed off to Radio Shack and dropped 2 bucks on a piezo buzzer. A zip and a zap and a little rubber paint and I had a pickup. It's here, wedged under a strip of brass between the bridge feet.

UprightAcousticBass003.jpg
 
  • Like
Reactions: T_Bone_TL
Yesterday I decided that I needed some position markers, so I added side dots made of aluminum welding rod. Works great, and so easy to work with. As this is supposed to sort of be a double bass thing I knew I needed a sound post. And you can't set a sound post without a spooky hole. I'll tell you now, never stick your hand in the spooky hole. You might pull back a stub.

UprightAcousticBass005.jpg
 
  • Like
Reactions: T_Bone_TL
As I build for me, in my spare time, I always rush the finish. I'll surely tweak the FB and bridge a time or two, might shave a bit more off the neck. Might add a thumbrest and a mag pickup. Once it's all sorted I'll sand off the Krylon and give that luan the respect it deserves.

Of course it's not done, but I'd gig it. In fact, I plan to. The acoustic gig fell through, as luck would have it, but it's got a spot in my cover band for sure. Stranglehold sounds like boiled hell on this thing!

So, if you're thinking about building a thing, and you've got a few basic tools, do it. If I can pull this thing out of a pile of scrap with nothing but a staple gun, a few cheap power tools, and a bottle of Titebond imagine what you might do!!
 
Raising the bridge would increase the vibrating length (and therefore tension, given that the strings and tunings remain the same) and require a rebuild of the neck and fingerboard.

With increased tension...I'm not sure. My gut wants to say it would be louder, but I have no reason to really believe that.
 
Thanks for the comments, guys. I'm pretty happy with it so far. I forgot to mention that it's short scale (especially for an upright) at 30in. I had intended to make it 32, but once I started playing it 30 seemed so much more natural. I've got stubby fingers and usually play 30 or 32in.

The low bridge height was intentional. I don't plan to bow this rig, so that allowed me to keep the FB flat-ish and the belly wide. I set the neck angle where it is to keep the nut centered on the body, if that makes sense. I wanted it to feel half-way balanced standing up. To get more break-over angle on the bridge I can remove or reduce the tail block, might do so when I get around to putting a finish on it. That might get the top moving a bit more and increase volume.

Further to increase the acoustic volume I've got a lot of mass I could reduce. That bridge is totally dead, acousticaly. Far too thick. Similarly the "bass" bar is a monster. This is a brace that runs from the bass side foot to near the neck joint. I say "bass" because I glued it on the treble side by mistake! I didn't know how much strength I'd need in the top so I left it full thickness.

It's been a good experience. If I decide that I like this upright thing I'll likely build another with a bit more time spent designing and choosing woods.

Oh, total cost so far was a set of used tuners ($40), Strings (free, any bass strings would work), Scrap wood (probably $15 worth), purchased wood ($15), pickup parts ($5), and 1/4 of a bottle of Titebond. I guess I could have spent $150 or so if I didn't have a scrap pile and splurged a bit.
 
What I think is cool about upright basses is that they can look really rustic and rough, and still be cool. They can look beat up, with gouges out of the top, back or sides, and still be considered cool to people. Naturally, a really nice, unscathed upright is also beautiful, but this upright instrument, perhaps more than others, seems to maintain its coolness and functionality even though it looks kind of rustic -- like yours.

So, I'm going to congratulate you for taking on this project!