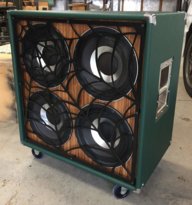
Always wanted another extension cabinet for mine. Had one in the 70’s with a Jensen 15 and it saw a lot of duty.

TalkBass has been independent since 1998. Add your voice.
Create a free account to reply to discussions, view embedded media, and browse with fewer display ads.
Join free Log in
Want zero display ads or expanded classifieds tools? Compare plans.

Same year Jess designed the B-15.Fender Showman 1960
Also had a ported 1x12 and ported 1x15
Otherwise known as the tone ring cabinets.
both standard with JBL Speakers.
100 watt amplifiers
Either way seeing both examples in today's world
Still give me goosebumps.

Same year Jess designed the B-15.
Yep, a lot of folks think that Everett Hull was the guy at Ampeg who hated loud music and rock and roll, and he was. But while Jess had a little bit better read on the times and was willing to work in their parameters to a degree, his daughter Roberta told me that he hated loud music and rock and roll, too.it is very interesting.
Both companies released ported cabinets in 1960.
Much like the OP's project. The good old diamond blue asthetic of the Ampeg amplifiers. Definitely grabs the users attention. Pretty timeless attractive design.
Possible the only downfall was Jess had little interest in higher power systems.
But overall the Asthetic much like this project is pretty hard to not fall in love with.
The unfortunate side is Fender moved on to higher quality 9 pin preamp tubes. And selenium rectifiers. 100 watts is not considered much today. In 1960 was rather expensive and extremely powerful.
Jess eventually moved to selenium rectifiers as well. Then went back to tube rectifiers.
Ironically. In today's world.
Their is a little magic and romance with the older rectifier tubes and 8 pin preamp tubes.
Toss in a little 1940s style cathode bias. And you got magic tube tone.
Yep, a lot of folks think that Everett Hull was the guy at Ampeg who hated loud music and rock and roll, and he was. But while Jess had a little bit better read on the times and was willing to work in their parameters to a degree, his daughter Roberta told me that he hated loud music and rock and roll, too.

My B-15 cab had the plugs when I first got it, I sent a pic to Jess, and he said, "Please take those out and don't put them back in. Hull had them put in because he was almost deaf, refused to admit it, and couldn't tell that my cabs were tuned perfectly."Interesting.
Less speculation if his daughter confirms his opinions.
I'm curious if you have further information why Everett wanted to plug ports.
The Wiki suggested removing the plugs.
Jess didn't want to plug ports and later removed them.
My hats off to you friend.
Like you, I've always wanted a real deal B15.
But the idea of "can't buy one so I'll build one" is way out of my wheelhouse.
Looking forward to hearing how yours turns out!
 I have to get the amp done soon!
Good job. If it sounds as good as it looks, you’ll be well ahead.
So what was the hardest part?

You can get the old school ampeg logo plate for that off fliptops.com
Bravo dr_root.
Some day perhaps I'll follow in your footsteps.
For my B15 build, there's a Canadian company, Trinity Amps, that sells a kit. Some day...
View attachment 4083966
No affiliation.
I'll ditch the kit idea if I come across a deal on an original '66... yeah, right, when time and money converge, which happens almost as often as when Ampigs fly.

Actually, the hardest part was the cutting and later on the straight alignment of the tolex. With this checker pattern you basically see every misalignment instantly. I decided to wrap the cab with only two (actually 3 if you take the back lid into account) tolex parts. Before i applied the tolex parts, i carefully marked the centers of each side of the cab. Additionally i also drew some guiding lines onto the cab and started the wrapping. I started with the back wall part. For this part, i only had to follow my markings. The tolex part was approx 5cm (~2inches) larger than the backwall, such that I could wrap it around the edges. The second part was the complicated one. It only consists of one big tolex piece. I started the wrapping on the right side of the bottom to be able to hide the seam behind the corner protectors. Than i wrapped it around the cab while trying to align the checker pattern while trying to keep it straight. I didnt rush it, so in the end it worked out pretty much straight. However, i have to admit that there are some regions where i messed it up a bit and the tolex is not perfectly tense. Luckily the messed up regions are all on the back or the bottom and there are only two of them. So no worries
...
I know about the trinity trip top. However i wanted to have the freedom of choosing the components as i like. However, more importantly, i don't want to go for the original look as mentioned in the first post. I will keep the component arrangement as close to the original as possible but i will aim for the Shaw audio Roctal look. The cage will be build out of sheet metal with hexagonal holes (it arrived just today).
I planned the component layout of the amp in a CAD tool (see below) to get all the hole positions etc. For the actual wiring, i am copying the wiring of the 2010 Heritage B15. Next to the tubes, you can spot two things. First, in the amp power supply i will use a choke instead a resistor to slightly increase the clean headroom of the amp. Second, in the initial post i mentioned that i will add a Bo Hansen type DI output to the through, the preamp out as well as to the OT secondary. The DI transformers are located next to the tubes. I bought 3 Sowter 4243 DI transformers to get a decent DI audio quality. I´ll put the transformers there because its as close to the output XLR jacks as possible.
Alright, cheers guys!



Yup, understood.
I just said "for my build" it'll have to be the Trinity 'cause I don't have the skills nor bravado to build one as you are.
I'm currently building a Princeton 5F2A from a CCK that has a backarseward layout to the chassis — makes for heaps of confusion for a newb like me as I try to make the incorrect physical layout work with the original layout and schematic. Luckily, I've got a great Sifu watching over my build: This past Friday, upon inspecting my progress, he said "Good, but why do you have to make it look so ugly?"
Ceriatone has a kit now as well, though it's not designed to match the B15 aesthetic in anyway.
Bass : Aunt Peg | Ceriatone
Ceriatone has a kit now as well, though it's not designed to match the B15 aesthetic in anyway.
Bass : Aunt Peg | Ceriatone
 I dig the look of it.
Hi Guys,
Just a quick follow-up. I added a second handle to the cab because it ls way too heavy to get carried comfortably by just one hand.
Further, the logo has arrived. It's supposed to mean 'root', however, the words 'noot' and 'hood' have been called by people
Additionally, I managed to finish the turret board of the b15 clone. Initially i was a bit overwhelmed by the whole turret board approach since I'm just used to PCB boards. Therefore I reverse engineered the turret board of the heritage b15 of 2010 by looking at the schematic and one high Res gut shot I found online. The preamp and phase inverter section are more or less identical. When I reached the power supply section, I was confident enough to do it by myself
The next step is to drill all the holes into the case. I'll keep you guys updated.
Cheersroot
There was a mistake in the early schematic, post the one that you used and I’ll let you know if it is the right one.
). I went back and forth between the gut shot, the HB15 and the 196x schematic and made the wiring diagram. Further you can find the schematic i`ve drawn with some annotations. I hope, i`ve got it right Ah btw, both the wiring diagram and the schematic are more or less just a guide line when i`m working on the amp. On the one hand, I connected some turrets slightly different as shown on the diy wiring diagram. On the other hand, i will omitt some stuff (e.g. some fuses), which is shown in my schematic. Wiring this amp is not a 100% strict undertaking. Fantastic job, man. I like your use of a logo, but it does look like "noot" it should have the under line connect with the bottom of the "r". I don't know what you spent on it, might be worth getting redone? Such a beautiful cab to have a hiccup like that, that you'll have to explain every time someone says "noot?".
Ceriatone has a kit now as well, though it's not designed to match the B15 aesthetic in anyway.
Bass : Aunt Peg | Ceriatone

I'm hoping you know about chassis punches. Is the chassis aluminum and how thick is it?...The next step is to drill all the holes into the case.