I've been posting updates of this project in the Rogue VB100 Club thread, but I thought I'd give it a thread of its own, so that more people - who may not ever venture into the club thread - will have a chance to see it (big props to @SitDMC , @Stdjazz4 , and @GIBrat51 for being consistent followers and supporters of this project so far!  )
)
This bass is almost finished (just waiting on a control panel from Pickguardian) so you all won't have to wait (sometimes weeks) between progress reports, but I will make these posts in installments. There's a lot of information and pictures and there's no way I can get it all down in one sitting.
It's gonna be a long read, so if you're into projects like this, grab a cupa coffee and a muffin and settle in.
Here's a little background... Back in November, I bought one of these when MF was blowing them out the door for $149 (I actually got mine for $131 as an 'open box' item. I can't find anything wrong with it).
I used to own an Epiphone Viola a few years back (yeah, I'm a Beatles nerd) and it was a very high quality bass, but I just wasn't very inspired by the way it sounded. I put a set of Chromes on it and it sounded kinda boring. Maybe I just don't like Chromes, but I think the pickups were kinda lackluster, too. I was into modding back then, but I had no idea what kind of pickups I could replace the stock ones with, or where to find them (I wasn't very internet savvy yet).
The Viola ended up collecting dust and I eventually sold it after a couple of years. Every now and then, I would start thinking it would be fun to have another Beatle bass, but the Icons/Ignitions/Whatevers aren't anywhere near the quality of the Epiphone Viola, and frankly, I didn't want to invest $350+ for another go at this project of sheer whimsy.
Anyway... Along comes the Rogue, and I figure; for $131, what the heck... I didn't expect it to be as nice as the Epi Viola (and it's not) but it's a lot nicer than what I was expecting (which was a toy, honestly).
In fact, this is a pretty well made bass. A surprisingly well made bass. I could only find the most minor of finish flaws. If I had paid the regular price of $229, I probably still wouldn't have complained at all. It played well right out of the box. The fret work was well done (I did have to file just the slightest bit off of a couple of frets, but that was it). They were all seated well, dressed well, no sharp ends, etc.
This is a fully hollow bass, just like a Hofner, but unlike an Epiphone Viola - which was only semi-hollow. I think that's why I didn't like the sound of that bass. It just sounded dead and flat with that center-block. The Rogue is much more lively and resonant.
The biggest surprise were the stock pickups. They sounded really good. Especially the neck pickup. I didn't care for the sound of the bridge pickup as much, but that had more to do with the fact that you couldn't get it close enough to the strings. At any rate, I was planning on making this into a Hofner clone, so the pickups would have to go, in favor of a pair of Hofner-licensed replacement pickups from Allparts, but I'll get to that later.
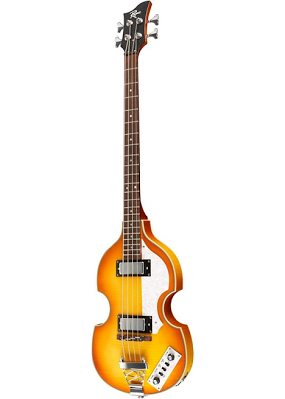
I like the fact that the Rogue has a Hofner style headstock and I think the body shape is closer to a Hofner than some of the other copies. What I didn't like was the 'lemon-drop' burst as it appears in the pics on the website, and it kept me from pulling the trigger on one for a long time. I found out that these are very old photos (MF has been using them since the '90s!) and they actually look more like this:

Note: By the time I had taken this photo, I had already changed the stock 'curly-Q' tailpiece for a genuine, German Hofner TP (found a good deal on one online). I also removed the hideous pickguard. It was the cheapest looking 'pearloid' PG I'd ever seen. Besides, why cover up that flame?
The paint job and finish are surprisingly well done, and looks even better in person, IMO. The burst is a little lighter around the edges than it looks in this photo. It's kind of a honey sunburst, leaning towards tobacco.
My original plan was to make a 'deluxe' Hofner clone out of this, since it already had the appropriate headstock and body shape. I figured the rest would just be a matter of getting the right parts. I knew I might have to get creative with some stuff, since there were sure to be structural differences between the two basses, but the further I got into the project, the more I realized that I would have to make too many compromises and it could never end up looking exactly like a real Hofner.
I wasn't thinking of trying to trick anybody. I just took it as a personal challenge. I thought of it in terms of; if I were playing 'Paul' in a Beatles tribute band, could I get this bass close enough to the real deal to get away with it on stage?
Anyway, I decided to go my own way with it, but my original plans informed most of my parts purchases, so it's still going to look (and hopefully sound) much like a Hofner, only with a few personal twists.
After installing the new TP and getting rid of the pickguard, the next thing I wanted to do was get the Rogue logo off the headstock. In most cases the decal is just under a thin layer of poly and you can sand it off without going all the way down to the wood. Not so in this case. The Rogue logo was screen printed right on top of the paint, so I would have to re-paint and refinish the headstock.
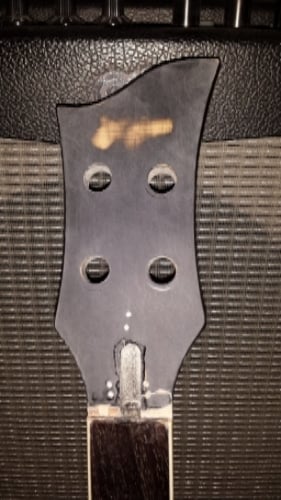
You'll notice a crack on the lower right side of the headstock, just above the nut. Someone went a little crazy with the glue when they installed the nut, so when I removed it, a big chip of wood came with it. Luckily, I was able to glue it back in and conceal the fissure in the end.

Since I was going to have to refinish the headstock, I decided to paint faux binding around the perimeter (as with many Hofners).
Taped and ready to spray (sorry about the blurry pic):

I used 3M blue painter's tape (never again). It didn't come out as clean as I had hoped. Had a few spots where there was some paint creep under the tape.
Left side - There's a couple of spots near the top of the headstock, and it's a little rough down toward the nut. I waited too long before pulling off the tape and it came off kinda chippy towards the bottom.

Right side - Came out a little better.

Top - another leak.

I cleaned up all of the leaks with an x-acto knife. Just put down a piece of masking tape to use as a guide and lightly scored/scraped the paint off with the x-acto blade. It all cleaned up quite nicely, but I CANNOT recommend the use of 3M Blue painter's tape for this application. It may be fine for water-based paints, like latex, but doesn't hold up to solvent-based paint.
Even still, I used it again for the black. I didn't think it would be as bad this time, since I would only be spraying a single, light coat of black, as opposed to the several coats of cream white I had to spray previously.
How wrong I was:

All kinds of creep... All the way around.

The right side of the headstock actually wasn't that bad, but it still needed a little cleaning up. According to my perfectionist nature).

I don't think the pics show it as bad as it truly looked, but I didn't panic. I was glad that I decided not to wait a day or two before removing the tape. I just waited until it was dry to the touch, because I knew I would have a better chance of cleaning up rough spots before the paint completely cured.
The white paint had been drying for a week, so it was fully cured by then and could probably stand up to a mild solvent if I'm careful and go lightly. You should always try the least aggressive solvent first, so I tried rubbing alcohol on a Q-tip and it worked brilliantly! I could use the Q-tip as a tool to rub the black paint back to a smooth, clean line all around the edges of the headstock and it didn't affect the white paint at all. (whew!).
For a first attempt (heck, for a 21st attempt) I couldn't be happier with the results (again... sorry about the photo quality. Photobucket sometimes make pics a little blurry when you reduce them, for some reason):


The challenge with painting the binding on this headstock came from the fact that the edges of the headstock are not sharp and square. There's a lot of spots where they rolled over the edge when sanding and the headstock has slightly less than uniform thickness from left to right, so I had to compensate for that as well.
There are all kinds of inconsistencies all around the headstock that make it hard to maintain what looks like a band of uniform thickness all around the perimeter. When you're laying the masking tape down, you have to look at it from all angles to get a sense of what it's going to look like. I had positioned and re-positioned the tape several times, and often times, where I positioned the tape seemed counter-intuitive when looking at it from the side, but when you look at it from the front of the headstock, it made perfect sense.
The fact that it looks uniform all the way around is partly an optical illusion... I had to fudge it a bit. This came into play when I was rubbing back the black too. I had to be careful not to expose too much white.
Anyway, I'm delighted with the way it came out. Whenever I attempt stuff like this for the first time, it's usually a lot of trial and error and starting from scratch again, or attempting a series of heroic 'fixes', which often times make it worse. I like it when everything comes out right the first time and bumps in the road are easily overcome.
Well, that's enough for now.
Next post: Tinting the binding, then decal and poly time!
)This bass is almost finished (just waiting on a control panel from Pickguardian) so you all won't have to wait (sometimes weeks) between progress reports, but I will make these posts in installments. There's a lot of information and pictures and there's no way I can get it all down in one sitting.
It's gonna be a long read, so if you're into projects like this, grab a cupa coffee and a muffin and settle in.
Here's a little background... Back in November, I bought one of these when MF was blowing them out the door for $149 (I actually got mine for $131 as an 'open box' item. I can't find anything wrong with it).
I used to own an Epiphone Viola a few years back (yeah, I'm a Beatles nerd) and it was a very high quality bass, but I just wasn't very inspired by the way it sounded. I put a set of Chromes on it and it sounded kinda boring. Maybe I just don't like Chromes, but I think the pickups were kinda lackluster, too. I was into modding back then, but I had no idea what kind of pickups I could replace the stock ones with, or where to find them (I wasn't very internet savvy yet).
The Viola ended up collecting dust and I eventually sold it after a couple of years. Every now and then, I would start thinking it would be fun to have another Beatle bass, but the Icons/Ignitions/Whatevers aren't anywhere near the quality of the Epiphone Viola, and frankly, I didn't want to invest $350+ for another go at this project of sheer whimsy.
Anyway... Along comes the Rogue, and I figure; for $131, what the heck... I didn't expect it to be as nice as the Epi Viola (and it's not) but it's a lot nicer than what I was expecting (which was a toy, honestly).
In fact, this is a pretty well made bass. A surprisingly well made bass. I could only find the most minor of finish flaws. If I had paid the regular price of $229, I probably still wouldn't have complained at all. It played well right out of the box. The fret work was well done (I did have to file just the slightest bit off of a couple of frets, but that was it). They were all seated well, dressed well, no sharp ends, etc.
This is a fully hollow bass, just like a Hofner, but unlike an Epiphone Viola - which was only semi-hollow. I think that's why I didn't like the sound of that bass. It just sounded dead and flat with that center-block. The Rogue is much more lively and resonant.
The biggest surprise were the stock pickups. They sounded really good. Especially the neck pickup. I didn't care for the sound of the bridge pickup as much, but that had more to do with the fact that you couldn't get it close enough to the strings. At any rate, I was planning on making this into a Hofner clone, so the pickups would have to go, in favor of a pair of Hofner-licensed replacement pickups from Allparts, but I'll get to that later.
I like the fact that the Rogue has a Hofner style headstock and I think the body shape is closer to a Hofner than some of the other copies. What I didn't like was the 'lemon-drop' burst as it appears in the pics on the website, and it kept me from pulling the trigger on one for a long time. I found out that these are very old photos (MF has been using them since the '90s!) and they actually look more like this:
Note: By the time I had taken this photo, I had already changed the stock 'curly-Q' tailpiece for a genuine, German Hofner TP (found a good deal on one online). I also removed the hideous pickguard. It was the cheapest looking 'pearloid' PG I'd ever seen. Besides, why cover up that flame?
The paint job and finish are surprisingly well done, and looks even better in person, IMO. The burst is a little lighter around the edges than it looks in this photo. It's kind of a honey sunburst, leaning towards tobacco.
My original plan was to make a 'deluxe' Hofner clone out of this, since it already had the appropriate headstock and body shape. I figured the rest would just be a matter of getting the right parts. I knew I might have to get creative with some stuff, since there were sure to be structural differences between the two basses, but the further I got into the project, the more I realized that I would have to make too many compromises and it could never end up looking exactly like a real Hofner.
I wasn't thinking of trying to trick anybody. I just took it as a personal challenge. I thought of it in terms of; if I were playing 'Paul' in a Beatles tribute band, could I get this bass close enough to the real deal to get away with it on stage?
Anyway, I decided to go my own way with it, but my original plans informed most of my parts purchases, so it's still going to look (and hopefully sound) much like a Hofner, only with a few personal twists.
After installing the new TP and getting rid of the pickguard, the next thing I wanted to do was get the Rogue logo off the headstock. In most cases the decal is just under a thin layer of poly and you can sand it off without going all the way down to the wood. Not so in this case. The Rogue logo was screen printed right on top of the paint, so I would have to re-paint and refinish the headstock.
You'll notice a crack on the lower right side of the headstock, just above the nut. Someone went a little crazy with the glue when they installed the nut, so when I removed it, a big chip of wood came with it. Luckily, I was able to glue it back in and conceal the fissure in the end.
Since I was going to have to refinish the headstock, I decided to paint faux binding around the perimeter (as with many Hofners).
Taped and ready to spray (sorry about the blurry pic):
I used 3M blue painter's tape (never again). It didn't come out as clean as I had hoped. Had a few spots where there was some paint creep under the tape.
Left side - There's a couple of spots near the top of the headstock, and it's a little rough down toward the nut. I waited too long before pulling off the tape and it came off kinda chippy towards the bottom.
Right side - Came out a little better.
Top - another leak.
I cleaned up all of the leaks with an x-acto knife. Just put down a piece of masking tape to use as a guide and lightly scored/scraped the paint off with the x-acto blade. It all cleaned up quite nicely, but I CANNOT recommend the use of 3M Blue painter's tape for this application. It may be fine for water-based paints, like latex, but doesn't hold up to solvent-based paint.
Even still, I used it again for the black. I didn't think it would be as bad this time, since I would only be spraying a single, light coat of black, as opposed to the several coats of cream white I had to spray previously.
How wrong I was:
All kinds of creep... All the way around.
The right side of the headstock actually wasn't that bad, but it still needed a little cleaning up. According to my perfectionist nature).
I don't think the pics show it as bad as it truly looked, but I didn't panic. I was glad that I decided not to wait a day or two before removing the tape. I just waited until it was dry to the touch, because I knew I would have a better chance of cleaning up rough spots before the paint completely cured.
The white paint had been drying for a week, so it was fully cured by then and could probably stand up to a mild solvent if I'm careful and go lightly. You should always try the least aggressive solvent first, so I tried rubbing alcohol on a Q-tip and it worked brilliantly! I could use the Q-tip as a tool to rub the black paint back to a smooth, clean line all around the edges of the headstock and it didn't affect the white paint at all. (whew!).
For a first attempt (heck, for a 21st attempt) I couldn't be happier with the results (again... sorry about the photo quality. Photobucket sometimes make pics a little blurry when you reduce them, for some reason):
The challenge with painting the binding on this headstock came from the fact that the edges of the headstock are not sharp and square. There's a lot of spots where they rolled over the edge when sanding and the headstock has slightly less than uniform thickness from left to right, so I had to compensate for that as well.
There are all kinds of inconsistencies all around the headstock that make it hard to maintain what looks like a band of uniform thickness all around the perimeter. When you're laying the masking tape down, you have to look at it from all angles to get a sense of what it's going to look like. I had positioned and re-positioned the tape several times, and often times, where I positioned the tape seemed counter-intuitive when looking at it from the side, but when you look at it from the front of the headstock, it made perfect sense.
The fact that it looks uniform all the way around is partly an optical illusion... I had to fudge it a bit. This came into play when I was rubbing back the black too. I had to be careful not to expose too much white.
Anyway, I'm delighted with the way it came out. Whenever I attempt stuff like this for the first time, it's usually a lot of trial and error and starting from scratch again, or attempting a series of heroic 'fixes', which often times make it worse. I like it when everything comes out right the first time and bumps in the road are easily overcome.
Well, that's enough for now.
Next post: Tinting the binding, then decal and poly time!




 and I realized, it doesn't have to look exactly like a Hofner to look good.