• TalkBass has been independent since 1998. Add your voice.
    Create a free account to reply to discussions, view embedded media, and browse with fewer display ads.
    Join freeLog in
    Want zero display ads or expanded classifieds tools? Compare plans.

Beatle Bass Overhaul

Great thread--I'm enjoying the photos and story of your work!

Yes, the stock control panel is weird. (There is a logic to it, but I'm not so sure it's good logic.) I've done some extensive rewiring to mine, and it opened up some versatile new tonal options.

First off, I'm in agreement with @Mosstone: the Rhythm/Solo switch is silly.

The Bass On switch is good--I like the fully open tone, and the .1 uF tone capacitor with 8.2K Ohm resistor is a good one, too.

On my Hofner I've repurposed these switches: the former Rhythm/Solo and Bass On switches allow me to switch between no cap, .015 uF, .03 uF (my all around favorite), and .047 uF. A standard tone control would probably be even better (you could even have a push-pull tone pot with two different capacitors). My set-up is mainly to preserve the original panel.

The Treble On switch has great potential, but it the way Hofner wires it does not allow that potential to be exploited, since switching Treble On turns off the neck pickup. Treble Off is the straight bridge pickup; Treble On puts a .01 uF capacitor in series for a bass cut. With the pickup soloed, this doesn't make much sense. But if both pickups are on and the .01 uF cap is switched in, the pickup blending improves dramatically. This starts to open up a whole realm of sounds: it allows both pickups to be dimed without any phasing or comb filtering issues and it offers a slew of blending options, depending on whether the cap is inline or not. (And for this reason, I think two volumes is better than a blend in this case.)

So if you're doing a whole new panel, I'd recommend volume, volume, tone, and a little toggle switch to put the .01 uF cap in series with the bridge pickup (and to switch it out). In my view, it's the single best mod you can make to a Hofner (or clone). And when you take the cap out of the circuit, you can use a tone control with the bridge pickup, so you can have a dark-sounding bridge tone. You can also put the bass-cut cap inline with the bridge pickup and then use the bridge pickup to dial some brightness back in when your tone control is at its darkest setting and you're favoring the neck pickup. (For instance, when I engage the .047 uF and .03 uF caps on my Hofner, I can then use the bridge pickup as a sort of tone control.)

Here's more info on the subject, with sound samples and diagrams: Link Removed (My handle in that thread is BassOn.)

Thanks for the info. I'm just planning to use volume/blend/tone with a .022 cap, but I'm famous for not leaving well enough alone and may decide to tinker a little more, further down the road. :D
 
For those of you who were asking about the NASA standard splicing technique, here's a link to a good visual showing how it's done. It's called a 'lineman's splice' and was in use back in the days of the telegraph. NASA adopted it as mandatory procedure when splicing wires/cables together.

Invalid Link Removed
 
After splicing some more wire onto the pickup leads and reconnecting it to the PCB, I was faced with my next issue. There was no way to get the bridge pickup anywhere close enough to the strings. At its highest point, the pickup was still about 3/4" away (sorry, I didn't think to take pictures of it).

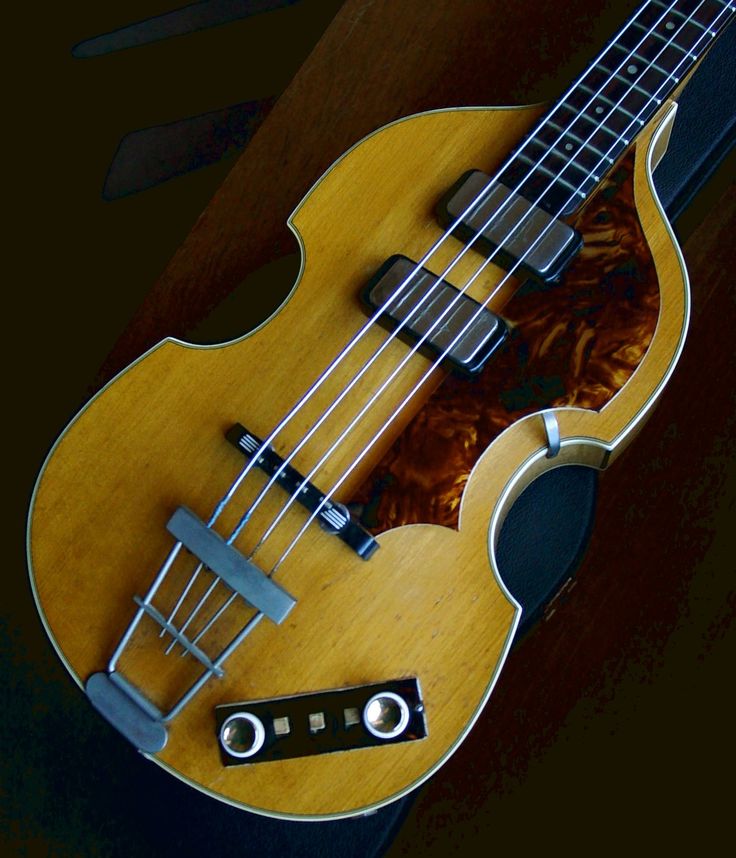
Hofner pickups are mounted right on top of the bass, instead of dropping into the body like many copies. This is because a Hofner neck is at a much greater angle in relation to the body than what you find on most copies. This is also why the Hofner replacement bridge I ordered was way too tall for this bass (I don't remember if I mentioned that earlier in the thread) so bear that in mind if you're planning to do the same to your Rogue (or Jay Turser, or Douglas, or Epiphone).

In order to gain a little more height, I cannibalized the stock pickup ring with a Dremel to use as a shim. This gave me an extra 1/8" of height.

gnarly20ring.jpg


The springs that came with the Allparts pickups were pretty long and hard to compress. When fully compressed, the spring was taking up about 3/8" (!), so I removed them. I thought the pickup would be a little wobbly without the springs to support it, but the screws alone hold it firmly in place.

Now, I can get the pickup too close to the strings! I had to back it off a little from this, because the pickup was pulling the strings.

bridge20pup20lift.jpg


Unfortunately, the neck pickup still overpowers the bridge pickup and there's not much you can do about it. The pickup is just positioned too close to the bridge where there's very little string excursion. Fortunately, the kind of tones I want to get out of this bass don't rely on a powerful bridge pickup, so I'm not too upset about it.

With both stock pickups engaged, the bridge just kind of tightened up the tone a little. Ironically, it sounded more like an upright with both pickups on than with just the neck pickup. Adding the bridge pup seemed to give it a stiffer, 'woodier' sound... It's hard to describe, but I liked it. I'm hoping the Allparts pickups will have a similar quality.

Honestly, it's been so long since I heard the stock pickups, I'm afraid I won't be able to tell if the new ones sound better or worse. From what I've heard of them so far, I like them. They sound different from the stock pickups, but not bad. They have more edge and definition to them than the stock ones (but man, those stock pups just nailed that upright tone!). The Allparts pickups make it sound more like an electric bass guitar than an upright, but I'm going to reserve final judgement until I get it all wired up with the proper pots and cap.
 
  • Like
Reactions: 12BitSlab
Incidentally, here's what the material the control panel is going to be made out of looks like (more'r less):

marble%20tort.jpg


It's called 'Tortoise Marble'. It's supposed to approximate the look of old celluloid tort. Tony says the material is translucent, but he can back-paint it, (so you won't see the hole it's covering).

I was also going to have a pickguard made from this material, and I was gonna do it right, too. I was going to float it on a bracket, all proper-like. None of this screw it right down to the top nonsense. But I couldn't find the original PG to use as a template. Later on, I came across some pics I took of the bass before I removed the PG and realized that there's a few things about the shape that I'd like to change... Which means a custom order... Which means I don't know if I want to invest another $70+ into this project... so I said scratch the scratchplate... For now.

I like the way it looks without a PG, but I also think it'd look really swank with a celluloid-looking tort guard on it too. I did a Google image search for pics of Hofners with a tort guard and came up with exactly ONE. It wasn't a very good picture and it looked like a 500/1 from the '50s, judging by the pickups (could be early '60s... I don't know when exactly they changed from the single-coils to the staple-top humbuckers). I didn't save that pic and when I repeated that search a few minutes ago, to post the picture here, it didn't come up in the search...

I scrolled through the pictures until my eyes got all googly, and the pictures got less relevant, and I started to forget what I was looking for. :confused:

This pic did come up, though, which I didn't see the last time. It's not the same color, but... it kinda gives you an idea what it would look like..

cf547ce2d0ee9df7493b72d652faaa9a.jpg


Oh well... It'll still still look really swank without it. :D
 
  • Like
Reactions: MAJOR METAL
Got an email yesterday from Tony at Pickguardian, telling me he shipped the control panel. I was starting to get a little antsy... He usually has a two-week turnaround, but the last two orders I sent took about a month, each.

Oh well, it's on its way now... I'll probably have it by Monday or Tuesday.
 
Got my control panel from Pickguardian today.... Man that was fast! I usually count on at least a 5 day wait for US Snail to get a package to me from Ohio.

tort20control20panel.jpg


I give you.... Marble Tort.

It's actually just a little darker in real life (flash). I think it will go well with the burst. I'm going to use gold, top-hat reflector knobs.

This means, this project should be completely finished this weekend! :hyper:
 
Last edited:
Alright! The Mosstone Beatle bass is finally complete!

My apologies to those of you who have been patiently waiting for an update on this project. It got side-lined for a bit in favor of another project I have going, and other obligations.

I don't recall if I mentioned this earlier in the thread (and I'm too lazy to check), but the first wiring diagram that I got from the SD website for wiring V/B/T was SO wrong, I can still barely believe it! I spent quite a bit of time with the soldering iron, only to find out that the bass would not make a sound. I doubted everything but the diagram... I tested the pots... everything was cool. Checked all my solder joints... everything was solid, and I was getting the correct DCR readings on the meter.

Can't be the diagram... It's Seymour Duncan!

I decided to put it aside after a while, and went and ran some errands. On my way back home, I was visualizing the circuits in my head, and suddenly it hit me...

The output was coming from the wrong lug on the tone pot. The diagram had me wiring the same lug for input and output.

I thought there was something odd about it when I was actually wiring it, but when I'm working from a diagram, I'm not thinking of the circuit. I'm just cutting, stripping and tinning pieces of wire and connecting points 'A' to points 'B'. If I'm doing a standard wiring scheme, I don't need a diagram, and I'm more aware of the paths that I'm wiring, but if I'm doing something outside the norm, I'm just painting by numbers. :)

So I figured out was wrong and wired the output to the correct lug, plugged it into my amp and there was bass coming outta the speaker! Haleluja!

But, uh-oh... Something's not right here. The blend knob isn't blending... Instead, it's selecting either the neck pickup or the bridge pickup, but not both at the same time. It's an anti-blend pot... When it's in the middle, the bass is silent.

Ok... Back to the drawing board... Since the whole reason I needed a wiring diagram was because I had never wired a blend pot before, I went in search of another diagram. Sure enough, ol' Seymour was giving me the wrong advice on how to wire a blend pot too! This diagram is completely made of fail. I expected more from Seymour.

JazzBass_1V_1Bld_1T.jpg


See how there's a black dot on the middle lug of the tone pot? I didn't notice this when I was wiring it up (was looking at it on my cell phone), but that's where the output should be coming from to the jack. Also notice the criss-cross action on the blend pot? That's what made it an 'either/or' switch. The diagram below is the one I ultimately followed:

jbass_mod.gif


This is a little different than I would have done it, left to my own devices. I would have the tone pot last in the circuit. As it is now, the volume pot doesn't completely turn the pickups all the way off. I'm ok with that though, as long as it's not affecting tone. I might go back in there some time and wire it the way I'm used to doing it, but it sounds pretty good to me. This bass is all about EQ from the amp, anyway. There's not much you can do to vary the tone much from the on-board controls, and at first, I was a little disappointed by the sound of this bass when I first plugged it in (after sorting out the wiring). Then I realized that I had it EQ'd for my Jaguar with J-pickups. After tweaking a few parameters, I was smiling.

Yes, this bass is a one-trick-pony and there's not much you can do about that. It's just the way it's made. But the one (ok, maybe two) tricks it's got are pretty damn good!

I spent a lot of time adjusting the pickups for optimal output. You can't get bridge pickup close enough to the strings to give it any balls before it starts to sound weird. Just have to accept that... The pickup is just positioned too close to the bridge. But unlike the stock bridge pickup, this one doesn't sound turrible when soloed. It's got lower output, but it still sounds good. Not weak and anemic. It also tightens up the tone and gives it some focus when blended 50/50 with the neck pup.

The neck pickup, of course, is what this bass is all about. The licensed Hofner pickup sounds really good! I'm assuming these pickups are made to Hofner specs, and I think they have a similar character to the originals. I haven't played a real German Hofner 500/1 in a very long time, but this is pretty much what I remember it sounding like.

I hesitate to say the Allparts pickup sounds better or worse than the stock pickup, but it does sound different. It's not as big sounding, or 'wooly' or 'woofy' as the stock pup (which is what I liked about it). It sounds like a higher quality pickup over-all, with a more refined tonal character (which I like as well). It sounds more like a bass guitar than a boomy, pseudo-upright tone, but you can get that sound with EQ. With the stock pickup, that's pretty much all you get.

I wanted to come out and say that this is really a single-pickup bass, and I should have saved myself the time and trouble, and just wired the neck pickup to a volume and tone pot and call it a day, but like with the stock pickups, dialing in the bridge makes the tone a little woodier and a little more upright-like. It's not dramatic, but you can hear a difference.

Was it worthwhile to make the switch? I think so. The replacements are a higher quality part and you can pretty much get the same tones as the stock ones, with just a little more tweaking. I also think they look much better than the stock ones. Something about those blank, bars of chrome always kinda bothered me on my Epi Viola. I didn't think they looked like real pickups. I'me used to seeing pole-pieces and screws and all.

Anyway, I'd like to keep my eyes peeled for when these go on sale again. I might just buy another one, repaint it and keep the stock pickups in, so I can hear how they compare, back to back. Right now, I'm basing this all on my memory from last November.

Ok, well enough jibber-jabber! Make with the pics already!

I really like the look of this 'marble tortoise' control plate that Tony (Pickguardian) made for me. I'm still struggling with the knobs though. At first, I thought gold, top-hat reflector knobs would look good on this, but when I tried it out, it gave me the dry heaves. So I figured darker, not lighter was the way to go and ordered these rosewood knobs. They look ok, I guess, but I still feel like this control panel needs something. I just don't know what right now... any suggestions?

rogue20knobs.jpg


I really like the color and everything about the control panel. I like how the marble pattern goes in the same direction as the flame, creating the illusion that you're seeing the flame through the panel, but it's actually opaque (back-painted). That was not planned for.

I think it goes well with the finish, although, it took me a while to get used to not seeing a pearloid control-plate. I almost changed my mind, and started thinking about having Tony make a pearloid one, but now that I'm used to it, I want to see more of it on this bass. I've been thinking about having Tony make some pickup rings out of this material, and maybe a pickguard.

Whaddaya all think?

rogue20body20ed1.jpg


rogie20body20vert20angle.jpg


rogue20body20horiz20angle1.jpg


rogue20body20reflect1.jpg


headstock20ed1.jpg


Some shots on the stand:

body20low.jpg


rogue20full20stand.jpg


rogue20stand.jpg


mosstone20headstock20white20bg.jpg


And here's a look at the Wilkinson Ultra-Lite knock-offs. Pretty good tuners, actually... Nice and smoooooth. I think Wilkinson hardware is good quality, and I use their parts a lot in my builds and mods.

These almost have a vintagey, open-back vibe to them. :)

rogue20headstock20tuners.jpg
 
Very nice, love me a Hofner clone. I like the tort panel, maybe something contrasty for the knobs, chrome maybe?

I thought about that. God knows I've got enough knurled, chrome, barrel knobs knocking around here, but I think it's a little too incongruous to the style of the bass.

Contrast was my first inclination, hence the gold top-hat knobs. Plus, I thought they had enough 'old-school' style to go with the vintage vibe of the bass. But they just stood out too much and looked garish and out of place.
 
Ok, gotta make some revisions here... I sent an email to Seymour Duncan to inform them about their incorrect diagram. I received a quick response, thanking me for pointing out their mistake at the tone pot, but said that the blend pot wiring was actually correct.

I checked another diagram on StewMac and they had the blend pot wired the same way, so I guess it is correct (and it does make sense), but I have no idea why it would behave the way it did. I'm pretty darn sure I wired it exactly as it was in the diagram (checked and rechecked). I don't know... But I'm going to go back to that wiring again and see what happens, because I also found out that the way I have it wired now (2nd diagram above) is not actually wired for true blend. On the StewMac website, they called it a kind of 'stereo' wiring. It controls both pickups, but they don't blend. You get 100% of both pickups at the center detente (blend should be 50/50), but when you turn the knob one way or the other, you lose the other pickup completely. Blend should 'pan'.
 
PSA

If you want a beautiful project like this one, they're currently on sale at MF for $179.99. If you're a Backstage member, you can apply the current coupon, dropping the price to $152.99 until June 7th.

No affiliation... Just thought I'd pass that along.
 
Last edited:
Ok, here it is... It took a while before I could finally call it 'complete'. I wired it up a couple of months ago (VBT) and it sounds amazing! (I may switch to a VVT arrangement, though). I'm really glad I went with the Allparts pickups. I was afraid that I would never get a pleasing sound out of the bridge pickup, but after messing around some more with the pickup heights, I think I've found the sweet spot for both of them, and I take back what I said earlier in the thread about this being primarily a on-pickup bass with the bridge pup only good for adding an 'edge' to the sound.

Where I have it set, the bridge pickup has just a bit more output than the neck pickup, and actually sounds great soloed! Using the tone knob, I can get a good range of tones out of it, too... So much for my original belief that a tone pot might be unnecessary on this bass. Even rolling a little treble off the neck pickup yields some nice sounds. I thought it would just sound like mud (which is what the stock pickup sounded like with the treble rolled off.

It really is dramatic the difference that pickup height can make, and I'm glad I took the time to fiddle with it some more. The bass is a lot more versatile, and I'm a lot happier with the sounds I'm getting out of it now.

But something was still not right... I wasn't going to go with a pickguard, but that control plate looked too awkward on the bass by itself. I really like that Tortoise Marble material from Pickguardian, and I wanted to see more of it on the bass, so I decided to have Tony make a PG and a TRC out of the same material. The trouble was, I couldn't find the original pickguard anymore to send in as a template, and it was a while before it finally turned up (I was starting to think I might have thrown it away in disgust... But that doesn't sound like me :)).

After finding it, I immediately mailed it off to Tony, but it was about five or six weeks before I got a package back. He usually only has a two to three week turnaround, but I guess he's been really busy lately. It was worth the wait, though... I think it looks great on this bass! I definitely wanted something different from the pearloid you see on every other Hofner bass or copy.

IMG_20170806_26219.jpg


IMG_20170806_21413.jpg


IMG_20170806_57105.jpg


IMG_20170806_22467.jpg
IMG_20170806_11854.jpg


IMG_20170806_44658.jpg