

Enjoy the benefits of a premium membership!
Upgrade Account
-
TalkBass has been independent since 1998. Add your voice.
Create a free account to reply to discussions, view embedded media, and browse with fewer display ads.
Join free Log in
Want zero display ads or expanded classifieds tools? Compare plans.
You are using an out of date browser. It may not display this or other websites correctly.
You should upgrade or use an alternative browser.
You should upgrade or use an alternative browser.
Black Limba 33 inch scale 5 string bass
- Thread starter Drake Custom
- Start date
More options
Who Replied?

- Aug 24, 2010
- 440
- 1,082
- Disclosures
- Builder/Owner:Drake Custom Bass Guitars
Another day and some more progress shots. To be honest I am way farther along on this build than what my posts show. I build two or three at a time and have a hard time keeping the posts up with the progress I am making in the shop. Not a bad problem to have I guess.
Anyway the answer to the question about sound clips is that I don't have any at the moment. I will see if one of my customers will record something with one of their 33's. You would not want a clip of me playing.
The majority of basses I make are 33's or 32's. I have smallish hands and find that the scales are better suited for me. I have also found that the 33 inch scale is very good for 5 string basses. Less muddy tone on the B string and with good set up, the B string does not feel flappy either. I never string with anything bigger than .125 for a B string and like the using .110's for B's with a light set for EADG. Nice soft action and great tone.
Anyway I digress....
Today I will cover what I did for the radiusing and fretting of my neck. I promise I will get the body together next time.
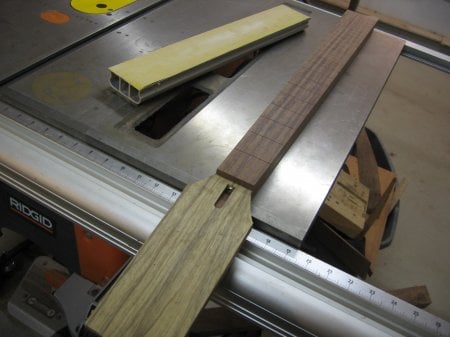
First shot is the neck, again, stuck down to the table saw with carpet tape. The actual tape works the best. I used the type that had fibers in it but it was a mess to work with. This stuff is very thin and has great holding strength which is important here as I am wanting the neck to be as flat as possible. I have adjusted the truss as sometimes the necks change when glueing on the FB. Not much but I see a slight gap about mid-ships along the neck. So I straighten the neck and then stick it down flat. I do not ever carve the neck before the radiusing and fretting so that I have full support of the the squared wood to work with.
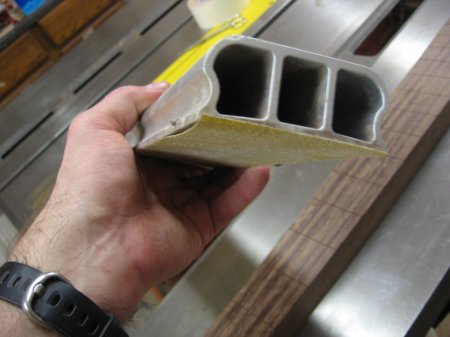
Using this very nice radiusing beam with stikit sandpaper I can get a very even and consistent radius on my fret board. In this case it is 20 inch radius that I am going for. The beam is a Stewmac (No, I don't work for them but it seems their tools seem to work for me) and costs around the $125 mark but is probably more now in days.
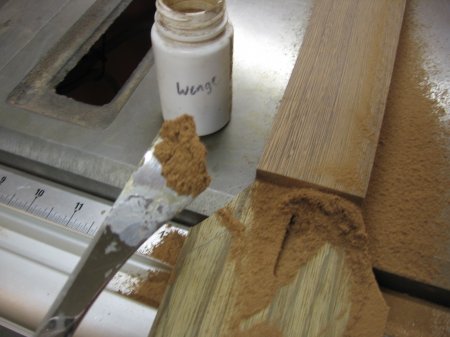
Next, I like to keep the dust from the radiusing for filler for inlays and fret slot filler. I used to keep the dust from the fret board slotting but it was much coarser than the fine dust from 320 grit sandpaper (please note that in the photo I have dust from 100 grit paper. I do not keep this dust and wait until later when I am using 240 to collect the dust). Also, it is wise to wait until the sandpaper has broken in a little to keep from having sanding grit in your fine dust. After a few passes the loose grit has fallen off.
I use .25 inch thick FB's to start with and like to radius them down to suit. I don't want to be all day about it so I start with 100 grit and do most of the work with it. Then I quickly go through 150, 240,320, 400, 600 to reach the smoothness I want. You don't need to get to carried away with the finer grits especially if you are going to do inlay work. Save the finest grits for after inlay work to save the extra time. For this build I decided not to use inlays on the face of the FB.

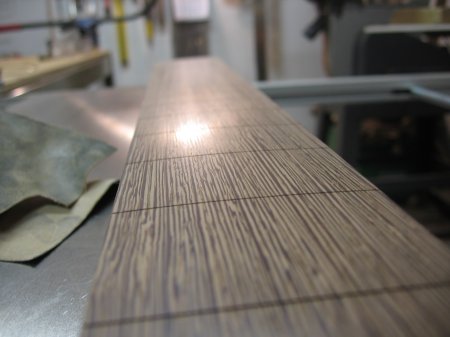
In this picture I am showing my Stewmac fret slot gauge. You can see I have a long way to go to get to the perfect depth so that I don't have too much slot for the fret. Believe it or not it doesn't take much time to radius with the beam I use. I think this step took me about 20 minutes start to fine grit finish sanding.
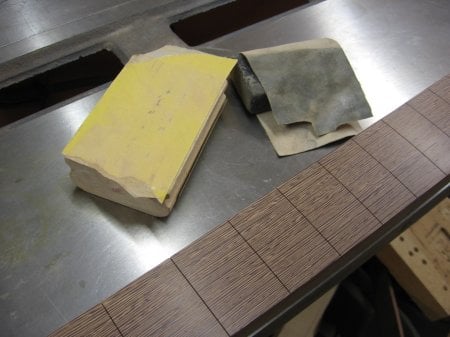
Once I reach the desired thickness and radius all the way along my FB, I then use finer grits on the wooden block to remove the small scratches left from higher grit abrasives. After the block I switch to Micro Mesh abrasives. These are rubber backed cloth that are very fine and work well for wet sanding and finish work. I use this wrapped around a rubber block to polish the wood into a nice luster.
Fretting
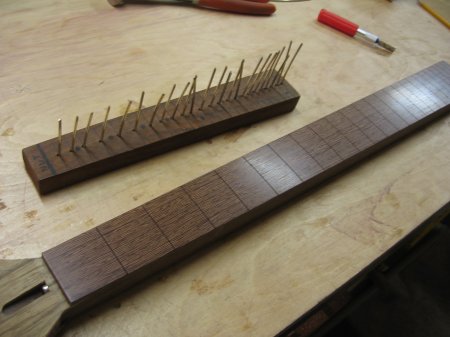
Here we have the neck again ready to fret. After I had finished with the micro mesh I blew out all of the dust and checked and scraped out the fret slots. Since I am using a Wenge FB I have another step to add. I apply a very thin coat of fret board oil which is really just a fine oil varnish. It is so thin that it does not build and penetrates deeper into the wood. I let dry and buff to a sheen. Re-micro mesh with 2400 grit and re-apply the oil varnish. My goal is not to "finish" the FB as Wenge does not really need finish to remain stable, but the woods color looks better and I feel the oiled wood holds frets better. I have no proof of that but it makes some sense to me. I would not do this on all woods but on some. After the second coat, I let it dry and then buff it with a soft cloth to bring out the sheen.
I have a fretbender from Stewmac that radiuses the wire to the correct radius of my FB. Actually I radius it a few inches tigher than what my FB is. This helps the fret lock into place.
I cut and store my bent frets to the basic lengths I need for my bass. I made a block that has lines and dot markers so I don't get confused when cutting. I still do though.
Fretting is not as hard on new builds as it is on repair work. New wood holds frets well as long as the slots are cut and cleaned correctly and the correct size wire is being used. I use a StewMac saw for slotting but LMI's wire fits better than Stewmacs wire. Go figure. Anyway I have my wire cut to length, my FB prepared by once again cleaning and checking the slots. Once you think they are clean enough, do it again. It will save you some headaches later on. I also take a fine three sided needle file and bevel the slots ever so slightly to help guide the fret in. I have to be careful when doing this as one slip and I am back to sanding and re-radiusing to hide a scratch that goes across the grain. BTDT.
People may argue with me but I do not use glue to set my frets in. As I said earlier, new wood holds frets pretty well. I would use glue on a repair if the FB is worn out from previous refrets. So for this next step I will use no glue or epoxy.
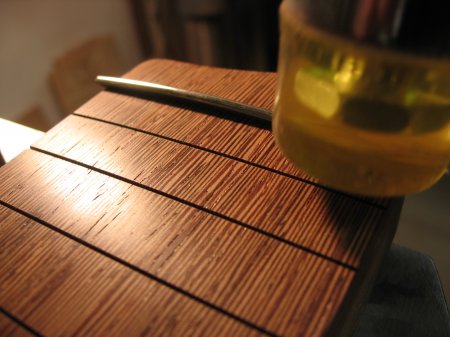
The first thing I do to press in frets is to tap one end of the wire into the slot. One good blow should seat it in nicely. I am just trying to get it started. I do this work on my table saw again as it is thick flat steel and does not bounce back when struck. I do not hammer in the other side as the press will do that. I used to hammer in the far side and press the center in last but I had some blow outs of the edge of the FB. I noticed that on a tour of the Warwick plant, that the frets were just stuck in on one side and a machine just went along and pushed the frets down much in the same way I am doing it here.
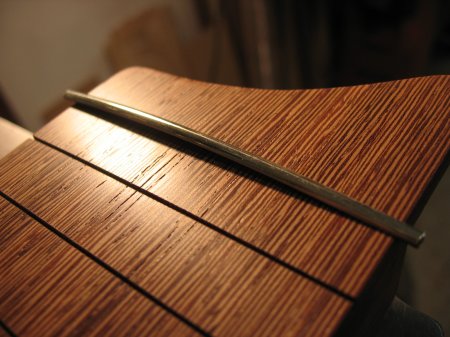
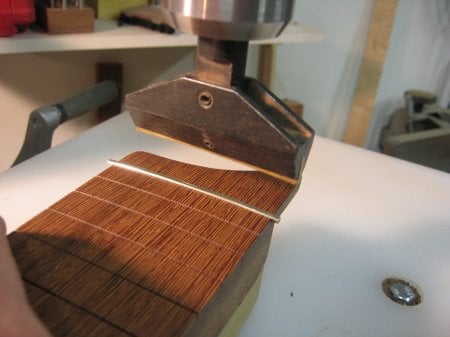
I then move over to my drill press where I have chucked in my pressing caul. Another Stewmac item that is great for the small modular type shop that does not have room for an arbor press.
And here she is all pressed into place. I hook a finger nail on each end and try to pry it out of the slot. If it comes out then I would have issues to deal with but as with most times, it holds well. I repeat this step 23 more times.
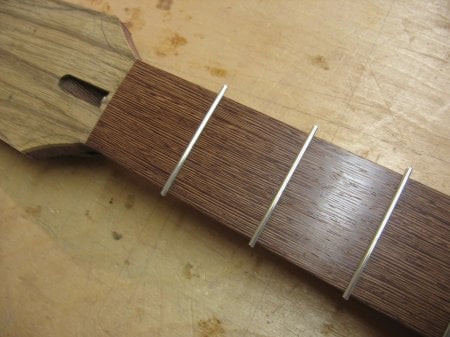
10 minutes later....I have all of the frets in and ready to be trimmed.

I use cheaper cutters as I get requests for stainless steel wire and it eats up good tools quickly. The note on the cutter is because one side is completely shot from SS. When I cut I hold the cutter like you see in the photo and I push toward the neck and pull with my hand from the other side to keep from pulling the fret in the slot.
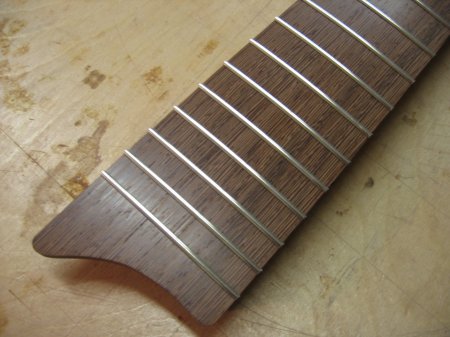
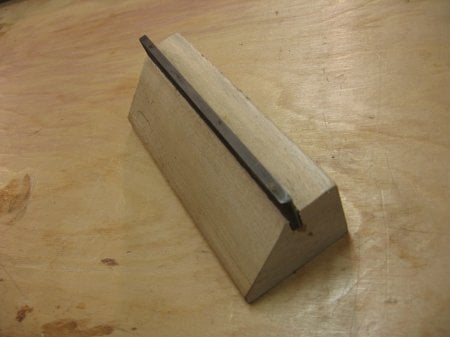
To trim off the sharp edges I use this homemade contraption. It is just a piece of wood with a file wedged up its backside and cemented in place with epoxy. I can do 90 degree or 35 degree angles.
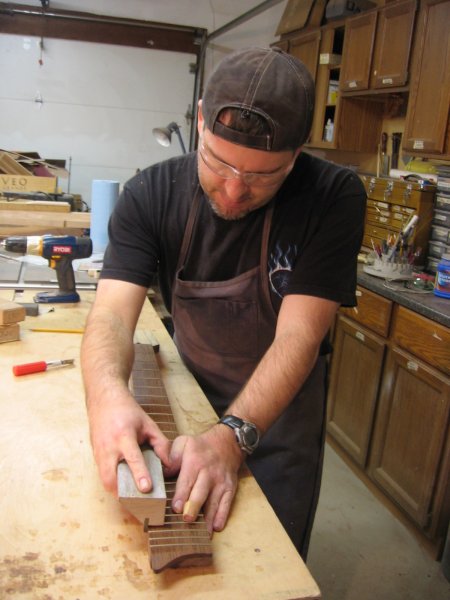
I trim each side and follow up with a hard sanding block to polish the ends and remove file marks. There will be more fret work to do later but we are done for now.
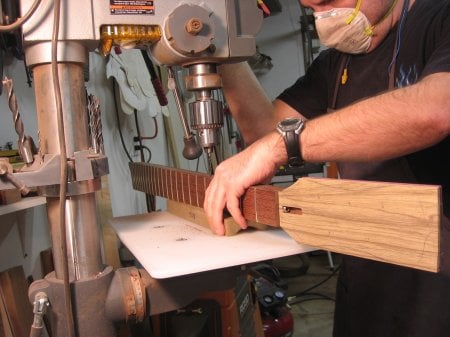
I now have some time to drill the side dot inlays and fill any fret slots that are still showing. I try to make my slot depth to be perfect to the depth of the fret tang but these things are all done by hand in my shop and I am a human...most of the time..and sometimes cut a little deep. Super glue and the dust collected earlier is just what the doctor ordered.
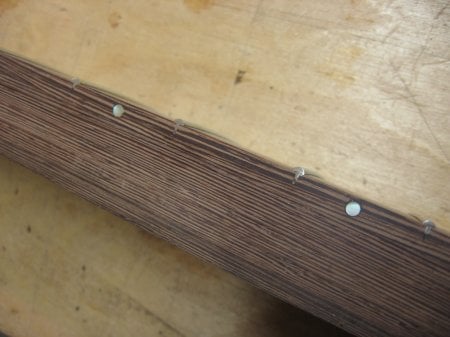
Side dots are in for this picture but I have yet to blow out the residue and fill the fret slot gaps.
Ok enough for today. Thanks for checking out my build and for the feedback.
Anyway the answer to the question about sound clips is that I don't have any at the moment. I will see if one of my customers will record something with one of their 33's. You would not want a clip of me playing.
The majority of basses I make are 33's or 32's. I have smallish hands and find that the scales are better suited for me. I have also found that the 33 inch scale is very good for 5 string basses. Less muddy tone on the B string and with good set up, the B string does not feel flappy either. I never string with anything bigger than .125 for a B string and like the using .110's for B's with a light set for EADG. Nice soft action and great tone.
Anyway I digress....
Today I will cover what I did for the radiusing and fretting of my neck. I promise I will get the body together next time.
First shot is the neck, again, stuck down to the table saw with carpet tape. The actual tape works the best. I used the type that had fibers in it but it was a mess to work with. This stuff is very thin and has great holding strength which is important here as I am wanting the neck to be as flat as possible. I have adjusted the truss as sometimes the necks change when glueing on the FB. Not much but I see a slight gap about mid-ships along the neck. So I straighten the neck and then stick it down flat. I do not ever carve the neck before the radiusing and fretting so that I have full support of the the squared wood to work with.
Using this very nice radiusing beam with stikit sandpaper I can get a very even and consistent radius on my fret board. In this case it is 20 inch radius that I am going for. The beam is a Stewmac (No, I don't work for them but it seems their tools seem to work for me) and costs around the $125 mark but is probably more now in days.
Next, I like to keep the dust from the radiusing for filler for inlays and fret slot filler. I used to keep the dust from the fret board slotting but it was much coarser than the fine dust from 320 grit sandpaper (please note that in the photo I have dust from 100 grit paper. I do not keep this dust and wait until later when I am using 240 to collect the dust). Also, it is wise to wait until the sandpaper has broken in a little to keep from having sanding grit in your fine dust. After a few passes the loose grit has fallen off.
I use .25 inch thick FB's to start with and like to radius them down to suit. I don't want to be all day about it so I start with 100 grit and do most of the work with it. Then I quickly go through 150, 240,320, 400, 600 to reach the smoothness I want. You don't need to get to carried away with the finer grits especially if you are going to do inlay work. Save the finest grits for after inlay work to save the extra time. For this build I decided not to use inlays on the face of the FB.
In this picture I am showing my Stewmac fret slot gauge. You can see I have a long way to go to get to the perfect depth so that I don't have too much slot for the fret. Believe it or not it doesn't take much time to radius with the beam I use. I think this step took me about 20 minutes start to fine grit finish sanding.
Once I reach the desired thickness and radius all the way along my FB, I then use finer grits on the wooden block to remove the small scratches left from higher grit abrasives. After the block I switch to Micro Mesh abrasives. These are rubber backed cloth that are very fine and work well for wet sanding and finish work. I use this wrapped around a rubber block to polish the wood into a nice luster.
Fretting
Here we have the neck again ready to fret. After I had finished with the micro mesh I blew out all of the dust and checked and scraped out the fret slots. Since I am using a Wenge FB I have another step to add. I apply a very thin coat of fret board oil which is really just a fine oil varnish. It is so thin that it does not build and penetrates deeper into the wood. I let dry and buff to a sheen. Re-micro mesh with 2400 grit and re-apply the oil varnish. My goal is not to "finish" the FB as Wenge does not really need finish to remain stable, but the woods color looks better and I feel the oiled wood holds frets better. I have no proof of that but it makes some sense to me. I would not do this on all woods but on some. After the second coat, I let it dry and then buff it with a soft cloth to bring out the sheen.
I have a fretbender from Stewmac that radiuses the wire to the correct radius of my FB. Actually I radius it a few inches tigher than what my FB is. This helps the fret lock into place.
I cut and store my bent frets to the basic lengths I need for my bass. I made a block that has lines and dot markers so I don't get confused when cutting. I still do though.
Fretting is not as hard on new builds as it is on repair work. New wood holds frets well as long as the slots are cut and cleaned correctly and the correct size wire is being used. I use a StewMac saw for slotting but LMI's wire fits better than Stewmacs wire. Go figure. Anyway I have my wire cut to length, my FB prepared by once again cleaning and checking the slots. Once you think they are clean enough, do it again. It will save you some headaches later on. I also take a fine three sided needle file and bevel the slots ever so slightly to help guide the fret in. I have to be careful when doing this as one slip and I am back to sanding and re-radiusing to hide a scratch that goes across the grain. BTDT.
People may argue with me but I do not use glue to set my frets in. As I said earlier, new wood holds frets pretty well. I would use glue on a repair if the FB is worn out from previous refrets. So for this next step I will use no glue or epoxy.
The first thing I do to press in frets is to tap one end of the wire into the slot. One good blow should seat it in nicely. I am just trying to get it started. I do this work on my table saw again as it is thick flat steel and does not bounce back when struck. I do not hammer in the other side as the press will do that. I used to hammer in the far side and press the center in last but I had some blow outs of the edge of the FB. I noticed that on a tour of the Warwick plant, that the frets were just stuck in on one side and a machine just went along and pushed the frets down much in the same way I am doing it here.
I then move over to my drill press where I have chucked in my pressing caul. Another Stewmac item that is great for the small modular type shop that does not have room for an arbor press.
And here she is all pressed into place. I hook a finger nail on each end and try to pry it out of the slot. If it comes out then I would have issues to deal with but as with most times, it holds well. I repeat this step 23 more times.
10 minutes later....I have all of the frets in and ready to be trimmed.
I use cheaper cutters as I get requests for stainless steel wire and it eats up good tools quickly. The note on the cutter is because one side is completely shot from SS. When I cut I hold the cutter like you see in the photo and I push toward the neck and pull with my hand from the other side to keep from pulling the fret in the slot.
To trim off the sharp edges I use this homemade contraption. It is just a piece of wood with a file wedged up its backside and cemented in place with epoxy. I can do 90 degree or 35 degree angles.
I trim each side and follow up with a hard sanding block to polish the ends and remove file marks. There will be more fret work to do later but we are done for now.
I now have some time to drill the side dot inlays and fill any fret slots that are still showing. I try to make my slot depth to be perfect to the depth of the fret tang but these things are all done by hand in my shop and I am a human...most of the time..and sometimes cut a little deep. Super glue and the dust collected earlier is just what the doctor ordered.
Side dots are in for this picture but I have yet to blow out the residue and fill the fret slot gaps.
Ok enough for today. Thanks for checking out my build and for the feedback.




Andrew does great work and is amazing to talk to in person. I would recommend him for a build anytime, he'll soon be starting one for me in the next month. I cannot wait!
Yeah. I was planning on a sterling 5 or modulus but those plans are out the window. The stella is stellar and I am figuring out a self finance plan.



- Aug 24, 2010
- 440
- 1,082
- Disclosures
- Builder/Owner:Drake Custom Bass Guitars
I am back to update my build progress. I have made quite a bit over the week.
This time I am going to cover the body blank construction. This bass is what I call my Custom Lite as it has a front and back with a chambered core. This removes weight (as Purpleheart his quite heavy) and gives the instrument more resonance.
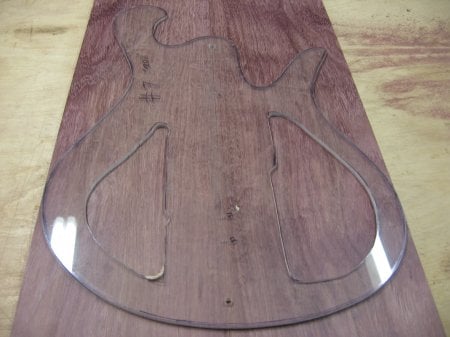
This first picture is of the Purple heart core that I am going to use. On this bass the top and back are each .5 inches thick and I am going for a total thickness of 1.5 inches so I have planed the core wood to .5 inches. I trace my template so I can map out the layout.

Next I trace my template onto the top of the bass.
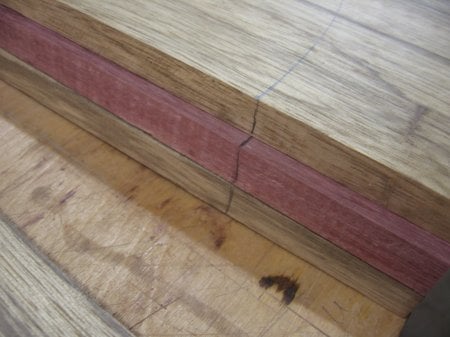
I then stack the front/core/and back on top of each other. I check the alginment ot the top and mark down the edge of each piece so that the tracings on each section will line up somewhat. Multilayer bodies require a little more prep work but it will pay off later on. I think of it as a three dimensional blueprint.
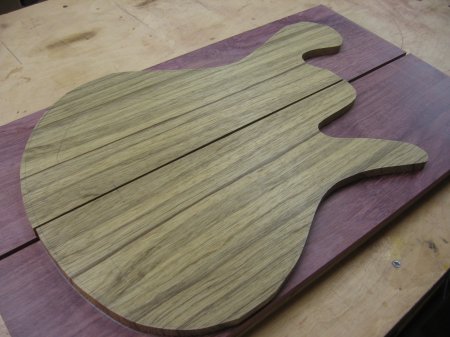
I then cut the top out leaving about 1/8 outside of the lines. You want to leave a little wiggle room for later and after glueing when the body gets trimmed out, the glue lines seem to be less noticable.
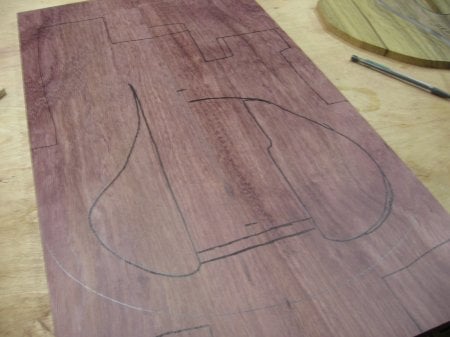
I map out the chambers and where the pickups will go so that I can make sure that the chambering does not overlap. On basses with just a top over a back, I would then use a router to remove the chambered areas. For this bass I have a front and a back so I just take it to the bandsaw and remove the areas inside the chamber zones. Keep in mind that with this method I do slice into the center from the center edge. I do this on each side but I stager my "intro cuts" so that they are not in the same spot on each side. I also try to put them in an area that is not visible when looking inside the bass from the electronics cavity. Also in the picture you can see that I drew some dark lines blocking around the shape of the body. The core gets trimmed along these lines before glue up. The flat edges left on the core will be used to keep the clamps square during glue up. If each side of the core was cut in the shape of the bass, the clamps and glue would not seat squarely and cause the two parts to move and throw everything out of alignment.
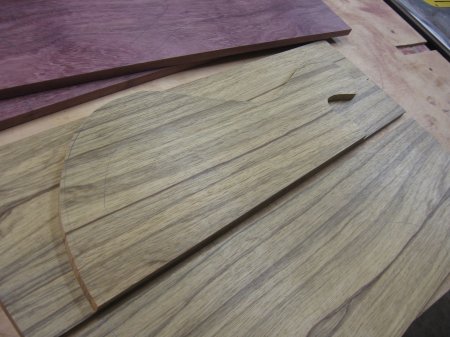
Then using the reference lines I made down the edge of each layer, I line up my top and trace it onto the back. The tracing seems to get a little bigger each time but that is fine, it will get trimmed later on. I then cut the back out using the template tracing but leaving a quarter of an inch extra along the outside of the tracing. This will be explained later.
Remember that I trimmed the core as well but I left the squared edges . The top and back get cut to the rough shape of the body. The reason I cut all of the pieces down to size before glue up is so that I can get may clamps in around the perimeter of the actually bass shape and to be able to reach out over the top and back with clamps to keep everything flat while the glue dries. I don't have room in my shop for a vacuum table or go-bar press. This low-tech method has worked well for me over the years.
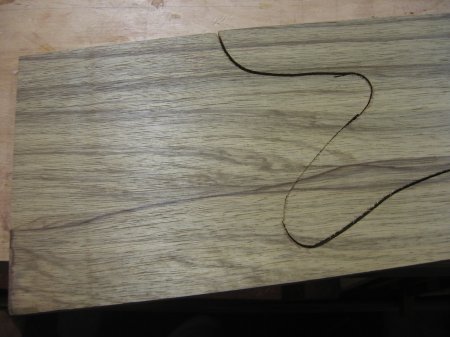
Here I was cutting out the back side. I leave the area forward of the lower horn as big as possible so that I can get a somewhat matching piece of wood for my electronics cavity.
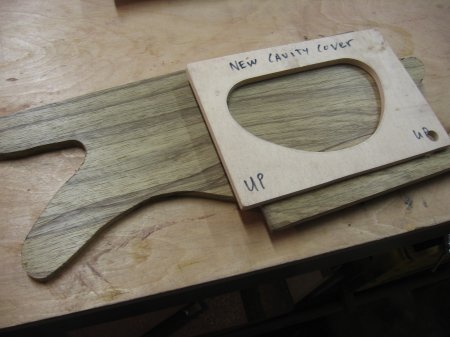
As you can see the color of the wood matches and will blend fairly well. I have always been pretty lucky with having the cavitycover blend with the back wood. All it takes is a few grain lines to match up to make the eye naturally blend the two parts together.
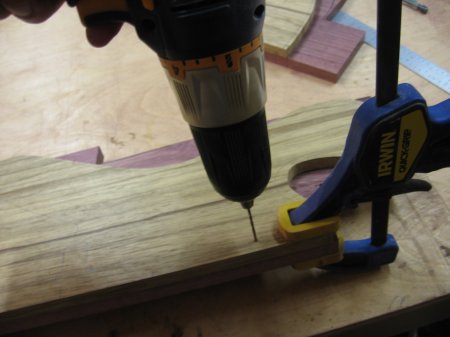
OK, toothpick time again. I start layering my sides together my glueing on the front or topwood. I use my refence lines down the inside edges to align front and core. I use my toothpicks to hold the top onto the core and keep them lined up when being clamped. I sink the toothpicks into areas like the neck pocket and pickup cavity areas that get routed away later. I will do this when I glue on the back as well, but I put the toothpicks into the quarter inch area outside of the tracing lines as there are less places (no neck pocket or pickup cavities) on the back of a bass to hide the toothpick holes.
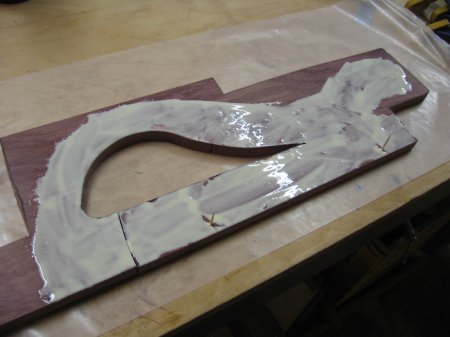
I apply glue to the core. I use the traced lines to mark where I need glue so that I don't need to smear glue over the entire core. In this picture you can see the chambering I did earlier. Notice that I sliced into the chambered area from the center well away from the edges of what will be the basses' shape. This has never proved to casue any weakness to the body construction and does not need to be plugged. It gets glue from glueing on the top and back. Notice that I have cut the core down a bit before glueing the top on.
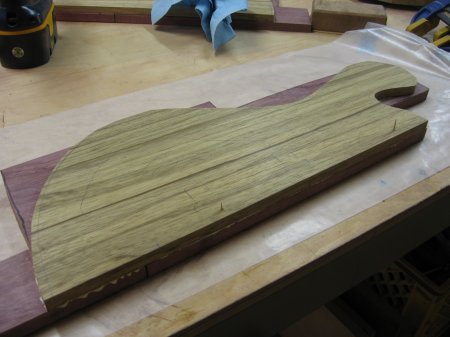
Using the toothpicks as a guide, I carefully attach the top onto the core.....
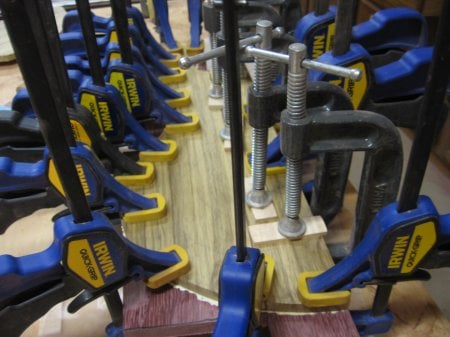
...and put the clamps on. I do this for both sides. To save some time....after the glue has set for a few hours, it is safe to pull off the clamps and attach the back pieces in the same manner as I did the front. Then I reapply the clamps all around.
I will post more this week but for now thanks for checking back.
This time I am going to cover the body blank construction. This bass is what I call my Custom Lite as it has a front and back with a chambered core. This removes weight (as Purpleheart his quite heavy) and gives the instrument more resonance.
This first picture is of the Purple heart core that I am going to use. On this bass the top and back are each .5 inches thick and I am going for a total thickness of 1.5 inches so I have planed the core wood to .5 inches. I trace my template so I can map out the layout.
Next I trace my template onto the top of the bass.
I then stack the front/core/and back on top of each other. I check the alginment ot the top and mark down the edge of each piece so that the tracings on each section will line up somewhat. Multilayer bodies require a little more prep work but it will pay off later on. I think of it as a three dimensional blueprint.
I then cut the top out leaving about 1/8 outside of the lines. You want to leave a little wiggle room for later and after glueing when the body gets trimmed out, the glue lines seem to be less noticable.
I map out the chambers and where the pickups will go so that I can make sure that the chambering does not overlap. On basses with just a top over a back, I would then use a router to remove the chambered areas. For this bass I have a front and a back so I just take it to the bandsaw and remove the areas inside the chamber zones. Keep in mind that with this method I do slice into the center from the center edge. I do this on each side but I stager my "intro cuts" so that they are not in the same spot on each side. I also try to put them in an area that is not visible when looking inside the bass from the electronics cavity. Also in the picture you can see that I drew some dark lines blocking around the shape of the body. The core gets trimmed along these lines before glue up. The flat edges left on the core will be used to keep the clamps square during glue up. If each side of the core was cut in the shape of the bass, the clamps and glue would not seat squarely and cause the two parts to move and throw everything out of alignment.
Then using the reference lines I made down the edge of each layer, I line up my top and trace it onto the back. The tracing seems to get a little bigger each time but that is fine, it will get trimmed later on. I then cut the back out using the template tracing but leaving a quarter of an inch extra along the outside of the tracing. This will be explained later.
Remember that I trimmed the core as well but I left the squared edges . The top and back get cut to the rough shape of the body. The reason I cut all of the pieces down to size before glue up is so that I can get may clamps in around the perimeter of the actually bass shape and to be able to reach out over the top and back with clamps to keep everything flat while the glue dries. I don't have room in my shop for a vacuum table or go-bar press. This low-tech method has worked well for me over the years.
Here I was cutting out the back side. I leave the area forward of the lower horn as big as possible so that I can get a somewhat matching piece of wood for my electronics cavity.
As you can see the color of the wood matches and will blend fairly well. I have always been pretty lucky with having the cavitycover blend with the back wood. All it takes is a few grain lines to match up to make the eye naturally blend the two parts together.
OK, toothpick time again. I start layering my sides together my glueing on the front or topwood. I use my refence lines down the inside edges to align front and core. I use my toothpicks to hold the top onto the core and keep them lined up when being clamped. I sink the toothpicks into areas like the neck pocket and pickup cavity areas that get routed away later. I will do this when I glue on the back as well, but I put the toothpicks into the quarter inch area outside of the tracing lines as there are less places (no neck pocket or pickup cavities) on the back of a bass to hide the toothpick holes.
I apply glue to the core. I use the traced lines to mark where I need glue so that I don't need to smear glue over the entire core. In this picture you can see the chambering I did earlier. Notice that I sliced into the chambered area from the center well away from the edges of what will be the basses' shape. This has never proved to casue any weakness to the body construction and does not need to be plugged. It gets glue from glueing on the top and back. Notice that I have cut the core down a bit before glueing the top on.
Using the toothpicks as a guide, I carefully attach the top onto the core.....
...and put the clamps on. I do this for both sides. To save some time....after the glue has set for a few hours, it is safe to pull off the clamps and attach the back pieces in the same manner as I did the front. Then I reapply the clamps all around.
I will post more this week but for now thanks for checking back.

- Aug 24, 2010
- 440
- 1,082
- Disclosures
- Builder/Owner:Drake Custom Bass Guitars
In the last post I was glueing up the body blank sides. I did unclamp the sides and added the backs onto them before reclamping. This sped things up a little for me. It was the same process of aligning the backs with the reference lines I had drawn down the edge of the center to mark the edge of the body. I clamped the backs on and drilled small holes out side the lines of the body to insert the toothpicks (this is why it is good that the layers get bigger as I did the layout work. The back ends up having a quarter of an inch waste around the body shape. I use this area to sink toothpicks). I then disassembled and added glue. Then I again used the toothpicks as a guide to make sure the backs got glued on aligned with the tops. Just like I did on the front side.
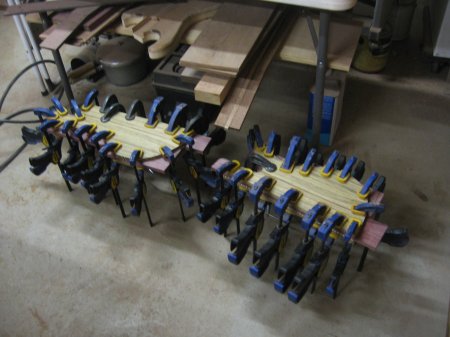
Here the two sides are in the clamps.
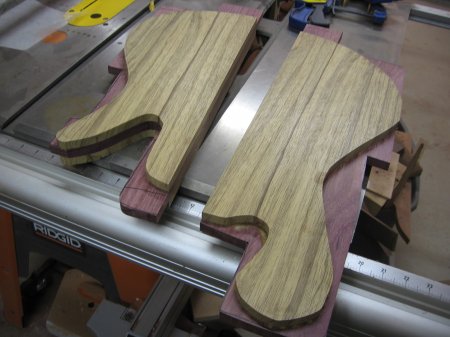
You can see the two halves after some passes over my jointer to prepare the center edges for glueing together the two halves.
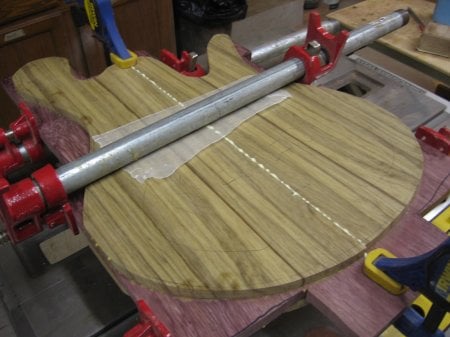
You can see why I left the core wood's edges squared off a bit. My pipe clamps work so much better when they have a flat space to clamp to. I also use some small clamps at the ends to keep the lines, created by the layers, to match up. I like the core to look as if it is one piece of wood with a top and back laminated onto it. I have seen some basses with broken lines where the bottom side of the tops don't match up. It looks like amatuer night when that happens. I have made that mistake too many times and obsess about not doing it again.
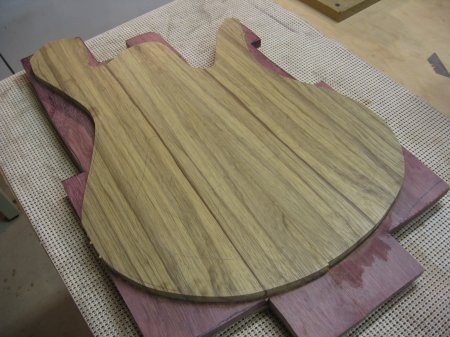
Fresh out of the clamps and after scraping off excess glue.
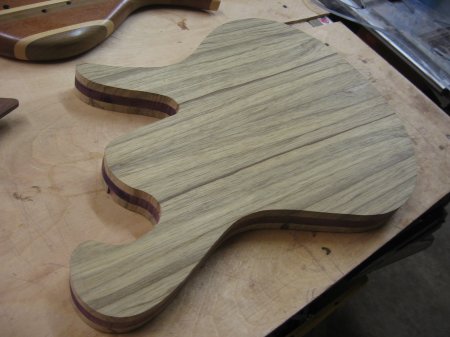
After she lost some weight she is looking more like a bass. They look pretty rough until after this stage. Then you start seeing the shape.
Next time I will join the neck and body.
Thanks for looking.
Here the two sides are in the clamps.
You can see the two halves after some passes over my jointer to prepare the center edges for glueing together the two halves.
You can see why I left the core wood's edges squared off a bit. My pipe clamps work so much better when they have a flat space to clamp to. I also use some small clamps at the ends to keep the lines, created by the layers, to match up. I like the core to look as if it is one piece of wood with a top and back laminated onto it. I have seen some basses with broken lines where the bottom side of the tops don't match up. It looks like amatuer night when that happens. I have made that mistake too many times and obsess about not doing it again.
Fresh out of the clamps and after scraping off excess glue.
After she lost some weight she is looking more like a bass. They look pretty rough until after this stage. Then you start seeing the shape.
Next time I will join the neck and body.
Thanks for looking.
- Aug 24, 2010
- 440
- 1,082
- Disclosures
- Builder/Owner:Drake Custom Bass Guitars
Ok, lets go back to the neck. I like to veneer the front and backs of my necks. It is something I do on all of my basses and guitars. There is a couple of reasons I do this. I like the looks of it for one. Two, I like to cover the glue line left on the back left from the scarf joint. I glue the peghead on top of the scarf and not toe joint it like many do. The way I do it leaves a glue line across the back. The third reason is that most of my truss rods have access at the nut. The adjustment end of the truss requires a larger route. This removes some extra wood and I like to thicken up the area around it with the 1/8 inch veneer of hard wood. When you look at the side of my headstocks you see layers like a finger joint. On top you have the fret board, then the pgghead and top veneer, then the part of the neck that the peghead is glued onto, and finally the rear veneer. This makes the joint very strong. I have never had one broken. Anyway....
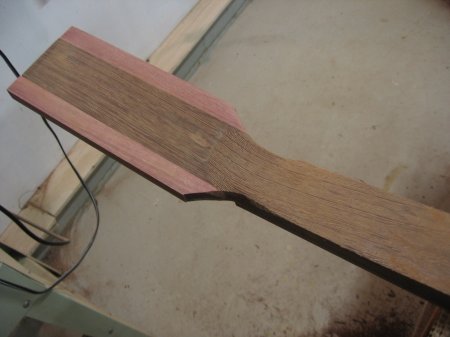
Here is the back of my neck blank. I used a rasp and sanding blocks to smooth the back of the peghead and to blend it into the neck. The area is curved but if the curve is not too great, the veneer will bend easily enough to allow glueing into place. I dry fit it first with clamps to make sure.
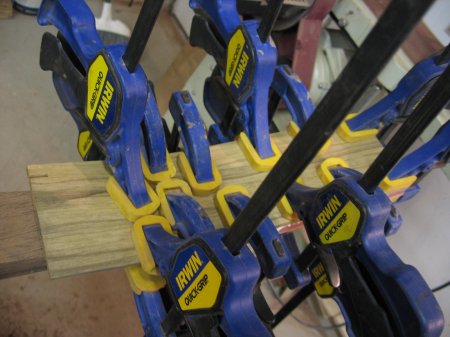
Here you see the back peghead veneer being glued into place.
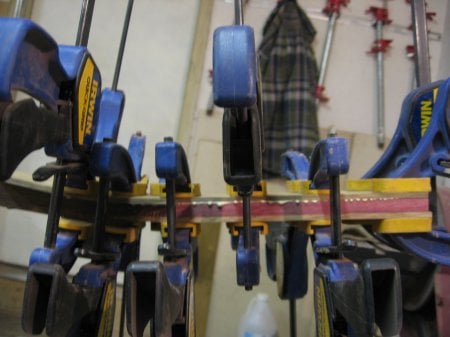
You can see how the back curves a little but the veneer bent into place just fine. Sometimes the veneer cracks a little but the cracks never seem to reach the area that will be left after carving.
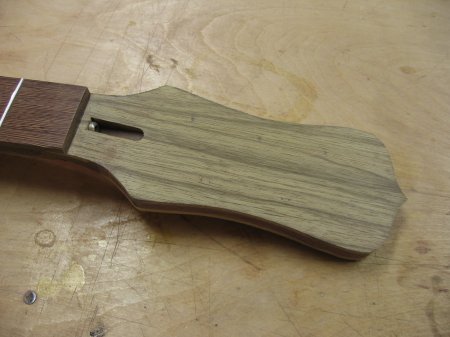
After the glue dried I was able to saw out the basic shape of my peghead. I also marked the tuner holes. I always try to make it so that the tuners do not get too close to the edge of the headstock as I do carve the edges over a little. Also the layout is important so that the higher strings don't come into contact with the next lower tuner's post. I try to make the tuners move closer to the center of the headstock the farther away from the nut to prevent this.
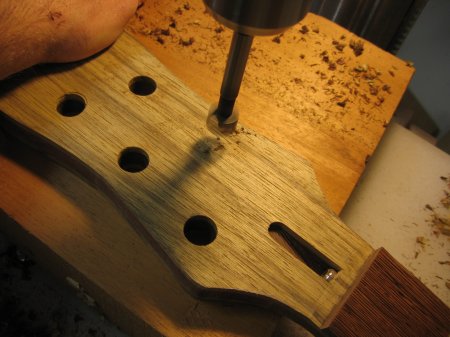
I use a forstner bit and backing block to drill the tuner holes to the correct 9/16 width for my tuners.
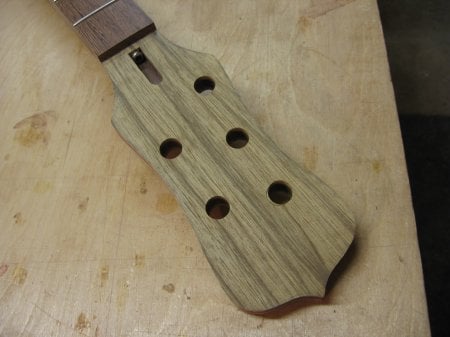
All of the tuner holes drilled and the neck is ready to carve.
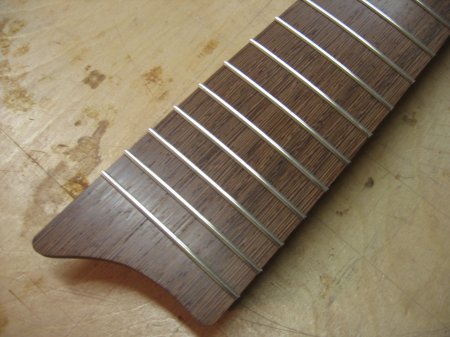
You may remember from previous builds, that I leave the neck squared off until I cut the neck pocket. I do this to help with radiusing and fretting but also so that I can lay straightedges along the neck to help center the neck. I make sure that my neck is sanded flat on each side and that it is to the finish sanding stage as I do not want the neck to get thinner after I make my neck pocket.
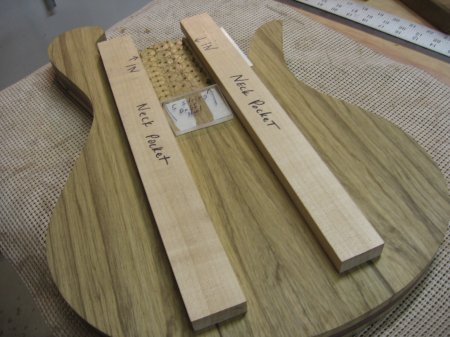
For my neck pocket template I use a low-tech method that has worked well for me for a long time. The template is just two quarter sawn pieces of Hard Maple planed down with the top face tapered to a slight angle. I taper them so that my neck pocket will be at a correct neck angle for the bridges I use. The taper is only a couple of degrees. I don't ever use shims for my bolt on necks because the pocket is angled, not the heel of the neck. It stays flat.
To make this template, I just used a wider piece of wood and tapered it down and then ran the sides and bottom over my jointer. Then cut it in half and you have two sides that match for angle and height. I use the finished edge as the inside surface for my router bit bearing to ride on.
Using the heel of the neck and some straightedges, I align the neck with a center line drawn down the center of the body. Once the neck is aligned and sitting on the body, I carefully mark the edges with a mechanical pencil. I then take my template pieces and apply carpet tape to the whole length of each side. I then carefully attach the bass side template onto the body flush up against the neck heel. Without moving the neck I do the same to the opposite side. I then cut some plexiglass to act as the back stop for the heel and stick it into place with carpet tape. The reason for taping the whole length of each template piece is to make sure that the piece is stuck down to the body and will not move around. I test it often. If it moves, I then reapply tape and check again. I then lift the neck out of the template and recheck to make sure it is still ligned up with the center line on the body and that it is not going to move around. Once that is done, I use a forstner bit to remove a lot of the wood from the pocket area. I then recheck that the tape is holding and that the template has not moved.
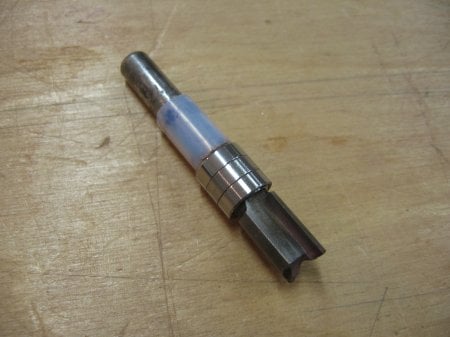
Using this bearing template bit, I route the pocket in multiple passes. This is the Stewmac 3/8 inchtemplate bit with an extra bearing added.
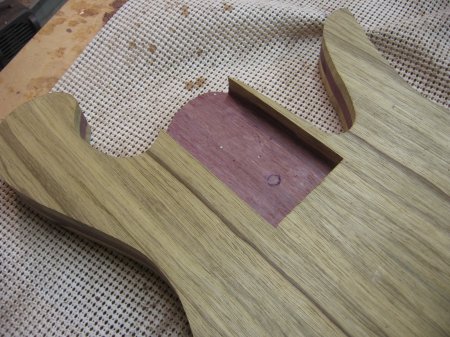
I route the pocket to about 3/4 of the depth I need it to. At this time I can remove the plexiglass stop (I leave the wood pieces in place) and check my neck fit. To do this I have to chisel the corners to allow the edges of the heel to fit down into the pocket. Using a straightedge and the bridge that will be used for the build, I place the bridge onto the face of the bass where it will be mounted, and lay the straightedge on top of the frets bridging onto the E string saddle. I make sure that the straightedge sits into the E string saddle slot with the saddle at it's lowest setting. If the straightedge is above the saddle I know that I need to make the pocket depth deeper. I router some more and recheck until it is perfect. I like the string to sit on the frets when the saddle is at it's lowest setting so that I have a lot of adjustment headroom for setup.
You may have noticed that this heel pocket is somewhat like a large dovetail joint. This makes it so that the neck fits in only one way. There is no shifting and the pocket is much tighter this way. I can also set this neck up to have a glue in neck if I wanted to. Once the final fit is good and the neck slides easily into the pocket, I can remove the wood template pieces and drill holes for mounting hardware or leave it for glue as a set neck later.

Here the neck and body are joined. I have drilled for mounting screws as she will be a bolt on. The neck fits tight enough that I did need to use any screws to hold her on for this picture.
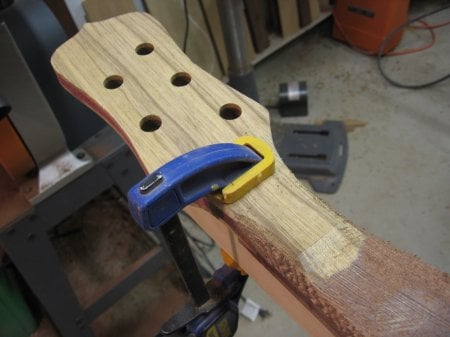
Now to carve the neck.
I start with the headstock end and work the vollute area first. I try to get the area as close to the desired thickness and shape before moving on to the heel end where I do the same thing. I clamp the neck FB side down onto a long piece of wood like a 1X4. This piece of wood goes into my vice so that I have the ability to carve down both sides of the neck.
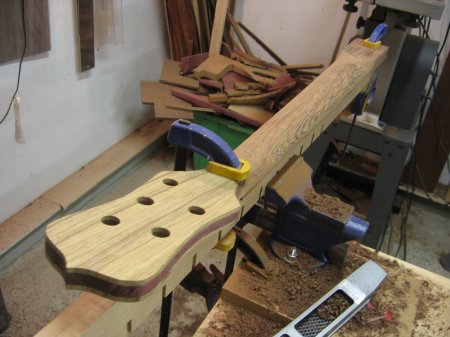
Here is better look at my jig. As you can see here I have been carving away at the neck and am almost finished. I use rasps, files, sanding blocks, and scrapers to carve my desired shape.
This is enough for today. Thanks for looking and for the feedback.
Here is the back of my neck blank. I used a rasp and sanding blocks to smooth the back of the peghead and to blend it into the neck. The area is curved but if the curve is not too great, the veneer will bend easily enough to allow glueing into place. I dry fit it first with clamps to make sure.
Here you see the back peghead veneer being glued into place.
You can see how the back curves a little but the veneer bent into place just fine. Sometimes the veneer cracks a little but the cracks never seem to reach the area that will be left after carving.
After the glue dried I was able to saw out the basic shape of my peghead. I also marked the tuner holes. I always try to make it so that the tuners do not get too close to the edge of the headstock as I do carve the edges over a little. Also the layout is important so that the higher strings don't come into contact with the next lower tuner's post. I try to make the tuners move closer to the center of the headstock the farther away from the nut to prevent this.
I use a forstner bit and backing block to drill the tuner holes to the correct 9/16 width for my tuners.
All of the tuner holes drilled and the neck is ready to carve.
You may remember from previous builds, that I leave the neck squared off until I cut the neck pocket. I do this to help with radiusing and fretting but also so that I can lay straightedges along the neck to help center the neck. I make sure that my neck is sanded flat on each side and that it is to the finish sanding stage as I do not want the neck to get thinner after I make my neck pocket.
For my neck pocket template I use a low-tech method that has worked well for me for a long time. The template is just two quarter sawn pieces of Hard Maple planed down with the top face tapered to a slight angle. I taper them so that my neck pocket will be at a correct neck angle for the bridges I use. The taper is only a couple of degrees. I don't ever use shims for my bolt on necks because the pocket is angled, not the heel of the neck. It stays flat.
To make this template, I just used a wider piece of wood and tapered it down and then ran the sides and bottom over my jointer. Then cut it in half and you have two sides that match for angle and height. I use the finished edge as the inside surface for my router bit bearing to ride on.
Using the heel of the neck and some straightedges, I align the neck with a center line drawn down the center of the body. Once the neck is aligned and sitting on the body, I carefully mark the edges with a mechanical pencil. I then take my template pieces and apply carpet tape to the whole length of each side. I then carefully attach the bass side template onto the body flush up against the neck heel. Without moving the neck I do the same to the opposite side. I then cut some plexiglass to act as the back stop for the heel and stick it into place with carpet tape. The reason for taping the whole length of each template piece is to make sure that the piece is stuck down to the body and will not move around. I test it often. If it moves, I then reapply tape and check again. I then lift the neck out of the template and recheck to make sure it is still ligned up with the center line on the body and that it is not going to move around. Once that is done, I use a forstner bit to remove a lot of the wood from the pocket area. I then recheck that the tape is holding and that the template has not moved.
Using this bearing template bit, I route the pocket in multiple passes. This is the Stewmac 3/8 inchtemplate bit with an extra bearing added.
I route the pocket to about 3/4 of the depth I need it to. At this time I can remove the plexiglass stop (I leave the wood pieces in place) and check my neck fit. To do this I have to chisel the corners to allow the edges of the heel to fit down into the pocket. Using a straightedge and the bridge that will be used for the build, I place the bridge onto the face of the bass where it will be mounted, and lay the straightedge on top of the frets bridging onto the E string saddle. I make sure that the straightedge sits into the E string saddle slot with the saddle at it's lowest setting. If the straightedge is above the saddle I know that I need to make the pocket depth deeper. I router some more and recheck until it is perfect. I like the string to sit on the frets when the saddle is at it's lowest setting so that I have a lot of adjustment headroom for setup.
You may have noticed that this heel pocket is somewhat like a large dovetail joint. This makes it so that the neck fits in only one way. There is no shifting and the pocket is much tighter this way. I can also set this neck up to have a glue in neck if I wanted to. Once the final fit is good and the neck slides easily into the pocket, I can remove the wood template pieces and drill holes for mounting hardware or leave it for glue as a set neck later.
Here the neck and body are joined. I have drilled for mounting screws as she will be a bolt on. The neck fits tight enough that I did need to use any screws to hold her on for this picture.
Now to carve the neck.
I start with the headstock end and work the vollute area first. I try to get the area as close to the desired thickness and shape before moving on to the heel end where I do the same thing. I clamp the neck FB side down onto a long piece of wood like a 1X4. This piece of wood goes into my vice so that I have the ability to carve down both sides of the neck.
Here is better look at my jig. As you can see here I have been carving away at the neck and am almost finished. I use rasps, files, sanding blocks, and scrapers to carve my desired shape.
This is enough for today. Thanks for looking and for the feedback.

Drake, you are an endless source of information and inspiration. As always, it look beautiful, well planned, and more expensive than I could ever afford.  subbed.
subbed.
- Aug 24, 2010
- 440
- 1,082
- Disclosures
- Builder/Owner:Drake Custom Bass Guitars
Thanks for the feedback guys.
Today I will complete the routing of the cavities.
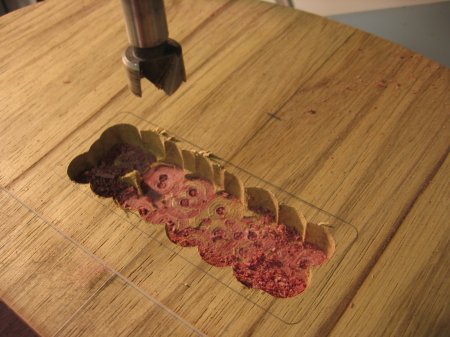
First I have drawn out the layout of where the bridge, pickups, and neck are going to be. Then I use this forstner bit to hog out the area inside of the pickup's footprint to save my router bits from extra wear.
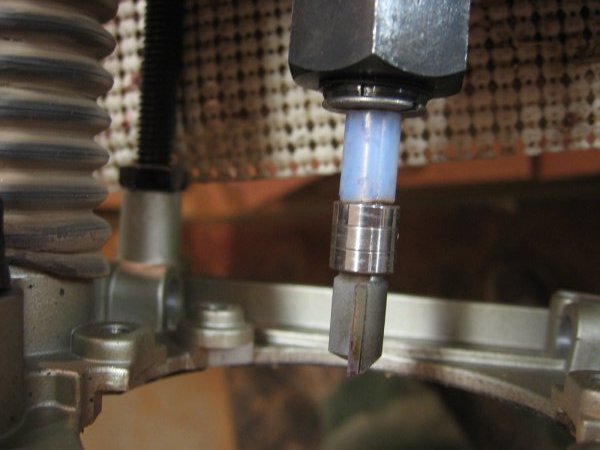
Then I use this Stewmac brand bearing pattern bit to do the rest of the work.
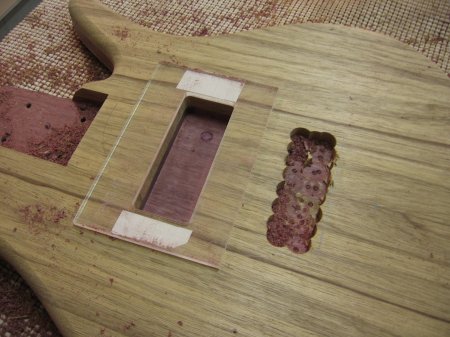
I stick the template onto the face of the body over the footprint of the pickup and then clean the rest of the wood out with the router.
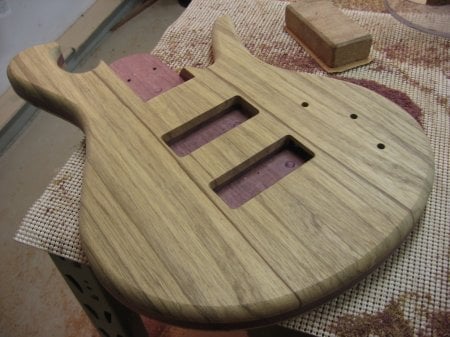
Here the pickup cavities are completed. Depth depends on the pickup being used. I also drilled the pot holes and the output jack hole in the side.
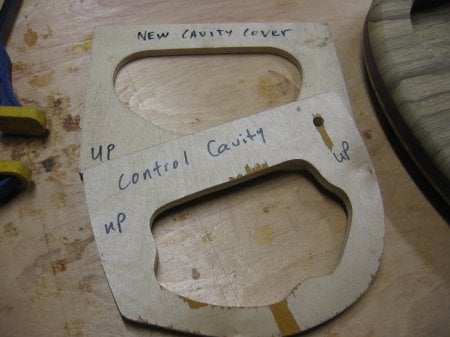
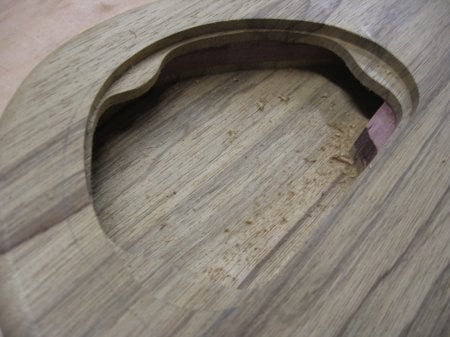
The same process for the cavity cover. Since I made this a semi-hollow bass I did not need to use the forstner bit to remove any extra wood but with solid bodies I use it.
I use these templates (see above) that I made from plywood. Why plywood when all of my other templates are plexiglass? The answer is that for the cover recess I do not need to go that deep and my bit is about 1/2 inch deep. The template is high enought that my bit's bearing can run along the template. The actual electronics cavity is the same type of thing because I use a bigger and deeper bit that needs more height for the bearing. Anyway....I do the inner cavity first and then I do the recess for the electronics cavity cover plate.
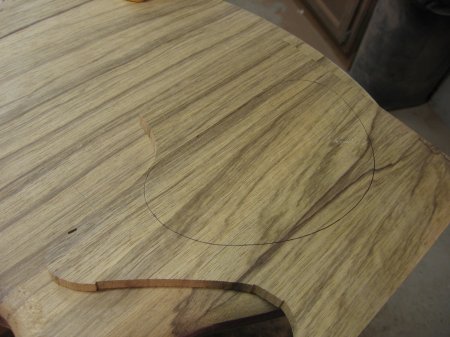
Now to make a cover plate for the electronics cavity. Remember that I saved the part of the back that was cut off just in front of the lower horn. I now take that piece and make sure that the same side is showing out so the grain run out isn't so great. I then try to align some of the grain with the pattern that follows through. This is to attempt to conceal the cavity cover. Most of the time I get some of the lines to blend but there is always some odd patterns. I don't think it looks bad and as long as some grain blends, the human mind kind of blends the rest.

I use the cavity recess template to trace the shape onto the cover wood and then bandsaw out the shape. I touch it up on the disc sander.
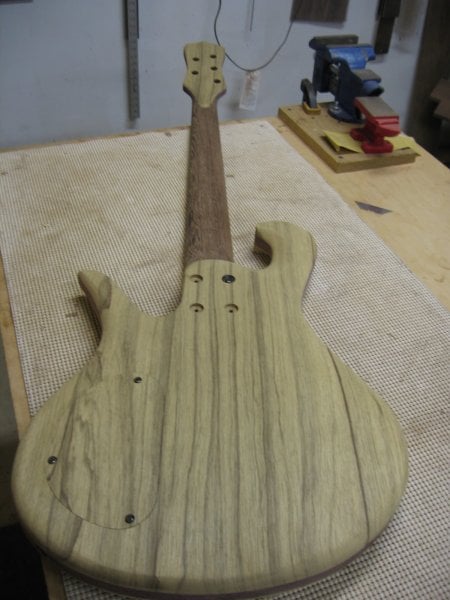
You can see that if you do not just focus on just the cover plate it really does not stand out.
Then it is a matter of drilling some screw holes or magnets or whatever you wish to use to attach the cover.
Thanks for looking at my build. Next time I will have the fine sanding completed and will have some more shots of the progress. Won't be long now until I can finish her. The hardware should be here soon so I can drill for the bridge mounting screws.
Today I will complete the routing of the cavities.
First I have drawn out the layout of where the bridge, pickups, and neck are going to be. Then I use this forstner bit to hog out the area inside of the pickup's footprint to save my router bits from extra wear.
Then I use this Stewmac brand bearing pattern bit to do the rest of the work.
I stick the template onto the face of the body over the footprint of the pickup and then clean the rest of the wood out with the router.
Here the pickup cavities are completed. Depth depends on the pickup being used. I also drilled the pot holes and the output jack hole in the side.
The same process for the cavity cover. Since I made this a semi-hollow bass I did not need to use the forstner bit to remove any extra wood but with solid bodies I use it.
I use these templates (see above) that I made from plywood. Why plywood when all of my other templates are plexiglass? The answer is that for the cover recess I do not need to go that deep and my bit is about 1/2 inch deep. The template is high enought that my bit's bearing can run along the template. The actual electronics cavity is the same type of thing because I use a bigger and deeper bit that needs more height for the bearing. Anyway....I do the inner cavity first and then I do the recess for the electronics cavity cover plate.
Now to make a cover plate for the electronics cavity. Remember that I saved the part of the back that was cut off just in front of the lower horn. I now take that piece and make sure that the same side is showing out so the grain run out isn't so great. I then try to align some of the grain with the pattern that follows through. This is to attempt to conceal the cavity cover. Most of the time I get some of the lines to blend but there is always some odd patterns. I don't think it looks bad and as long as some grain blends, the human mind kind of blends the rest.
I use the cavity recess template to trace the shape onto the cover wood and then bandsaw out the shape. I touch it up on the disc sander.
You can see that if you do not just focus on just the cover plate it really does not stand out.
Then it is a matter of drilling some screw holes or magnets or whatever you wish to use to attach the cover.
Thanks for looking at my build. Next time I will have the fine sanding completed and will have some more shots of the progress. Won't be long now until I can finish her. The hardware should be here soon so I can drill for the bridge mounting screws.
- Aug 24, 2010
- 440
- 1,082
- Disclosures
- Builder/Owner:Drake Custom Bass Guitars
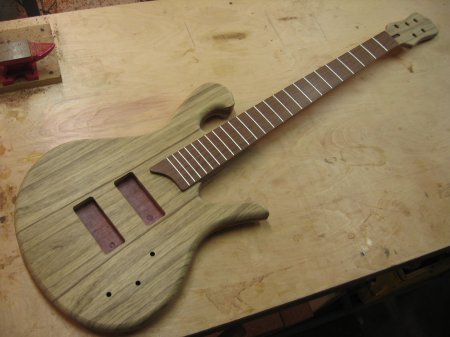
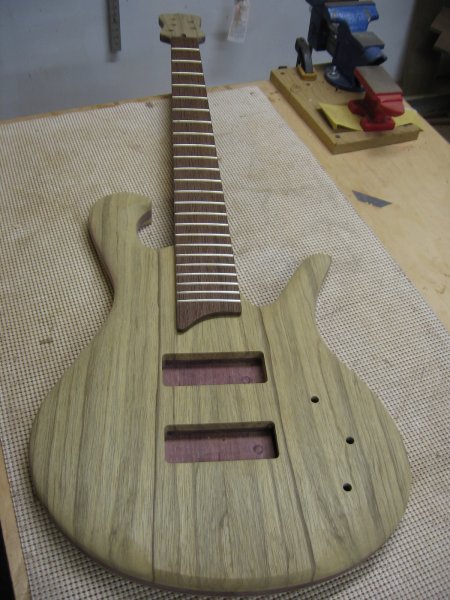
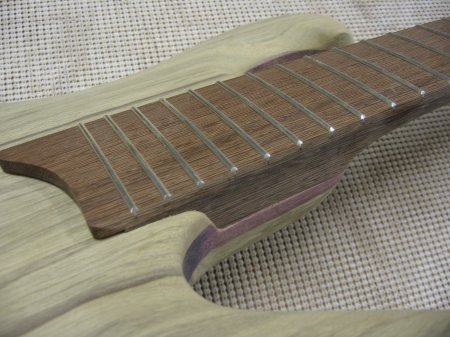
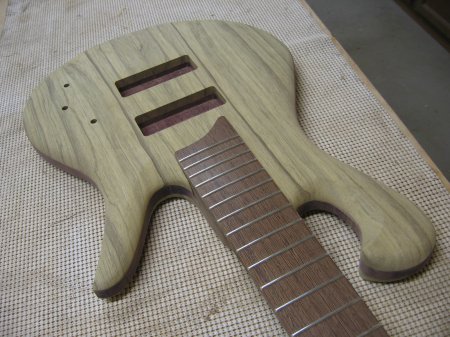
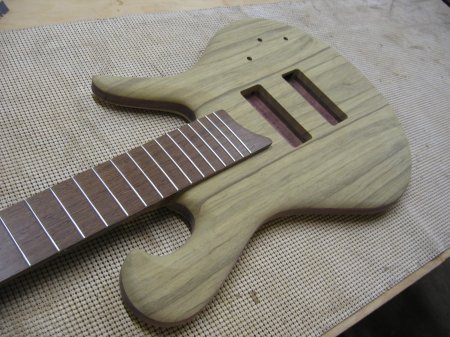
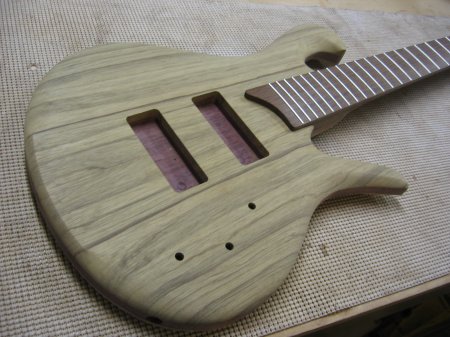
Well I am at the finish sanding stage, The bass is mostly carved and I have been saniding a bit. I am waiting on my electronics and hardware to show up before I can pre-assemble her and double check that everything is set right. In this case, the customer has decided on EMG P5 and J5 pickups with Vol, Vol, Tone controls. For hardware he wanted Hipshot Ultra-lite tuners and A style bridge with the string through the body feature. Once I get the bridge in stock then I will be drilling for the string through feature before doing my pre-finish assembly. I should have the hardware this week so by this weekend I will be into finish. Probably have the bass ready to go next Tuesday.
Here are some pics of her after some shaping and sanding. I still have some to do. I have the logo inlay completed and will have pics of it next time.
The first pic is of her before I did the carving.
Thanks for looking.
Here are some pics of her after some shaping and sanding. I still have some to do. I have the logo inlay completed and will have pics of it next time.
The first pic is of her before I did the carving.
Thanks for looking.


