• TalkBass has been independent since 1998. Add your voice.
    Create a free account to reply to discussions, view embedded media, and browse with fewer display ads.
    Join freeLog in
    Want zero display ads or expanded classifieds tools? Compare plans.

Build thread: 2nd build, first 6-string

Hey there folks, Donnie in Colorado here.

I've only built one bass so far, and I rarely play a 6-string. So, of course, I couldn't shake the idea of building a 6-string - I just had to do it. This bass-building obsession really seems to take its own course for some reason, and I'm content enough to go with the flow. I also started a new 4-string build at the same time, but I'll get a thread for that one going sometime soon.

I'm getting pretty far along, but with some ways left to go, but I thought I'd go ahead and start a build thread to show progress. After all, what's this place without build content?

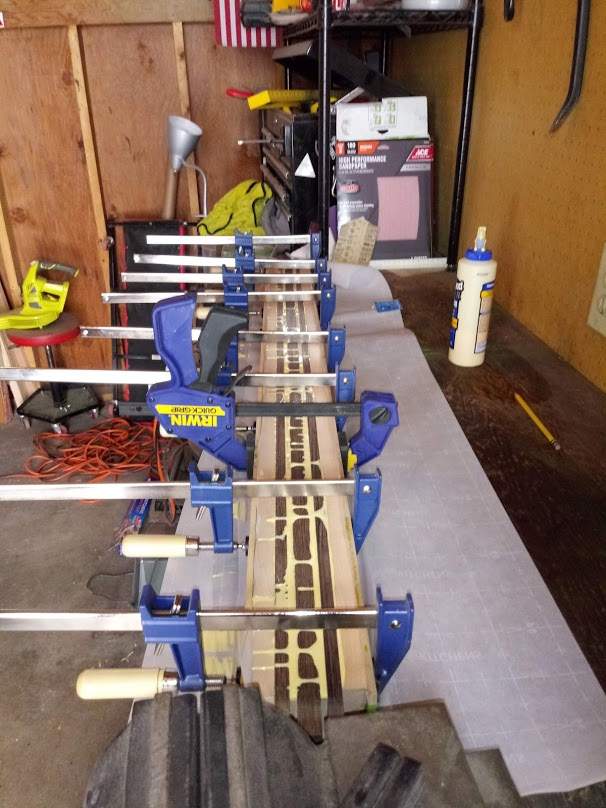
I actually made this wide blank back in March and it was sitting around, taunting me to make a bass out of it. Maple and wenge.
6_string_0.jpg


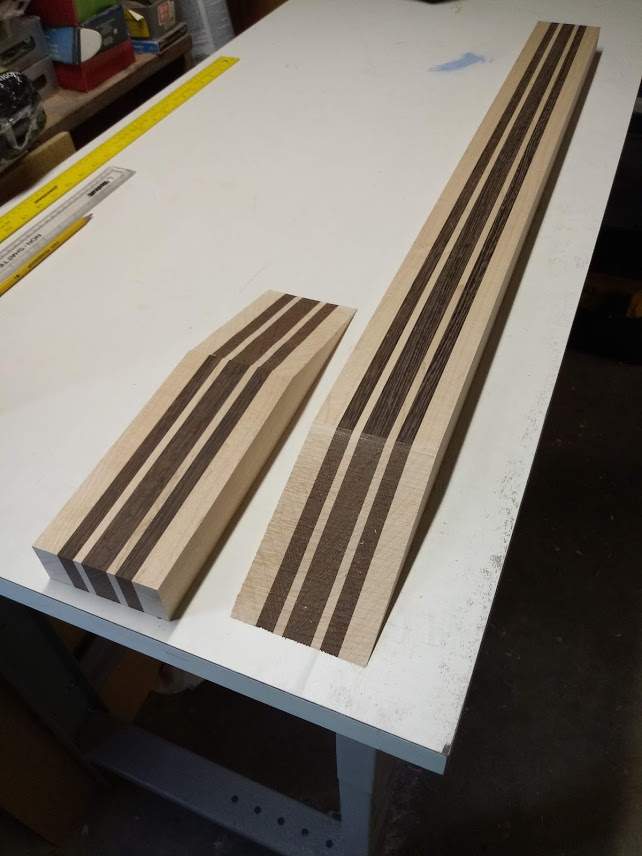
Going to try the scarf joint technique. It seems challenging but doable. Rough-cut with the band saw. Went for 12 degrees.
6_string_3.jpg


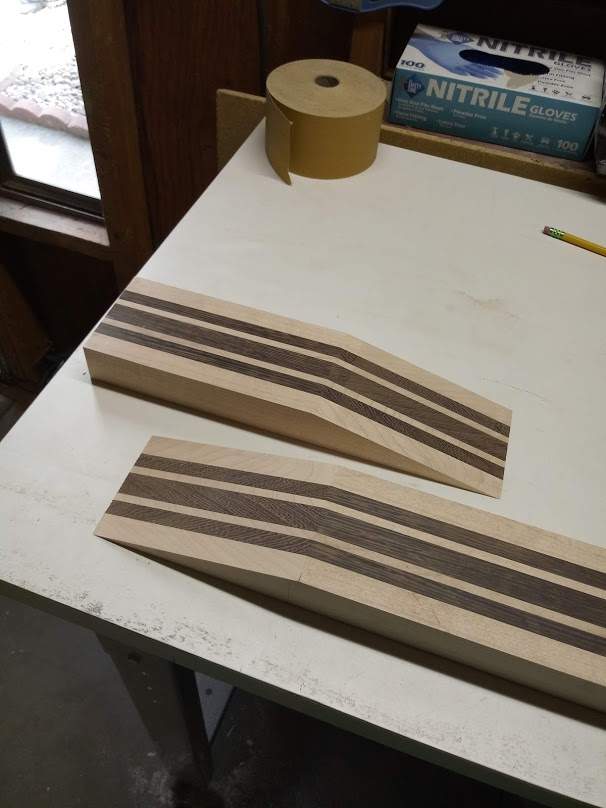
Smoothed out for mating. Used a hand plane and a sanding bar with 80, then 150 grit.
6_string_4.jpg


Scarf party. Hoping for the best, I'm not sure how well the wenge stringers are lining up. The 5-piece maple neck lined right up, though.
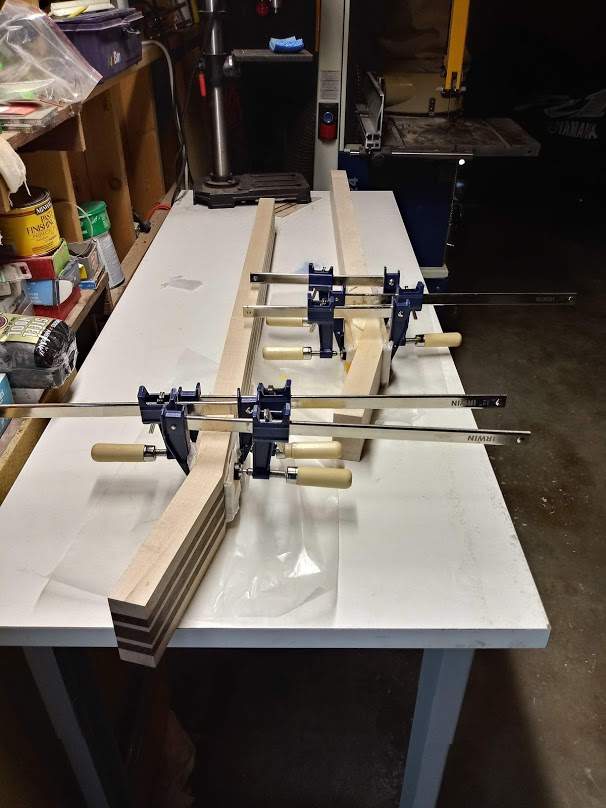
6_string_5.jpg


Seems workable. Not perfect, but no disasters
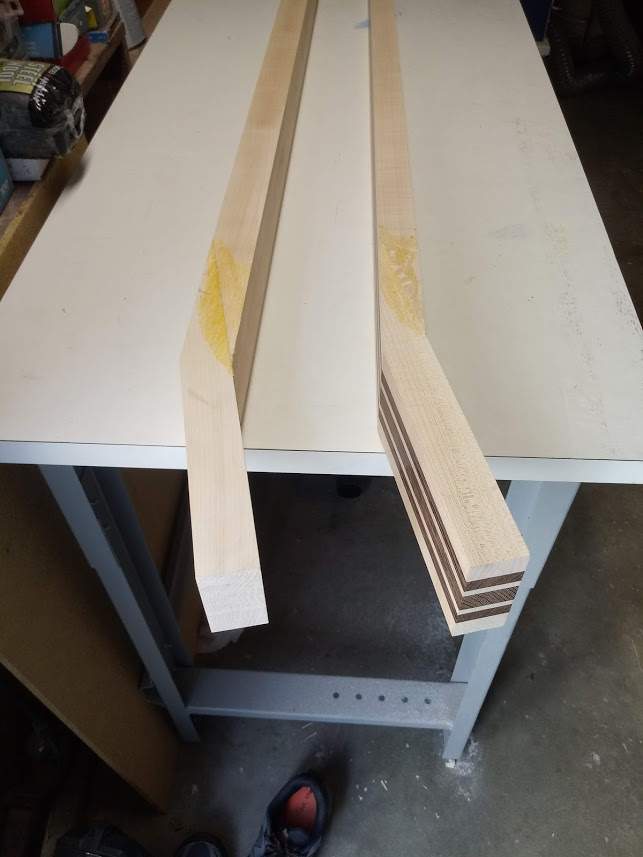
6_string_6.jpg


continued...
 
I got a 20% off deal at Woodcraft of Loveland, CO on African Mahogany. Rough-sized some body blanks for future use, including this build
6_string_7.jpg


Going to try carbon fiber reinforcement for the 6-string. Seems like it'll help.

6_string_8.jpg


Preparing an ebony fretboard. This is where I made a dumb mistake and marked out the 12th and 24th fret markers to the wrong width. You can see that I set it up for a 4 string, not a 6-string. :banghead:
Anyway, not a huge deal. I'm rolling with it.
I ordered some bass fretboard blanks from Gilmer wood and this piece of ebony showed up and was huge and wide. I immediately thought it would make a nice 6-string board, and that's where the seed was planted for this build.
6_string_9.jpg


On with the fretboard, lots of tools in this shot. My bass workshop has really started to come together this year. Let' s hope the skills come along as well.
6_string_10.jpg


Necks! The purpleheart 5-string died from an accumulation of mistakes until I decided not to continue. Lot of valuable lessons learned on that neck build.
6_string_11.jpg

Rough-shaped the neck. Added some ear material to the headstock.
6_string_12.jpg
 
Had a place in this fretboard glue-up that didn't get together so well. Over a few hot days in the garage, the split grew a little. I let it finish moving and decided it could be fixed.
6_string_13.jpg


I love this pic! I made it my phone background. Body will be mahogany base, wenge accent/tone layer, and a super figured maple top. I'm really hoping to do the top justice when I do the finish.
6_string_14.jpg


Gluing on a wenge backstrap. I like the way the backstrap worked on my first build, going to keep rolling that style.
6_string_15.jpg


Building the body wings. I've been using Titebond II since I started building and haven't seen any reason to use anything different yet.
6_string_16.jpg


Time to address the fretboard glue-up issue. Wicked #10 thin super glue into this fretboard joint and clamped 'er up tight. Came out well, no sign of the issue, the board seems mounted solidly all over.
6_string_17.jpg


Layout the pieces. One issue with my first build was the lower bout could interfere with the fretting hand during some extra-spirited fretting motions, so I needed to try to add a little clearance. I started here with a lot more than the original design and re-drew it a couple times, adding a little more to end up here. Should be better at least than the first time. Also moved the waist neckwards and added meat and roundness to the butt-end. Lessons learned from the first build, the proportions and waist location came out a little wonky on that one. This should be better.
6_string_18.jpg
 
Put a rough carve on the neck, volute, and heel. More work to do, but nicely roughed in.
6_string_19.jpg


Time to come clean. The mating on my scarf joint was poor, and it doesn't quite line up. I've spent a lot of time during this build thinking about what to do with it. Options have basically boiled down to:
1- live with it and learn to do better
2- fully obscure with opaque finish
6_string_20.jpg

I'm thinking mostly about option #2, obscure with finish. I don't want to hide that wenge neck, though. So, what I have in mind is to paint the back of the headstock and the upper part of the neck dark brown and fade into clear below the scarf. It'll look custom and cool, and intentional. I can't live with it as-is, I think I have to hide it :D

Side dots to match
6_string_21.jpg


Rough-cut the body wood. Laying it out, things are getting exciting, it looks bass-like
6_string_22.jpg


6_string_23.jpg


That's current for now. I'll post updates as it comes together.

Thanks for looking!
 
Have focused on another build over the last couple weeks, but I finally dragged this 6-string bass back onto the bench and made a little progress. Here's a couple new progress pics:

Prepared the fretboard and slots for fretting. Skipped the arbor press this time as well and just used a fretting hammer. I guess I feel like the arbor is overkill at this point.
6_string_24.jpg


Testing some ideas for the finish out, pre-stain, color stain and clear varathane on these samples. I was looking into a yellow-green fade, but I've started liking the idea of a basic moss green with this bass. Still could change my mind on shade, but I'm trying to work out the technique.
6_string_25.jpg


Back to the fretwork, taped 'er up, ready to work the ends, then level and crown the frets.
6_string_26.jpg


Not too bad for a first go. When I'm near the finish of this build, I'll probably re-tape the board and do a final touch-up and polish on these. It may not need it, they turned out pretty good - we'll see.
6_string_27.jpg


Pretty close to gluing up the wings and getting on to cavity routing. Looking forward to getting this one back under some momentum.
 
I took a break from messing with the finish on my other build and put in some work on the 6 string build.

Here's the body glue-up. I used small pins to keep the body wings aligned.
6_string_32.jpg


I made up a template for the pickups out of some MDF. White EMG pickups!
6_string_28.jpg


Routed the pickup holes and started in on shaping the body with the big files. I still need to fine-tune the corners of the pickup routs, but they did not turn out bad.
6_string_29.jpg


Carving away. Still got a little more to go on the forearm relief, but it's starting to take shape.

6_string_30.jpg


Also routed out the rear cavity and cover recess. Still have some shaping to do, but it's getting close to the end of the woodworking.
6_string_31.jpg


That's it for now, it's coming together!
 
I've made a little progress on this one, time for an update

I put an ebony veneer on the headstock. I bought it separately, but fortunately it's a great match to the fretboard. I like it when the fretboard and headstock are the same wood, it always looks cool to me.
six_1.jpg

six_2.jpg

I prepped the holes for the tuners. I spent more effort making sure the string throws are straighter than my last build. It's a detail that bothers me about that bass when I look at it, so I'm hoping to improve it here. Plus it matters a little more with a 6, they are close together and it will stand out if they are wonky.
Hipshot hardware this time.
six_3.jpg

six_4.jpg

On to final shaping and starting onto surface sanding. I decided that I wanted to cut the pickups routs a little deeper, so I dragged out the router and did that. Then I took some chisels and neatened up the corners as best I could. That figured maple top doesn't want to cut, it wants to kind of crumble into little bits, so it was hard to get a good corner cut. Turned out ok I guess.
six_5.jpg

Here's a preview of what I'm going to try to do with the top, some kind of moss green, and I'll leave the rest of the bass natural. White EMG soapbars.
six_6.jpg

Next up, holes for the pots and jack, then lots more sanding...
 
More work on this one

I sanded til the cows came home and prepared to color the top. I've been looking forward to this part, it might be the most fun step for me, finally adding the color after all that woodworking.
six_7.jpg


Here's what I came up with, an earthy yellow-green burst that I thought would look good with the chocolate browns of the wenge and ebony.
six_8.jpg


Black paint for the pickup routs. I'm not sure why I do this, there's no practical use for it, it just seems right.
six_9.jpg


I did a small 'fix' to the place where the scarf joint didn't line up the neck stringers very well. I just used a couple tiny touches of chocolate brown acrylic paint. Just enough that your eye connects the dots and it looks ok from 3 feet. Good enough for me at this stage, I was considering doing more but I'm happy with this minimal fix.
six_10.jpg

Another look at the dry stain. I like it!
six_11.jpg


Made the control cover as well. Might need some fine-tuning.
six_13.jpg


Also made a truss-rod cover. I may just make one out of white/black/white pickguard material instead to match the fretboard markers and the white pickups. I'll probably make both and see what I like better.
six_14.jpg


I need to do some final touches, like the nut slot, but it's pretty much time to do the finish.
 

Attachments

  • six_12.jpg
    six_12.jpg
    51.2 KB · Views: 70
Been blasting some Varathane when I get a chance. Never mind that this is a terrible space to spray, it's what I have to work with these days.

Here's the first base coat on, it's fun to see it wet and get an idea of how that figure is going to look
six_15.jpg

More coats, this is directly after spraying. You can see how wet and blue I've got it. This coat may have run a tad on the sides, but not too worried because after this coat I'll do a pretty heavy 400-grit level sand. I'm just trying to get plenty of product on at this stage.
six_16.jpg

I think this is the first coat going on after level sanding with 400.
six_17.jpg


I've still got a little ways to go, but it's going well so far I think. I've got a better feel about what to do with this finish now. Still learning each time, but I can start to picture what I want to do.
 
Well, this one is complete, and I'm playing it. I'm pretty happy with how it turned out overall, although there's a few mistakes I'd like to take back (isn't that how it goes?) :D
I took a few pics so I can close out the thread.

My third build, the green six string:
35" scale
BEADGC 6-string
16mm spacing at bridge
Hipshot Aluminum B-style bridge and Y-style ultralight tuners.
EMG 45DC pickups and an EMG BTC system
Ernie Ball extra long slinky roundwounds

Thanks for looking!

green 6-string - 3 of 6.jpg

green 6-string - 4 of 6.jpg

green 6-string - 6 of 6.jpg

green 6-string - 5 of 6.jpg

green 6-string - 2 of 6.jpg

IMG_6638.jpg

