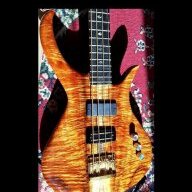
The bass I'm making is almost done, so now I'm starting on a guitar. I hope you guys don't mind that I post it here. This will be the first guitar I've made and the majority of what I now know about building instruments came from this forum.
Here's what I have so far for specs:
-6 string guitar
-Neck thru
-Wings will have walnut on top and bottom, ash and a stripe of Eastern red cedar in between
-Neck will be 5 pieces: maple, red cedar, walnut, red cedar, maple
-Neck through section will show on the front, but the back will have a tone block made of red cedar and maple (these will show on the heel contour area), covered by a walnut backing, so the back of the guitar will be solid walnut, unless I put thin veneers between the pieces since they won’t have the same figure/grain
-Scarf joint with a veneer in between that will probably be red cedar, maple, red cedar side by side
*Changing the layout of the veneers
-3x3 tuners, headstock shape will be the same as the bass
-String through body
-Gold hardware (tunematic roller bridge, ferrules, jack plate, frets)
-Cosmo black mini Gotoh tuners
-Possibly black mother of pearl dot inlays
*Changed to walnut dot inlays
*Only on 12 and 24
-Possibly three piece fretboard (maple, rosewood, maple)
*Changed to maple fretboard
*Changed again to Indian Rosewood
-Vertical wooden side markers made from walnut
*Changed to maple
-Probably EMG pickups (61-x and 85-x is what I'm thinking for now) with an ivory finish
-Knobs made from zebrawood
-Thinking about maybe chamfering the front
*Maybe archtop
-5/8” roundover on the back (front too if I don’t do the chamfering)
-All finished with Tru-Oil, satin finish with open grain look


I didn’t glue the back piece of walnut to the bottom wing yet because I’m going to route the control cavity first, then cut the cover shape out of that piece of walnut and make the cover out of it so it’s a continuous piece of wood that will slide off. Then I can glue the part that isn’t the cover to the back.


I'll update more once I get some work done on it.
I really like how the walnut looks, so I already can't wait to see it finished.
Any input, suggestions, "you're doing it wrong"s, etc are welcome.
-Lisa
Here's what I have so far for specs:
-6 string guitar
-Neck thru
-Wings will have walnut on top and bottom, ash and a stripe of Eastern red cedar in between
-Neck will be 5 pieces: maple, red cedar, walnut, red cedar, maple
-Neck through section will show on the front, but the back will have a tone block made of red cedar and maple (these will show on the heel contour area), covered by a walnut backing, so the back of the guitar will be solid walnut, unless I put thin veneers between the pieces since they won’t have the same figure/grain
-Scarf joint with a veneer in between that will probably be red cedar, maple, red cedar side by side
*Changing the layout of the veneers
-3x3 tuners, headstock shape will be the same as the bass
-String through body
-Gold hardware (tunematic roller bridge, ferrules, jack plate, frets)
-Cosmo black mini Gotoh tuners
-Possibly black mother of pearl dot inlays
*Changed to walnut dot inlays
*Only on 12 and 24
-Possibly three piece fretboard (maple, rosewood, maple)
*Changed to maple fretboard
*Changed again to Indian Rosewood
-Vertical wooden side markers made from walnut
*Changed to maple
-Probably EMG pickups (61-x and 85-x is what I'm thinking for now) with an ivory finish
-Knobs made from zebrawood
-Thinking about maybe chamfering the front
*Maybe archtop
-5/8” roundover on the back (front too if I don’t do the chamfering)
-All finished with Tru-Oil, satin finish with open grain look
I didn’t glue the back piece of walnut to the bottom wing yet because I’m going to route the control cavity first, then cut the cover shape out of that piece of walnut and make the cover out of it so it’s a continuous piece of wood that will slide off. Then I can glue the part that isn’t the cover to the back.
I'll update more once I get some work done on it.
I really like how the walnut looks, so I already can't wait to see it finished.
Any input, suggestions, "you're doing it wrong"s, etc are welcome.
-Lisa



 keep em coming..!!