
Im making a bass nut for my Ibanez Musician. This is a prototype. I am a machinist by trade. I drew it up in my CAD system MasterCAM and I will be cutting it out of Brass. I can cut it out of just about anything. Here is a screen shot of it on my system
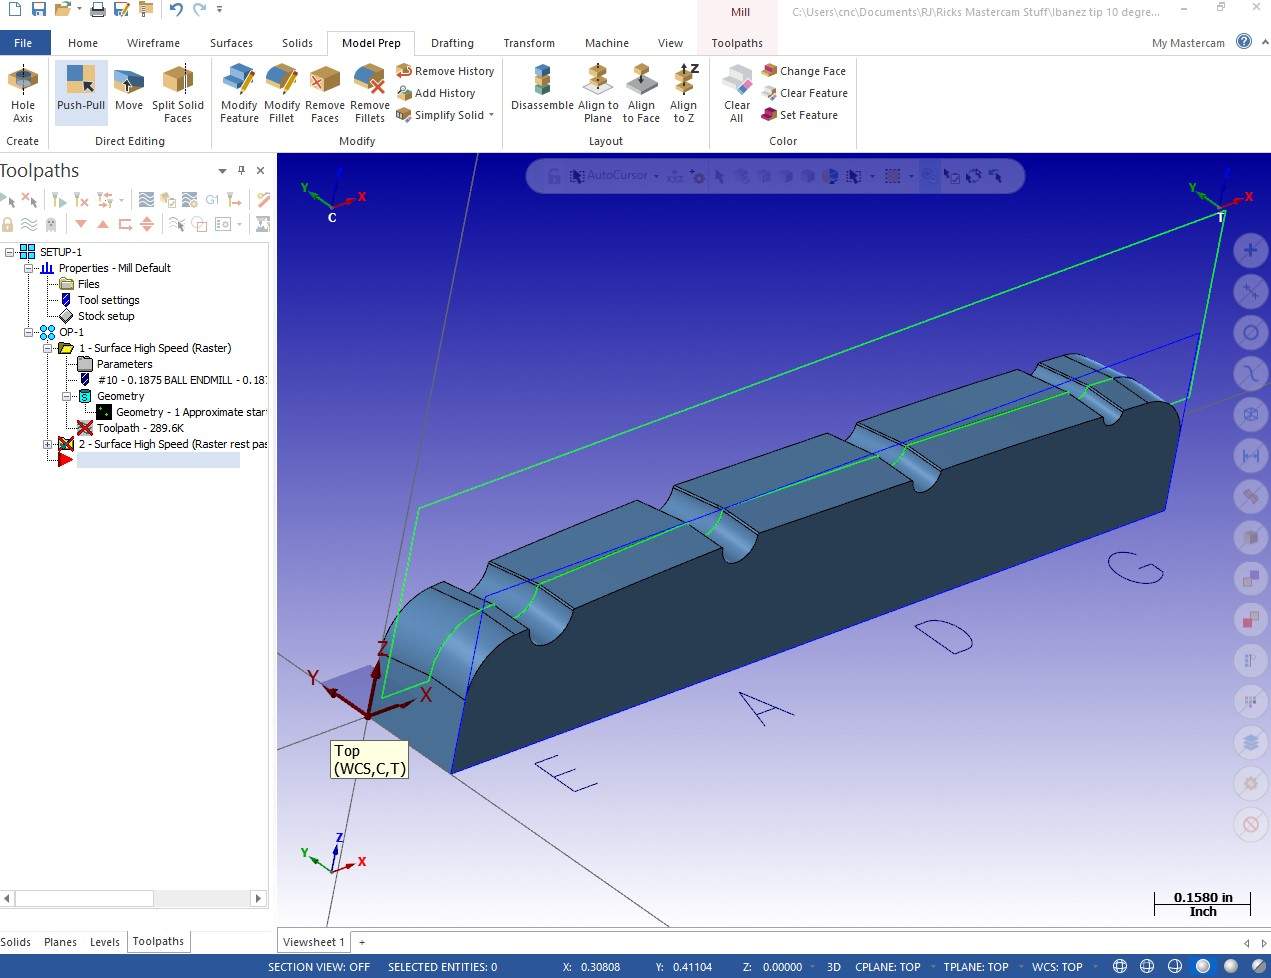 . Ill post more pics as I make it.

Enjoy the benefits of a premium membership!
Upgrade Account
-
TalkBass has been independent since 1998. Add your voice.
Create a free account to reply to discussions, view embedded media, and browse with fewer display ads.
Join free Log in
Want zero display ads or expanded classifieds tools? Compare plans.
You are using an out of date browser. It may not display this or other websites correctly.
You should upgrade or use an alternative browser.
You should upgrade or use an alternative browser.
More options
Who Replied?
Yes I did. here is a side view. I made it 10 degrees.Cool. Do you have the slots angled down towards the headstock a bit?
Bridge is to the LEFT in this view.
Last edited:

I will start off by saying I'm no luthier so I may be wrong about this. Hopefully someone with more experience will chime in.
I believe the angled slot should go all the way to the face of the nut. Otherwise, the string may not be seated very well at the leading edge of the nut (fretboard side) and may cause intonation issues.
On another note, have you thought about using stainless?
I believe the angled slot should go all the way to the face of the nut. Otherwise, the string may not be seated very well at the leading edge of the nut (fretboard side) and may cause intonation issues.
On another note, have you thought about using stainless?
I have some 304 Stainless right here. Yes I am going to make it out of that also. I think the angle will work good. I do believe you want a small area to be on the same plane or close to the fret boards plane. Also if it went just on an angle ( a ramp) that would leave a sharp edge, and that edge (closest to the bridge side) would get "filed/worn away" by the strings as that would be a point of wear at the very edge. Leaving a small flat would give the string a small platform to rest on and slide on while tuning up.
Last edited:
I have some 304 Stainless right here. Yes I am going to make it out of that also. I think the angle will work good. I do believe you want a small area to be on the same plane or close to the fret boards plane. Also if it went just on an angle ( a ramp) that would leave a sharp edge, and that edge (closest to the bridge side) would get "filed/worn away" by the strings as that would be a point of wear at the very edge. Leaving a small flat would give the string a small platform to rest on and slide on while tuning up.
Negative. You want the entire slot length to be angled towards the machine head posts. You're gonna have a helluva time with intonation and tuning, otherwise.
Riis
Yeah, full angle. That's how cut them with a nut file. Some say split the difference in the angle needed to go from front edge of nut to the tuner. Then round the back edge down a little bit to make a smooth entry/exit for the string on the back side of the nut.
Last edited:
I researched this and you are correct about a possible intonation problem. I also found in the same articles to never put the nut slots on a straight angle. It should be a constant curve. I can do that easily. They describe how creating a straight line ramp through the nut will saw it's way into the nut. Makes sense to me. Here is the article I read after I read your post. Nuts - how to cut the slots it goes into very good detail about what and what not to do with explanations. I'm going to make it that way. To be honest, that flat on the nut I drew up was .08"(2.03mm) in length. Almost to a point..... Almost. That nut is .200" (5.08mm) wide where the strings go through . We're talking some short distances here. The radius' on top of the string channels are .005 radii.Negative. You want the entire slot length to be angled towards the machine head posts. You're gonna have a helluva time with intonation and tuning, otherwise.
Riis
Last edited:

I'm curious how you plan to hold the part in the machine vise? A special pair of aluminum vise jaws? Machine it on top of a larger bar, then saw it off? That's one of the tricky parts of making a nut: how do you hold on to it while working on it?
I make up metal nuts for almost all of my basses, and for some other Luthier clients. Most of my own are aluminum, but I often make them from brass, and I've done a few in stainless. I usually make them so they attach down to the neck with a pair of 4-40 socket head cap screws, down from the top. That solves a lot of problems. I drill the two counterbored holes in the blank rectangular bar stock first. Then I use those two holes to screw the blank down to an aluminum holding block. That holding block clamps in the mill vise while I do any milling operations. I also clamp the holding block in the bench vise while hand shaping the outside with files. And I use the screws to mount the nut to a longer aluminum bar handle, to polish it on a buffing wheel. When the nut is finished, I fasten it securely to the bass neck with a pair of stainless 4-40 cap screws. The screws make the whole job so much easier.
My machine shop is old-school, but I have digital readouts on my mills. I usually draw up a custom metal nut in 2D AutoCad (LT 2000!), mostly to work out the exact spacing of the slots. I'll use the mill to locate the slots, often with just a small V-tip cutter. Not to the full depth, just to get the slots started. From there, I'll put the holding block in the bench vise and finish up the shape, depth and angle of the slots with standard Nut Files. Unscrewing the nut from the holding block a few times to check the depth of the slots on the actual instrument neck.
When the slots are all good, I put the nut on the longer handle block and shape the top contours by hand on a vertical belt sander. Smooth it all down with fine files, and polish it on the buffing wheels.
About the slot geometry:
In most cases, I cut the bottoms of the slots to 0.010" above the tops of the frets. That's a good nominal height for most basses. Going lower than that gets dangerous. If you plan to cut the slots completely with your mill, you need to get accurate measurements from the bottom of the nut shelf in the neck to the top of the frets on your Ibanez neck. I recommend that you mill the slots down close, but then get them right to the final depth with files, on the bass. Unfortunately, it's hard to repair the slots on a metal nut if you go too far.
Yes, the slots should be angled back, ideally at about 1 degree more than the break angle of the string. You want the string to kink slightly on the very front edge of the nut, and then almost rest fully down the length of the slot. That's the perfect geometry. In reality, most of us file a slight vertical curve in the slots, just to be sure we don't get an accidental buzz.
I make up metal nuts for almost all of my basses, and for some other Luthier clients. Most of my own are aluminum, but I often make them from brass, and I've done a few in stainless. I usually make them so they attach down to the neck with a pair of 4-40 socket head cap screws, down from the top. That solves a lot of problems. I drill the two counterbored holes in the blank rectangular bar stock first. Then I use those two holes to screw the blank down to an aluminum holding block. That holding block clamps in the mill vise while I do any milling operations. I also clamp the holding block in the bench vise while hand shaping the outside with files. And I use the screws to mount the nut to a longer aluminum bar handle, to polish it on a buffing wheel. When the nut is finished, I fasten it securely to the bass neck with a pair of stainless 4-40 cap screws. The screws make the whole job so much easier.
My machine shop is old-school, but I have digital readouts on my mills. I usually draw up a custom metal nut in 2D AutoCad (LT 2000!), mostly to work out the exact spacing of the slots. I'll use the mill to locate the slots, often with just a small V-tip cutter. Not to the full depth, just to get the slots started. From there, I'll put the holding block in the bench vise and finish up the shape, depth and angle of the slots with standard Nut Files. Unscrewing the nut from the holding block a few times to check the depth of the slots on the actual instrument neck.
When the slots are all good, I put the nut on the longer handle block and shape the top contours by hand on a vertical belt sander. Smooth it all down with fine files, and polish it on the buffing wheels.
About the slot geometry:
In most cases, I cut the bottoms of the slots to 0.010" above the tops of the frets. That's a good nominal height for most basses. Going lower than that gets dangerous. If you plan to cut the slots completely with your mill, you need to get accurate measurements from the bottom of the nut shelf in the neck to the top of the frets on your Ibanez neck. I recommend that you mill the slots down close, but then get them right to the final depth with files, on the bass. Unfortunately, it's hard to repair the slots on a metal nut if you go too far.
Yes, the slots should be angled back, ideally at about 1 degree more than the break angle of the string. You want the string to kink slightly on the very front edge of the nut, and then almost rest fully down the length of the slot. That's the perfect geometry. In reality, most of us file a slight vertical curve in the slots, just to be sure we don't get an accidental buzz.
Last edited:
I had to edit my post on dimensions of the nut. The flat was actual .08" in length and the entire width of the nut (the string channel length) is .200" (5.08 mm). I got confused talking about all the measurements going on in my head at the time. I'll post pics of my process making the nut. I am going to use a 3/4" (19mm) diameter brass bar. So I think I'm going to make two nuts out of one bar sitting bottom to bottom of each other. Ill post pics of my design. I am at work so I work on this when I get everything else running and have time.
I just put them in the vice up high "barely" holding onto them. 1) cut the overall finish dimensions into a rectangle. 2) put into a vice and cut the top contour on. 3) cut the channels in for the strings. The cutter will (waterfall) over the edge at the ends to put the radius on but I can control that depth so it wont hit the vice.I'm curious how you plan to hold the part in the machine vise? A special pair of aluminum vise jaws?

a long time ago i made a vise with stepped jaws and wedm'd corner relief for holding onto thin sheet metal. works well for this kind of thing.
i would certainly expect to fine tune the geometry with files after install. getting close with the mill is a fine plan -it's how i make mine.
i would certainly expect to fine tune the geometry with files after install. getting close with the mill is a fine plan -it's how i make mine.
OK I'm back and redesigned the Overkill bass nut. I am not cutting it yet I have been busy here at work and cant get on the machines yet. But I have been fiddling around and I think I have the best solution. I have made the string channels on a constant radius as recommended on the luthier website linked to above. There are no flats in the nut and there is no sharp edge at the front or rear of the nut for the strings to "saw" into the nut. The string will flow off the rear of the nut toward the machine heads due to the radius.... and the side going toward the bridge will transition to almost a point there but not quite because it is a slight radius. Here are some pics of the model.
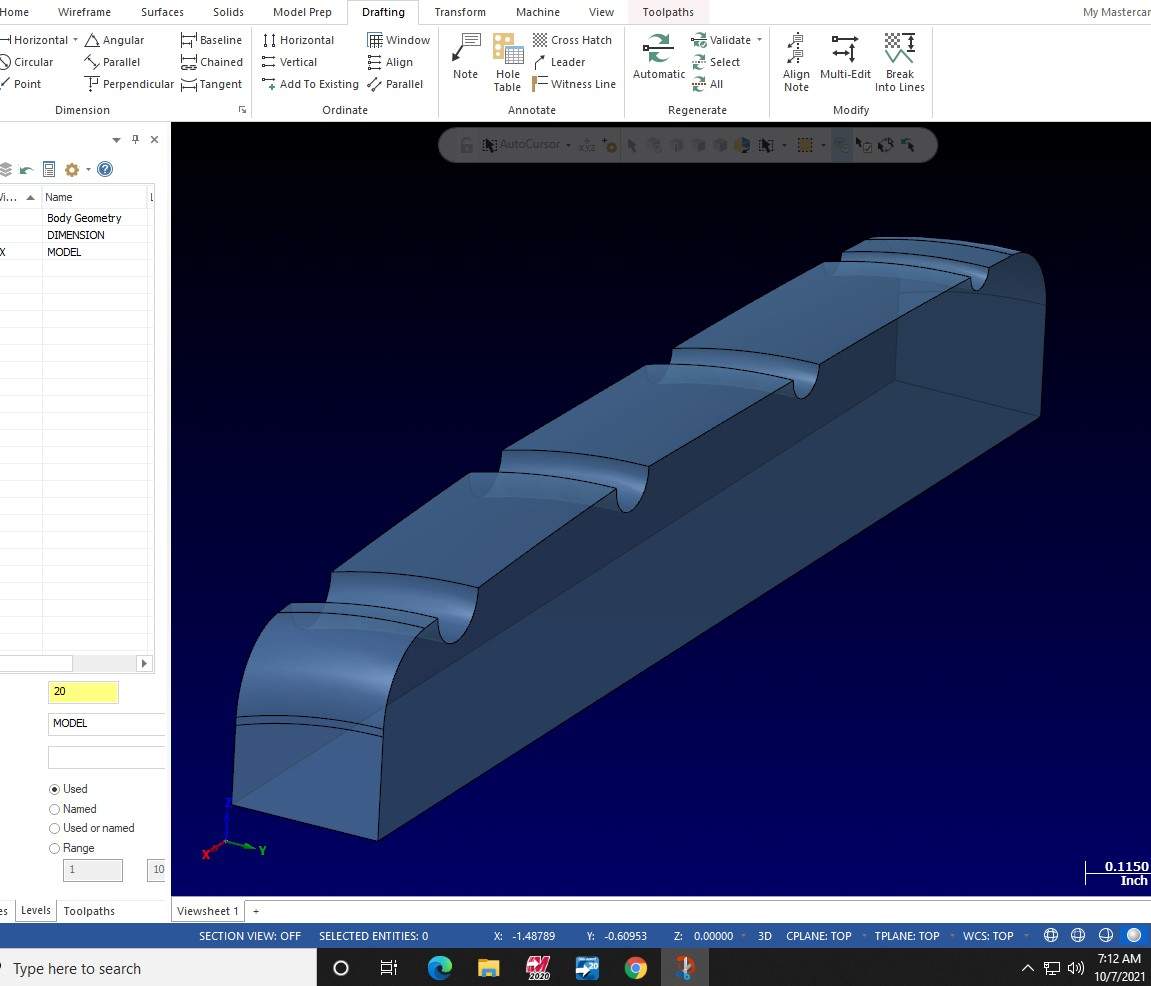 3d View
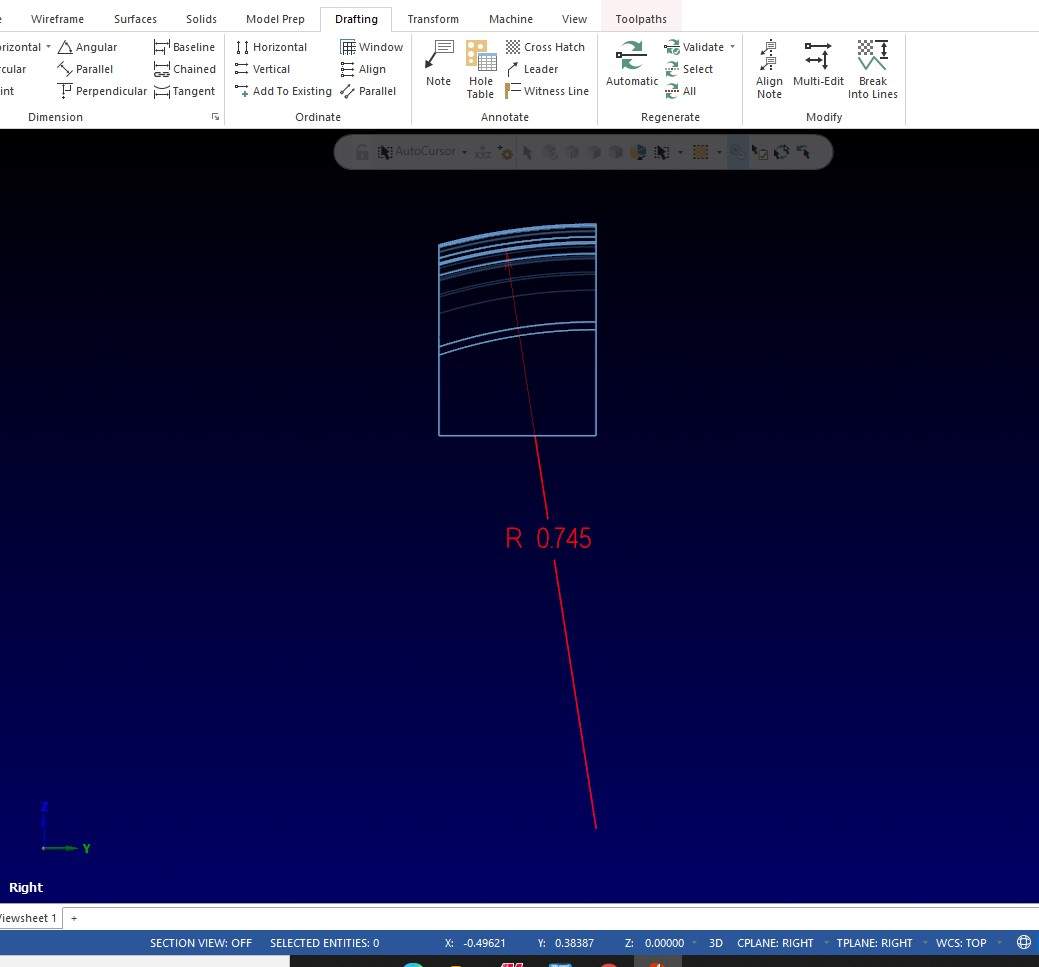 Side View showing radius dimension of the string channel
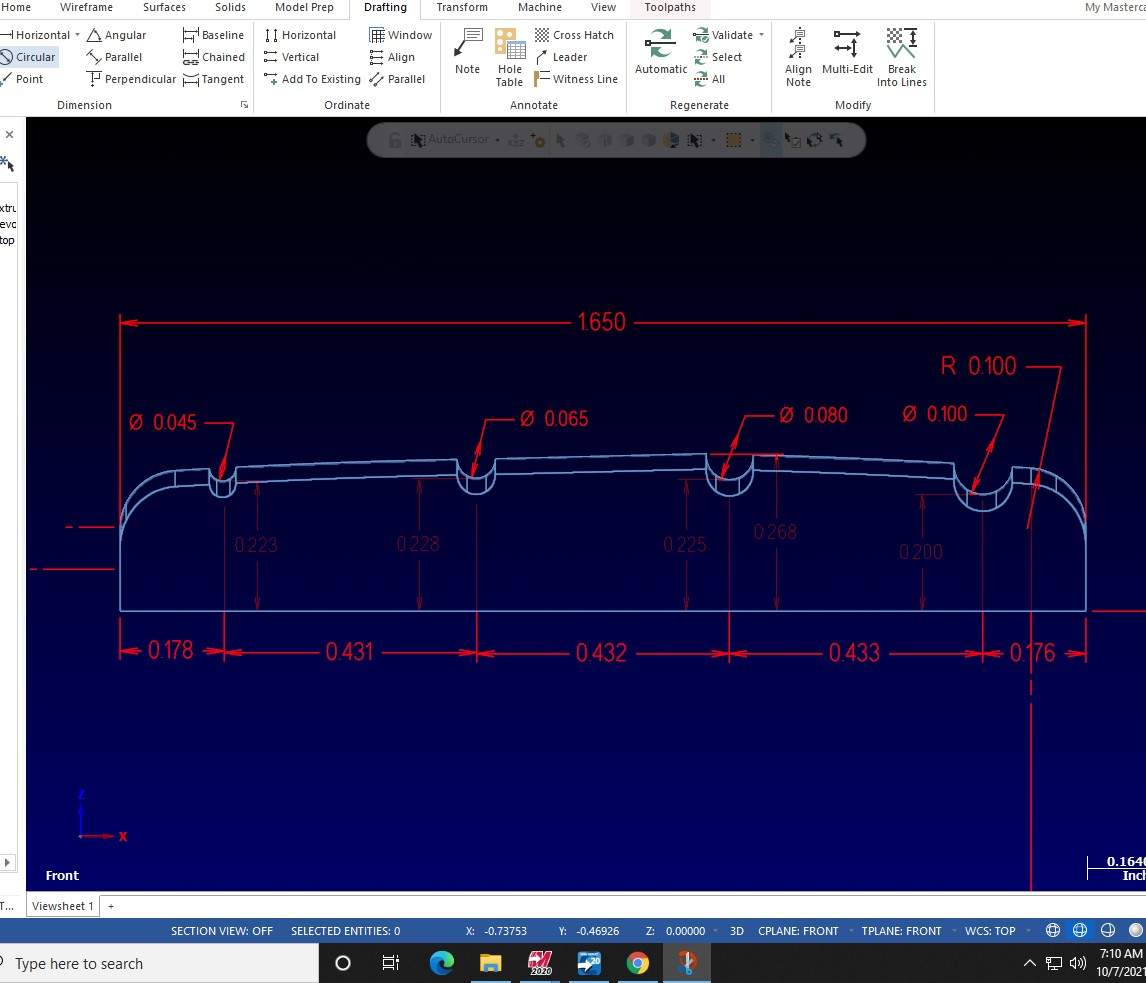 Front View dimensions for the nut
Last edited:
looks good in the pc, on the bass it will need small adjustments, polishing, etc.. i suggest leaving .005+ on the bottom to allow you to adjust the slot depth to the first fret. were it mine, i'd make the slots +.001/.002 wider. strings aren't always exactly to dimension and you don't want binding. then again polishing the slots may give you the clearance anyway.
what toolpaths are you going to use?
what toolpaths are you going to use?
Last edited:
I agree with Arie X; you've got the geometry right in the computer. That's what we Luthiers do in a few minutes with nut files. The critical thing is that the front edge of the curved slot is perpendicular to the front face of the nut. You've got that. Drawing it all out in detail in CAD, and precisely machining it in a CNC mill seems a lot of wasted time, but hey, it's some good educational fun with computers and mills.
Like Arie says, I recommend that you leave the slots a little high when you machine it. Then touch them up to the exact depth with files when it's on the bass. And yes, the slots should not be a tight fit on the strings. The string needs to be able to slide easily while tuning.
Like Arie says, I recommend that you leave the slots a little high when you machine it. Then touch them up to the exact depth with files when it's on the bass. And yes, the slots should not be a tight fit on the strings. The string needs to be able to slide easily while tuning.
looks good in the pc, on the bass it will need small adjustments, polishing, etc.. i suggest leaving .005+ on the bottom to allow you to adjust the slot depth to the first fret. were it mine, i'd make the slots +.001/.002 wider. strings aren't always exactly to dimension and you don't want binding. then again polishing the slots may give you the clearance anyway.
what toolpaths are you going to use?
Here are the tool paths I am using with some small terminology for anybody that sees this and want to know what I'm talking about...... look under each picture for a small explanation....
This is the first cutter path (in blue riding over the piece of brass (the nut) . The cutter is a ballnose (round end) and the size is .1875 (3/16 ballnose). This path leaves .015 of material on the nut for a following finish cut. The blue line the cutterpath weaves itself back and forth in a continuous line from start to finish. That is one line over the top of that nut and the yellow vertical lines are showing me the entry and exits of that cutter path. I put the cutter on there just for show.
Pretty cool stuff huh?
Attachments

were it mine (and i'm not telling you to do this but just offering suggestions  ) i would:
create patch surfaces across the slots for the top of nut profile. this will keep the tool from diving into the slots MC thinks it can fit into. or create one singular surface and put in on another level.
untick the "roll over all surfaces" box in your parameters. you have some tool dive on the top profile as well as the slot toolpaths. other alternative is to select the front and back surfaces as check and leave .0005 on them or untrim that surface and extend it 1/2 the tool diameter for a cut that is surface normal. roll over will likely produce an unwanted edge break on the fretboard side of the nut.
i would not bother to surface those tiny slots. minute movements like that tend to cause a machine to stutter trying to crunch all the code necessary for the splines generated by that toolpath and the small endmill. unless you are using a really nice machine with good control and good look ahead and/or nurbs optimization.
I would consider just a 3D contour toolpath with the appropriate endmill for each slot and offsetting this contour left and right a few thou to give the clearance needed. it's totally quicker and produces less code.
just my two cents
) i would:create patch surfaces across the slots for the top of nut profile. this will keep the tool from diving into the slots MC thinks it can fit into. or create one singular surface and put in on another level.
untick the "roll over all surfaces" box in your parameters. you have some tool dive on the top profile as well as the slot toolpaths. other alternative is to select the front and back surfaces as check and leave .0005 on them or untrim that surface and extend it 1/2 the tool diameter for a cut that is surface normal. roll over will likely produce an unwanted edge break on the fretboard side of the nut.
i would not bother to surface those tiny slots. minute movements like that tend to cause a machine to stutter trying to crunch all the code necessary for the splines generated by that toolpath and the small endmill. unless you are using a really nice machine with good control and good look ahead and/or nurbs optimization.
I would consider just a 3D contour toolpath with the appropriate endmill for each slot and offsetting this contour left and right a few thou to give the clearance needed. it's totally quicker and produces less code.
just my two cents
Last edited:
That is a solid model not a surface. I just sliced the geometry through the solid rectangle I created. Create solid rectangle> Create geometry in front view> Create Revolving solid (CUT) and that is it. 3 operations. I thought about patching the slots but did not feel it was necessary. The actual cuts will be on a model made from this one. That model I will pull the front and back walls out so there won't be no cutter dive anywhere and what little there is there will never be seen. Regarding the slots.... it will cut perfect for this application. I could have z leveled it through there I just took the quick way out and slapped a remachine on it to cut the extra. The machine I am running will not stutter at all in there. It is a highspeed machining center. The controller for the machine is a TNC530 Heidenhain. It never stutters due to data starvation... that's impossible or so I like to think. I did tag the thread as Bass Nut Overkill and it is for a simple nut. I'm not a luthier and do not think this is a faster, better way to create a nut. This was just for fun and to share how i created one on a CNC.
Last edited:
I have a couple choices of what machine. In my Immediate area I have a a Zimmerman FZ30 and a HaasVF3. If my manager seen this on the FZ30 he'd kill me. That would be pretty funny actually. It is a decent size 5 axis bridge mill. We have MORIs in the back also. All are well kept nice machines.
I have a couple choices of what machine. In my Immediate area I have a a Zimmerman FZ30 and a HaasVF3. If my manager seen this on the FZ30 he'd kill me. That would be pretty funny actually. It is a decent size 5 axis bridge mill. We have MORIs in the back also. All are well kept nice machines.
Yeah, I'm sure the boss would be upset seeing you using the FZ30 to make up your own little part! That would be funny to see. The FZ30 is supposed to be used to earn him many $100's per hour. Just to make its own payments!
Latest posts
-

-

-
-
 TC Electronic Spark Booster. Underrated champion of low-gain overdrives
- Latest: John D Harris
-
