• TalkBass has been independent since 1998. Add your voice.
    Create a free account to reply to discussions, view embedded media, and browse with fewer display ads.
    Join freeLog in
    Want zero display ads or expanded classifieds tools? Compare plans.

Drake Custom semi-hollow bass. Koa, Roasted Maple, Rosted Swamp Ash, Richlite, Ebony, 4 string

Drake Custom

Commercial User
Aug 24, 2010
440
1,082
Iowa
www.drakecustombass.com
Disclosures
Builder/Owner:Drake Custom Bass Guitars
Hello all. It has been quite a long time since I have posted a build on TB. I have had calls asking if I am still about, and yes I am very much so. I have been very occupied building custom builds and doing repairs and mods. I have not had much time to do posts or read many for that matter.
I recently have decided to move out of the custom one-off builds for a time, and will focus on my own designs. I will still occasionally do a custom one-off for someone if the design is good and I feel I can do it in an efficient time frame. I can write a book about the issues with doing all one-off customs. So for Jazz bass orders, customers will have to go to the many other builders who do those.
I also have decided to produce instruments in batches of 5 and 6 of the same models, in order to have sales stock. I have not really done this before. It was always batches of 3 or 4 totally different designs, at the same time. This took a lot longer and the profits were not great. In the end, everything was paid for, bills and such, but the savings accounts were not moving either way. In order to make forward progress as a builder (ie...make a living and a profit even) I decided to try a production style of building. More time efficient and profitable so far. It has been an enjoyable experience so far.
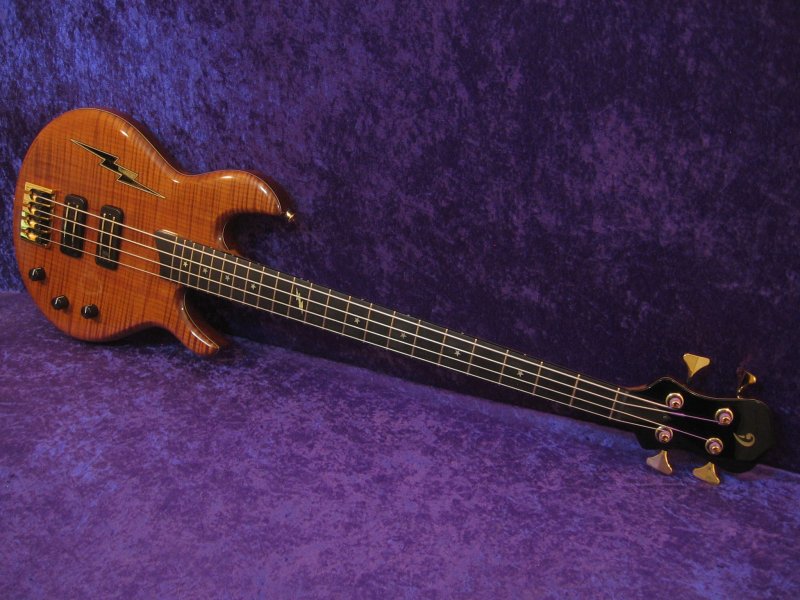
Queenie-9.jpg

This is an example of what I will be building in the batch I will show in this post. This is my Model 10 or Hornet design. The one pictured is shown with some custom upgrades. The Model 10 essentially is a semi-hollow bass that weighs in around 6.8-7.9 pounds, and can be made in 32,33,and 34 inch scales. I have three levels that I use to grade the variants. There is a Basic model, a Deluxe model, and a Custom model. In the batch I will show here, there are examples of each. I will try to remember to point them out as I go.

Right then, the first step is making up the blanks I will use for the construction.
Drake-M10-production-3.jpg

I start with nice planks of Tempered (Roasted) Swamp Ash for the Deluxe models, and Tempered Basswood for Basic models. I trim each side to make it at least 3s and run them through a sander to clean the faces up so I can match grain.
Drake-M10-production-1.jpg

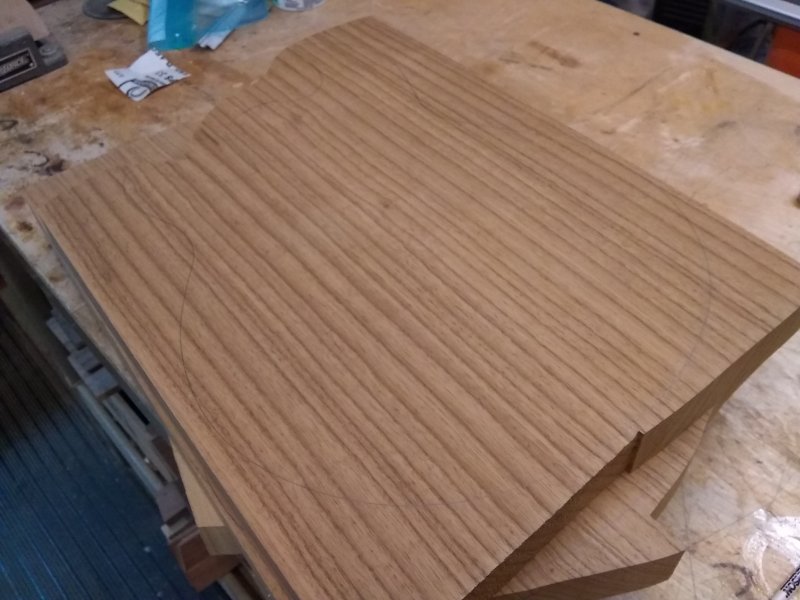
Then I use my template to find areas where the grain will match up without disturbing the grain pattern. You can see why I like straight grained pieces of Ash for this. Makes it so much easier. I get the planks long enough to cut and join the two halves together to make a blank for the body.
Drake-M10-production-5.jpg

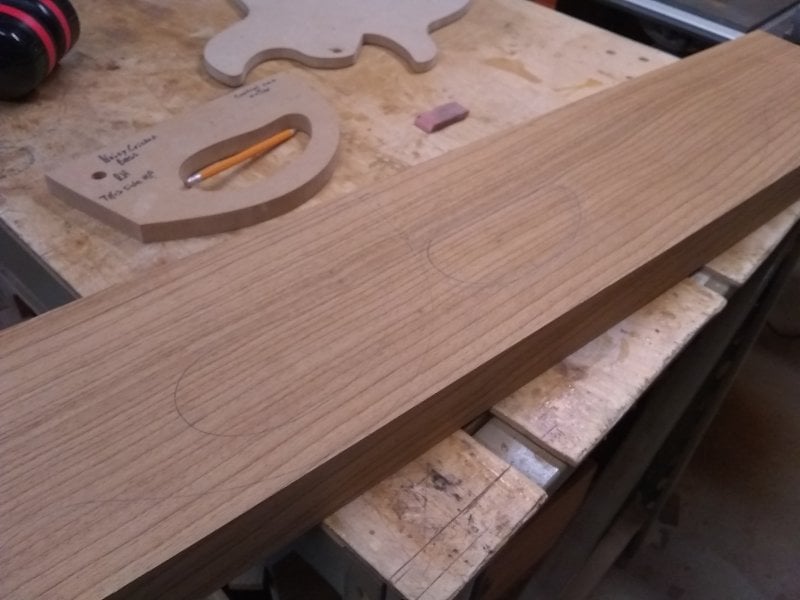
I look at the grain that will show on the back. My designs receive a top wood of some sort, and so the important view of the grain will be on the backside. Another benefit to using straight grain, is that I can mark out the location of the electronics cavity, and find a scrap section that I can match grain to make the covers. Hard to see here, but I have penciled out the cover location and matching piece to make the cover.
Drake-M10-production-6.jpg

Here I have cut the two halves out and laid them together to match the grain and hide the glue line. I hate glue lines.
Drake-M10-production-9.jpg

Once I have the halves sorted out, I join the edges and glue them up. My floor, at the end of the day, is covered by glue up sets.
Drake-M10-production-14.jpg

After gluing and sanding.
Drake-M10-production-15.jpg

And before I lose them, I rough out the cavity cover plates. Nice match on this one. They are not all so perfect, but with some time and planning, I can usually make the grains look good together.
Drake-M10-production-17.jpg

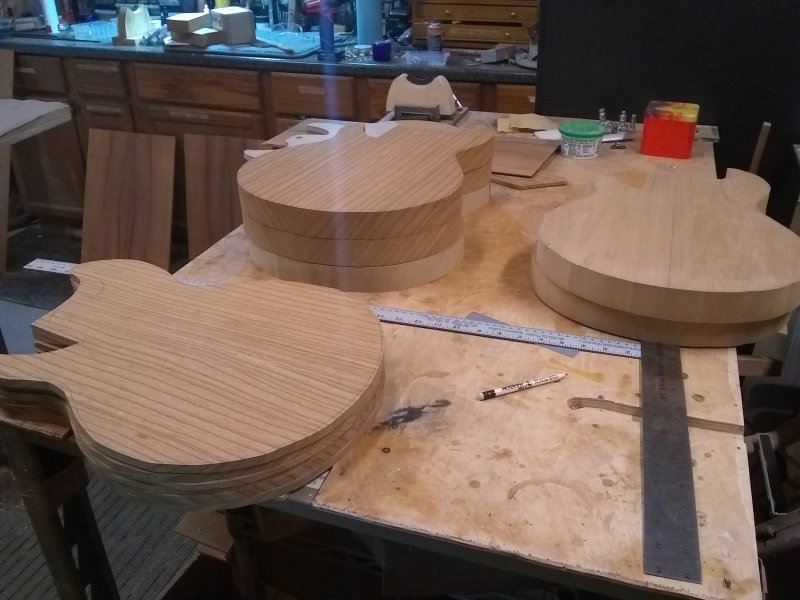
After the blanks are glued up and sanded, I rough cut out the shapes of the body. You will notice some of the Swamp Ash bodies and some of the Basswood bodies stacked here. Up front, you will see a stack of cut offs. I have access to a large resaw machine here locally, so I opt to glue up blanks and then slice the blanks to thickness rather than planing the excess off. This leaves me with "tops" of Swamp Ash of Basswood. I glue those "tops" up and put them back into the build rotation. These will be made as painted solid color finished bodies. The wood is expensive to buy so I hate wasting any of it.
Drake-M10-production-22.jpg

The next step the bodies go through, is the lamination process. I get nice dyed slices of Italian Poplar and laminate this to the face of the body blanks. My Basic models get two solid black slices layered on, and my Deluxe models get a black/natural Maple/ black layering.
Drake-M10-production-20.jpg

I use this press to laminate the slices onto the face of the body. I press down the center bit onto a sheet of plexiglass cut to the rough shape of the model I am making, and seal around the edges with clamps. There usually is not any ripples in the lamination, but when there are, they are in areas that get routed away, so no worries.
Drake-M10-production-25.jpg

One Basic model body laminated.
Drake-M10-production-24.jpg

A side view of the lamination after trimming. This is a Deluxe model body blank.
Drake-M10-production-28.jpg

The last step in making the body blanks is marking the ares to be bulked out. I have a template that I have made to mark the markings. I will put these aside and make the neck blanks in the next post.
Thanks for taking the time to view and read my posting.
 
Last edited:
Thanks guys.

Neck blanks.
Drake-M10-production-B-1.jpg

I start most of my necks with a 4/4 stick of Tempered (roasted) quarter sawn Maple. I trim it to about 3 inches wide (4 string bass) and put the excess to the side. I can usually glue up a 3 piece neck out of the remains of two necks. So a bonus neck for every two blanks purchased. Once the stock is cut to just a bit proud of 3 inches....
Drake-M10-production-B-2.jpg

....they are ran over the jointer on both sides to make everything square. They are now bang on 3 inches wide. I also true up the faces on both sides. My goal is a blank that is 7/8 inch thick.
Drake-M10-production-B-7.jpg

Then I use a modified angle sled, set to my angle, to cut the peg head bits. I mark 8 inches from the end and draw the line. I always have enough material on both ends of the blank. This becomes important later.
Drake-M10-production-B-9.jpg

The pegheads are ready to be sanded flat, flipped over, and glued back on to form the back angle to the neck.
Drake-M10-production-B-11.jpg

Pegheads glued on.
Drake-M10-production-D-2.jpg

Now I cut off the excess peg head girth on the front side.
Drake-M10-production-D-3.jpg

And clean up the faces with either my hand plane or jointer. Sometimes both.
Drake-M10-production-D-4.jpg

I now have a prepared blank to make a neck out of. Next step is to do the layout and truss rod/carbon fiber routes.
Drake-M10-production-E-2.jpg

I double check that I have a nice straight edge on the bass side of each blank. If I do not, I address that bit first. Then I mount the blank onto my jig and clamp in place. I use a router with an edge guide to route the channels. Since all of the neck blanks are the same, I set up the router and can do each one without adjusting any settings. To check the centering, I had installed a pointed bit into the router and made sure it was set so that the point aligned with the center line on each blank. They all matched and we are off to the races. So I install my 1/4 inch bit (6.35mm) and route the first part of the truss channel.
Drake-M10-production-E-4.jpg

I did the 3/8 inch rounded area for the truss rod adjuster, before I switched bits and set up to route the carbon fiber channels. I do one side of the blanks before switching settings and doing the other side of each blank.
Drake-M10-production-E-6.jpg

Here you can see the truss rod adjuster channel that opens up to the 3/8 inch wide. I now have all of the necks prepared for the next step, which I will share next time. Thanks for checking in.
 
The pegheads are ready to be sanded flat, flipped over, and glued back on to form the back angle to the neck.

Do you pin the pegheads on or do anything else to ensure alignment? I've tried clamping like you have in that photo and I find it really hard to keep the peghead from squirming out of position because of the angled joint. I've ended up clamping them right to the same table saw sled I use to cut the angle. But it looks like you're doing OK just clamping them?
 
Dwizum, yes, I use toothpicks drilled into the waste area of the peghead to ensure that they do not move out of alignment. I also apply the glue and let it stand for a few minutes before I place the peghead bit and apply pressure. Seems that the glue gets just enough tack to it, to keep the peghead from slithering around too much. The toothpicks only can do some much as they are not always perfectly round. Since I attach ears on the pegheads later, any slop is easily fixed then.
 
Got a little time today, so I will get on with it.
Drake-M10-production-E-7.jpg

Once the glue is dry, I layout the taper of the peghead. No I am not making a Metal bass with a pointy peghead, just preparing the peghead for the next step. I band saw the taper and then put the edges to the jointer for a smooth gluing surface. Hand planes can work but time is a big factor.
Drake-M10-production-F-1.jpg

One of Rosie's jobs to to help select and match "ear" sets to the wood of the necks. These are made from neck cut offs and each pair is matched together. If we can't match the wood grains and color to the neck core, we use those sets on the Deluxe models with the black accent lines. If I can't hide or blend something, I make it look intentional and dress it up. I use black veneer as accent lines between the ears and the peghead core on the Deluxe models.
Jeff-Cricket-Bass-015.jpg

Like this. You can sort of make out the accent lines. I always laminate both front and rear of the peghead to hide glue lines, so the accents look nice in the end and are only seen from the sides.
Drake-M10-production-F-4.jpg

Here the ears are glued on and you can see that we keep them from slithering off by drilling and sliding a dowel through the tip of the peghead. One reason why I leave the tip on the necks until later.
Drake-M10-production-F-6.jpg

Now I remove the dowels to use next time, and take each one to the vice to true up the peghead face.
Drake-M10-production-G-1.jpg

I use the hand plane to take down any high spots before taking the peghead to the jointer to put a smooth face on it. It is important that I get the face as square as I can so the geometry is not off where the nut will be.
Drake-M10-production-G-2.jpg

You will notice that the area where the nut will be, has a nice crisp line perpendicular to the center line of the neck. This is important. If it is slanted, I have to work the peghead until it looks right. When I plane off the reverse side, I want the peghead square to the rest of the neck. Here you can see the black accent lines of a Deluxe model.
Drake-M10-production-G-4.jpg

Then I rough trim the pegheads leaving the pointed end in tact. I do not try to bring the perimeter to the final shape yet, as the Safety Planer will often chip out the sides especially and pointed parts.
Drake-M10-production-G-7.jpg

The reverse side of the peghead. I should have pointed out that the ears were trimmed to match the shape of the scarf joint before gluing. The peghead widens as it gets toward where the volute will be. We place the ears next to the peghead and pencil the profile along the ears so we can rough trim them to shape. Less work later.
Drake-M10-production-G-8.jpg

The Safety Planer doing it's bit. I bring the pegheads down to a specific thickness that leaves some room for sanding. Again, the pointy bit on the end makes a nice handle. The Safety Planer is billed as leaving smooth surfaces on the work piece, but I have yet to see that. There is always finish sanding to remove burns and marks. So I leave plenty of thickness to allow for sanding.
Drake-M10-production-G-9.jpg

And soon after, I can cut the point off.
Drake-M10-production-G-10.jpg

Here is a good view of the peghead from the side. You can see how the peghead thickens as it gets toward the volute area. That part gets shaped later on just before I glue the rear veneer on.

All I have time for today. If anyone has questions of where I source materials or the tools, let me know. I am trying to stay within the rules and am not paid to advertise for any particular company. I have found several vendors that provide good stable materials and some that are not reliable. I do not mind sharing this info.

Thanks again for viewing my posts.
 
Andrew,
Always an automatic sub from me. You're a really good teacher! And open source approach to commercial building, without trade secrets. Much appreciated.

I just want to ask about the length of the carbon rod slots, why they look so short? Is it just for ski jump prevention? Neck stiffness in the roasted maple is good enough not to need them near the nut?

Never seen this detail before...
 
  • Like
Reactions: Means2nEnd
JayGunn, I use 10-12 inch long pieces (depending on the instrument scale) as I have found that to be enough to keep the neck to body transition stable. I used to use long pieces that ran the whole length of the fret board, but there was no real benefit to it. It costs more and I did not notice any more rigidity than without. The carbon fiber reaches out from just inside the end of the heel, to about 2 inches passed the 12th fret. They are light in weight, but really keep that part of the neck rigid. The truss rods I use are very durable and seem to always have enough strength to stand up to the string tension. Since the wood is tempered (roasted) it is stabilized and I have yet to have one warp. I use only Tempered Maple for necks, and only quarter sawn wood at that.

MPU, I have had to re-neck a few Warwick necks. The short steel bars they use only cover from about the 10th fret to the 17th fret. For some reason they do not run the bars all of the way into the body joint. Not sure if the bars had anything to do with the neck failures. Here are some piccys of a Warwick that I re-necked. I use Tempered Maple for the neck and Dark (double roasted) Maple for the fret board. I re-use the hardware from the original necks but I do not put a W on the peghead nor do I put my logo on. I ran the carbon fiber from 10th fret to the heel end of the new neck. I was able to carve the neck much thinner than the original and a year later, it is still set up as nice as when it left my shop.
Warwick-project-3.jpg

Warwick-project-7.jpg

Warwick-project-9.jpg
 
Thanks Means.
Sorry I have flaked out on this posting as I have been trying to get caught up on repairs for players that need stuff done for Holiday shows. I can catch up some today.

Where was I? Look like we were covering neck construction.
Drake-M10-production-G-12.jpg

Carbon fiber cut to be installed. I spoke of this last time. I use sections 9-10 inches in length. I have found that I do not need to install carbon fiber the whole length. I use great truss rods and high quality QS neck wood for my necks, so I just want to make the neck to body joint strong and as rigid as possible. The carbon fiber reaches to within a half inch of the heel end. in the photos, I have not trimmed the necks to length yet. About 4.5 inches will come off.
Drake-M10-production-G-13.jpg

Since the router leaves a nice rounded end in the channel, I round the ends of the carbon fiber to create a nice fit.
Drake-M10-production-G-15.jpg

I then tape off over the carbon fiber bits, and use a razor to open up the tape to expose the carbon fiber. Now I can mix up some epoxy.
Drake-M10-production-G-16.jpg

And soak it in.
Drake-M10-production-G-17.jpg

I pull tape soon after and clean any wayward epoxy seepage.
M10-Hornet-production-H-1.jpg

While the epoxy cooks off, I cut plugs and install the truss rods.
M10-Hornet-production-I-1.jpg

The underside of the plugs gets shaped with a rounded razor file. These files have really helped in my shop. Get some if you don't already have them. Saves so much time.
M10-Hornet-production-I-2.jpg

Here is some detail. You can see the shape under the plug.
M10-Hornet-production-I-3.jpg

I tack the plug in place with CA glue (tiny amount) and trim with a sharp chisel.
M10-Hornet-production-H-3.jpg

Time for glue up. I prep the neck and fret board, align it, and glue it on. This takes a couple days to do a batch as I can only do 2 in one sitting.
M10-Hornet-production-I-5.jpg

Here, out of the clamps and trimmed within 1/8 inch of final perimeter.
Drake-M10-production-J-4.jpg

I have been using these MDF templates to shape my basic neck tapers. I have them slightly over sized so I can use a long hard sanding block to bring them to a precise spec.
Drake-M10-production-J-5.jpg

Drake-M10-production-J-8-.jpg

I measure and mark a line 3/4 inch from the bottom side of the FB, and use the table saw to bring the heel thickness in.
Drake-M10-production-J-7.jpg

then I use a drop on template to trim under the fret board and form a heel.
I will be back later today to show the peghead lamination process. In real time today, I am working on bodies. So I will have some more updates over the holiday.

Thanks for checking in.
 
OK, back for peghead lamination.
Drake-M10-production-J-6.jpg

I start with all of the necks to the point where the peghead is to a standard thickness and the design is penciled onto the face of the peghead.
Drake-M10-production-J-11-.jpg

I do layers on the Deluxe and Custom models and just a black Richlite on Basic models. Here you can see (top to bottom) Ebony, Maple veneer, black dyed Italian Poplar, over the tempered Maple. The pieces are just on with glue at the moment.
Drake-M10-production-J-12-.jpg

I use a piece of plexi as a caul and a lot of clamps to get a nice tight glue up.
Drake-M10-production-L-7.jpg

For the Richlite peghead veneer on the Basic models, I don't need the plexi. I use it on real woods that may warp with the water in the glue. Gluing Richlite with water based wood glue has not been a problem. I do run the surface of the Richlite through a sander to leave a coarse surface for better mechanical bonding.
Drake-M10-production-L-1.jpg

Glue is dry and the peghead is ready to be trimmed again. The edges seem to be open, but are closed up very tight over the Maple peghead.
Drake-M10-production-L-2.jpg


Drake-M10-production-L-3.jpg

A Koa peghead veneer on a Custom order.
Drake-M10-production-L-4.jpg

I use this file to create the 3/16" nut slot.
Drake-M10-production-L-6.jpg

After cutting the nut slot (not to final depth, just so that I have marked it), I sand the face of the peghead back to a desired thickness. Veneer cap and purfling lines must be under 1/8" on my pegheads. I have a rear peghead veneer made out of the QS Tempered Maple, that must be glued on the back later, so I have to keep in mind my tuner specs for thickness.
Drake-M10-production-L-8.jpg

A Deluxe and a Custom ready for the next step.
Drake-M10-production-L-12.jpg

I found this picture showing the sides of the pegheads. You may notice the purfling lines on the higher end model necks. The Basics still need to be trimmed out some yet.

Might have more later this week. I decided to work through the holiday, so there will be some updates. Merry Christmas!
 
First off, I am real a very patient man, but does any body know how long you can work on a post before it times out and closes? Twice today I have lost 30 minutes of work on a post due to a time out issue. I type it all up, and go to post it, but I have re-log on and I find most of my post gone.


Anyway......Back for some more on the neck construction and will crack on with some body work.
Drake-M10-production-L-14.jpg

Here the neck are ready for some side dots and some more radius work.
I found that I was moving too quick on a good rhythm in the shop, and failed to snap any piccys of that process. It is nothing Earth shattering, I just use a hand plane to round the edges and transfer over to a radius sanding block about 10 inches long. I get the radius to be as even as I can over the full length, then move on to inlays, as I will have to take more off after that. I still tape (two sided carpet tape) the neck down to the surface of my table saw, as that is the one true flat surface in the shop, and it is at the correct height to work on.
Drake-M10-production-M-3.jpg

These are neck for the Basic model M10. They get a Richlite fret board with both luminlay sides dots and sim MOP on the face. I use a typical brad tip bit to cut the face dots, and CA glue to install the dots.
Drake-M10-production-M-4.jpg

I use a razor file to bring the sim MOP down to flush. It cuts easily through the acrylic. I then use a radius block to true up the fret board.
Drake-M10-production-N-001.jpg

So the necks are ready for the next step. I a going to put them aside while I catch up on the body work. Also to avoid losing this bit, I am going to post now and continue right after.
 
Ok, while I once again layout the internal cavities on the bodies.....
Drake-M10-production-N-006.jpg

......Rosie picks out some tops to use.
Drake-M10-production-N-003.jpg

She selected the Koa for the first one as it is a purchased custom order requiring that. The others are just whatever tops tempt us the most. I have several batches worth of tops made up and stored for production work.
Drake-M10-production-O-1.jpg

On custom orders and Deluxe models, we use magnetic cavity covers which require a wood cover that matches the grain of the back, and different cavity recess design. I have to route those in first. I place the covers that you saw earlier, over the area that is going to be the cavity access point. I carefully trace around the cover, assuring the grain match.
Drake-M10-production-O-3.jpg

Then I align the internal cavity template to the penciled cover shape, and route about 3/4 of an inch down into the body. Basic models get a different type of cover so I do those later.
Drake-M10-production-O-11.jpg

Here, Rosie is bulking out the excess wood with a forstner bit.
Drake-M10-production-O-6.jpg

Then I set to it with this bit loaded into my router. It is a 5/8 dia. pattern bit. Carbide none the less.
Drake-M10-production-O-12.jpg

A drop on template gives the bearing a shape to follow. I clean everything down to 3/4 inch, which is the depth of the area above the belly cut.
Drake-M10-production-O-14.jpg

Drake-M10-production-O-15.jpg

Drake-M10-production-O-16.jpg

I use a two step insert to route the contours on the inside to follow the belly cut contour that will appear on the back of the body.
Drake-M10-production-O-19.jpg

Custom and Deluxe show the cavity access while the Basic models are left un-cut for the access. I will do that next.
 
I use a drop on template to route the internal cavity shape on the Basic models.
Drake-M10-production-Pb-3.jpg

I only have to route about 1/2 inch in to connect to the chambers.
Drake-M10-production-Pb-4.jpg

Drake-M10-production-Pb-6.jpg

Then the recess part of of the cavity. About 1/8 inch deep.
Drake-M10-production-Pb-9.jpg

Then I finish up the access cover route on the Deluxe and Customs. They use a magnetic attachment, so I have to make room for the magnets and an area to press the cover into to cam it up and out of the body. I do this bit of routing freehand usually.
Drake-M10-production-Pb-8.jpg

Drake-M10-production-Pb-7.jpg

And I make some covers for the Basic models.
Drake-M10-production-Pb-1.jpg

I use 1/8 inch thick Richlite material. I made a jig to act as a pattern for my router. I can cut three in one sitting.
Drake-M10-production-Pb-2.jpg

These will go on all Basic M10 basses.

Time for Christmas dinner, so I am signing off for the day. Merry Christmas!
 
Looking really nice! :thumbsup:

Regarding the time out issue... I select the "keep me logged in" function, and that way it autosaves my text in the field at the bottom of the thread. Even if I close my browser, the draft text remains saved in that field for the next time I open it. Alternatively, you can write the whole post in a text document and then cut/paste it over when you're done, add in the pics, and post.:)