• TalkBass has been independent since 1998. Add your voice.
    Create a free account to reply to discussions, view embedded media, and browse with fewer display ads.
    Join freeLog in
    Want zero display ads or expanded classifieds tools? Compare plans.

Double Bass Epiphone B4 Serial #1426 Condition

I'm no expert, but I give you my thoughts. I visualize it this way: the tension of the strings wants to rotate the neck towards the front of the bass, with the fulcrum being where the neck meets the top plate (table). This causes the back plate to be under tension, while the top plate is under compression in the longitudinal direction; also the top is under compression from the bridge in the front-to-back direction. The bass bar and the soundpost help with this compression stress. The back plate under tension makes the "button" (the part of the back plate that overlaps the end of the neck heel) very important for structural strength.

I would say that the neck joint itself is under compression near the fulcrum point (next to the top plate) while it is under tension towards the button. From what I've gathered of a few years reading opinions on this forum, the dovetail joint of old American basess is typically troublesome because of the low quality fitting they did at the factories then, and the very soft poplar wood they used for the counterpart neck block. It seems as if a dovetail is not really needed in the joint, and a well-fitted mortise and tenon joint is well adequate for the stresses.

Good luck with your project!! You've done a great job documenting the state of your bass!!
 
  • Like
Reactions: Picknhand
Well....did a whole lot of thread reading today to collect some more insight on the task at hand. A couple of things floating around my brain: (1) thinking the neck joint repair would be best accomplished with a jig, which of course will take some thinking/planning, (2) thinking I am going to proceed with the mortise joint versus the dovetail (even if I solicit the services of a professional), (3) it's sinking in that the neck splitting and repair is a lesser documented problem/repair, which makes me appreciate more the comments early on about "you should just buy a new neck", (4) the more I read about glue/epoxy, the more concerned I am that the top was glued (non-hide glue) down and may be problematic IF I have to pop this top off, (5) ordered a book (okay two books), and (6) I'm really in no hurry so will just keep digging in and see what shakes loose, oh and (7) decided I am going to track down the previous owner to learn what he knows and try to track down the original owner (I know...silly task perhaps but would be cool right??). Also also...I emailed MollyKay separately to see if I can get this added to the database and get access to the database; awaiting her reply. :) Thanks party people.
 
  • Like
Reactions: s0707 and marcox
Merry late Christmas. Just an update (of sorts); just been studying a whole bunch really. I got a couple of gadgets from Santa that are to assist with this project (a) Chuck Traegar's book (as recommended by @jsf729 ), (b) endscope (as recommended by @eh_train ) , and (c) a date with a professional luthier (as recommended by everyone..thanks folks)

The Book
The book reference is very enlightening and inspirational to say the least. What an amazing combination of experience and a scientific approach (seemingly) to his work. Very cool and interesting! I'll search the threads but he seems to be a big proponent of "iron work" in the neck area especially, which I suspect gets some folks blood pressure (and passionate dialogue) up. I'll keep pouring through the threads on that topic. Additionally, have been window shopping per some insight from @stefaniw80401

Endscope (a bust)
The endscope was an absolute bust because the image quality was so poor. So, as an alternative, I very carefully poked my iPhone in the F-holes and attempted some additional pictures focusing on the visual condition/integrity of the bass bar and its connection to the top as well as the visual condition/integrity of both the end block and neck (upper) block. Visually I don't see any cracking or major trauma, but your opinion on this would be great. It seems more obvious that the water intrusion from the storm found its way on the G-side F-hole and settled on the G-side of the end block.
See pictures:
EP B4 1426 - Interior Bar 1
EP B4 1426 - Interior Bar 2
EP B4 1426 - Interior Bar 3
EP B4 1426 - Interior Bar 4
EP B4 1426 - Interior Bar 5
EP B4 1426 - Interior Bar 6
EP B4 1426 - Interior End Block 1
EP B4 1426 - Interior End Block 2
EP B4 1426 - Interior End Block 3
EP B4 1426 - Interior End Block 4
EP B4 1426 - Interior Sound Post Patch


Seek Professional Help
As recommended by just about everyone, I have a date (rescheduled due to COVID) with a luthier in the New Orleans area. I contacted a music friend of mine, who contacted his upright bass friends, and got the name of Mr. Bill Schettler (of Schettler Violins) (see here). I was scheduled to see him on Tuesday of this week, but some COVID thangs came up and will reschedule with him hopefully later in the week. I've never been to a luthier before so I am a little nervous about rolling up with my problems. Will definitely follow-up post-visit. I'm hoping to salvage the body and the fretboard but fear the neck is a lost cause (again as many of you have pointed out). Losing the neck, brings me to my final note for now...

Serial Number
Losing the neck will suck, but it dawned on me as I kept looking at the Epi's neck construction that it appears the neck and scroll are one piece...a port (neck/scroll) and a starboard (neck/scroll). Say it ain't so (somebody please)? You see, reading around and watching neck/scroll repairs, it was my assumption that the scroll was separate from the neck but studying the existing seams closely doesn't appear to support that. So in the end...I think I lose the neck and scroll AND THE SERIAL NUMBER STAMP. So my question...how could you conceive of keeping this birth certificate intact for posterity. I'd hate to have this important detail get separated from its birthplace ya know??
See EP B4 1426 - Model Number

So...not much physical progress but definitely made progress on the learning front.
 

Attachments

  • EP B4 1426 - Interior Bar 1.JPG
    EP B4 1426 - Interior Bar 1.JPG
    34.2 KB · Views: 95
  • EP B4 1426 - Interior Bar 2.JPG
    EP B4 1426 - Interior Bar 2.JPG
    62.6 KB · Views: 87
  • EP B4 1426 - Interior Bar 3.JPG
    EP B4 1426 - Interior Bar 3.JPG
    61.6 KB · Views: 92
  • EP B4 1426 - Interior Bar 4.JPG
    EP B4 1426 - Interior Bar 4.JPG
    25.9 KB · Views: 100
  • EP B4 1426 - Interior Bar 5.JPG
    EP B4 1426 - Interior Bar 5.JPG
    47.2 KB · Views: 98
  • EP B4 1426 - Interior Bar 6.JPG
    EP B4 1426 - Interior Bar 6.JPG
    33.6 KB · Views: 92
  • EP B4 1426 - Interior End Block 1.JPG
    EP B4 1426 - Interior End Block 1.JPG
    23.4 KB · Views: 90
  • EP B4 1426 - Interior End Block 2.JPG
    EP B4 1426 - Interior End Block 2.JPG
    44.5 KB · Views: 93
  • EP B4 1426 - Interior End Block 3.JPG
    EP B4 1426 - Interior End Block 3.JPG
    24.6 KB · Views: 85
  • EP B4 1426 - Interior End Block 4.JPG
    EP B4 1426 - Interior End Block 4.JPG
    47.1 KB · Views: 98
  • EP B4 1426 - Interior Sound Post Patch.JPG
    EP B4 1426 - Interior Sound Post Patch.JPG
    54.9 KB · Views: 92
  • EP B4 1426 - Model Number.JPG
    EP B4 1426 - Model Number.JPG
    67.2 KB · Views: 93
The interior looks better than I expected. Unless there are areas of delamination it may be viable without major work. The neck is bad news. In addition to saving the serial, saving the distinctive Epi scroll should be a priority. That means a scroll graft, which won’t be cheap.
 
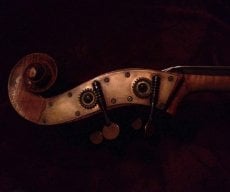
Caveat-I am not a luthier, but I've seen my share of damaged instruments. The neck, including the scroll, looks like a total loss to me. I see in the scroll two dowels and two nails from previous repair attempts, which never bodes well for salvage. If the two halves of the near are warped, gluing them up will be difficult. Goos luck.
 
@Picknhand , I think you can and must save that pegbox and fingerboard!
Takes some tools, woodworking skills and problem solving, but can be made stronger than ever, and preserve the value, character and most importantly, that accrued mojo of decades in NO.
One could saw the neck from the pegbox, just below the volute. Then, gently separate the already
split pegbox parts. There’s probably dowels/screws holding the sides together. Run each inside surface against a large sanding belt, until any warping is removed.
Glue in a spline of hardwood, wide enough to replace the thickness lost in the sanding operation. Then proceed with a normal neck graft.
Rout the existing neck block mortise to receive the new straight sided tenon heel, at least 1 3/4” deep.
That’s oversimplified, but contains the major sequence I would try. It’s remarkable what you can learn from the TB threads!
Oh yeah, requires courage and the ability to endure failure!
 
@Picknhand
Condino is a mentor of mine as well as many others here on TB. He is a real pro and does fantastic work.
If you want to see how a beginner bass rescue works, check out either of my “Igloo” threads. Mine were in similar condition as yours, sans the delaminating pegbox. This tortured soul has been rescued and returned to active service.
24AA4A17-EE74-4EBF-8266-34F3AFAE6C06.png
77C9C418-9958-48D8-8078-60F19168A553.png
 
Okay, the photos help. The stain on the inside is small potatoes, you can get that from overzealous use of a Dampit. If the grainy black stuff coating the inside is mold, that's an issue you want to address.

I'm estimating that the neck damage is due to excess humidity over a long period of storage rather than liquid water damage. The first thing to do is get some appropriate clamps on the scroll and see how resistant it is to coming back together. If it's relatively easy, work in some glue, reclamp it and call it good. If it's hard, it's time to consider splitting the neck and jointing it back together, as previously described. I would not be considering throwing the neck away at this point.

I'm sticking with my position on replacing the neck block.
 
  • Like
Reactions: Picknhand
@Picknhand
If you want to see how a beginner bass rescue works, check out either of my “Igloo” threads. Mine were in similar condition as yours, sans the delaminating pegbox. This tortured soul has been rescued and returned to active service.
View attachment 4518752 View attachment 4518753
F A N T A S T I C! Reading now...staycation + COVID quarantine = repair reading
 
  • Like
Reactions: Hogslapper
I would not be considering throwing the neck away at this point.

I'm sticking with my position on replacing the neck block.

When you say keep the neck...do you also mean preserve the current dove tail tenon? I thought I understood your previous input that eliminating the dove tail approach and replace with a mortise was recommended. If that is the case, it seems my only option would be to glue in a new tenon in place of the dove tail. Then of course my new neck block would accomodate. Sorry that I don't quite see it in my head. See EP B4 1426 - Neck Joint Tenon
 

Attachments

  • EP B4 1426 - Neck Joint Tenon.JPG
    EP B4 1426 - Neck Joint Tenon.JPG
    43 KB · Views: 84
Sorry folks...some additional observations. @Steven Ayres Yes, I think I can clamp back the neck without too much resistance and thus not cracking. I just did a test clamp to see.

However, upon doing so and looking down the neck centerline, I see there is a pronounce cant that seems to start right around the nut area. I created a side-by-side where you can see I visually aligned the neck CL and then the scroll/peg box CL. Wondering if the previous scroll repair got this thing twisted up. Suspect this will influence my path forward.

Related, what is the key working point(s) or reference line(s) that should be established for all things measurements. In shipbuilding we use baseline (BL) and forward perpendicular (FP) and wondering if the neck flat would be the BL and the nut the FP?

On a positive note, I thing my son's weight bench is going to be converted to a work bench if he doesn't start using this thing.
 

Attachments

  • EP B4 1426 - Scroll Neck CL.JPG
    EP B4 1426 - Scroll Neck CL.JPG
    76.1 KB · Views: 83
I understood your previous input that eliminating the dove tail approach and replace with a mortise was recommended.

First, no, I'd take nothing off the neck. You'll need that wood to hold the joint together. If you're not replacing the neck entirely, your choice is in what you do to create a stable base for it from what you have.

No matter what you do, because of the forces involved the dovetail joint will always be inherently less stable than a straight, solid, traditional joint. That said, there are a great many old basses out there doing good work with dovetail joints for many decades. So you or your luthier is looking at several engineering options, none of which is optimal, but that can be good enough.

Because for the sake of economy we usually need to try to save the block, a common approach is to shim the joint cheeks to tighten the joint up. Success with this depends on good joinery skills and the stability of the block material. My feeling is it failed that way once, so it's likely to fail that way again, and failure will damage the block further. But that failure may be decades away, too.

Another common save-the-block approach is to cut out the dovetail mortise into a straight mortise, and build out the neck tenon. The weakness with this is adding joints that can fail. But again with good joinery skills you can make a solid tenon and set yourself up so that if failure comes it happens at the joints you prefer to repair. Failure of a straight mortise joint does not risk destroying the block.

Given the opportunity my preference is to replace the block, because it's made of inferior or poorly aging wood, with stronger wood and cut a well-fit dovetail mortise to fit your existing tenon. This restores the instrument to its original configuration, presumably with material that will last longer than the previous did, without taking away good material. The downside is that this takes significantly more work.
 
Okay...so after much contemplation and reading (see EP B4 1426 - Chuck Guidance) and more questioning, I decided to “pop” the top off to have a look-see. I’ll let you all weigh in but I think everything looks pretty good accept for a few problem areas. Most notably (I think) is the neck block...I think @Steven Ayres was on to something because the neck block has a crack at the lower G-side corner (see EP B4 1426 - Top Off Neck Block 1) that would have absolutely failed probably immediately. Additionally, the ribbing on the G-side near the end block looks to have some issues (see EP B4 1426 - Top Off Interior 7 through EP B4 1426 - Top Off Interior 9). The bass bar seems to be intact and doesn't show any signs of popping off, but maybe worth reinforcing in some way while the top is off.

I must say, this was the first time doing this and I was nervous as hell. Used a combination of two butter knives and a painting spatula to oh so carefully motivate the seam to release (see EP B4 1426 - Top Off Technique 1 through EP B4 1426 - Top Off Technique 4). As you can see, I do have some areas to clean up and fix (which I will ask how to later). But for now, I inserted a few cross braces and longitudinal brace (see EP B4 1426 - Top Off Cross Bracing) to try and keep the ribs shape in tact while I plan my next move....will have some questions on neck block woods and how to order.
 

Attachments

  • EP B4 1426 - Chuck Guidance.JPG
    EP B4 1426 - Chuck Guidance.JPG
    196.6 KB · Views: 67
  • EP B4 1426 - Top Off 1.JPG
    EP B4 1426 - Top Off 1.JPG
    55.4 KB · Views: 72
  • EP B4 1426 - Top Off 2.JPG
    EP B4 1426 - Top Off 2.JPG
    62.1 KB · Views: 69
  • EP B4 1426 - Top Off Bass Bar 1.JPG
    EP B4 1426 - Top Off Bass Bar 1.JPG
    60.7 KB · Views: 67
  • EP B4 1426 - Top Off Bass Bar 2.JPG
    EP B4 1426 - Top Off Bass Bar 2.JPG
    72.5 KB · Views: 74
  • EP B4 1426 - Top Off Cross Bracing.JPG
    EP B4 1426 - Top Off Cross Bracing.JPG
    52.7 KB · Views: 79
  • EP B4 1426 - Top Off Interior 1.JPG
    EP B4 1426 - Top Off Interior 1.JPG
    46.8 KB · Views: 72
  • EP B4 1426 - Top Off Interior 2.JPG
    EP B4 1426 - Top Off Interior 2.JPG
    68.4 KB · Views: 70
  • EP B4 1426 - Top Off Interior 3.JPG
    EP B4 1426 - Top Off Interior 3.JPG
    98.6 KB · Views: 75
  • EP B4 1426 - Top Off Interior 4.JPG
    EP B4 1426 - Top Off Interior 4.JPG
    64.3 KB · Views: 73
  • EP B4 1426 - Top Off Interior 5.JPG
    EP B4 1426 - Top Off Interior 5.JPG
    95.4 KB · Views: 64
  • EP B4 1426 - Top Off Interior 6.JPG
    EP B4 1426 - Top Off Interior 6.JPG
    62.3 KB · Views: 80
  • EP B4 1426 - Top Off Interior 7.JPG
    EP B4 1426 - Top Off Interior 7.JPG
    75.4 KB · Views: 72
  • EP B4 1426 - Top Off Interior 8.JPG
    EP B4 1426 - Top Off Interior 8.JPG
    81.8 KB · Views: 62
  • EP B4 1426 - Top Off Interior 9.JPG
    EP B4 1426 - Top Off Interior 9.JPG
    87.3 KB · Views: 67
  • EP B4 1426 - Top Off Interior 10.JPG
    EP B4 1426 - Top Off Interior 10.JPG
    78.3 KB · Views: 69
  • EP B4 1426 - Top Off Interior 11.JPG
    EP B4 1426 - Top Off Interior 11.JPG
    91.3 KB · Views: 74
  • EP B4 1426 - Top Off Lower Bout G-side.JPG
    EP B4 1426 - Top Off Lower Bout G-side.JPG
    86 KB · Views: 73
  • EP B4 1426 - Top Off Lower Top.JPG
    EP B4 1426 - Top Off Lower Top.JPG
    188.8 KB · Views: 78
  • EP B4 1426 - Top Off Neck Block 1.JPG
    EP B4 1426 - Top Off Neck Block 1.JPG
    59.1 KB · Views: 70
  • EP B4 1426 - Top Off Swept.JPG
    EP B4 1426 - Top Off Swept.JPG
    94.7 KB · Views: 73
  • EP B4 1426 - Top Off Technique 1.JPG
    EP B4 1426 - Top Off Technique 1.JPG
    49.8 KB · Views: 68
  • EP B4 1426 - Top Off Technique 2.JPG
    EP B4 1426 - Top Off Technique 2.JPG
    51.8 KB · Views: 72
  • EP B4 1426 - Top Off Technique 3.JPG
    EP B4 1426 - Top Off Technique 3.JPG
    47 KB · Views: 66
  • EP B4 1426 - Top Off Technique 4.JPG
    EP B4 1426 - Top Off Technique 4.JPG
    37.1 KB · Views: 66
  • EP B4 1426 - Top Off Top Full.JPG
    EP B4 1426 - Top Off Top Full.JPG
    68.8 KB · Views: 72
  • EP B4 1426 - Top Off Upper Top.JPG
    EP B4 1426 - Top Off Upper Top.JPG
    92 KB · Views: 63
Last edited:
  • Like
Reactions: Steven Ayres
The top block was cut terribly, typical of a later American plywood bass and probably on a jig that had worn out years before. Fitting a new one will be a pig, but all is not lost.

Not having seen the top of the block, it may be possible to drill and pin through the break with a glued softwood dowel. If the mortise was narrower, as on a Kay, this wouldn’t be possible.
 
I've been patiently observing without comment....

All factory instruments are a dance in imprecision; ask anyone who has worked in one. Management calls the neck a "handle", design / "engineering" have never been on the production floor to actually make something with their hands, & sales only cares about their monthly bottom line.

I know it may seem like a bit of a journey & time commitment, but compared to the 100+ hours you will put into this project (minimum!!!!), stuffing all of those parts in the back of your car and driving over to Asheville for a long weekend as a bass repair student will advance your knowledge of this project and life skills immeasurably and set you on a righteous path to turning this back into a great playing, sounding, and looking $3000 instrument. I'll even show you how to forge that stamped serial number on a new neck...Book a gig while you are in town and you can use the whole thing as a tax write off!

I very successfully complete projects like this & teach others to do it almost every day of the year. The biggest suggestion would be to do everything with hot hide glue so you can reverse it if needed and turn off your computer or device; there is a lot of conflicting advice....

DelayedLimitedGrouper-max-1mb.gif
 
Last edited: