• TalkBass has been independent since 1998. Add your voice.
    Create a free account to reply to discussions, view embedded media, and browse with fewer display ads.
    Join freeLog in
    Want zero display ads or expanded classifieds tools? Compare plans.

Essex Headstock Mod "The Blade"

We're all familiar with the headstock debate. Having received my medium scale Jazz last week I evaluated my options for mods. My goal of turning this ugly duckling into a swan is based on the philosophy of emphasizing its strengths while retaining its core character. In short when I look at this bass I see a headstock that wants to be pointy but just hasn't gotten there yet, and I see an orange neck that wants to be embellished with gold. I decided to begin this makeover by creating "The Blade".

Here is the beginning product:
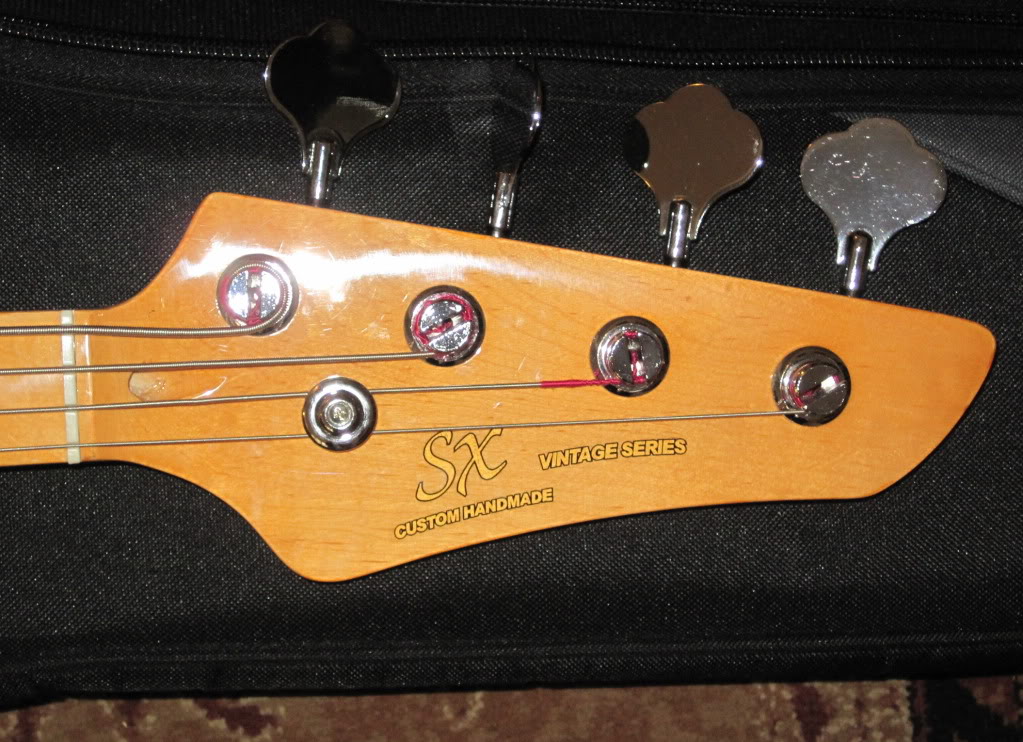
IMG_1323.jpg


And here is a computer design of the desired endpoint:
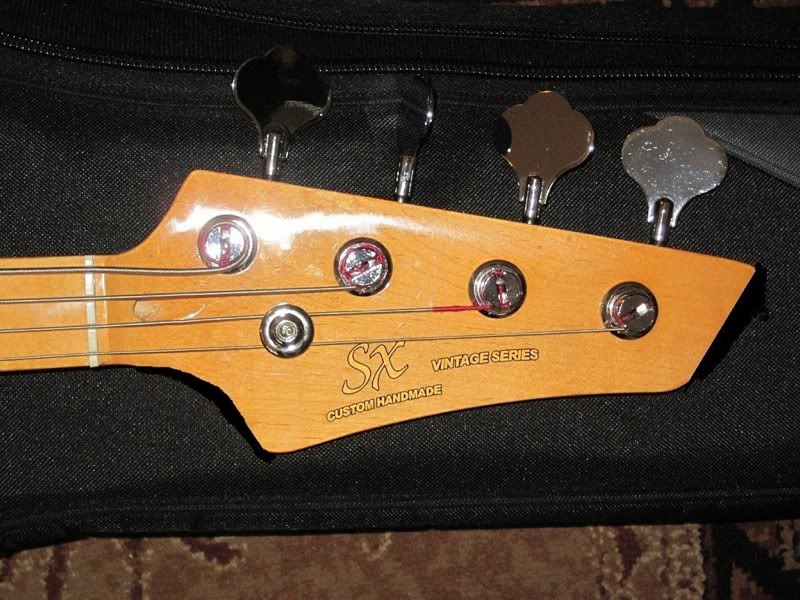
3.jpg
 
My first step was to draw a line from the top point to the bottom in order to gauge how much I would take of the heel of the headstock. I was hoping that the direct line would provide some symmetry to the design as well. I then used magic marker to free hand the ellipse:
IMG_1330.jpg
 
I don't have a lot of tools so I decided to use a technique that I think people use with bathroom tiles. That is putting multiple perpendicular cuts (left) with the goal of snapping them out (the right). Then filing it all down afterwards. Approximately ten minutes after this photo a cold sweat hit me as I began to wonder if I had made a big mistake.
IMG_1331.jpg


In the end it came out all right. I went over the peak of the bottom point with my sander and made a few errant scratches but I'm hoping to cover them with stain.
IMG_1334.jpg


Here is a pic of the finished heel. Tomorrow I will work on the nose. Interestingly, I decided to pick up the stain "Golden Pecan" rather than the popular "Colonial Maple" Perhaps the new Ursa heads are a tad less orange. I plan to polyurethane after the stain. I would like to keep the finish on the neck as much as possible but please let me know if this combo is bad as I'm a newbie.
IMG_1332.jpg

IMG_1335.jpg
 
Here is a pic of the finished heel. Tomorrow I will work on the nose. Interestingly, I decided to pick up the stain "Golden Pecan" rather than the popular "Colonial Maple" Perhaps the new Ursa heads are a tad less orange. I plan to polyurethane after the stain. I would like to keep the finish on the neck as much as possible but please let me know if I'm this combo is bad as I'm a newbie.

I LOVE "The Blade"! Great design mod!

I did the "Dixiecup" on all my Ursa SX basses. (Round nose)

I used colonial maple stain and it matched perfectly on my basses. But I also "cheated" a bit because the orange part seems to start to settle out after you shake it up so you can sort of control the color by how long you wait between stirs! If pecan is the match then go for it! You can judge the match before you put on the poly finish after the stain dries.

My last Ursa was unstained and needed nothing but clear coat. The Minwax polyurethane coat seems totally compatible with SX finish and even just coating only the modified edges you don't see any noticeable problems. (the first one I did ended up with a huge drip down the front of the headstock which I later had to sand out and then coat the front of the headstock too, but even that worked out OK...didn't lose the logo)

My only comment is that I switched to "rub on" poly (also Minwax) which I apply with a small folded piece of cloth. It is much thinner in consistency than the normal Minwax poly so it gives you much more control over the job. You lightly rub down the coats with 0000 steelwool between coats. It is more work because it usually takes quite a few coats to get it just so, but as I said that also lets you fix any problems as you go.

Good Luck!
 
I LOVE "The Blade"! Great design mod!

I did the "Dixiecup" on all my Ursa SX basses. (Round nose)

I used colonial maple stain and it matched perfectly on my basses. But I also "cheated" a bit because the orange part seems to start to settle out after you shake it up so you can sort of control the color by how long you wait between stirs! If pecan is the match then go for it! You can judge the match before you put on the poly finish after the stain dries.

My last Ursa was unstained and needed nothing but clear coat. The Minwax polyurethane coat seems totally compatible with SX finish and even just coating only the modified edges you don't see any noticeable problems. (the first one I did ended up with a huge drip down the front of the headstock which I later had to sand out and then coat the front of the headstock too, but even that worked out OK...didn't lose the logo)

My only comment is that I switched to "rub on" poly (also Minwax) which I apply with a small folded piece of cloth. It is much thinner in consistency than the normal Minwax poly so it gives you much more control over the job. You lightly rub down the coats with 0000 steelwool between coats. It is more work because it usually takes quite a few coats to get it just so, but as I said that also lets you fix any problems as you go.

Good Luck!
Bassbenji, thanks for the recognition and tips. Nice work on the DC, its a smooth operator. Thanks for the tips on the poly. I had heard about the rub on, but it only comes in like half gallon containers. I know that will sit in my garage for the next 10 yrs. Anyhow, might be worth it to get it right.

This is where I'm at tonight. Sawing and sanding is complete. I'm partial but I think it looks awesome. I decided to take off the finish on the entire bottom edge in order to have a nice clean finishing process. To make the cut, I just drew a line from the two corners on the nose and went at it. NOTE: This shape may not work if your using traditional tuners as the g-string base plate may be exposed at the tip of the headstock (note holes in pic 2). I have some ultralites coming that I believe only have screws the nut side of the tuners. Off to finish to product.
IMG_1363-1.jpg

IMG_1364.jpg
 
While I'm waiting for parts I decided to do my first shielding using a Stewmac pkg. I'm running a little short on material and am hoping I can complete the pickguard. Besides that concern, I was happy to successfully link the bridge pup housing to the control panel housing with a copper channel. Chunger has some great tips for this on his newbies link. I've also marked where I intend to solder however, I've never done it before. I did a quick look but couldn't find examples of the basic steps. Does anyone have a link for how to solder?
IMG_1367.jpg


Edit: 20 Jan 11:I just want to give some recognition to my buddy Kris Gleason who did an absolutely amazing job helping me with the soldering. Nice connectivity throughout the whole cavity.
 
I'm still waiting for my pickguard from Terrapin before full assembly, so I decided to do some additional work. Here is a pic of some thread inserts provided by 'Chung. With a 5/16 they went in like butta and threaded perfectly. Thanks 'Chung. Interestingly, I attempted to use an insert thread from Lowes on the top left corner. It used a phillips head and busted off under low pressure. Kind of made for a messy job so needless to say, the hex inserts are the only way to go.

IMG_1378.jpg


Here is a pic of the completed finish job. You can compare where my finish (golden pecan) meets with the stock finish. I'm satisfied, however it could still use a tad more orange. It would be interesting to get a side to side between the golden pecan and colonial maple.

IMG_1379.jpg
 
So after some asking around I was able to find Brady Muckelroy here in Austin to help with the set up and fretwork. Brady did an awesome job at a fair price and is available to help you out if your interested. He can be reached at: http://www.facebook.com/profile.php?id=689578529

Anyhow, he was kind enough to post build pics and narrative on his Facebook page which I have transposed below for your viewing.

IMG_1581.jpg

This SX Jazz Bass has undergone some major improvements. The owner purchased some gold Hipshot Lightweight tuners, Gold-plated control plate, a new pickguard, and a gold (off-brand) bridge. Along with the vintage knobs, he has put together a visually stunning package. So far, I've installed the pickups, ran the ground wire to the bridge, wired up the 2 volumes & master tone pot to the input jack, installed the control plate and the pickguard....knobs too....

EDIT: I'm not sure if Brady knew this however, I initially purchased a gold control plate, however it did not fit as the bass is 7/8 size. After doing some searching in town I found Vic Gerard at Gold Effects 24K Plating (512) 448-4093. He's been playing bass in Austin for some time so was familiar with the job. The finish came out awesome and the price was fair. I recommend him for anyone looking to gold plate some parts.

2.jpg

A shot of the bridge after installation. Don't worry....I dusted off the bass & wiped off all of the fingerprints.....

3-1.jpg

And here is the foundation!!Looks sharp!
 
4.jpg

Here's the part where I go over-kill....especially when I'm working on a painted/ finished body. I shield as much as possile! I don't want to chance putting scratches in a shiny finish.

5.jpg

Here, I've removed the nut. For whatever reason, they used a TON of glue..it was very hard o get out..Another thing which was a head-scratcher; it looks like they cut a fret slot in the nut pocket? I leveled out the bottom as flat as possible after I cleaned out all of the gunk & residue from the copious amounts of glue.

6.jpg

And, to be more & more careful, I've taped off the back of the bass/ the neck too.
 
7.jpg

Building a new nut (from tusq). I'm carving the slots in this picture.

8.jpg

Here is a rough shot of the nut after the first pass at it with the slot files. Not very smooth/ kind of crude...it'll get smoothed over later. I've also left myself plenty of room to cut the slots deeper. Once you cut 'em too deep, you have to start over.

9.jpg

The fingerboard got taped off/ the neck was set straight & the frets get a good once over. I checked for high spots/ low spots.....there quite a few. Here, I'm giving the tops of the frets a gentle leveling. Once they've all been touched on by the leveling file, I'll go back over & spot level any remaining high spots so the playing surface is perfectly level. The ends of these frets did not need beveling. They were nicely done straight from the factory!
 
10.jpg

Next, I crown the tops of each fret.

11.jpg

I use this custom made file to dress the little sharp corners of each fret. When it comes to frets, they to be smooth to the touch.

12.jpg

Now the sanding/ polishing. I start with 320 grit paper. I will graduate through finer grits...600, 800, 1000, 1500 and then 0000 steel wool.

13.jpg

The frets are cleaned with a mild cleaning solution/ the tape it removed/ and TADA! I glued in the nut just before shooting this picture.
 
14.jpg

The bass is strung & the truss rod is adjusted back for string tension. Of course, the nut slots need to be lowered. To be safe, I'm using a feeler gauge to prevent me from cutting too deep for each string. Once the slot depth is correct, I'll polish up the nut & string the bass back up...& procede with detailing the setup/ neck/ saddle height/ intonation/ pickup height.

I must say; for being a medium scale jazz bass with LaBella flatwound strings, this little booger has some MONSTER tone! To the point of me being ok with buying a full length scale/ doing the same work & gigging/ teaching on the thing. SX Basses are available at www.rondomusic.com