

Enjoy the benefits of a premium membership!
Upgrade Account
-
TalkBass has been independent since 1998. Add your voice.
Create a free account to reply to discussions, view embedded media, and browse with fewer display ads.
Join free Log in
Want zero display ads or expanded classifieds tools? Compare plans.
You are using an out of date browser. It may not display this or other websites correctly.
You should upgrade or use an alternative browser.
You should upgrade or use an alternative browser.
Even fretless fingerboard levelling tips
- Thread starter jesterbass
- Start date
More options
Who Replied?

I’m trying to picture an “hourglass” pin router jig for this….. and failing miserably, though I’m sure you will get it to work. I’ve been trying to do a bit of this on fret leveling, following the string paths, but I don’t know if the final “blending” across the fret tops ends up filing that tiny correction out. So if I use a straightedge parallel to centerline along the outer edges, I should see a very small gap at the center of the board?

I’m trying to picture an “hourglass” pin router jig for this….. and failing miserably, though I’m sure you will get it to work.
Oh yeah, I've thought that out, but I haven't built it yet. It's not really that complicated. Basically adding a third axis to the fixture, a Yaw axis, where one end of the fixture pivots on a vertical pin and the other end can swing side-to-side through about 5 degrees. Then connect that axis to the Roll axis (which rolls the neck through the radius) with a linkage that moves them together at a particular ratio. So, as the neck rolls to one side of center, the Yaw axis would also shift off center by some set proportional amount. The pin router spindle would end up copying the motion and geometry of the sanding board above. That's how it would work.
And yes, that type of fixture could also work on a benchtop with a hand router. The radiusing fixture that you've built could be modified by adding a Yaw axis. The board holding your fingerboard would pivot on a vertical pin at the headstock end, and the heel end would be able to swing side to side through a few degrees. This movement is in relation to the straight rails that your router bridge rides on. Then you'd have to figure out how to synchronize the router bridge movement with the Yaw axis.
I’ve been trying to do a bit of this on fret leveling, following the string paths, but I don’t know if the final “blending” across the fret tops ends up filing that tiny correction out. So if I use a straightedge parallel to centerline along the outer edges, I should see a very small gap at the center of the board?
Yes! This Hourglassing geometry and technique applies to frets too. You've seen my method of leveling the frets with long stone bars, following the string paths. Same geometry, same reasons. Checking with a straightedge along the string paths, they should be flat, no gaps. Put the straightedge parallel to the centerline, and you'll see a gap under the center. That shows that the Hourglassing has been done correctly.
Last edited:


Out of interest, how do you ensure you are levelling on the exact string paths, or are you just eyeballing it?
Oh yeah, I've thought that out, but I haven't built it yet. It's not really that complicated. Basically adding a third axis to the fixture, a Yaw axis, where one end of the fixture pivots on a vertical pin and the other end can swing side-to-side through about 5 degrees. Then connect that axis to the Roll axis (which rolls the neck through the radius) with a linkage that moves them together at a particular ratio. So, as the neck rolls to one side of center, the Yaw axis would also shift off center by some set proportional amount. The pin router spindle would end up copying the motion and geometry of the sanding board above. That's how it would work. And yes, that type of fixture could also work on a benchtop with a hand router.
Yes! This Hourglassing geometry and technique applies to frets too. You've seen my method of leveling the frets with long stone bars, following the string paths. Same geometry, same reasons. Checking with a straightedge along the string paths, they should be flat, no gaps. Put the straightedge parallel to the centerline, and you'll see a gap under the center. That shows that the Hourglassing has been done correctly.
Out of interest, how do you ensure you are levelling on the exact string paths, or are you just eyeballing it?
Hey Flying B;
Basically, I'm eyeballing it, sighting down the neck from the heel end. And I'm not making four distinct flat paths; it's a gradual blend from the center out to the edges of the fingerboard. While gradually shifting the angle to approximately line up with the string paths as I go over them. I know how much to sand by watching how the sanding board is contacting at the two ends, and if I can feel any rocking over a high lump in the middle. That's the whole point: to sand down that lump in the middle of the string path, while the flat sanding board's path is lined up with the string path.
I've just been eyeballing it, though guess you could put a white pencil mark at nut and heel and try to follow that imaginary line, or literally draw the line in white pencil (assuming it's a dark board) and sand along that line until it's gone. Not sure why that didn't occur to me sooner.
I've just been eyeballing it, though guess you could put a white pencil mark at nut and heel and try to follow that imaginary line, or literally draw the line in white pencil (assuming it's a dark board) and sand along that line until it's gone. Not sure why that didn't occur to me sooner.
Sure that works, to give you a more visual guideline. I don't usually bother.
I suppose you could rig up some moving guide rails for the sanding board, but that seems excessive. Looking at the numbers, you're trying to sand down a lump that may be 0 to 0.010" high. Being slightly off in your alignment to the string path isn't going to make much difference.

The one thing that messes me up conceptually when I try to visualize hourglassing/string path leveling is that it only has to take into account the length of the fingerboard, not the full distance from nut to bridge, and that this is true whether the board is 20 stops, 24 stops, or whatever. I mean, I take for granted this is correct, both from explanations here and first-hand experience with properly prepared necks of different lengths, so this isn't a challenge to the wisdom of the experts here.
The one thing that messes me up conceptually when I try to visualize hourglassing/string path leveling is that it only has to take into account the length of the fingerboard, not the full distance from nut to bridge, and that this is true whether the board is 20 stops, 24 stops, or whatever. I mean, I take for granted this is correct, both from explanations here and first-hand experience with properly prepared necks of different lengths, so this isn't a challenge to the wisdom of the experts here.
Yes, that's correct. This whole Hourglassing business is only about the fingerboard. Making the narrow path of wood, directly under each string, straight and flat.
That flat strip is cut while the neck is unstrung and unloaded. When you string it up, pull it up to tune, and fine-tune the truss rod, the neck will pull into the shallow forward Relief Curve. That's necessary for the clearance of the flopping string. If you do the Hourglassing correctly, the depth and shape of the relief curve will be the same under all of the strings.
If you don't do the Hourglassing, the Relief won't be the same under the different strings. For example, picture a 5-string with a 10" radius cylindrical fingerboard, no Hourglassing. If you adjust the truss rod so that the relief under the A string is, like, 0.010", the relief under the E and D may be 0.002", and the relief under the B and G may be -0.004", a slight backbow with a hump in the middle. That's how you get the weird buzzing and uneven Mwah. The only way to fix it is to set the relief much higher on the A string, until the relief on the B and G are acceptable. But the five strings end up different in feel, buzz and Mwah.
The Hourglassing fixes that, so that you can set the relief on the neck where you want it, and all the strings will be about the same.
The root cause of the problem that Hourglassing fixes is the geometric conflict between a radiused fingerboard surface and string spacing that's narrower at the nut than at the bridge. The horizontal-plane angle of the outboard strings against the radiused surface, puts a lump in the middle of their string path. If the strings ran parallel down the neck, there would be no problem with the lump. Or, if the fingerboard was flat, with no radius, there would be no lumps. The lumps are because of having tapered string spacing on a radiused surface. Hourglassing is the fix.
Last edited:
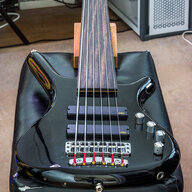
Update from last year.
I improved this bass quite a bit last year, however I did not go far enough. I was concerned about overdoing it, being the novice that I am. There was a large dip at both ends of the fingerboard , a hump at the octave (neck kink?) and low spots about 60% to the first octave.
I used 240 paper and I was not making much progress following only the string paths. So I broadened my sanding to the entire area between E and G string paths. Then, I sanded the area between D and C string paths and between B and A string paths. This worked well, however a small hump at the octave remains and there is a small dip on both the B and C string paths at th 60% point. I suppose a skilled intrument builder could plane the fingerboard to perfection, however, after what I have read about builders not "getting it" with fretless basses, I will carry on as-is. My cello luthier does not work on bass guitars.
The result is much improved. I bought this second-hand as an experimental bass and it has become my main bass.

I've been re-reading sections of this thread and really trying to absorb it all. I'm wondering... Does a Plek machine take "Hourglassing" into consideration? If it's supposed to be the bees knees, it should! I've only owned one bass that was Plek'd and it wasn't anything magical. I certainly couldn't slam the action super low or anything like that.
Part of your problem might arise from your pictured neck support.View attachment 7494886
Update from last year.
I improved this bass quite a bit last year, however I did not go far enough. I was concerned about overdoing it, being the novice that I am. There was a large dip at both ends of the fingerboard , a hump at the octave (neck kink?) and low spots about 60% to the first octave.
I used 240 paper and I was not making much progress following only the string paths. So I broadened my sanding to the entire area between E and G string paths. Then, I sanded the area between D and C string paths and between B and A string paths. This worked well, however a small hump at the octave remains and there is a small dip on both the B and C string paths at th 60% point. I suppose a skilled intrument builder could plane the fingerboard to perfection, however, after what I have read about builders not "getting it" with fretless basses, I will carry on as-is. My cello luthier does not work on bass guitars.
The result is much improved. I bought this second-hand as an experimental bass and it has become my main bass.
When I levelled one of my fretless necks, I was really surprised by how flexible the neck was. Like a wet noodle, it actually SAGS under its own weight when supported at the headstock like you show. Levelling such a sagged neck will grind down the ends preferentially to the middle, producing essentially a backbow when allowed to straighten out, not really what's intended.I found no measurable deflection using a 12" caul about mid-neck for support. Of course, YMMV.
I would prefer a slight backbow. The kink prevents that.Part of your problem might arise from your pictured neck support.
When I levelled one of my fretless necks, I was really surprised by how flexible the neck was. Like a wet noodle, it actually SAGS under its own weight when supported at the headstock like you show. Levelling such a sagged neck will grind down the ends preferentially to the middle, producing essentially a backbow when allowed to straighten out, not really what's intended.I found no measurable deflection using a 12" caul about mid-neck for support. Of course, YMMV.

Does a Plek machine take "Hourglassing" into consideration? If it's supposed to be the bees knees, it should!
If by hourglassing you mean compound radius, i.e. getting flatter towards the heel, then yes the Plek can do that. I had my fretless EBMM SR4 put through the process and the playing experience is exceptional.
But a word of caution - by default the Plek will try to remove as little wood as possible when levelling the board. If you do a compound radius on an existing board it will need to take away more at the heel end than at the nut end. Go too radical on the difference in radius and you could end up messing up the depth taper profile (front to back) of the neck which in turn may affect the action of the truss rod. If the neck has very little taper to begin with, you could, in theory at least, end up reversing the depth profile. So measure the neck carefully front to back before pressing 'GO'.
I've been re-reading sections of this thread and really trying to absorb it all. I'm wondering... Does a Plek machine take "Hourglassing" into consideration? If it's supposed to be the bees knees, it should! I've only owned one bass that was Plek'd and it wasn't anything magical. I certainly couldn't slam the action super low or anything like that.
I don't know. It depends on how it defines the map of the final surface in its little computer brain. It may define it as a straight cylinder, or a conical (compound radius), and either one could be modeled with or without the Hourglassing/String Paths correction. It wouldn't be difficult to add that into their software. From what I understand, the Plek machine takes its data point measurements along the string paths, right next to each string. You'd think that would mean that they could very easily read how flat the string paths are, so therefore, the need for Hourglassing should be obvious.
For example, if they ground a fingerboard to a 7 1/4" cylindrical radius, based on a straight cylindrical radius model, then when the machine runs its final check with the sensors, it should be obvious that the outboard string paths have a 0.010" lump in the middle. They must have seen that during their R & D. So, I like to believe that they corrected their model (by Digital Hourglassing), before sending out the machines.
Somebody should ask them.
Last edited:

I don't know. It depends on how it defines the map of the final surface in its little computer brain. It may define it as a straight cylinder, or a conical (compound radius), and either one could be modeled with or without the Hourglassing/String Paths correction. It wouldn't be difficult to add that into their software. From what I understand, the Plek machine takes its data point measurements along the string paths, right next to each string. You'd think that would mean that they could very easily read how flat the string paths are, so therefore, the need for Hourglassing should be obvious.
For example, if they ground a fingerboard to a 7 1/4" cylindrical radius, based on a straight cylindrical radius model, then when the machine runs its final check with the sensors, it should be obvious that the outboard string paths have a 0.010" lump in the middle. They must have seen that during their R & D. So, I like to believe that they corrected their model (by Digital Hourglassing), before sending out the machines.
Somebody should ask them.
New band name: Digital Hourglassing.

New band name: Digital Hourglassing.
Yeah, that's actually a good band name! For Plek owners, I see it as an extra-cost option in the service. Which the operator switches on with one keystroke.
Yeah, that's actually a good band name! For Plek owners, I see it as an extra-cost option in the service. Which the operator switches on with one keystroke.
Don't give 'em any ideas Bruce! If they could create a Digital Hourglassing subscription, they would!


