• TalkBass has been independent since 1998. Add your voice.
    Create a free account to reply to discussions, view embedded media, and browse with fewer display ads.
    Join freeLog in
    Want zero display ads or expanded classifieds tools? Compare plans.

Fingerboard Radius Jig for Router

Thought I'd resurface this post. I just made one of these and it works like a charm. Thanks ledbelli bass for putting this out there.
To make things easier for changing the ends, I used threaded rod that runs thru the body. It also makes it easy for adding shims.
 

Attachments

  • IMG_1523b.jpg
    IMG_1523b.jpg
    92.3 KB · Views: 752
Thought I'd resurface this post. I just made one of these and it works like a charm. Thanks ledbelli bass for putting this out there.
To make things easier for changing the ends, I used threaded rod that runs thru the body. It also makes it easy for adding shims.

Excellent! That is a great improvement that I could probably modify my existing jig to use! Thanks much!
 
I've considered this jig but the one thing that concerns me is the possibility of the pipe flexing a little in the middle. I know it's heavy duty pipe that is pretty stiff but it's not hard to make it move a little at that length. Have you experienced anything like this? My current radius jig has the pipes on a fixed platform fully supported underneath for the entire length. The sled I use has the radius built into it with stops on either end so it can't be over-rotated.
 
I've considered this jig but the one thing that concerns me is the possibility of the pipe flexing a little in the middle. I know it's heavy duty pipe that is pretty stiff but it's not hard to make it move a little at that length. Have you experienced anything like this? My current radius jig has the pipes on a fixed platform fully supported underneath for the entire length. The sled I use has the radius built into it with stops on either end so it can't be over-rotated.


I would love to see a picture of your current jig! I'd like to see how it works!

On my jig I use 1" Galvanized pipes over a 36" length. I have never had issues with pipe flex. I would be concerned using smaller I.D. pipe

However, that being said, I still use a radius sanding block for final shaping and sanding. So, if there is an issue with pipe flex, the final sanding pretty much takes care of that.
 
//snip//


IMG_0336.jpg


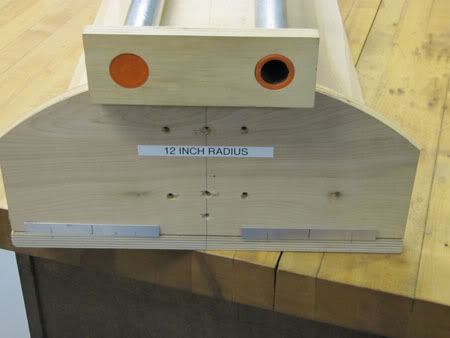
Note the shims on the 12" radius. The make up for unwanted taper to the fingerboard.

I'm getting ready to build a radius jig for putting a double radius on a U-Bass fingerboard. Your design is by far the best I have found for this purpose anywhere on the web! Beautiful simplicity in its design!

I'm relatively new to building, and it is not clear to me how you are using the shims shown attached to the 12 inch radius end.

Does this photo show how they are placed when in use, or is this how you store them? With the tighter radius on the 12 inch end vs the 20 inch end, I assume you are getting a taper that produces a thinner fingerboard toward the headstock, and the shims elevate the track enough to eliminate this. Is that correct, or have I missed the point altogether? Are there times when you would "not" use the shims? Couldn't you also remake the 12 inch radius end piece with a height that would include the thickness of the shim?
 
No reply is needed to my above post. I revisited "all" of the previous postings in this thread and found my answer in one of the previous comment responses by LB. I thought the shims were "craft sticks" temporarily stored on the end of the 12 inch radius, but I now understand them to be aluminum channel, so only the exposed part of the shim is showing in the photo. Once again, thanks for a really great post and sharing this jig design!
 
I've shown my fingerboard radiusing rig on a few other threads. I always prefer to cut the radius with the fingerboard glued on the neck, so this fixture is designed to clamp the necks between two side plates, with the rails along the top edges. I use gauges to set the height accurately at each end. It allows me to pre-tension the truss rod, and I even have a rig that attaches with a set of strings to pull the neck up to operating load. I've made router bases that cut radiuses from 4" up to flat. I haven't made a compound radius rig for it yet, but I could. I built the first version of this rig in 1993. This one has been in continuous use since 1999. I've radiused over 1000 necks in it.

IMG_2388D.jpg IMG_2390D.jpg IMG_2914D.jpg

In case you are wondering, that's the 4" radius setup, on one of my Series IV Scroll Bass necks. With that setup, the side plates are moved closer together and neck sits up higher than normal. Most of the time, I'm cutting 7 1/4" to 12".
 
Last edited:
  • Like
Reactions: JayGunn and ddanner
I have gone back to my original jig, but it has been modified from the earlier verson. I've had some recent requests for info, so this post is to address that.

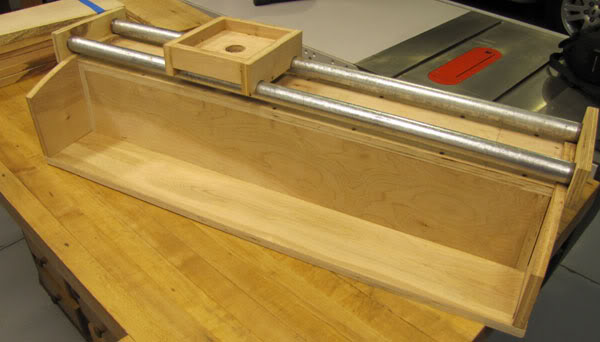
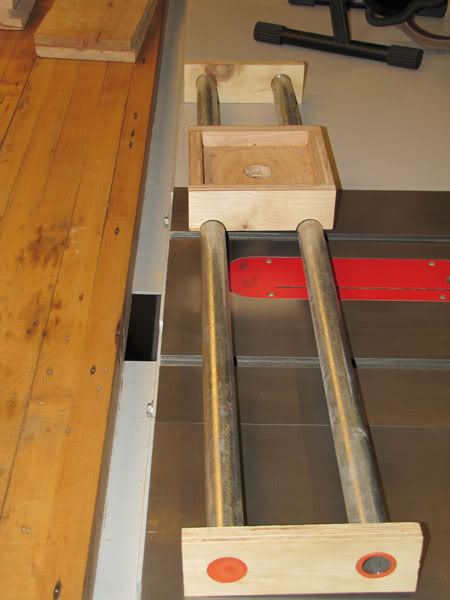
The Jig:

IMG_0334.jpg


IMG_0335.jpg


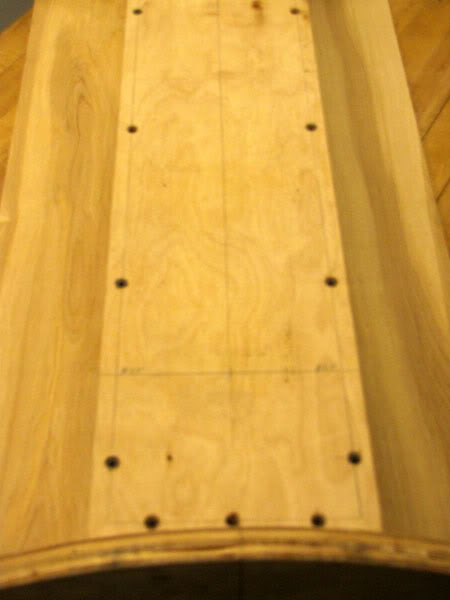
Close-up of the fingerboard bed:

IMG_0338.jpg


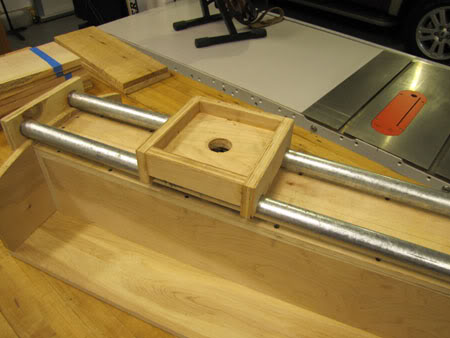
The router carriage. The router sets inside the sled . . .

IMG_0340.jpg


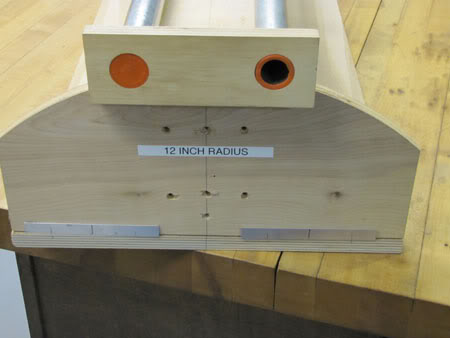
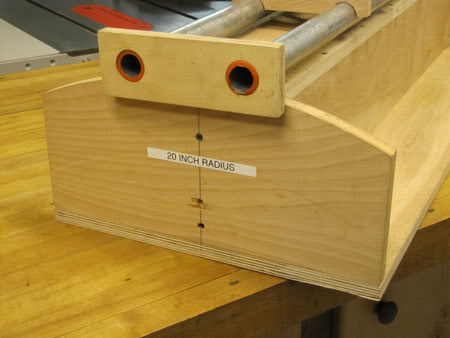
The endpieces in their respective radii:

IMG_0336.jpg


IMG_0337.jpg


The length of the fingerboard bed is 38 1/4"

The pipes are 41" long.

Note the shims on the 12" radius. The make up for unwanted taper to the fingerboard.

To use: just tape your fingerboard to the bed. Set the pipe carriage on, put your router in the sled, set the proper heights, and go . . .

I'm loving this jig. You could quite easily make the end radius pieces interchangable....meaning you could have different radius option using the same jig. It just needs an accurate and tight slots for the end pieces to sit in.
 
No reply is needed to my above post. I revisited "all" of the previous postings in this thread and found my answer in one of the previous comment responses by LB. I thought the shims were "craft sticks" temporarily stored on the end of the 12 inch radius, but I now understand them to be aluminum channel, so only the exposed part of the shim is showing in the photo. Once again, thanks for a really great post and sharing this jig design!


So sorry for the delay on replying . . . I am very rarely on TB.com anymore!

I'm glad you like the jig . . . I still use it for all of my radiusing needs: compound radius or straight radius; attached to fingerboard or not attached to fingerboard. It works for everything I do.

I'm glad you find that it works for you . . . very simple and very easy to use.

Thanks!
 
  • Like
Reactions: tjclem
Seems to me that letting the smaller end of a compound board "fall off" a little could be desirable. It's like a built in tilt-back without doing it in the pocket... or is it more wise to have the fingerboard material be the same thickness from end to end? It could be more structurally sound this way, I guess, to resist bowing.

Great thread, though. Very cool to see the different approaches in achieving the same end result.
.