• TalkBass has been independent since 1998. Add your voice.
    Create a free account to reply to discussions, view embedded media, and browse with fewer display ads.
    Join freeLog in
    Want zero display ads or expanded classifieds tools? Compare plans.

First build: The Headless Mermaid

Thank you! I didn't really say much about my skills. I've been doing wood for about 2 years, and felt like I was ready to do the body of a new guitar. I originally asked Hugo to make me a neck, and he encouraged me to do the whole thing, and offered to guide me.

And so far, knock wood, he hasn't done ANY of the work. He's given tons of guidance, but the hands-on are all mine.

Also, he's genuinely a fabulous teacher. I'm very lucky.
That's a helluva good friend you in ave there
 
Day 6

And the denoument. After today, I lose Hugo to Burning Man. I've got lots of work to do in his absence, but it's all preparation for the final sprint. When we returns we'll do the finishing.

Today was quite short. I started by shaping the volute. It's quite long, with the gentle part of the ramp starting well past the first fret. The bass is fretless, which puts the thumb reference point about half a fret farther up the neck than it would be for a fretted.
01 volute.jpg

I then cut a brass guide to guide the strings through the headstock. This needs tons of shaping, but I wanted to bang out the rough piece quickly.
02 string guide.jpg


I don't have a hard time admitting mistakes, even more so at my level of expertise. But this was a sad moment, as I couldn't just ask Hugo for instructions on how to fix a mistake, but I asked him to fix it for me. My work chiseling out the nut slot was sloppy, and I was sure that the more I tried to fix it the worse it would get. So, thanks buddy :) I had hoped to do it all myself, and this marked the end of that fantasy.
03 hugo fixes my mistakes.jpg


And at last, we were ready for a dry fit!
05 dry run.jpg

This, folks, was a magical moment. I played music on the bass I made myself. High fives all around! If you're reading this, I know you can relate. I can't say it sounded amazing, since the nut is a hastily-carved ebony block, and the neck isn't set up or even sanded. But it coughed, then spoke in a beautiful baritone as it started to find its voice.

And it all works!

The one issue that the dry run revealed was that my finger relief at the tuning pegs wasn't deep enough. So I gave it a fresh pass with the router (no pics) and called it a day. Other than that, no adjustments need to be made, which was quite amazing.

So, after six intense days, I basically have a bass! It's not one that I can take to rehearsal yet, but it has certainly been born into the world. I'll be doing lots of sanding and cleanup over the weekend, then maybe I'll wire up the electronics. But it will mostly be on hold for the next two weeks. )'( I'll post more pics when the hiatus is over.

Was a one-week build ambitious? Hell yeah. Was it doable? Probably not, unless the week included both adjacent weekends. But I can safely say that this was an incredible vacation week for me.
 
We have ignition! I wired up the electronics for a full spectrum test. This is just the first 30 seconds of sound. It took another minute to dial in the EQ, which I didn't catch on camera. The thing sounds absolutely amazing, and plays like a dream.

Some of my design decisions validated themselves quite strongly in this first touch: the flat fingerboard, the double side dot at the 7th fret, the wide open access at the upper horn, and of course the whole electronics setup (Aguilar pickups & preamp).

I have some work to do at the nut area, and I'll be making some matching wooden knobs later today.

 
How did you get the grooved cutouts on the top section of the bass to be so heavily contrasted against the maple top? Is that what happens when you carve flamed maple? See in the pic below. It almost looks like those are two completely different woods....Are they? How did you do that? Beautiful work, by the way.

Screen Shot 2018-08-26 at 7.22.32 PM.png
 
How did you get the grooved cutouts on the top section of the bass to be so heavily contrasted against the maple top? Is that what happens when you carve flamed maple? See in the pic below. It almost looks like those are two completely different woods....Are they? How did you do that? Beautiful work, by the way.

Thank you!

I'm not seeing what you're seeing though. There's just a maple cap (about 1/4" thick) and the khaya body. If you look at the three main cutouts (neck pocket + two pickups), you can see the line.
 
Thank you!

I'm not seeing what you're seeing though. There's just a maple cap (about 1/4" thick) and the khaya body. If you look at the three main cutouts (neck pocket + two pickups), you can see the line.

Oh I think I see what's happening. I wasn't understand how it so suddenly went from flamed maple to what I am now realizing is the khaya body. The top of the body is slightly domed, which is how you got the stark line between the maple and the khaya. Disregard my comment. Also don't worry if this doesn't make any sense. Beautiful work!
 
Yes, that's right. With the round carve, there's only one sharp line between maple and khaya. Our eyes are used to seeing beveled carves (like Kiesel's), which produce two lines. I really love the rounded look.

The maple top will have a bursted edge on it, so it will be a very strong interface line where the two woods meet.
 
Damn, Brother, nice work there! That's unbelievable for a first (or 10th) build, nothing like having expert advice, access to good tools, etc, but you obviously have a knack for it, and no amount of practice will substitute for a little talent. That feeling when you first plug it in, and it works, is like no other ,"I made that!!!". Of course, now you are screwed, this Amateur Luthiery business is addictive (and expensive!). I can't say I'm not a little jealous of your first build experience, my instructor was "Mr. Youtube", an amazing resource, but no substitute for expert instruction. You came to the right place though, some great pro Luthiers post here and help out the amateur contingent. I hope you have access to a shop or plan to build your own. There are some great builders on TB working out of second story apartments, so it's not all about the space. Dust control can become an issue though!:D You also have the advantage of having seen what's really necessary tool wise, I did waste some money on "bargain" tools that turned out to be crap. I hope you build another. Please post here on LC.
 
Really appreciate that! I planned hard, including many hours of watching YouTube while I work, and of course a few years of woodworking as well. My own shop is really a tiny storage shed, but I'm not far off from having all the tools I'd need to do this myself.

The most likely possibility is that this is a one-and-done. I know that sounds crazy, but I only really need this one instrument. I'm not a collector; if I can have a great 5-string fretless that checks all the boxes, I'm done. And from my brief play-test, the mermaid might just do it. I'm much more likely to get wrangled into making an instrument for someone else than for myself! (And that also sounds crazy, coming from someone who's only built one instrument, and only with an expert safety net!)
 
  • Like
Reactions: Gilmourisgod
Well, Hugo's been off in the desert this week, so I've been at my day job. But I've still been able to get a bunch of stuff done this weekend.

Made the electronics cavity cover. It will be secured with magnets. The pencil mark is where I'll carve a thumb relief to make it easy to open.
1 electronics cavity cover.jpg


And the knobs. Both the knobs and cavity cover are made from offcuts of the roasted flame maple neck. These need a bit more sanding:
2 knobs.jpg


I've spent a lot of hours this week making color samples. The plan has been to use a rich brick color for the maple, or a neutral black maple with brick on the khaya body. Alas, I've struggled to find the right way to make this happen beautifully, even with dozens of dye colors at my disposal. I think the Mermaid has been trying to tell me she doesn't like red.

So I listened, and on my next attempt hit the nail on the head. The Mermaid wanted to be blue. The khaya body wood will be a blue-black (it renders full black in this photo), and the neck and knobs will be golden.
3 final color selection.jpg


I also experimented mightily with topcoats, and settled on Osmo satin hard wax oil. I absolutely love the medium sheen, and I love the feel of the wood, unimpeded by plastic. Curious if anyone has experiences with hard wax oils like Osmo or Rubio.

Hugo gets back this week, so I hopefully will be able to finish by the weekend. I think there's only about a half-day's work left before we get to finishing.
 
Not sure if you've already carved it, but I find the thumb relief works better when carved into the body rather than the cover. That way, you can hook the cover with your thumbnail to get leverage over the pull of the magnets. :)
 
Regarding the cover, I like to remove a bit off the bottom of one corner of the cover, so you can push down to lift up the other end. Keeps it looking clean. Others shave a bit off the shelf for the same effect, depends on the thickness of the cover. I hope that's clear, can post pics if needed...
 
  • Like
Reactions: Beej
Yeah thanks -- I'm still considering whether I should use push-down or pull-up. The cover is pretty thin, maybe 1/8". It could be that push-down (with the relief carved from the shelf) will put the minimum stress on the cover.
 
Hugo's back, all shiny and wide-eyed from the Burn. I had some time with him today, doing some last minute projects before we start finishing tomorrow!

All of the photos today are mid-way through each project. That's why everything looks like it could use some sanding.

First, I started cutting a new nut. The previous nut was not well spaced. The new one is cocobolo, and it gets slotted tomorrow.

1 new cocobolo nut.jpg

I carved out some relief for an angle plug. The output jack is inset almost 1/2" into the body, making angle plugs impossible. The new carve allows about 120 degrees of freedom for an angle plug to swivel.

2 angle plug access.jpg


Made an access ramp for opening the electronics cavity cover, which will be held on with magnets.

4 cavity access ramp.jpg


And I carved the end of the fretboard.

5 fretboard end.jpg

I have about an hour of finish sanding tonight. Tomorrow we'll mask off the maple and apply some dye!
 
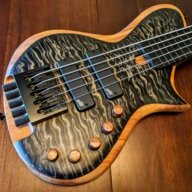
It's finished! Well, let's be accurate: it's finished, but it's not finished. Heck, even the finish isn't finished, but it's at the point where WOW!!

The maple top is dyed black, with a soft burst around the edges. The roasted maple neck and knobs are dyed with a golden brown. The khaya body is natural, save for the coat of BLO that I put over everything. Tonight I'll start putting the Osmo hard wax oil on.

Here's a crappy phone shot. It'll get better glamour shots once it's put together, hopefully this weekend.

IMG_20180913_062820.jpg