• TalkBass has been independent since 1998. Add your voice.
    Create a free account to reply to discussions, view embedded media, and browse with fewer display ads.
    Join freeLog in
    Want zero display ads or expanded classifieds tools? Compare plans.

First build: The Headless Mermaid

Greetings! This is my first build, so, go me!

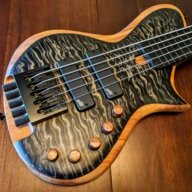
Before I tell you anything else, here's the mockup to whet your appetite.

headless mermaid mockup.png


This project is driven by the need for a smaller bass for travel. I have a defretted Ibanez Mikro 5, and it travels well but it doesn't sound near as good as my Warwick. As luck would have it, there's an amazing luthier right near me. Hugo here agreed to let me use his shop and to guide me through the process. My goal is to match his quality without his hands touching the instrument.

So, with the assistance of Mr. Mermet, the Headless Mermaid was conceived.

Specs:
  • Khaya body
  • Insane quilted top, with brown/black burst
  • Insane flamed roasted maple neck, one piece, bolt-on
  • Ebony board with maple inlay lines (quiet in the back row)
  • Hipshot headless hardware
  • Aguilar pickups & preamp
And the body will be super-rounded, not beveled. The upper horn will the the only place that isn't curved.

This is going to be a fast project. I've got the week off to do it.

[Edit] It's done! Glamour shots are here.
 
Last edited:
Nice work! Ambitious for a week though... lol :D

If you haven't already finished that pickup routing template - know that you only have to get the top 1/8" perfect so that the bearing can ride there, and the walls will be automatically cleaned up on the first router pass. Saves having to get the entirety of the side of the template perfect before use. I do this with all my templates... :)
 
Thanks! I'm all for ambitious. I'll survive if it doesn't happen in a week.

And good point about the template. This one is done now of course; that was just a process pic. But for future templates I'm happy to stop worrying about how true the sides are, as long as they bevel away from the router.
 
Looking like a nice instrument and a great build. If you are going for an all maple neck...use a pair of carbon rods to strength and stabilise it. Maple is quite bendy compared to say purpleheart or wenge. Even cutting and putting a few veneers will help strengthen an all maple neck.
Slow and steady wins the race with bass building. There's a certain pace that works...too slow and nothing happens...too fast and big mistakes occurr that take a lot longer to fix.
 
Day two

Well heck, I'm just going to start at the end. Here's Hugo, my luthier and mentor, holding up the bass as it stands now. As you can see, we cleaned up the body, made the neck, and dry-fit it to the body. A massive day, and massively successful.

11 day's end.jpg

The neck isn't shaped yet, and there's no fingerboard, but we'll get there. And you can at least see the woods we're dealing with here. Both the maple top and the neck are stunning.

Ok, a few process pics, which won't excite or surprise, just stuff that happened.

Here's Hugo's plan for my day. We didn't get to the electronics, but otherwise ticked every box.
04 my checklist.jpg

We resawed the neck blank to get it closer to the desired thickness. We'll be using the offcut for the cavity cover.
06 resawn neck.jpg

Here's the neck with its template. The headstock is temporary; almost all of that wood will get removed, since this is a headless build.
07 neck with template.jpg

Hogging out the neck pocket. I had to remake the template, as the first one wasn't long enough. It was the biggest mistake I made so far, and it wasn't big at all. In other words, we're cooking with gas!!

09 hogging out the neck pocket.jpg


Luckily the bridge arrived today, so all we're waiting for is the fingerboard, which should be there tomorrow. He gives us about 90% to finish this week!! Dayum, this is as awesome and fun and exciting as I hoped it would be!
 
Day three

Oh man this is hard work. I normally sit at a computer all day.

Today we routed the pickups...

a03 pickup cavities.jpg


... and the electronics cavity ...
b06 electronics cavity.jpg

We slotted the fretboard ... yes, using a printed paper template and manual layout. (We don't need no steenkin' alignment pins!) WHOA BOY that was scary stuff.
c08 slotting the frets.jpg


And, at the end of the day, glued the fretboard onto the neck.
d09 gluing up the neck.jpg

After I got home I did a bunch of color tests. Here are the final results, using a custom blend of Angelus leather dyes (alcohol based). Clockwise from the right: the quilted maple top, the flame roasted maple neck, and the khaya body.

These samples don't have a topcoat, so they're just a teaser for now!

e10 final color scheme.jpg
 
Day 4

Tons of small projects first, like the output jack...
a jack hole.png


... and neck bushings ...
b neck bushing holes.jpg

... and pot holes:
c pot holes - complete.jpg

But the main event was the body carve:
d carving.jpg

Which, by day's end looked pretty damned spectacular.
e end of day.jpg

Just for good measure, we popped in the veneers for the fretlines and glued the maple cap for the mini headstock.
f fretlines.jpg

Tomorrow is the part of the process I fear the most (neck carving) and the part I loathe the most (sanding).
 

Attachments

  • c pot holes - complete.jpg
    c pot holes - complete.jpg
    1,007.3 KB · Views: 69
Yup, nice work! You're either a better woodworker than you originally let on, or your mentor is kick-ass.... it's probably a combination of both! :D
Thank you! I didn't really say much about my skills. I've been doing wood for about 2 years, and felt like I was ready to do the body of a new guitar. I originally asked Hugo to make me a neck, and he encouraged me to do the whole thing, and offered to guide me.

And so far, knock wood, he hasn't done ANY of the work. He's given tons of guidance, but the hands-on are all mine.

Also, he's genuinely a fabulous teacher. I'm very lucky.
 
Day 5

Honestly, I'm bushed. This has been an intense week! One more work day before I lose my luthier to the playa. We definitely won't get the finish on, but it's possible that we'll have it ready for finishing. Fingers crossed!

A few warmup projects to get the day started. Installing & checking the bridge:
03 checking bridge placement.jpg

Routing the truss rod access hole:
05 finished truss access.jpg

The main event of the day was actually the headstock, which took much longer than I thought it would. The thing is so damn small, it's not even a real headstock!
07 headstock rough cut.jpg


I carved the maple top to make a slot for the nut:
08 carve nut slot.jpg


My comfort level with hand tools is a fraction what it is with power tools. (I've told Hugo many times how upset I am that he's banned my angle grinder from the shop.) Well, while chiseling the nut slot, I cracked the fretboard. D'oh!
09 oops! cracked ebony.jpg


No worries, a little CA glue and a clamp, and no one will ever know.

Next up, side dots. Large Luminlay dots. And yes, that's a double at the 7th fret. Here I was thinking I was being innovative, but it turns out Martin has been doing this for tens of thousands of years.
14 filled side dots.jpg


Next, attaching the string block to the back of the headstock. Another oops: the holes weren't centered. I had to dowel & re-drill.
17 oops! string block placement was bad.jpg

Drilling holes for the strings:
18 string-thru holes.jpg

Then on to the neck! First project was to remove as much waste as possible with the router. Much faster than rasping, but dammit Hugo, this would be so easy with the angle grinder!
19 removing a lot of neck thickness.jpg

And at the end of the day, we have a carved neck! That was crazy good fun, and Hugo's rasps are quite amazing. I'll clean up the volute tomorrow.
22 finished main neck carve.jpg
 
  • Like
Reactions: Gilmourisgod
It's Hipshot.

Don't forget about Invalid Link Removed, who makes an excellent system that's priced right. There may be a few other smaller makers. But in general I agree that there's not a lot of viable options at more reasonable price points. I guess it's either too hard a problem or too small a market.
 
Last edited:


