• TalkBass has been independent since 1998. Add your voice.
    Create a free account to reply to discussions, view embedded media, and browse with fewer display ads.
    Join freeLog in
    Want zero display ads or expanded classifieds tools? Compare plans.

Fretless 5

Dec 11, 2019
893
3,208
UK
I was considering waiting to do this build for the winter build off, but seven weeks is too long, so I'm doing it now. I'm going to make a 5 string fretless with a full length fingerboard and hidden pickups.
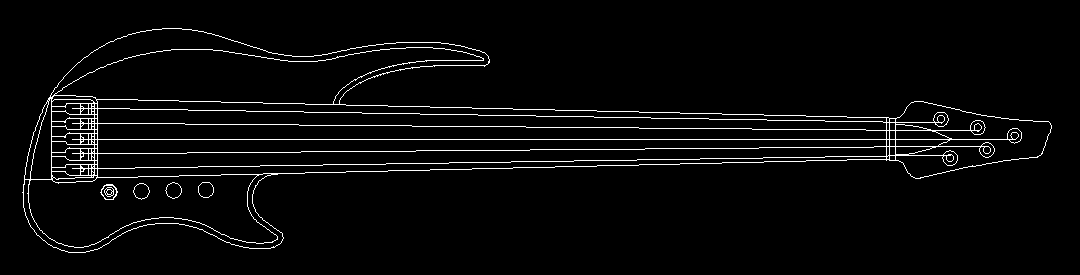
outline.png


I want a subtle and sleek look so I'm keeping the palette of materials quite small. Quarter sawn Sapele and Padauk, with dyed black veneer. The top will be stained black, with the sapele showing around the edges, and I've bought some black grain filler too.

I've already made the pickups, save for potting them. An advantage of making your own pickups is you can make them short enough to fit behind the fingerboard.


stringers sml.jpg


neck and fingerboard small.jpg


Stringers and glued up neck blank, plus the fingerboard blank.
 
Last edited:
I was considering waiting to do this build for the winter build off, but seven weeks is too long, so I'm doing it now. I'm going to make a 5 string fretless with a full length fingerboard and hidden pickups.

View attachment 4861094

I want a subtle and sleek look so I'm keeping the palette of materials quite small. Quarter sawn Sapele and Padauk, with dyed black veneer. The top will be stained black, with the sapele showing around the edges, and I've bought some black grain filler too.

I've already make the pickups, save for potting them. An advantage of making your own pickups is you can make them short enough to fit behind the fingerboard.

View attachment 4861095

View attachment 4861093

Stringers and glued up neck blank, plus the fingerboard blank.

Looks cool! So the pickups are going to install from the back, with the magnets fitting into the back of the fingerboard? Wild. Are you going to put marker dots to show you where the pickups are?
 
  • Like
Reactions: jafp
Yep, pickups fitted from the back. The fingerboard wood is going to be very thin in the corners. What's keeping me up at night is not that the wood will be strong enough, more that I've got to be super accurate not to route through it.

I'm not planning to mark the position of the pickups. Whether that's a good idea or not time will tell.
 
  • Like
Reactions: Max Bogosity
I'm not planning to mark the position of the pickups. Whether that's a good idea or not time will tell.

I'm picturing you trying a long slide all the way to the bridge, and the sound just shuts off when you are over the pickup. Embarrassing on stage, in the middle of your solo.
 
  • Like
Reactions: smart51
Looks interesting!

I'd just be careful how closely the out socket and pots are to the nearest string.

My thought too. I like the body shape and the overall look and the knobs and jack as shown look good, but in if it was me, I'd have to move them as they'd be in my way at least some of the time. Still it isn't my build and I won't be playing it...;):D
Definitely following this.
 
I'm picturing you trying a long slide all the way to the bridge, and the sound just shuts off when you are over the pickup. Embarrassing on stage, in the middle of your solo.
Or when you slide past the pickup and the pitch suddenly drops three octaves because the pickup is now sensing the vibration of the part of the string between your finger and the nut. Actually that might be cool.
 
This was almost a disaster. I'm putting a veneer stripe between the neck and the fingerboard. Somehow the extra step knocked me off my stride and I forgot to route the truss rod channel. It was only after I'd clamped it all up, gone back in the house and washed up that I realised. Thankfully it is cold here now, so while the glue had started to set up, it hadn't stuck.

The truss rod is now in, but I made a mess of the opening. It will have a cover, but I'm still disappointed. Now it's glued up I can see that some of the position markers are not quite square too.

20221104_084705.jpg
 
More progress pictures. The whole thing is now shaped and ready for sanding. I like the result. A word of caution for those looking for alternative volute designs: stay away from a coin volute. I've seen pictures of flat, round volutes and thought I'd have a go. Unless you have a CNC it won't be perfectly round and your eye will see that every time. I'm hoping that a lot of sanding will soften the edges enough not to see that mine is hand made.

20221107_131808.jpg


20221107_131833.jpg