• TalkBass has been independent since 1998. Add your voice.
    Create a free account to reply to discussions, view embedded media, and browse with fewer display ads.
    Join freeLog in
    Want zero display ads or expanded classifieds tools? Compare plans.

Help locating a L2500 Truss Rod end.

I adjusted my 2009 L2500 Truss rod to spec 12 thou at the 9th fret. It was playing great. Then one evening while playing another one of my basses, POW, loud bang, had no clue where the noise came from until I picked up the L2500. So i took a 4mm allen wrench to the truss rod nut, spun freely and I was able to remove the nut.

I was talking to the luthier that I purchased the bass from and he suggested that before attempting taking the fingerboard off he would open up the base of the neck in the back and look for the weld in the 3rd picture. I found these pictures on this link. G&L Truss rod explained site hoping this is the truss rod in my 2009 serial number date 090108.

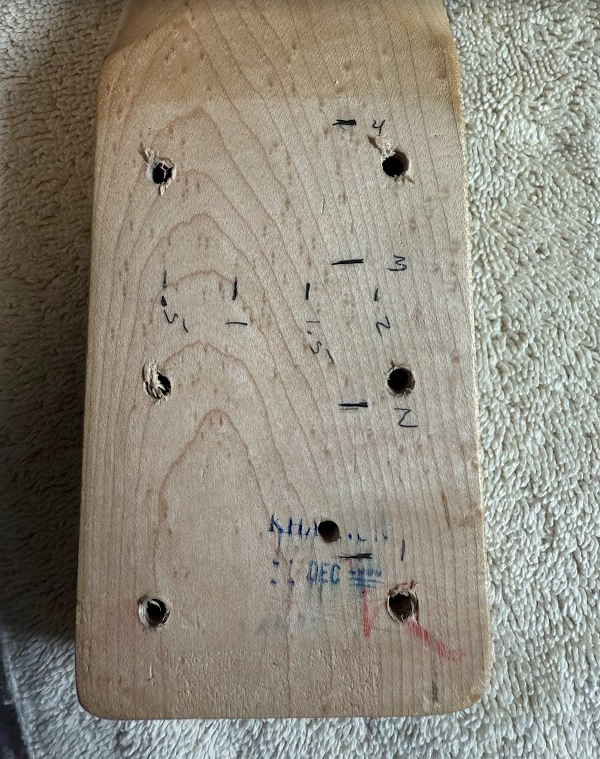
What I am looking for help here is to see where I should start drilling in the base of the neck to find the bottom of the truss rod. I did attempt to locate the end of the truss rod with a magnet and stud finder, no luck. Maybe I need a stronger magnet.

I did contact G&L support and the guy just suggested I go to a Luthier or wait for a B stock neck to come out for an L2500 which is rare.
I'm pretty handy with tools and a tig welder and the luthier may be my final choice but, I am just investigating my options to see the best route to repair.

The last picture has some inch markings on it. If one of you fine gentlemen out there has ever done this before, especially on an L2500 or G&L bass in general, any insight where I should start drilling would be greatly appreciated!!!
Thanks for your input.
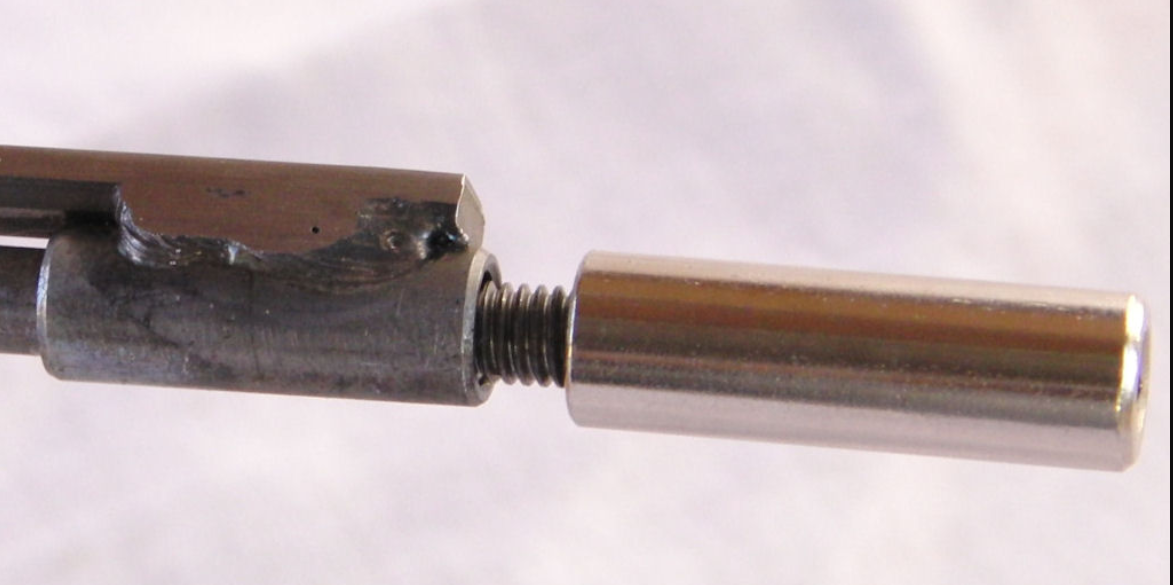
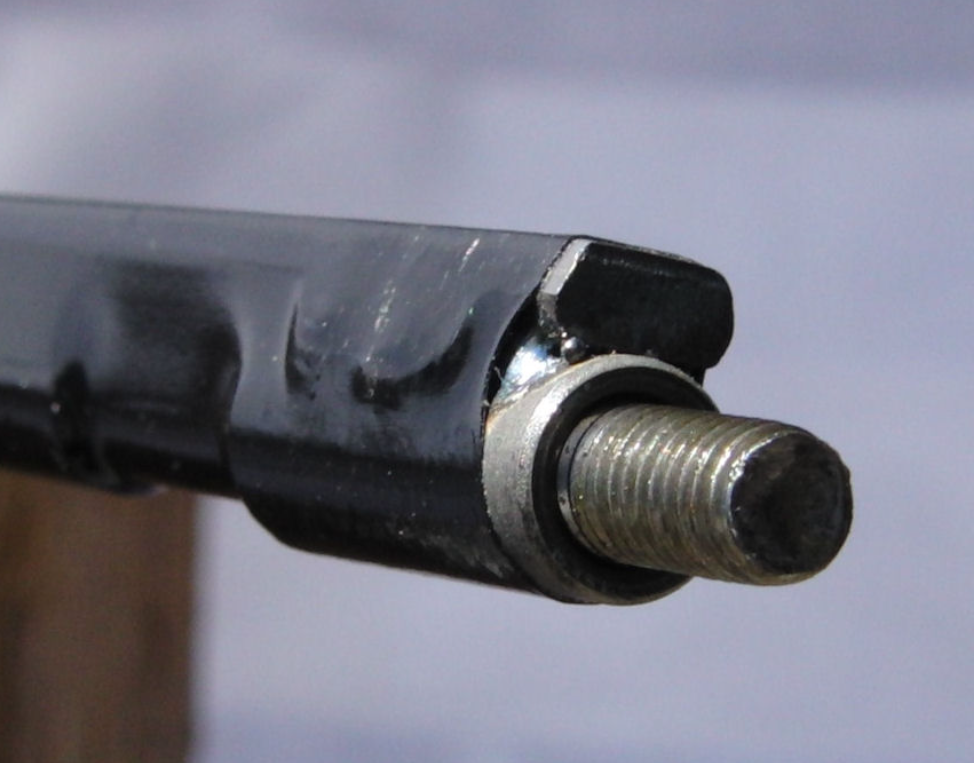
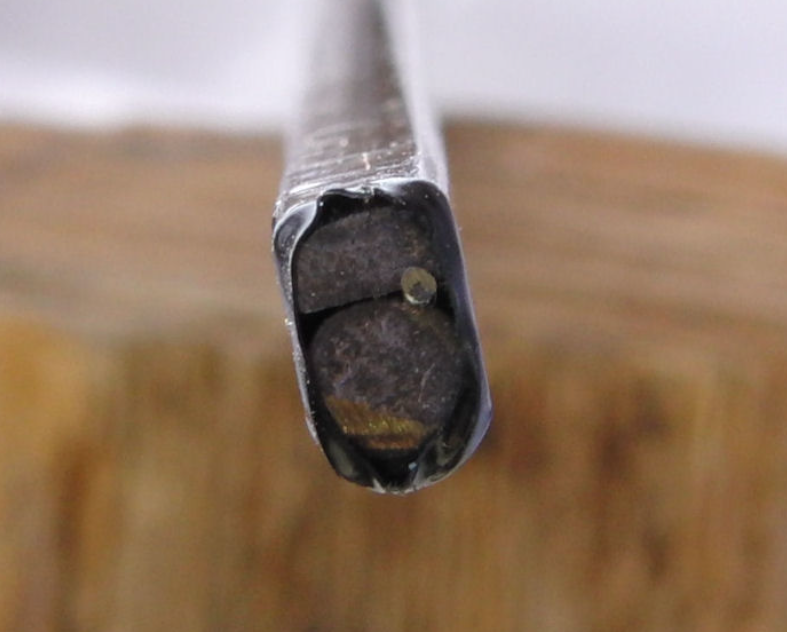
TrussrodBottomLooseNut.png
TrussrodNutend.png
TrussrodBottomEnd.png
NeckBaseMarked.png
 
I'm not sure if this would work with your particular truss rod, but I'll offer it up anyway.
I've removed rods, to repair/rethread them, by opening up the heel, and extracting from there,
then after re-installing, plug the access opening back up;

View attachment 7230465

View attachment 7230466
Thank you for the pics. It sure beats removing the finger board off it will work!
 
  • Like
Reactions: eddybuzzard
This is probably not the entry level truss rod repair.

It's a dual action truss rod, and it appears it snapped somewhere. So you're unlikely to be able to pull it out without pulling off the fretboard.

The most common way to fix something like this, remove fretboard, replace truss rod, reattach fretboard. You might be able to fix truss rod instead of replace, but by the time I've opened up a neck and done all this, I'm usually making sure it stays fixed for a while.

There are a few videos on youtube of people doing the process. However, wood working is a pretty important skill in this process. TIG welding is neat, but I probably wouldn't be fixing the old truss rod, I'd probably replace.

if you haven't been building guitars or remove/replacing fretboards, this can be daunting. Take your time, and think it through and this is possible. People with experience will probably be able to do it faster and or neater.

It does cost money though. G&L support is probably correct in terms of cost/ease/effectiveness of repair.
 
  • Like
Reactions: RSBBass
This is probably not the entry level truss rod repair.

It's a dual action truss rod, and it appears it snapped somewhere. So you're unlikely to be able to pull it out without pulling off the fretboard.

The most common way to fix something like this, remove fretboard, replace truss rod, reattach fretboard. You might be able to fix truss rod instead of replace, but by the time I've opened up a neck and done all this, I'm usually making sure it stays fixed for a while.

There are a few videos on youtube of people doing the process. However, wood working is a pretty important skill in this process. TIG welding is neat, but I probably wouldn't be fixing the old truss rod, I'd probably replace.

if you haven't been building guitars or remove/replacing fretboards, this can be daunting. Take your time, and think it through and this is possible. People with experience will probably be able to do it faster and or neater.

It does cost money though. G&L support is probably correct in terms of cost/ease/effectiveness of repair.
I don't think the dual action truss rod came out until 2013. This is a 2009 bass. Also I was able to remove my truss rod nut confirming that it is not welded to the adjustment rod. I would suspect that confirms that this is the old style truss rod. Wouldn't you agree?
 
Can't remember where I read it, but there was a story a while back about a radiology office that always seemed to have a luthier or furniture restorer in the outer office waiting to have broken objects X-rayed to find out what was inside them and where.
 
  • Haha
Reactions: Mikerla
If it's a single action truss rod, you should be able to extract it routing from the heel side of the neck like @eddybuzzard says. Drilling from the base of the neck as you suggest will help you find where the broken anchor is, but you will have to remove it from the neck anyway in order to weld it back together.

It's probably better to do it with a chiesel rather than routing, you don't want to frun into a hidden piece of steel bar with a router bit. And not knowing how wide the anchor is, it's also probably not much easier than removing the fingerboard.
 
  • Like
Reactions: eddybuzzard
I read somewhere that the truss rod nut is welded to the truss rod for dual action assemblies. If I find the picture I will post it. Hell I may be totally wrong. I read so much stuff in the last few days :woot::woot::woot:
 
The link you provided in post #1 was copyrighted in 2010, and specifically says it is not a dual action rod.
It's more of an independent type, similar to a Rick hairpin.
When tightened, the flat bar presses up on the backside of the fretboard.
My guess is the welds broke on one of the ends.

Personally, I would try to pull it out from the heel end, weld/repair, slide it back in, and patch the heel.
If it won't slide out that way, patch the heel up, and prepare yourself mentally for a fretboardectomy :woot: (Last resort in my garage)
 
Last edited:
  • Wow
Reactions: Mikerla
The link you provided in post #1 was copyrighted in 2010, and specifically says it is not a dual action rod.
It's more of an independent type, similar to a Rick hairpin.
When tightened, the flat bar presses up on the backside of the fretboard.
My guess is the welds broke on one of the ends.

Personally, I would try to pull it out from the heel end, weld/repair, slide it back in, and patch the heel.
If it won't slide out that way, patch the heel up, and prepare yourself mentally for a fretboardectomy :woot: (Last resort in my garage)
That's where I am going with this. I am guessing the flat bar is pressing up behind the fingerboard. I have a good feeling that my problem is at the base of the neck
 
  • Like
Reactions: eddybuzzard
That's where I am going with this. I am guessing the flat bar is pressing up behind the fingerboard. I have a good feeling that my problem is at the base of the neck

I use a template with a 1/2" pattern bit to cut the bulk of the channel, screwing it into the existing neck mounting holes,
set it just short of hitting the metal, and hand chisel the last part.
A nice straight clean channel is much easier to patch later. I usually hog out most of the wood with a forstner bit before routing.
I'd still use the 3/32" drill bit to determine exactly where the metal end is; you don't want to route into metal ;)

20250519_194518.jpg
 
Last edited:
  • Like
Reactions: KidAmnesia
I use a template with a 1/2" pattern bit to cut the bulk of the channel, screwing it into the existing neck mounting holes,
set it just short of hitting the metal, and hand chisel the last part.
A nice straight clean channel is much easier to patch later. I usually hog out most of the wood with a forstner bit before routing.
I'd still use the 3/32" drill bit to determine exactly where the metal end is; you don't want to route into metal ;)

View attachment 7231384

That is an excellent suggestion. I have some of those forstner bits. Thanks. 👍
 
  • Like
Reactions: eddybuzzard
Update on my progress. I was able to gain access to the truss Rod and you can see by the pics it snapped after the weld. I guess I ran out of adjustment when I made the last turn and it snapped. I’m going to get my tig welder buddy on it and see if he can fix it. I also ordered a new nut with the washer from G&L
IMG_2954.jpeg
 

Attachments

  • IMG_2952.jpeg
    IMG_2952.jpeg
    1.3 MB · Views: 9
  • IMG_2955.jpeg
    IMG_2955.jpeg
    1.6 MB · Views: 8
  • Like
Reactions: Joshua and RSBBass