• TalkBass has been independent since 1998. Add your voice.
    Create a free account to reply to discussions, view embedded media, and browse with fewer display ads.
    Join freeLog in
    Want zero display ads or expanded classifieds tools? Compare plans.

Help with my electronics please

This is my first time posting here, I'm sorry if I make a mistake...

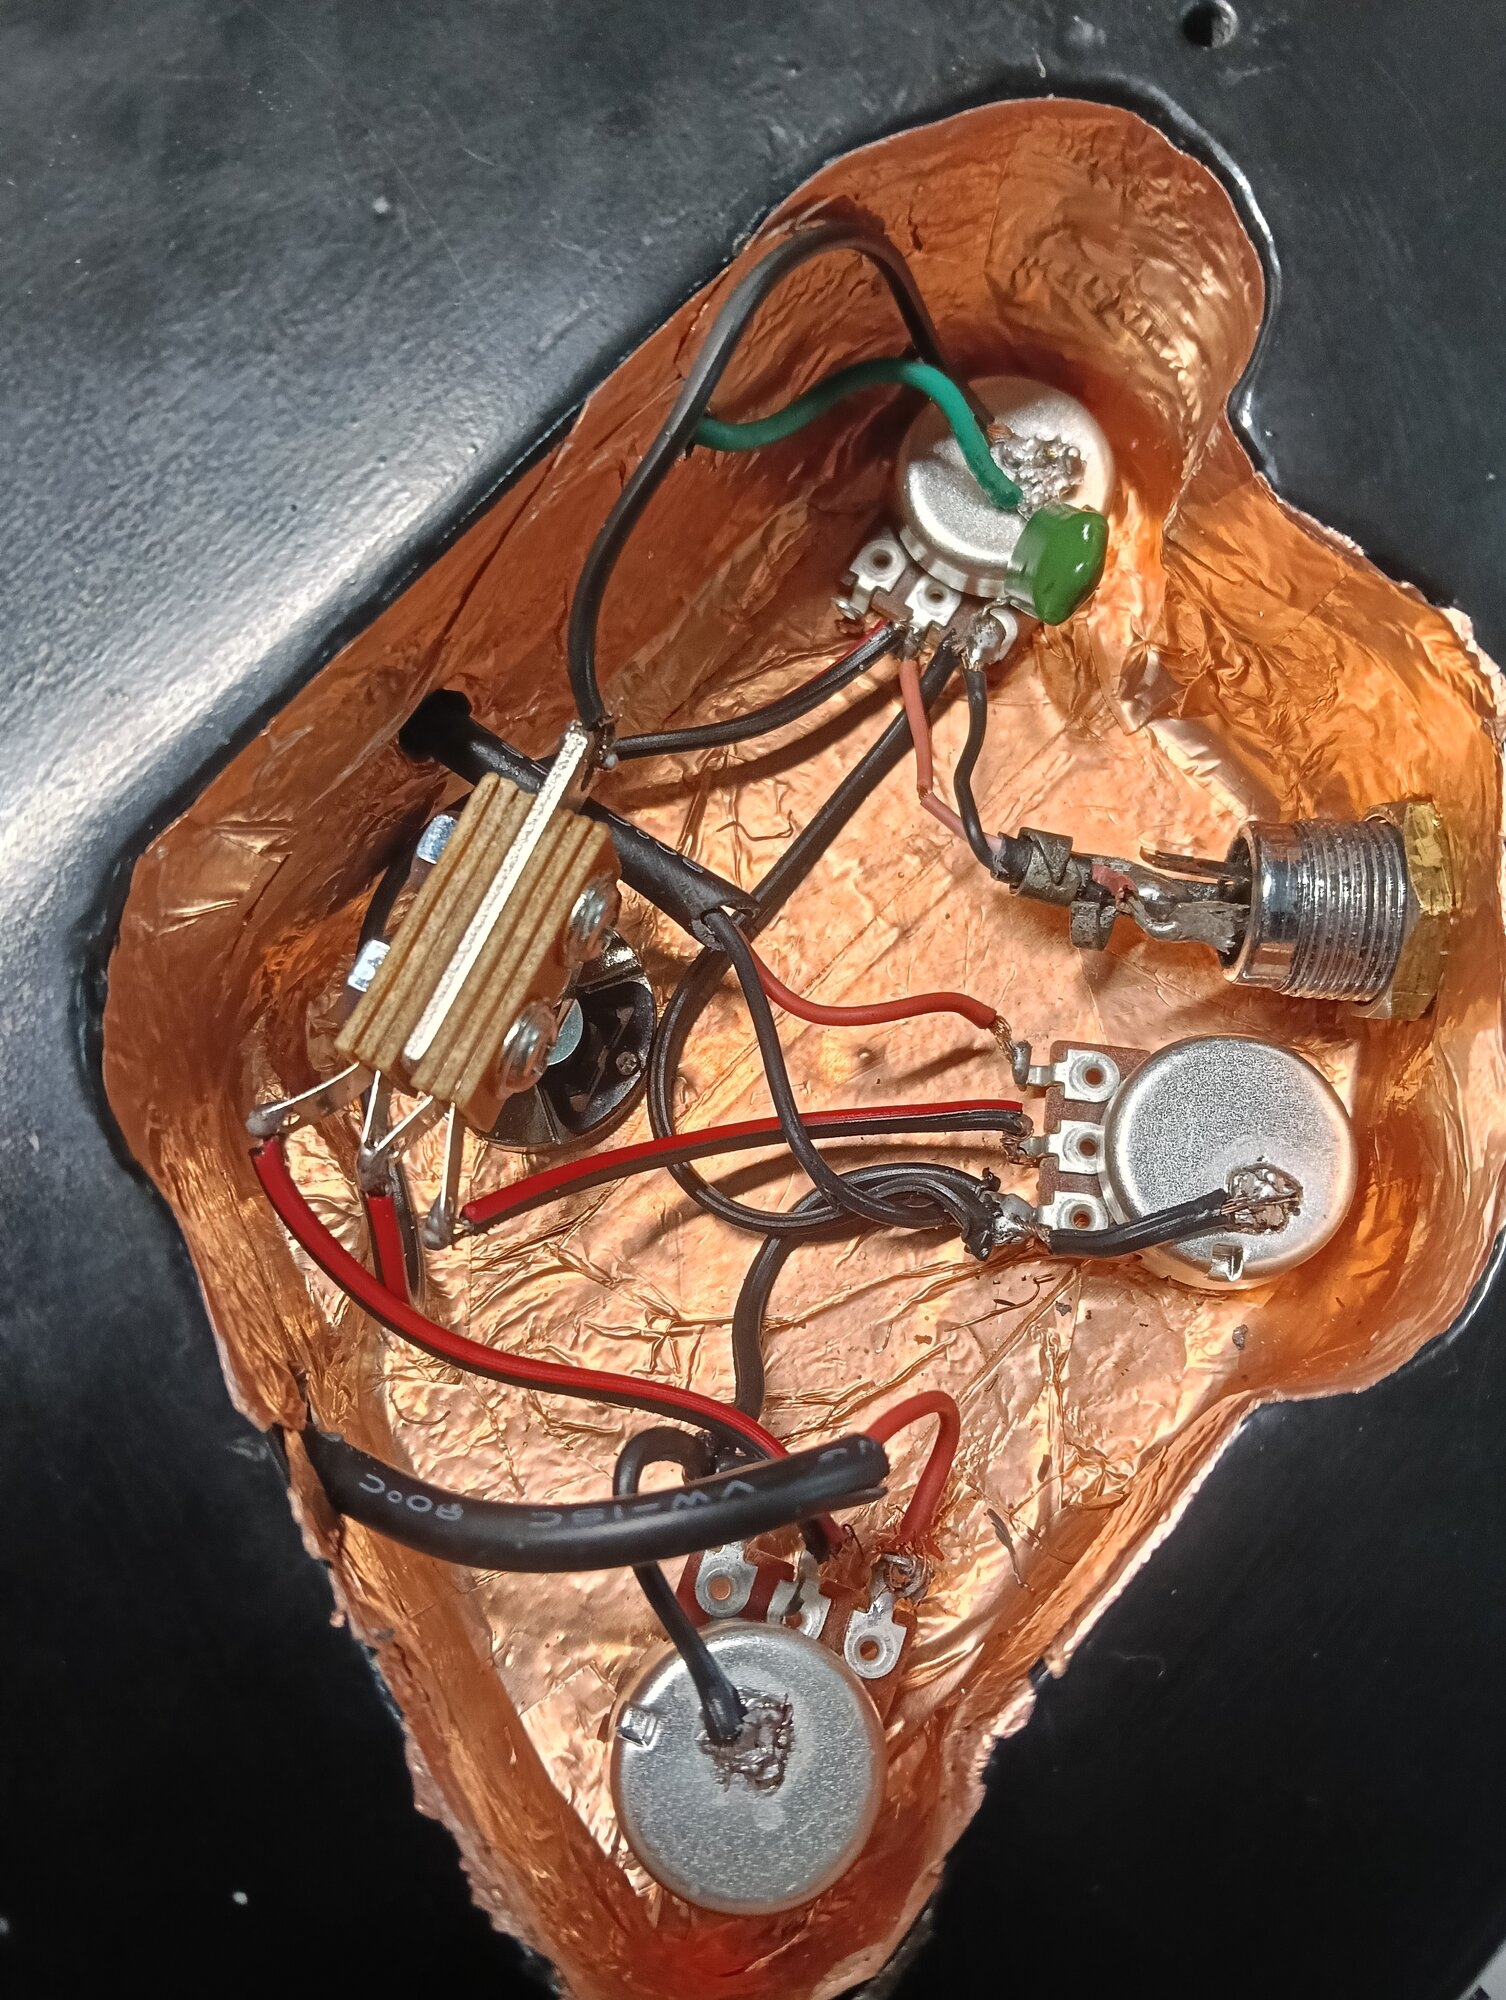
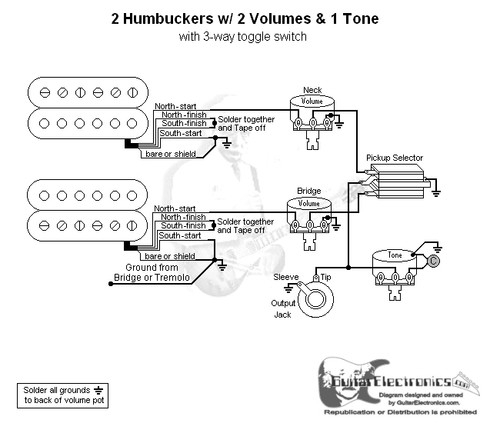
So, I'm trying to revive a Samick bass that belongs to a church, and the electronics are completely useless (not a single pot works), this is a 5-string PJ configuration bass with 2 volume and 1 master tone with a 3 position pickup selector. As I said before, anything was working, so I bought all the stuff needed (3 A500k pots and a 3 way selector), and I tried to make a connection like the one in the post following a guitar diagram, but instead of getting a 3 position pickup selector, 2 independent volume pots and a master tone, I just obtained a 3 position pickup selector, each volume pot works independent only if I use each pickup individually, and when combined both volume pots works together (if I turn one pickup down the other one turns down as well), and the "tone" pot works as a master volume hahahaha.
If somebody please can explain me what I'm doing wrong, or can share to me a diagram, or even tell me if the stuff I'm trying to make is even possible I'll be very grateful. Thank you 😁
1000326782.jpg
1000326791.jpg
 
Solution
If you want the two volumes to work independently when the switch is in the middle position switch the tabs for the pickup wire and the wire going to the switch, ie pickup to the middle tab and switch on the end tab.

On the tone control, remove the two ground wires from the potentiometer solder tab and move them to the pot case. Leave one leg of the capacitor attached there and the other leg to the pot case.
If you want the two volumes to work independently when the switch is in the middle position switch the tabs for the pickup wire and the wire going to the switch, ie pickup to the middle tab and switch on the end tab.

On the tone control, remove the two ground wires from the potentiometer solder tab and move them to the pot case. Leave one leg of the capacitor attached there and the other leg to the pot case.
 
Upvote 0
Solution
The pot in the lower part of the pic has stray wires sticking out. Not a good thing since it can cause shorts. Besides the recommendation given by Matt Liebenau above, you might want to work on your soldering. Looks like several cold solder joints. I find having a container of flux can help get joints to flow with the crap solder available today.
 
  • Like
Reactions: NitroBobby
Upvote 0
A few tips on soldering to help get cleaner results:
- Don't cut back too much of the sheathing on your wires. Only expose as much as you need so there's less exposed strands of copper.
- GENTLY twist the copper strands at the end of your lead, not too hard as you don't want to break any. You just want to keep from having "strays"
- Tin the twisted lead with solder to help hold it together, it'll also make connecting easier
- Get some solder onto the spot you're soldering the lead to, doesn't need to be a ton...sometimes less is more.

If you make any splices, be sure to use heatshrink tubes instead of electrical tape. It's not a sin to use electrical tape, but I wouldn't use it for that.
 
Upvote 0
some keys to soldering:

1. Cleanliness. Clean the surfaces with isopropyl to remove any oil/grease/dirt
2. Tin the leads and the pads. Getting some solder on both will make the connection much easier. this also keeps the wire together which prevents the stray wires/mouse nest situation that was identified by @Thumpin6string above.
3. Keep the iron tip coated with solder when not in use. always coat the tip before putting the iron in the holder. if you don't, it will develop corrosion on the surface of the iron and it will impede heat transfer.
4. Use a sponge or wet paper towel to clean the tip. before soldering the connection, drag the iron across the sponge to remove the old solder that was on there when you put it down. tin the tip again with new solder, then solder the connection. clean the tip again and coat with a bit of solder again.
5. Solder joints should be shiny and smooth. cracked or cloudy looking solder is likely a cold solder joint which will lead to a higher resistance connection or an open.

Since you took the time to use the copper foil in there, you can use it as a ground bus and help to clean up the connections on the pots. the cases of the pots SHOULD be grounded. so that means you shouldn't need to attach additional wires to the cases. you can solder the grounds to the foil and then to the jack. check for continuity between the pot cases and the foil. you may find that you have several parallel ground connections that are not needed.

good luck
kgb
 
Last edited:
Upvote 0
If you want the two volumes to work independently when the switch is in the middle position switch the tabs for the pickup wire and the wire going to the switch, ie pickup to the middle tab and switch on the end tab.

On the tone control, remove the two ground wires from the potentiometer solder tab and move them to the pot case. Leave one leg of the capacitor attached there and the other leg to the pot case.
Thanks Matt, I just did that and it worked! I have a lot to learn 😁
 
Upvote 0
The pot in the lower part of the pic has stray wires sticking out. Not a good thing since it can cause shorts. Besides the recommendation given by Matt Liebenau above, you might want to work on your soldering. Looks like several cold solder joints. I find having a container of flux can help get joints to flow with the crap solder available today.
I will have that in consideration. I just wanted to make sure that the bass sounds, then I took care of the solder. I'm not so good with this, but I'll practice more. Thanks for the advise 🤝
 
Upvote 0
A few tips on soldering to help get cleaner results:
- Don't cut back too much of the sheathing on your wires. Only expose as much as you need so there's less exposed strands of copper.
- GENTLY twist the copper strands at the end of your lead, not too hard as you don't want to break any. You just want to keep from having "strays"
- Tin the twisted lead with solder to help hold it together, it'll also make connecting easier
- Get some solder onto the spot you're soldering the lead to, doesn't need to be a ton...sometimes less is more.

If you make any splices, be sure to use heatshrink tubes instead of electrical tape. It's not a sin to use electrical tape, but I wouldn't use it for that.
Thanks Keving, I'll be saving all of this comments to improve my inexistent soldering skills hahaha 👏
 
Upvote 0
If you have a volume for each pickup you really dont need a switch. I would simplify the wiring and eliminate the three way switch, just wire it VVT like a Jazz bass.
Yeah, I thought about that too, but the owner of the bass wanted to have a pickup selector. I thought about adding another tone to have 2 independent tone pots... But at the end it's not my choice 🤒
 
Upvote 0
Yeah, I thought about that too, but the owner of the bass wanted to have a pickup selector. I thought about adding another tone to have 2 independent tone pots... But at the end it's not my choice 🤒


Soldering is like playing bass, you'll get better at it with practice. Also as a note, the two tone controls would not be independent with both pickups selected. Either tone will affect everything. Two different capacitor values could be amusing or maybe keep one a treble cut and make the other a bass cut.
 
  • Like
Reactions: luthier_wannabe
Upvote 0
Soldering is like playing bass, you'll get better at it with practice. Also as a note, the two tone controls would not be independent with both pickups selected. Either tone will affect everything. Two different capacitor values could be amusing or maybe keep one a treble cut and make the other a bass cut.
Woah, ok, I'll have that in mind. By any chance, do you know about any book or resource about bass and guitars electronics that you can recomend to me, please?
 
Upvote 0
Thanks Keving, I'll be saving all of this comments to improve my inexistent soldering skills hahaha 👏
No worries, like others have mentioned it's something that only improves by practicing it. I still won't crack open the controls on my SRX3EX, as any more exposure to oxygen will make that Bart preamp cease to function :roflmao:

The list contained advice on things I did mistakenly for years, so no shame there and also kudos for being receptive to tips. Sometimes folks get offended when offered advice, you're soaking it up like solder wick ;)
 
  • Like
Reactions: luthier_wannabe
Upvote 0