• TalkBass has been independent since 1998. Add your voice.
    Create a free account to reply to discussions, view embedded media, and browse with fewer display ads.
    Join freeLog in
    Want zero display ads or expanded classifieds tools? Compare plans.

Instructional Step by Step: How I do Block Inlays

Great tutorial. Definitely going to try this process when I get around to block inlays.

Does anyone know of a place where one could get block inlays for all 24 frets? (1,3,5,7....24) I've found sets that have enough for a jazz bass but nothing else.

 
It's good to see you around here again LedBelli. Thanks for the tutorial.
Agreed!

I do my block inlays a little bit different than your workflow Cleve - if I was doing them by hand, I'd be pretty close to the method you detail.

I cut all my inlay blocks and fretboard cavities on the CNC. Here's a peek at a neck I currently am working, and the blocks (enough for 5-string necks) that were cut out of a standard sheet of .188" thick material

VRB_Neck_5_BlockCavitiesCutInFretboard.jpg


I still need to break out the chisel to detail the corners ... haven't yet found an end mill that will leave a square inside corner :)

all the best,

R
 
Great tutorial. Definitely going to try this process when I get around to block inlays.

Does anyone know of a place where one could get block inlays for all 24 frets? (1,3,5,7....24) I've found sets that have enough for a jazz bass but nothing else.

The source I used for inlay is www.luthiersupply.com

If you call them and request an added inlay for fret 24, they will provide it, usually at no extra charge!
 
  • Like
Reactions: kaoskater08
Okay, now on to the final finishing process that I use:

Once I am satisfied that I have filled and sanded all blemishes to my satisfaction, I then continue sanding using the radius beam through progressive grits: 150, 220, 320.

Then, I use a soft neoprene pad (that comes with Micro-mesh abrasives) and I use 600, then 800 grit to bring the natural wood (and inlay) up to a near mirror-like finish. I continually wipe down the work with Mineral Spirits:
IMG_2569_zps222d6ee4.jpg


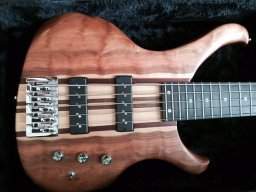
Once I am satisfied with my final sanding result, I then use a Natural Danish Oil finish (4 coats over 4 days) and then proceed to the fretting stage (a completely different subject). But the final result looks something like this (not a great picture!)
IMG_2574_zps024d527e.jpg


Body and neck painting are underway (Trans white over a blue Ceruse grain). I will post a picture of the final result when it's completed.

Any more questions, just fire away . . . thanks!
 
Ledbelli
My fingerboard will be bubinga. Would you recommend a Danish oil finish on it? Would you apply sealer coats to the body and neck back before the oil? I'd be concerned about contaminating any surfaces to be painted with Watco. I suppose the oil could be put on last?
 
Ledbelli
My fingerboard will be bubinga. Would you recommend a Danish oil finish on it? Would you apply sealer coats to the body and neck back before the oil? I'd be concerned about contaminating any surfaces to be painted with Watco. I suppose the oil could be put on last?

I've never (not yet) worked with Bubinga so I'm afraid I'm no expert on finishing this wood. In my experience I've found that Danish Oil does an excellent job of sealing wood when applied in multiple coats over several days. The more absorbent the wood, the more coats of oil.

To answer your other question: yes, I would apply sealer wherever I thought there was a chance of contamination from oil that might interfere with painting. In this particular case, I still have some finish touchup sanding to do on the neck and so I was not too concerned about cross-contamination.
 
Nice tutorial. I'm doing this exact upgrade on a build I did two years ago, a Fender Aerodyne clone that I put my own spin on. I pretty much do it the same way you do, except I score the outline with an xacto knife to start, and use another xacto knife with a chisel blade to clean up the edges and corners after I hog out the center with a router. The 3 piece blocks you use certainly alleviate the problem of radiusing the inlays somewhat. I was going for that classic Fender look though, so I cut out my own one piece blocks from MOP blanks. Unfortunately I did have a sand through on one of them and managed to crack two more while gluing them in. Oh well, live and learn right. I have more blanks coming in the mail and will do the repairs when they get here, mean while I've got other cosmetic issues to deal with. Nice to see I'm in the ball park with my methods though. Thanks for posting.
 
Nice tutorial. I'm doing this exact upgrade on a build I did two years ago, a Fender Aerodyne clone that I put my own spin on. I pretty much do it the same way you do, except I score the outline with an xacto knife to start, and use another xacto knife with a chisel blade to clean up the edges and corners after I hog out the center with a router. The 3 piece blocks you use certainly alleviate the problem of radiusing the inlays somewhat. I was going for that classic Fender look though, so I cut out my own one piece blocks from MOP blanks. Unfortunately I did have a sand through on one of them and managed to crack two more while gluing them in. Oh well, live and learn right. I have more blanks coming in the mail and will do the repairs when they get here, mean while I've got other cosmetic issues to deal with. Nice to see I'm in the ball park with my methods though. Thanks for posting.

:thumbsup:
 
Great tutorial.

I found it more difficult to deal with the chipouts/gaps for lighter-coloured woods, such as maple.
The harder I try to fix the chipouts/gaps the more messed up it looks. :)

Just curious, how would you tackle the issue above on maple?

Thank you.


Harry

Hope Led Belli doesn't mind me attempting to answer this (it's a great tutorial by the way).

To fill any voids when inlaying into Maple I use Baking Soda and mix with artists paints to get the right colour. Kind of like making your own artificial wood dust. As it's Maple it'll most likely be lacquered/finished so match the colour to the wet wood rather than dry and don't go too pale or it'll look awful!
 
Hope Led Belli doesn't mind me attempting to answer this (it's a great tutorial by the way).

To fill any voids when inlaying into Maple I use Baking Soda and mix with artists paints to get the right colour. Kind of like making your own artificial wood dust. As it's Maple it'll most likely be lacquered/finished so match the colour to the wet wood rather than dry and don't go too pale or it'll look awful!

:thumbsup:
 
  • Like
Reactions: Manton Customs
Great tutorial,thanks so much!!! I've done some inlays with veneers but never on an instrument....yet,now you've inspired me!!!
I use a "D" handle rotozip that I bought when drywalling my home and it works great as long as I don't use the drywall bits!LOL.
I do have a question,how do you support the neck when you're working on it,especially when using the chisel? ...and have you ever tried using epoxy instead of superglue? ...or the titebond2 that I've used for veneer inlays? Thanks again for sharing your experience and skills!!!
 
Great tutorial,thanks so much!!! I've done some inlays with veneers but never on an instrument....yet,now you've inspired me!!!
I use a "D" handle rotozip that I bought when drywalling my home and it works great as long as I don't use the drywall bits!LOL.
I do have a question,how do you support the neck when you're working on it,especially when using the chisel? ...and have you ever tried using epoxy instead of superglue? ...or the titebond2 that I've used for veneer inlays? Thanks again for sharing your experience and skills!!!

In the photos you will see a simple jig made from a straight grained and dried 2x4 I use to hold the neck in place while I work on it. This jig supports the neck from underneath (not evident in the photos). The jig allows me to adjust the truss rod and support the neck in a dead straight line while I work on it.

As for epoxy, no, I have not used epoxy or Titebond 2 for this kind of work. No reason for that, I've just found that professional grade medium viscosity super glue gets it done and so that's what I use!
 
  • Like
Reactions: KramerDon
Agreed!

I do my block inlays a little bit different than your workflow Cleve - if I was doing them by hand, I'd be pretty close to the method you detail.

I cut all my inlay blocks and fretboard cavities on the CNC. Here's a peek at a neck I currently am working, and the blocks (enough for 5-string necks) that were cut out of a standard sheet of .188" thick material

View attachment 497892

I still need to break out the chisel to detail the corners ... haven't yet found an end mill that will leave a square inside corner :)

all the best,

R


I was just in Seattle over the weekend and visited a friend's furniture building workshop. Next time I should let you know and we can hook up.

Also, that same friend is a bassist who told me that Chad Beeler had opened a bass shop. So, I go take a look and there you are!

We have a lot to talk about, my friend! :)
 
definitely do so next time you're in the area! and I'll give you a shout should I find myself within range of your place

Chad's virtual at the moment, and has plans for a B&M storefront when the right location opens up. He's been stocking our basses since right after Winter NAMM 2014. I'm finishing up a couple new VRB units that will hit his store in the coming couple of weeks - none with blocks though